
So you've read all about the Internet of Things and all the cool stuff you can do with it – from setting up timers for your lights to making your breakfast – and now you're itching to get started? Great!
If you're a power user, you've probably settled on using Home Assistant as your smart home hub, but this choice has a few pitfalls:
- It's annoying to SSH into the server itself to change configuration. Wouldn't you like to use your favorite local editor instead?
- How do you keep your configuration backed up?
- How do you protect yourself from accidentally messing up the configuration?
In this guide we'll show you how to fix these annoyances yourself, thanks to Git and the power of GitLab Pipelines! We will set up a pipeline that will check your home-assistant configuration and deploy it to your home-assistant install, giving you the power to deploy changes from anywhere in the world with a simple git push!
Did you go on vacation and forget you wanted your lights to turn on and off randomly to make it seem like someone's home? No worries! Just open GitLab's Web IDE and make your changes from your hotel room.
By the end of this tutorial you'll have:
- Automatic configuration backups thanks to
git. You'll be able to see the history of every change you've made and revert changes easily. - Automatic configuration testing via GitLab pipelines. Never again will a simple typo have you scratching your head, wondering why things don't work!
- An easy way to push changes to your Home Assistant configuration without having to SSH into the server.
Requirements
In this guide we'll be assuming a few things:
- You installed Home Assistant using the Docker image
- The server Home Assistant runs in is accessible from the internet via SSH (or you're using a self-managed GitLab installation in the same network)
Set up your server
-
Navigate to your Home Assistant configuration folder.
-
Create a new file called
.gitignorewith the following content:*.db *.log -
Initialize the Git repo
git init git add . git commit -m 'Initial commit' -
Create a new GitLab project and push to it
git remote add origin YOUR_PROJECT_HERE
git push -u origin master
With this you now have a backup of your Home Assistant configuration. Let's now set up the GitLab pipeline!
Setting up the pipeline
We have a few goals for the CI/CD pipeline:
- Test the new configuration to ensure it's valid
- Deploy the new configuration to the Home Assistant server
- Bonus: Notify us of a successful deployment, since the default is to only notify for failures
The complete .gitlab-ci.yml can be found here.
{: .note}
General documentation for how to configure jobs can be found here.
We will be using the following stages in our pipeline:
- test: Will test the Home Assistant configuration to ensure it is valid
- deploy: Will update the Home Assistant configuration in the server and restart Home Assistant
- notify: Will send a push notification with success/failure state
Since these aren't default pipeline stages we need to declare them in our .gitlab-ci.yml like so:
stages:
  - test
  - deploy
  - notify
Automating configuration testing
Since GitLab CI/CD supports Docker images and Home Assistant is available as a Docker image, this is a fairly straightforward stage to add.
Add this to your .gitlab-ci.yml file:
test:
  stage: test
  image: homeassistant/amd64-homeassistant
  script:
    - hass --script check_config -c .
With this we are creating a job called test which will run in the test stage. We're using the homeassistant/amd64-homeassistant image because it exposes the hass command globally so we can use the built-in configuration checking command on our committed files. That's it!
Feel free to commit and push this change to test it out!
git add .
git commit -m 'Added testing stage to GitLab pipeline'
git push
You'll now see that a pipeline gets created whenever you push:

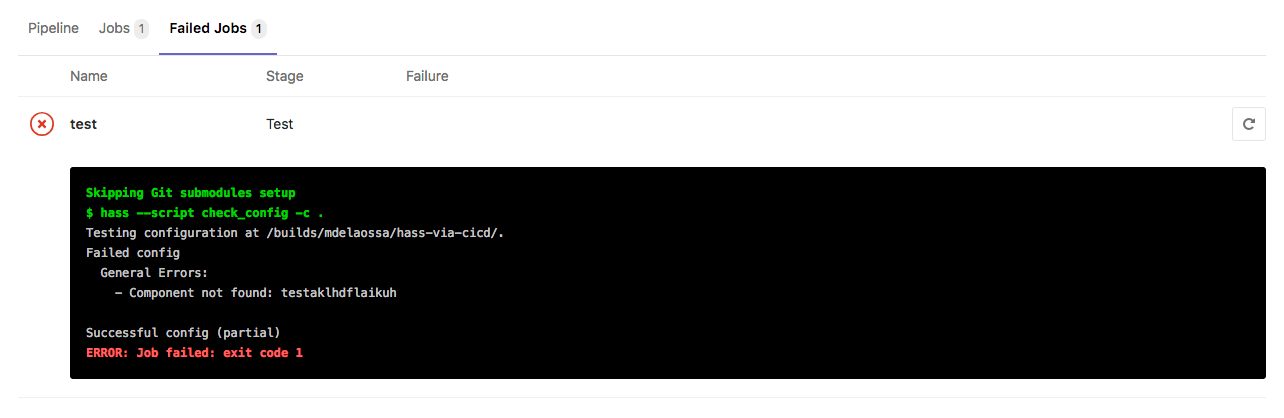
If your configuration contains any errors, they'll be shown in the Failed Jobs view of the pipeline and you'll get an email notifying you of the failure:
Automating deployments
Now that we have automated testing, let's add another stage that will deploy our new configuration if the tests pass!
"Deploying" in this case will consist of:
- SSHing into the server
- Doing a
git pullto pull down changes from the repo - Restart the Home Assistant Docker image
Preparing the server (and GitLab) for SSH access
Since we will be using SSH we need to prepare our server first. We'll follow these instructions from the GitLab documentation. We will also set some CI/CD Variables.
-
Generate a new SSH key pair. It's OK to save them to the current folder as you'll delete them later anyway.
ssh-keygen -t rsa -C "hass-deploy" -b 4096 -
On the server that runs Home Assistant, save the contents of the public key (the file ending in
.pub) to/home/user_running_hass/.ssh/authorized_keys -
Go to your GitLab project's CI/CD variables (inside Settings). Add the contents of the private key file to a variable named
SSH_PRIVATE_KEY. You can now delete the SSH key pair files if you'd like, or store them somewhere safe.
We also need to add our server's host keys to the GitLab runner so the runner will be able to SSH successfully. Alternatively we could disable host key checking, but this is not recommended.
- On your server, run
ssh-keyscan example.comwhere example.com is the domain or IP of your server. - Create a new CI/CD variable called
SSH_KNOWN_HOSTSand add the output ofssh-keyscanto it.
You should also create two other CI/CD variables (optional):
DEPLOY_USER: the user running HASS that the runner with SSH into the server as to perform the deployDEPLOY_HOST: the domain or IP of the server
The deploy stage
Now that we have prepared our server and GitLab CI/CD variables, we can add our deploy stage to .gitlab-ci.yml. Please note that we are using the only: keyword so that only new commits in the master branch will attempt a deploy.
deploy:
  stage: deploy
  only:
    - master
  before_script:
    - 'which ssh-agent || ( apt-get update -y && apt-get install openssh-client -y )'
    - eval $(ssh-agent -s)
    - echo "$SSH_PRIVATE_KEY" | tr -d '\r' | ssh-add - > /dev/null
    - mkdir -p ~/.ssh
    - chmod 700 ~/.ssh
    - echo "$SSH_KNOWN_HOSTS" > ~/.ssh/known_hosts
    - chmod 644 ~/.ssh/known_hosts
  script:
    - ssh $DEPLOY_USER@$DEPLOY_HOST "cd '$DEPLOY_PATH'; git pull; docker restart home-assistant"
The before_script above is in charge of:
- Making sure
ssh-agentis installed and installing it otherwise - Making sure
ssh-agentis running - Adding the
SSH_PRIVATE_KEYto the keys to use when logging into a server - Creating the
.sshfolder with required permissions - Adding the values we added to the
SSH_KNOWN_HOSTSvariable to the proper location
The script portion is what actually deploys our new configuration:
- We
cdinto the proper location (where the Home Assistant configuration files are kept) - We update the configuration with a
git pull, since this directory is a Git repo - We restart Home Assistant (in this case the Docker image was created with the name
home-assistant. Please use the name of your container)
Note: If you did not create DEPLOY_USER and DEPLOY_HOST variables on GitLab, please replace the proper values in the script
Now let's commit and push this new stage to GitLab!
git add .
git commit -m 'Added deploy stage to GitLab pipeline'
git push
With this new stage added, you can now edit your configuration from anywhere (including the GitLab Web IDE!) and be confident that these changes will be pushed to your Home Assistant server if there are no issues with the configuration. There's no longer a need to figure out how to connect directly to your Home Assistant server to make the edits you need.
Bonus: Successful deployment notifications
You'll notice that if the configuration is wrong or an error occurs during the deployment, you will get an email notification, but what about when everything runs successfully?
We have two options:
- Enable the
Pipeline Emailsintegration and set it to notify on every pipeline - Add a new stage called
notifyand use it to send push notifications to your phone
While email is really nice, there's something really satisfying about getting push notification for your services, so let's set things up using Pushover.
You'll need to create an 'Application' and add the token you get to a GitLab variable called PUSHOVER_API_TOKEN. You'll also need to add your user key to a variable called PUSHOVER_USER_TOKEN.
Since we'd like a different notification depending on whether our pipeline passed or failed, we will be adding two jobs to the notify stage:
notify_success:
  stage: notify
  allow_failure: true
  only:
    - master
  script:
    - curl -s --form-string "token=$PUSHOVER_API_TOKEN" --form-string "user=$PUSHOVER_USER_TOKEN" --form-string "message=New Hass config deployed successfully!" https://api.pushover.net/1/messages.json

notify_fail:
  stage: notify
  allow_failure: true
  only:
    - master
  when: on_failure
  script:
    - curl -s --form-string "token=$PUSHOVER_API_TOKEN" --form-string "user=$PUSHOVER_USER_TOKEN" --form-string "message=New Hass config failed. Please check for errors" https://api.pushover.net/1/messages.json
Our first job, notify_success, runs when the stage before it (deploy) completes successfully. This is the default for GitLab. Our notify_fail job on the other hand has when: on_failure set, which means it will only run when the stage before it fails. We also set allow_failure: true on both these jobs so that we aren't notified of a failed pipeline if for some reason the notification commands fail. We also set the only: - master option since deploys only happen on the master branch.
We are using Pushover's API to send the message we want in the script area.
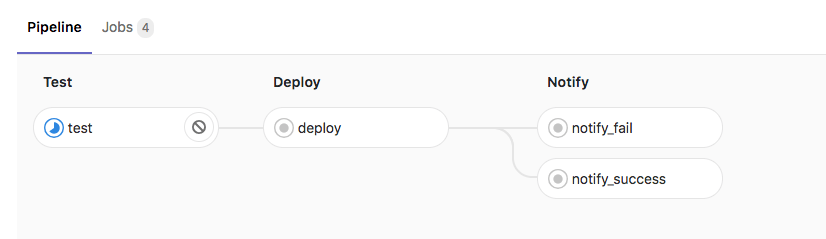
With this final stage in place, your pipeline should now look like this:
Enjoy!
There you have it! Now you can edit your Home Assistant configuration from anywhere you'd like, using your favorite editor, by following three simple steps:
git clone PATH_TO_REPO(if you have not cloned it before)- Edit the configuration
git push -u remote master

