Coupa End Users Guide
Business Need
The Business had identified the need to optimize the Procure to Pay process with tools that would allow the creation of Purchase Requests, Purchase Orders, 3-way invoice matching, vendor payments, and accounting protocols for SOX Compliance.
Business Solution
The Business decided to move forward with the implementation of Coupa for the procurement to payment platform and Zip for the purchase request platform. Together they provide the needed functionalities and is integrated to decrease procurement approval turn-times and reduce manual workflow delays.
To learn more about Zip, check the Zip Handbook page.
{: .alert .alert-info}
What is Coupa
Coupa is a cloud-based purchasing and payment platform that will be used by GitLab as of 2021-06-01 for the US and Netherlands entities and as of 2021-12-13 for remaining entities. It has an easy-to-use interface that will improve the way suppliers connect with GitLab. All new purchase orders, invoices and communications will be managed through the Coupa Supplier Portal.
How to access Coupa
Coupa is available via Okta. To access the platform:
- Login to your Okta home page.
- Click on the Coupa (Prod) button.
- A new tab should open with your user logged in.
Please note that every month all Coupa access will be reviewed and users who haven’t been active in a period of 90 days will have their access removed. (Note that this number may vary depending on the license count for the current month)
If you need to request access again, please reopen your initial Access Request issue and tag the Finance Systems Admins team using @gitlab-com/business-technology/enterprise-apps/financeops in a comment.
{: .alert .alert-warning}
If your job function requires you to manage budget and management approvals, purchase orders and invoice approvals in Coupa, follow the below steps:
- Open an Access Request for Coupa using the
Individual_Bulk_Access_Requesttemplate. - In Step 2, in the Justification for this access question, please describe what budget, management approvals, purchase orders and invoices approvals you will manage.
- Add the labels
FinSys - CoupaandFinSys::Service Desk. - After the AR is approved, you must review the tech stack and follow the instructions for provisioning (either assign to the provisioner, add the correct labels or both if not clearly stated) to avoid any provisioning delays.
- If you require immediate Coupa access, please ping in the
#coupa_helpSlack channel.
Due to the limited number of licenses available for Coupa, it is recommended that each department identify power users responsible for managing requisition budget and management approvals, purchase orders and invoice approvals on the team’s behalf.
How to Use Coupa for Purchasing
Home Page Overview

- Home Icon - This icon will bring you back to the homepage.
- Account Name - Contains a number of personal settings related to managing your account in Coupa.
- Cart - Links to your shopping cart, which contains any items selected but not yet submitted for approval.
- Search Bar - Used to search or browse catalog items and create free text requests.
- Recent Activity - Displays your 5 most recent transactions. Selecting
View Allwill bring you to Activity to display all of your previous requisitions and other transactions. - To Do’s - Displays a list of action items within Coupa that are assigned to you. Selecting
View Allwill bring you to your Coupa Inbox to display all of your To Do’s. - Additional Stores (“Punchouts”) - Offers the possibility to search, select and submit purchases directly from the Supplier’s portal.
- GitLab - Important Links and Resources - Displays important information about Coupa, along with links to training material and other important documents.
- Coupa Community - Connect or join to engage with other Coupa customers, partners, product managers, and the Coupa success team.
User Account
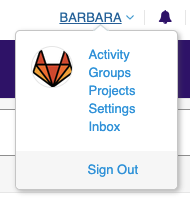
Account Name contains a number of options related to managing your account in Coupa:
- Activity: Displays all of your previous requisitions, related orders, receipts, and invoices. In each transactional tab, you can perform the following:

- View: allows you to quickly apply sets of filters to display reports such as all requisitions, requisitions requiring receipt, draft requisitions, and a number of other pre built reports, along with option of creating custom reports.
- Report Scheduling: allows to set up recurring reports that are emailed to recipients on a regular basis (can be daily, weekly, or monthly).
- Advanced: allows to apply a filter or set of filters to the list of requisitions.
- Search: allows to quickly search all fields on a requisition for a match.
- Export: allows downloading a report in CSV or Excel format based on the current filters applied to the list of requisitions.
- Actions: the icons next to each requisition allow you to edit, copy, cancel, withdraw, and resend requisitions.
- Groups: Access to Groups setup and allows user to add members in the group he/she belongs to.
- Settings: Contains consolidated personal settings.
- General: The General tab is where you can load a profile photo and check user forms.
- Address Book: Allows you to view your default shipping address and change it as needed (you can also change the shipping address of a particular requisition on the requisition page).
- Delegates: Users can delegate their receiving and approvals to another user by using the Delegates functionality (it is possible to add multiple, overlapping delegates, and enable notifications). Check the How to add a Delegate in Coupa section for more details.
- Reports: Users can schedule a report by going to a particular report view and specifying the scheduling details (only certain users will have access to reports and report views are dependent on role).
- Notifications: Coupa notifications can be managed under the User’s Settings.
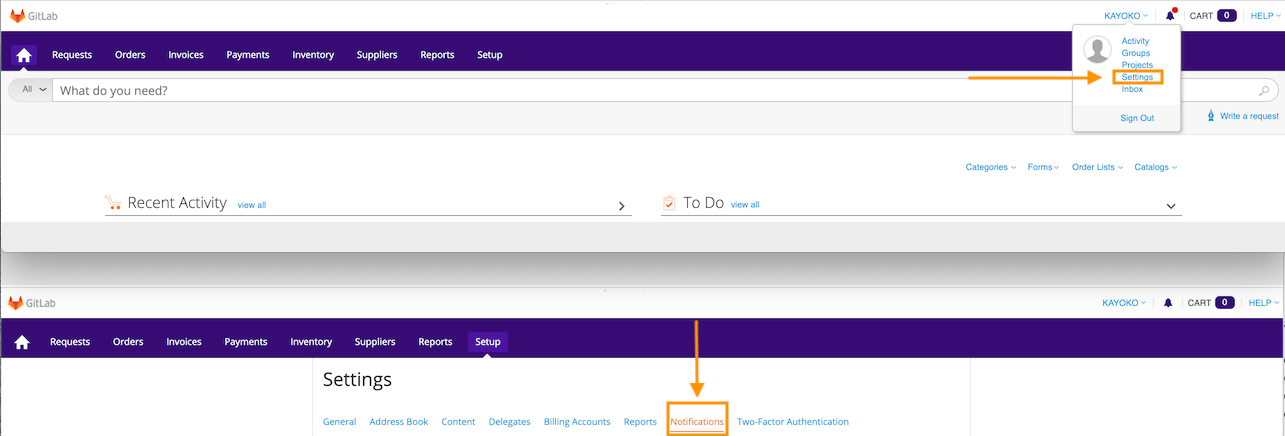
For each type of notification, the User can choose whether to receive notifications via email, Slack, or within Coupa (Online) and can select multiple platforms.
- Two-Factor Authentication (2FA): Should be enabled on user profiles to ensure that financial accounts and instruments are protected for control and use by the individual to whom they are intended. This extra authentication layer on the user profile is required before that user can be granted privileged permissions for working with payment features like creating batches for expense and invoice payments, creating accounts, and many other secured payment functions. Check the How to enable Two-Factor Authentication (2FA) section for more details.
- Inbox - Displays all current and previous notifications.
- Sign Out - to exit the application.
How to add a Delegate in Coupa
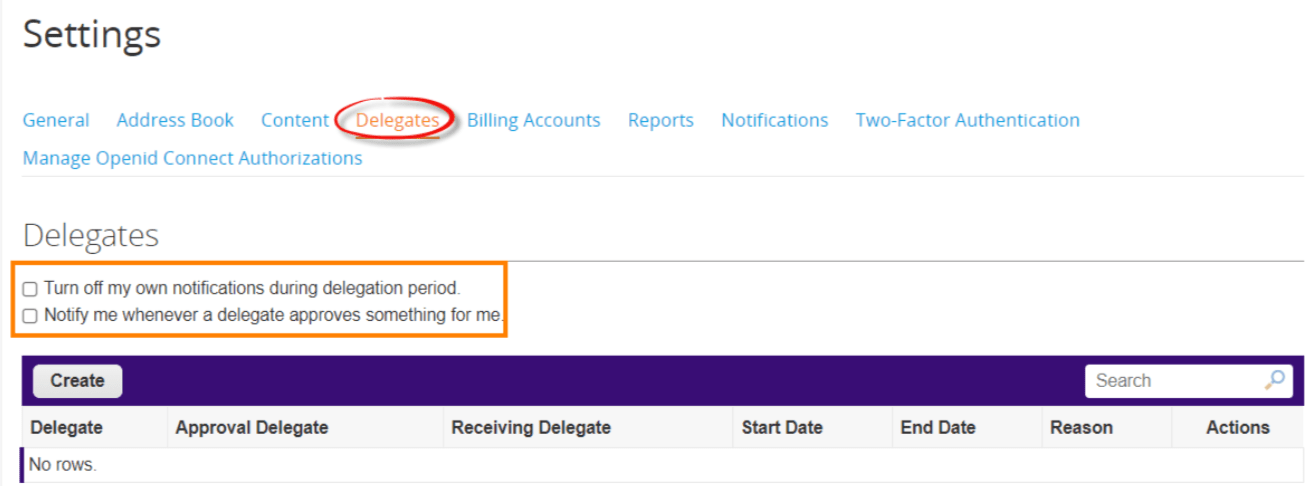
- Go to your “Account Name” > “Settings”.
- Click on the “Delegate” subtab.
- Click “Create” and select a delegate type approval (Receiving, Delegate) for a specified timeframe and give a reason.
- Click “Save”.
Assigned delegates must be of an equivalent or greater management level.
For approvals as part of an approval group, the individual must be a member of that group.
{: .alert .alert-info}
How to Enable Two-Factor Authentication
- Go to your “Account Name” > “Settings”.
- Click on the “Two-Factor Authentication” subtab.
- Click the “Enable” button.
- Use your Google Authentication app to scan the QR Code.
- Enter the 6-digits displayed in the authentication app in the Verification Code field.
- Click “Submit”.
Anytime you are challenged for a 2FA verification code, just launch your authenticator and enter the latest code.
How to Create a Requisition
Effective 2023-02-01, all purchase requisitions will be created in Zip. To learn more about Zip, check the Zip Handbook page.
{: .alert .alert-info}
How to Review a Requisition in Coupa
REQUISITION HEADER LEVEL
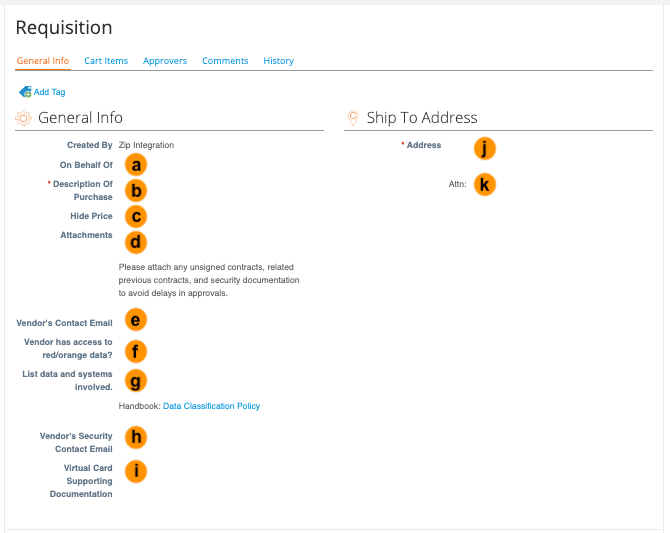
- a) On Behalf Of (synced from
Zip)
- This is used to create a request on behalf of another user. The approval chain will update following the person selected as “on behalf of”. This user will then have to approve the invoice once received.
- b) Description of Purchase (synced from
Zip) - c) Hide Price (optional)
- Used by Procurement to hide Purchase Order price from the Vendor.
- d) Attachments (synced from
Zip)
If an invoice is attached, it will also need to be emailed to ap@gitlab.com for processing. {: .alert .alert-warning}
- e) Vendor’s Contact Email (optional)
- f) Vendor has access to red/orange data? (optional)
- g) List data and systems involved (optional)
- h) Vendor’s Security Contact Email (optional)
- Click on the magnifying glass icon to select or create a different address.
- i) Virtual Card Supporting Documentation (optional)
- j) Address (defaults from the User record)
- k) Attn (defaults from the User record)
REQUISITION LINE LEVEL
- The above information is synced from
Zipor updated by FP&A Team if falls under Coupa Prepaid Automation Process.
Punchout Requisition

- On the Homepage Screen, click on any Punchout supplier located under
Additional Storessection. - Clicking on the Punchout link will take you to an approved supplier website where you start ordering your items, just like any online shopping experience.
- Start searching and add items to your cart.
- When done adding items in your cart, click “Checkout”.
- To go back to Coupa “Review Cart” screen, click “Transfer Shopping Cart”.
- Once in Coupa “Review Cart screen”, populate the required information such as the Commodity and Billing Account.
- Review completeness of the requisition and click Submit for Approval.
- Cart Checkout and returning to Coupa “Review Cart” screen depends on the Punchout site.
- It is recommended that users purchase via punchouts as often as possible.
- Don’t add multiple punchout suppliers to one requisition.
Approvals
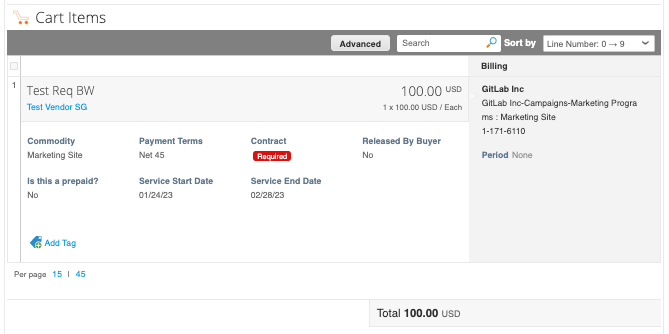
Once the requisition integrates from Zip into Coupa, the applicable approvers are displayed beneath the cart line.
The greater the amount of the requisition, the more approvers will be needed.

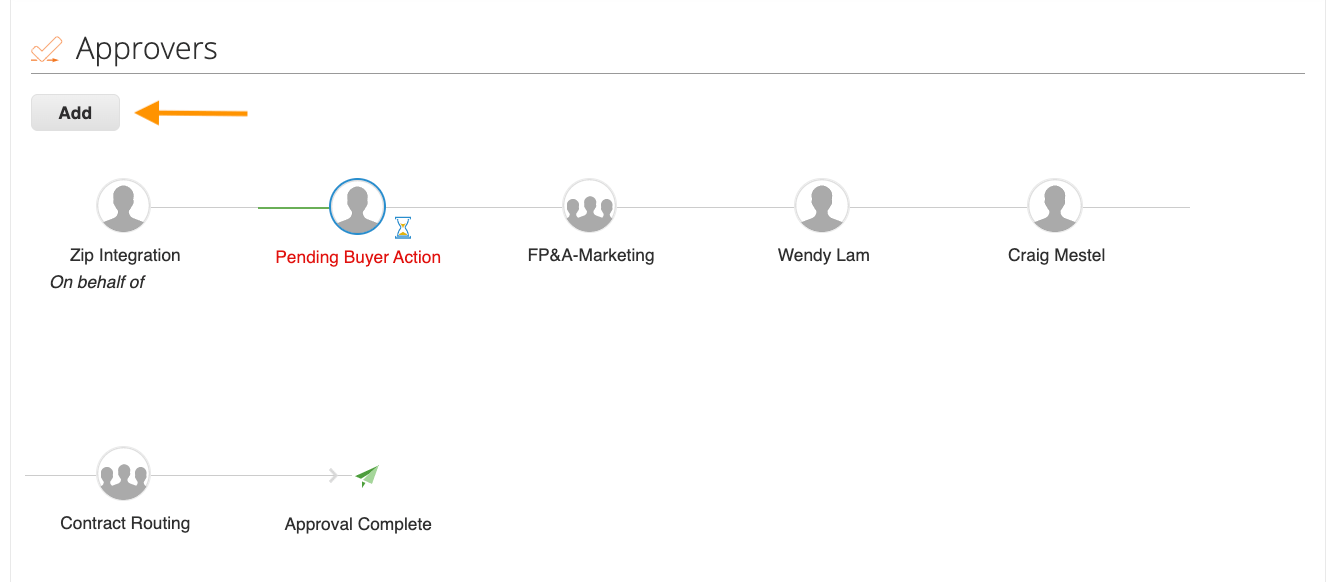
How to Add an Approver
- Click on the “Add” button.
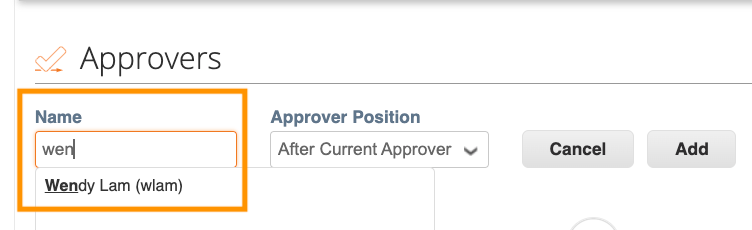
- Type in a few letters of the approver name and the system displays all possible entries.
- New approver must be an existing user in Coupa.
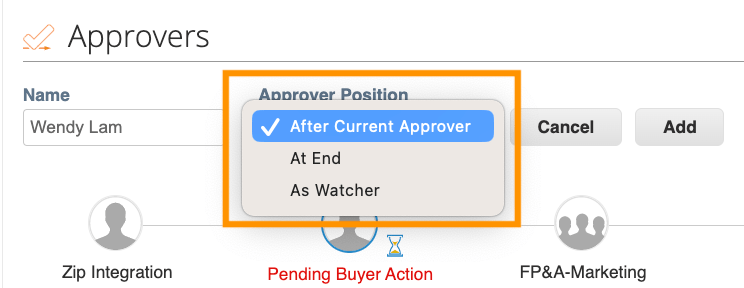
- Select if the person is to be added after the current approver, end of the chain, or only as a watcher.
- A watcher cannot approve or reject the cart but will receive notifications about the requisition.
Methods to Approve Transactions
There are several ways to approve transactions in Coupa:
-
To Do’s notification on the homepage screen
- To view the requisition/invoice/PO change request details, click on the subject line.
- The approver may add comments on the “Approval Comments” section before clicking on the Reject or Approve buttons.
- All approvers are displayed in the “Approvers” section.
- When rejected, a requisition goes back to “Draft” status, the requestor needs to make changes and re-submit. (Please, remember leave a comment about the rejection for the requester).
- When an invoice is rejected, it goes under “Rejected” status and the Accounts Payable needs to edit and resubmit the invoice (or void if necessary).
-
Inbox
- Users can access all their notifications through the “Inbox” section under “Account Name”.
- The User can change the report View to “To Do” to filter all notifications requiring action.
-
Via Activity > “Transactional Tabs” > Requiring My Approval view
- In each Activity transactional subtabs, users can change the report view to Requiring My Approval.
-
Email
- The approver receives a system-generated email notifying about the requisition or invoice as soon as a user submits the transaction.
- All the basic information is displayed on the email.
- The approver selects an appropriate action (View Req / Approve / Reject).
- The “View Req” option is a link to Coupa to see the transaction in the system.
- Once a choice is selected, an automatic email is created. The approver needs to send the e-mail for the approval to be made in Coupa.
- Once the e-mail is sent, the transaction will move to the next approver based on the approval chain in Coupa.
- If rejecting the Purchase Request, the approver should include a comment explaining the rationale for rejecting it.
-
Coupa Mobile App
- A mobile application of Coupa can be downloaded either at the Apple or Android stores. Once you download the app you need to sign-in as you normally would to the instance.
- The app allows you to do approvals for both Requisitions and Invoices:
- To Approve: Open the requisition or invoice notification, review the information, and approve.
- To Reject: Open the requisition or invoice notification, review the information, and reject.
-
Coupa Slack integration
- Coupa has built-in integration with Slack, which provides users with another method for Coupa notifications. To activate Slack notifications please follow below steps or view the Coupa Slack quick demo:
- Click “Settings” under your name on the top right;
- Click “Notifications”;
- Click button “Add to Slack”. New window will pop up. Click “Allow”
Once Slack notifications are activated you can choose what type of notifications you want to receive via slack. To specify notifications that should be received in slack please go to Settings - Notifications - mark “IM” boxes.
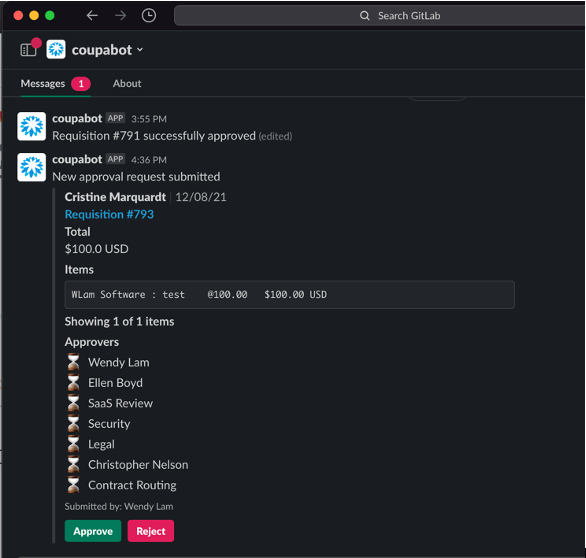
Below is an example of the approval notification in Slack:
- Coupa has built-in integration with Slack, which provides users with another method for Coupa notifications. To activate Slack notifications please follow below steps or view the Coupa Slack quick demo:
- If your requisition status is “Pending Buyer Action”, it is in Procurement’s To Do List and is being reviewed by the procurement team who will respond as soon as possible, no longer than 1-2 business days. If there are any issues, Procurement will add comments to the requisition and you will receive notification via email, Slack or in your To Do List (depending on your notification setup in Coupa).
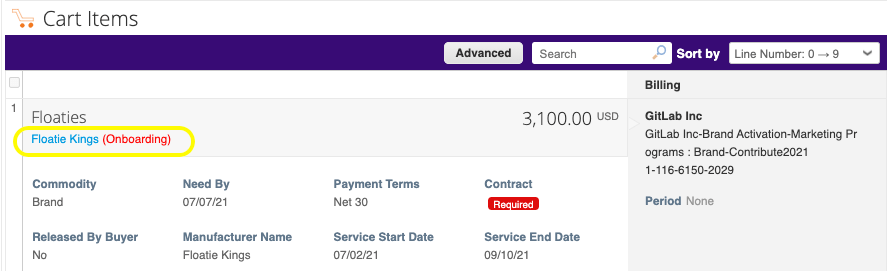
- If you see “Onboarding” next to the Supplier’s name on the line items of your requisition (see below screenshot), the Supplier has not completed the onboarding process. Suppliers have to complete their onboarding in Coupa before the requisition can be finalized.
How to Withdraw a Requisition
Provided that a Purchase Requisition has not been fully approved and flipped into an Order, only Procurement can withdraw the Purchase Request and make any changes before submitting again. Please reach out to the #procurement Slack Channel (including link to the Coupa requisition) for any requests or questions.
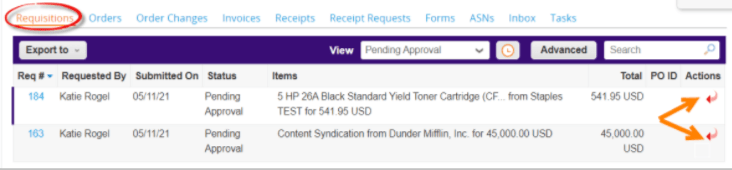
- Go to “Recent Activity” or “Activity” section.
- Find the Purchase Request on “Pending Approval” status and click on the “withdraw requisition” icon (Red Arrow).
- On “Activity”, select the “Pending Approval” view.
- If a Requisition has already been flipped into an Order, it cannot be withdrawn. A Purchase Order Change Request will have to created.
How to Receive an Order
Receiving is only required for an item-based (quantity) requisition. {: .alert .alert-info}
- The requestor can locate all requisitions pending receipt via the “Activity” option under ‘My Account’. This will display all the requisitions created by the Requestor.
- It is only possible to select requisitions that are pending receipt from the view Pending Receipt.
- Click on the receipt icon under the column “Actions”. This will open up the desktop receipt view.
- On the receipt details screen, enter the Quantity (since receiving is only required for item-based requisitions).
- Save the receipt by clicking on the “Submit” icon.
- A message indicating successful receipt is displayed.
- The requestor can receive partially OR the entire quantity.
- Receiving of goods (quantity) related purchases is required for the vendor to be paid due to 3-Way match rules.
- Adding receipt date and attachments is also possible.
How to Void a Receipt
There may be scenarios where a receipt needs to be voided (e.g. an incorrect receipt was made).
- Only an ADMIN and Central Receiver will have the ability to void receipts.
- A receipt cannot be voided if the PO is already soft-closed or hard-closed (this will occur once a PO is fully received and invoiced).
As Central Receiver, follow the below steps:
- Go to Inventory tab then “View Receipts”.
- Search for the line to be voided (may use Advanced Search).
- From the search results, identify the line to be voided then click the void icon under “Actions” column.
- Below the void page, select the “Reason for Voiding” and add notes if needed.
- Click the “Void Receipt” button.
- Confirmation prompt appears and status should be Voided.
How to do a Purchase Order Change Request
Effective 2023-02-01, all purchase order change requests will be submitted in Zip. To learn more about Zip, check the Zip Handbook page.
With the implementation of Zip effective 2023-02-01, all New Supplier Requests and Updates to Suppliers Requests will be created by the Procurement Team in Coupa.
How to Request a New Supplier
A supplier must exist in Zip prior to submitting a requisition for that supplier. To learn more about requesting a new supplier, check the Zip Handbook page.
To complete a New Supplier Request form:
- Click on the
Formsdropdown on the Home page - Select
PROC: New Supplier

- Complete the form details and click the “Review” button (located at the bottom of the page/screen).
- Review the information and if any changes need to be made, click the “Edit” button (located at the bottom of the page/screen) to make necessary changes.
- If the information is correct, click the “Submit” button (located at the bottom of the page/screen).
- An External Supplier Form will be automatically sent to the Supplier to gather additional information.
- The Supplier must complete the form and submit it back.
- After supplier submission, the external form will be routed to the Accounts Payable Approval Group for review and approval.
- After approval, the Supplier details will be integrated to NetSuite and it will flow back to Coupa to complete the New Supplier creation. By then, the Supplier should be available in
Zipwhen creating Purchase Requests.
How to Request Updates to a Supplier
To learn how to request updates to a supplier, check the training video.
How to Use Coupa for Invoicing and Payments
For further instructions on the invoicing and payment modules in Coupa, please visit the following links:
How to Request a Coupa Virtual Card
To learn more about requesting a Virtual Card, check the Coupa Virtual Card Guide.
Coupa Support
For any Coupa requests that are technical related, open an issue using the Coupa Request template.
If your request involves a change to the current business process, either the Procurement and/or Accounts Payable Team will have to approve it depending on the type of request.
{: .alert .alert-info}
If you have an urgent issue, send a message to the #coupa_help Slack Channel explaining your issue.
{::options parse_block_html=“false” /}
089990ea)
