Create a Jenkins Pipeline
Overview
Deprecation Notice: This tutorial is out-of-date and is only preserved for educational purposes. These steps no longer work on the GitLab Demo Systems.
GitLab’s Jenkins integration allows you to trigger a Jenkins build when you push code to a repository, or when a merge request is created. Additionally, it shows the pipeline status on merge requests widgets and on the project’s home page.
This tutorial shows you how to create a project with a Jenkinsfile, configure a project on the Jenkins server, configure the GitLab Jenkins integration plugin, enable the integration on your GitLab project, and perform a commit to show how pipelines are integrated between GitLab and Jenkins.
Step-by-Step Instructions
Task 1: Create a project for Jenkins CI pipeline integration
If you are just getting started with Jenkins, please follow the instructions in Option A to use our tutorial app that is a Ruby application with a pre-created Jenkinsfile.
If you’re using your own existing project, please follow the instructions in Option B to add a Jenkinsfile to your application.
Option A: Create a new project using the tutorial app template
- Visit https://gitlab-core.us.gitlabdemo.cloud and sign in with your Demo Cloud SSO credentials.
- Create a new project and select the Create from template tab.
- In the list of available projects, select the Instance tab.
- Find
Tutorial App - Jenkins Pipelineand click the Use template button. - In the new project form, use the following values:
- Project name:
Tutorial App - Jenkins Pipeline - Project URL:
Groups > demosys-users/{MY-USERNAME} - Project slug:
tutorial-app-jenkins-pipeline - Project description:
(leave blank) - Visibility Level:
Private
- Project name:
- After filling in the form, click the Create project button.
Option B: Add a Jenkinsfile to your existing project
Note: a Jenkinsfile will only be used if you create a pipeline job. You can skip this step if you want to show the integration with a freestyle job defined in Jenkins instead. Configuration for both options is included in this tutorial.
If you’re using your own project, you will need to create a new file named Jenkinsfile (without a file extension) in the root level of your project where your README file is.
/app/
  ...
.gitignore
Jenkinsfile
README.md
As a starting point, you can use an example that shows a few basic Jenkins stages that will report status back to GitLab. Note: this Jenkinsfile does not actually perform a build or test, it just shows where the specific commands for build and test should go, using an echo.
pipeline {
    agent any
    stages {
       stage('build') {
          steps {
             echo 'Notify GitLab'
             updateGitlabCommitStatus name: 'build', state: 'pending'
             echo 'build step goes here'
             updateGitlabCommitStatus name: 'build', state: 'success'
          }
       }
       stage(test) {
           steps {
               echo 'Notify GitLab'
               updateGitlabCommitStatus name: 'test', state: 'pending'
               echo 'test step goes here'
               updateGitlabCommitStatus name: 'test', state: 'success'

           }
       }
    }
 }
There are additional examples provided in the Jenkins docs based on the language of your application.
You can reference the Jenkins docs for more detailed pipeline configurations, however that is outside the scope of this tutorial.
You can reference the open source Jenkins GitLab plugin documentation for more information on additional options.
Task 2. Connect to the Jenkins Server
- Visit https://gitlabdemo.com and sign in with your Demo Cloud SSO credentials.
- On the Dashboard, you will see all of the Demo Cloud resources that you have access to.
- Locate the Jenkins Integration card (bordered section).
- Click the blue Jenkins Dashboard button to open a new tab and access the Jenkins server.

- You may or may not be prompted to sign in with your Demo Cloud SSO credentials depending on your browser session state. We have designed the integration to automatically sign in and take you to the dashboard.
In the Demo Cloud, we have configured the Jenkins server to use GitLab OAUTH for authentication. Keep in mind that this uses your Demo Cloud credentials and not your GitLab.com credentials.
- You will be directed to the dashboard with pipeline jobs and folders.
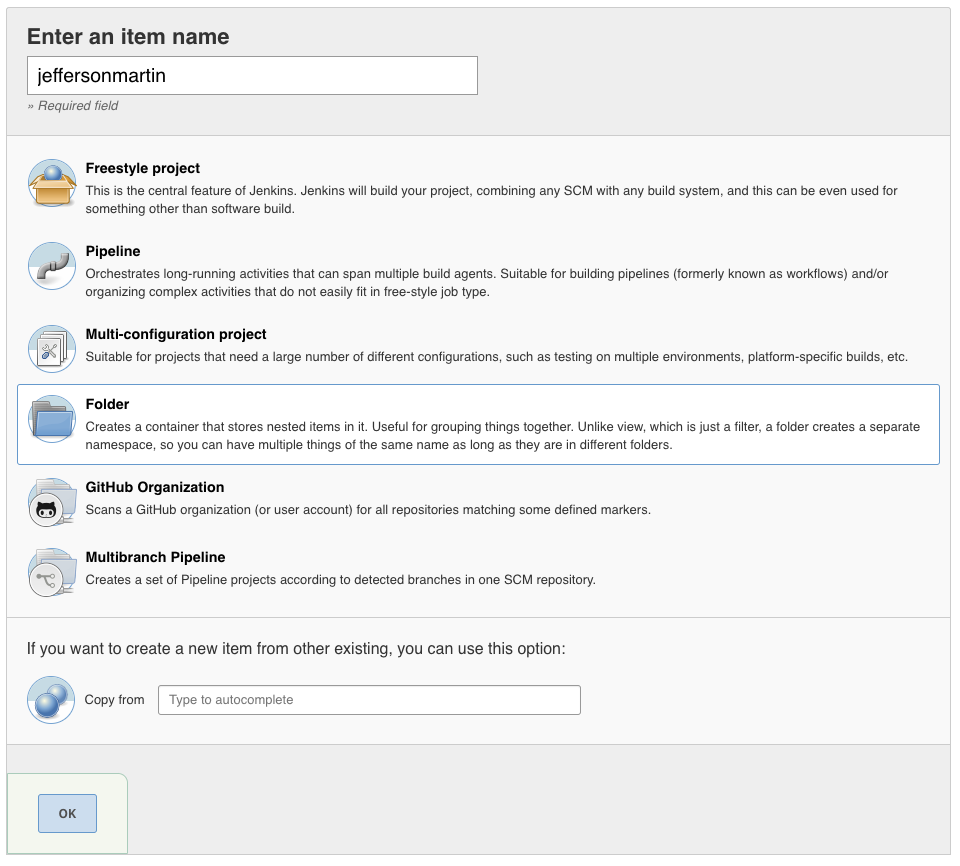
Task 3. Create a Jenkins folder for your projects
Keep in mind that this is a shared environment and it is best practice create a folder with your username to keep your pipelines in and keep things tidy on the dashboard.
- In the left sidebar, click New Item.
- In the Enter an item name field, type in your GitLab Demo Cloud username (ex.
jeffersonmartin).
If you don’t remember your username, switch back to the tab with the GitLab project. If you look in the browser URL, you can determine your username based on the path to your project.
- Click the Folder type from the list of options.
- Click the OK button in the bottom left corner.
- When your folder is created, you will be redirected to a folder details page. You do not need to make any changes here.
Task 4. Create a Jenkins project (Freestyle Project or Pipeline)
- In the top left of the page, click the Jenkins logo to navigate to the dashboard.
It is understandable that the Jenkins UI can be a challenge to navigate. If you have any challenges, simply click on the Jenkins logo in the top left to go back to the dashboard and navigate from there.
- Locate the folder for your username and click on the folder name hyperlink to navigate to the folder’s dashboard.
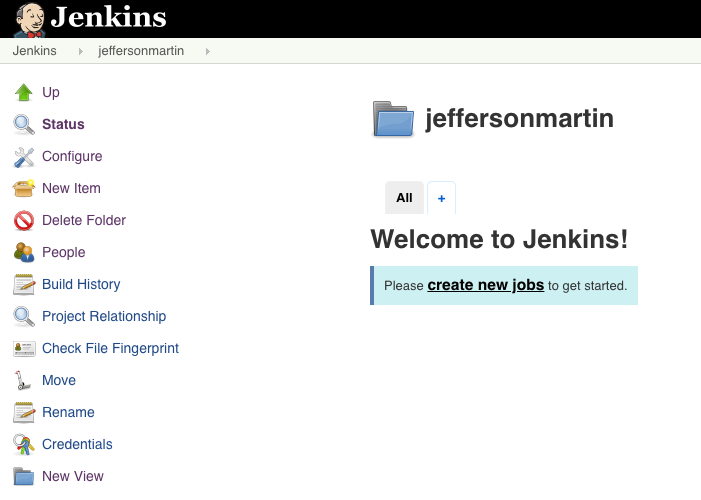
- In the left sidebar, click New item. TIP: Create new items in your folder. Keep in mind that since you’re inside a folder, this item will be created in this folder and not at the top-level. It’s easy to make this mistake so please be conscientious of this to avoid cluttering up the dashboard with uncategorized projects.
- In the Enter an item name field, type in the hyphenated URL name (slug) of your GitLab project.
Example
tutorial-app-jenkins-pipeline
- Choose either the Freestyle project or Pipeline type from the list of options.
- Click the OK button in the bottom left corner.
- You will be redirected to the project configuration page.
Task 5. Configure your Jenkins project
Option A - Freestyle Project (no Jenkinsfile needed for this)
- If you are not on the project configuration page from the previous task, you can navigate here from the dashboard by clicking on your folder, then your project and clicking Configure link in the left sidebar.
- In the General section, enable the checkbox for GitHub project.
One of the cosmetic limitations of the integration is that the GitLab integration use the integration built for GitHub so there is some nomenclature overlap that use the same underlying Git integration.
- Below the GitHub project checkbox, locate the Project url field copy/paste or type the URL of your GitLab project.
Example
https://gitlab-core.us.gitlabdemo.cloud/demosys-users/jeffersonmartin/tutorial-app-jenkins-pipeline
- In the GitLab Connection field, select the
GitLab Core USoption from the dropdown menu if it’s not already selected. This connection was configured by the system administrator earlier.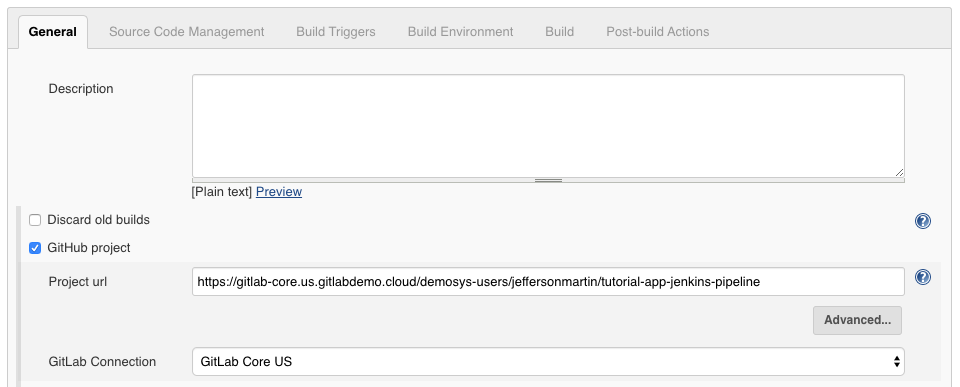
- Scroll down to the Source Code Management section.
- Select the Git radio checkbox.
- In the expanded section, locate the Repository URL field and copy/paste the GitLab project URL (same URL as step 2).
Example
https://gitlab-core.us.gitlabdemo.cloud/demosys-users/jeffersonmartin/tutorial-app-jenkins-pipeline
You may get an error message about connection error. This is expected behavior since there are no credentials selected. Simply proceed to the next step to select credentials from the dropdown menu.
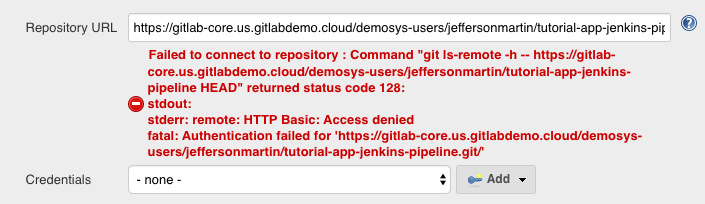
- Locate the Credentials dropdown menu and select the
integ_jenkinsoption. Do not add new credentials in the demo environment.
After you select the
integ_jenkinsoption, the Jenkins server attempts to connect to the API of the GitLab instance to locate your repository URL. If successful, the error message will disappear automatically.
- Click the Advanced button.
- In the Name field, type in
origin. - In the Refspec field, type in the following. This is directly from the documentation and is not customized for the demo environment.
+refs/heads/*:refs/remotes/origin/* +refs/merge-requests/*/head:refs/remotes/origin/merge-requests/*
- In the Branch Specifier field, remove the
*/masterfield so that it is blank. This allows jobs to run for all branches (useful when testing a MR).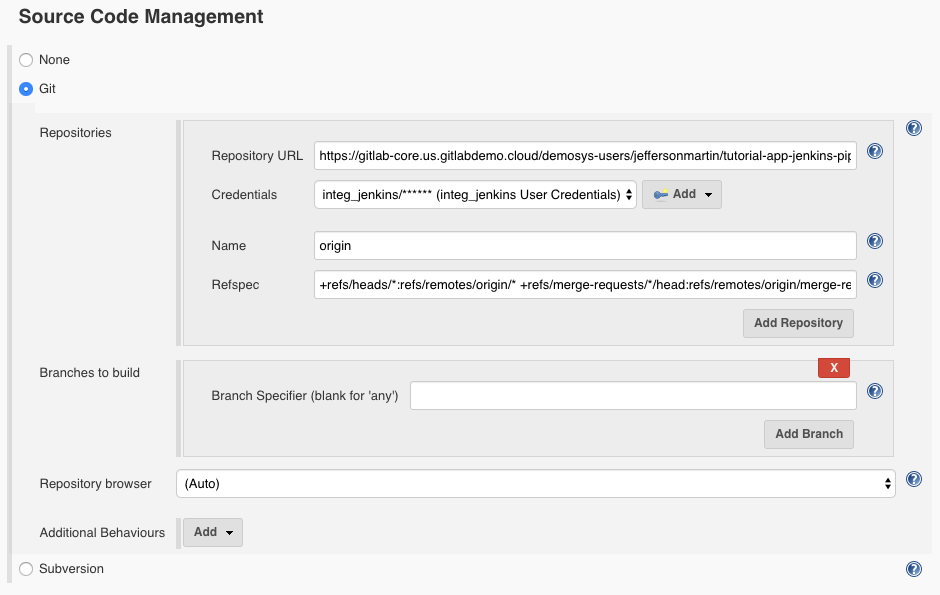
- Scroll down to the Build Triggers section. Enable the checkbox for
Build when a change is pushed to GitLab. Leave all options at their default value.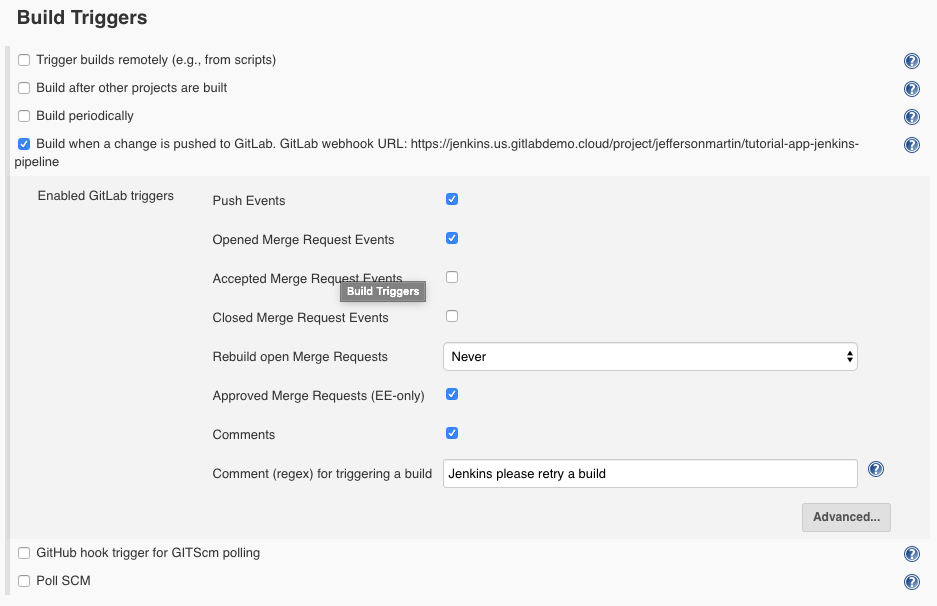
- Scroll down to the Build section. Click the Add build step dropdown menu and select the
Set build status to "pending" on GitHub commitoption. - Scroll down to the Post-build Actions section. Click the Add post-build action dropdown menu and select the
Publish build status to GitLaboption. - Click the Save button.
Option B - Pipeline project
- If you are not on the project configuration page from the previous task, you can navigate here from the dashboard by clicking on your folder, then your project and clicking Configure link in the left sidebar.
- In the General section, enable the checkbox for GitHub project.
One of the cosmetic limitations of the integration is that the GitLab integration use the integration built for GitHub so there is some nomenclature overlap that use the same underlying Git integration.
- Below the GitHub project checkbox, locate the Project url field copy/paste or type the URL of your GitLab project.
Example
https://gitlab-core.us.gitlabdemo.cloud/demosys-users/jeffersonmartin/tutorial-app-jenkins-pipeline
- In the GitLab Connection field, select the
GitLab Core USoption from the dropdown menu if it’s not already selected. This connection was configured by the system administrator earlier. - Scroll down to the Build Triggers section. Enable the checkbox for
Build when a change is pushed to GitLab. Leave all options at their default value. - In the Pipeline section, use the Definition dropdown to choose
Pipeline Script from SCM - For SCM, choose
Git - In the expanded section, locate the Repository URL field and copy/paste the GitLab project URL (same URL as step 2).
Example
https://gitlab-core.us.gitlabdemo.cloud/demosys-users/jeffersonmartin/tutorial-app-jenkins-pipeline
You may get an error message about connection error. This is expected behavior since there are no credentials selected. Simply proceed to the next step to select credentials from the dropdown menu.
- Locate the Credentials dropdown menu and select the
integ_jenkinsoption. Do not add new credentials in the demo environment.
After you select the
integ_jenkinsoption, the Jenkins server attempts to connect to the API of the GitLab instance to locate your repository URL. If successful, the error message will disappear automatically.
- In the Branch Specifier field, replace the
*/masterfield withorigin/$gitlabSourceBranch
- For Script Path, leave
Jenkinsfileas is. - Keep
Lightweight checkoutchecked - Click Save
Task 6. Generate an API Token for GitLab Integration
In the demo environment, each user generates their own API Token. In a production environment, you may want to create a service account-style user for the integration to simplify administration of API tokens if your security practices allow for that.
- In the top left of the page, click the Jenkins logo to navigate to the dashboard.
- In the left sidebar, click on People.
- In the list of users, locate your account and click on your username.
- In the left sidebar, click on Configure.
- In the API Token section, click the Add new Token button.
- In the form field with the
Default nameplaceholder, type inGitLab integrationan click Generate. - Create a new 1Password record or update your GitLab Demo Account record notes with the generated API token.
If you navigate away from this page without copying the token, you will need to generate a new key since this token will not be visible again.
Task 7. Configure GitLab project to integrate with Jenkins
We will configure the integration in GitLab. In some of the plugin documentation, you will see configuration instructions for webhooks which are the previous generation of the integration. Although webhooks can be used, they do not provide the depth of integration that GitLab offers now.
If you still have your GitLab project in a different browser tab or window, you can skip to step 5.
- Visit https://gitlabdemo.com.
- On the Dashboard, locate the GitLab Omnibus (US) card (bordered section).
- Click the blue My Group button to open a new tab and access your group on the GitLab instance.
- In the list of projects on GitLab, click the title of the application you used earlier (Ex.
Tutorial App - Jenkins Pipeline). - With the project open, verify that the
Jenkinsfileexists in the root of the repository. You do not need to make any changes.
If the file does not exist, go back to Task 1 to create a
Jenkinsfileor ensure that you’re looking at the same GitLab project you started with earlier.
- In the left sidebar, navigate to Settings > CI/CD.
- On the CI/CD Settings page, locate Auto DevOps and click the Expand button.
- Deselect the checkbox for
Default to Auto DevOps pipeline. Click Save changes.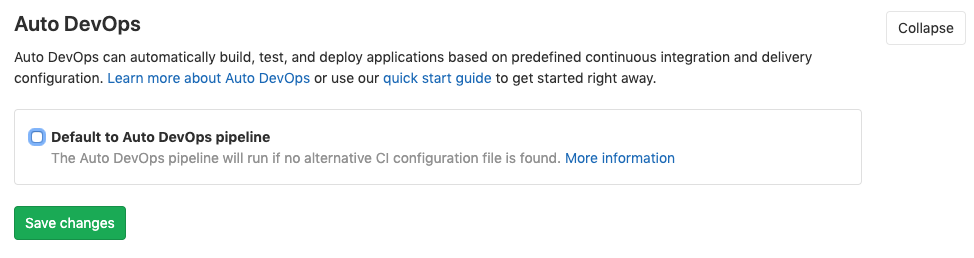
- In the left sidebar, navigate to Settings > Integrations.
- In the list of integrations, click on Jenkins CI.
- Locate the Active checkbox and select to enable it.
- In the Jenkins URL field, enter the Jenkins server base URL.
https://jenkins.us.gitlabdemo.cloud
- In the Project name field, enter your folder name and Jenkins project name using
{foldername}/{projectname}notation.
Example
jeffersonmartin/tutorial-app-jenkins-pipeline
- In the Username field, enter your GitLab username (the same as your folder name).
- In the Enter new password field, copy/paste the new API token that you just generated.

- Click the Test settings and save changes button.
If you get an error message, you may need to debug and see if your variables are correct. This is a common area to experience a problem and some light troubleshooting usually fixes the issue.
Task 8. Create a Branch and MR and Then Change a File to Trigger a Commit Event
- In the left sidebar, navigate to Repository > Branches.
- Click the Create Branch button, give the branch a name, and click save.
- Click the Create Merge Request button, scroll to the bottom of the page and click Submit Merge Request
- Click Open in Web IDE
- Locate the
README.mdfile and click on the filename. - Make a change to the text (change a word, add a line, etc.)
- Click the Commit changes button.
- Navigate back to the Merge Request
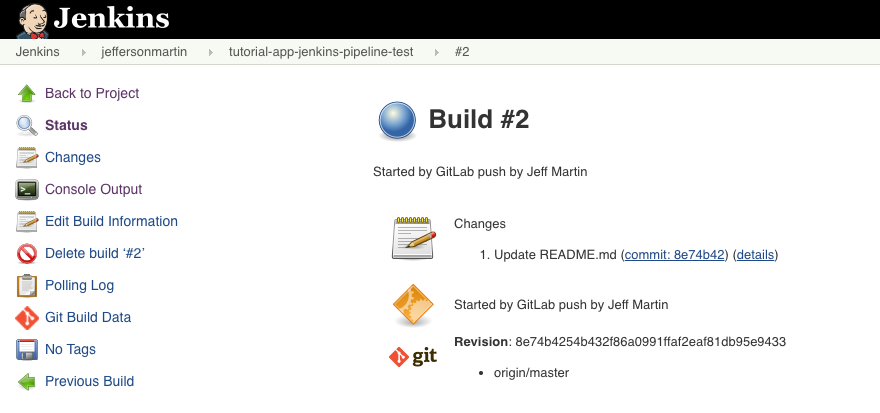
Task 9. Review the Jenkins Pipeline in the GitLab UI
- You should see the latest pipeline status in the merge request. This is valuable to customers because they can now use the Jenkins pipeline status with the GitLab project merge check
Pipelines must succeedto ensure that code is built and tested successfully prior to being merged to master. - Click the pipeline number to view the details.
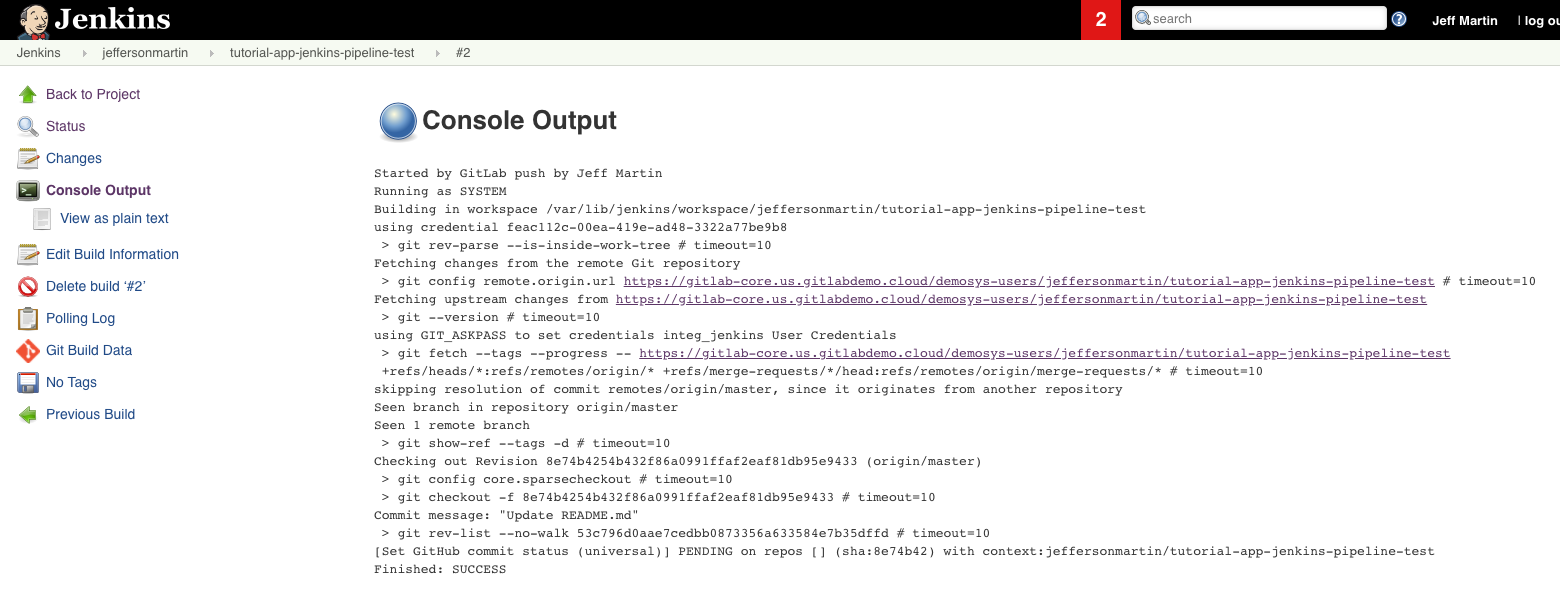
- In the pipeline details, if you have integrated a Jenkins freestyle job, you will see a single
Jenkinsjob. If you integrated a pipeline job using the suggested Jenkinsfile, you should see two jobs -buildandtest. Right click on any job and select Open Link in New Tab.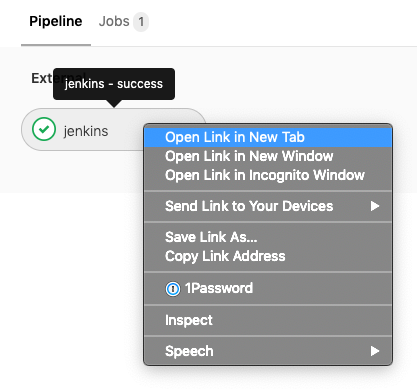
- The Jenkins UI will load and you’ll see the build job that was executed in Jenkins.
- In the left sidebar of the Jenkins UI, click Console Output.
- Review the console output to see the details about the job that ran.
Review
You have successfully integrated your GitLab project with Jenkins CI.
There are several approaches to the authentication (shared vs per-user vs per-project), so please consider the best option for your environment when integrating Jenkins.
To learn more about the Jenkins integration, please see the official GitLab documentation.
You can also learn more in the jenkinsci/gitlab-plugin open source integration’s README documentation on GitHub.
To learn more about using Jenkins with stages and multiple steps beyond our basic example, please see the Jenkins documentation.
de58a497)
