Allocadia
About Allocadia
Say good-bye to multiple spreadsheets, disparate data sets and misaligned marketing plans. The recognized leader in Marketing Performance Management (MPM), Allocadia’s budget management and strategic planning platform is the foundation for operational excellence for marketing leaders and their teams. Powered with data-driven insights, marketing leaders can visualize what’s working to enable greater planning agility. Learn how to run marketing like a business at Allocadia.com.
💰 Version purchased: Allocadia Optimize
🔑 Logins are available for Marketing budget holders
High level - how does it work?
- We enter top down departmental budgets into an
Investment Target, with annual and quarterly breakdown. These are the amounts that tie out to the board approved plan. Once the board has approved the plan from the CMO, we will lock down these targets which represent the envelope of money available to each department to plan and forecast. - We enter bottoms up departmental
Plansinto a hierarchy grid much like you’ve done in the past within non-head count spreadsheets. Each budget holder can use categories and subcategories as needed to organize their budget, so it makes the most sense for them. This establishes the list of line item expenses they expect to use during the year. If the totalplanneddoesn’t equal theinvestment targetenvelope, the department does not lose the funds. Once plans are set, we can lock them for the quarter. More in Allocadia docs. - We then enter
Forecastsinto these same line items, adding more details and more accuracy as we learn about the specifics of the events/campaigns/expenses.
Similar to prior year, if we do not use the full envelope provided to Marketing by the end of the quarter, we will lose those dollars.
Allocadia integrates with multiple systems described further below. However, this presentation gives a high level view.
Great links for more details in Allocadia support pages:
- Allocadia terms glossary
- Navigating Allocadia
- Navigating the Activities tab
- Searching for your activity/ budget line item
- Understanding Forecast Status Tags
- Switching between activity plans
- Budget Reallocations (transfers)
Partnership with Finance
Marketing and Finance partner together when using Allocadia. The Marketing Finance handbook page lists out:
- Finance Marketing Allocadia Training
- Financial terminology as it relates to your view in Allocadia
- Important dates to be aware of between finance and marketing
- And more!
Allocadia Internal communication
We have a slack room! Search - allocadia_mktg-budget-holders
All budget holders are added and Marketing ops is responsible for granting access.
Home
This section houses the main grid. This section is more for the Allocadia admin, although all budget holders will make use of it for mapping expenses to their line items as the NetSuite uploads are done monthly.
Also in this section, you can see where teams are from a forecast to plan standpoint by clicking into the view-roll up button. Video walk through in GitLab Unfiltered.
Home is also where targets are entered annually by quarter for each of the teams. To do so, find the icon next to the team in the Panel column called Panel (rollup panel when you hover over) and click to open. Scroll down to enter the top down targets/budget into the Qx Approved Target fields for each. This can only be done by an admin.
Activities
The activity planning section is where you add the tactics of your quarterly/annual plan and where you can see quick high level metrics to help you understand your Investment Target and your Plan vs. Forecast. Depending on what view you are in will depend on if you see this data based on the quarter or based on the FY.
View
In the top right hand section of the screen, you will see a drop down of different Views. When making changes to your actual activity prior to the Allocadia plan being locked, be sure you are in a plan view. Once the plan has been locked, you must be in the Forecast view to make any changes. We are locking plans quarterly in line with Finance calendars.
Within the view drop down you have the option to look at your targets by quarter or annually. Use whichever view best helps you run your business.
View Definitions
- FM Forecasting Monthly - will ONLY show line items with forecasted spend - Only available on the FMM activity plans
- FM Planning Monthly - will only show line items that were present at the time the plan was locked - Only available on the FMM activity plans
- My Forecast FYXX - Where you see what’s planned to ensure you’ve added forecasted amounts against the plan
- Q1 team Tracking - shows both plan AND forecasted line items with a start and end date in Q1
- Q2 team Tracking - shows both plan AND forecasted line items with a start and end date in Q2
- Q3 team Tracking - shows both plan AND forecasted line items with a start and end date in Q3
- Q4 team Tracking - shows both plan AND forecasted line items with a start and end date in Q4
- Quarterly Summary - where to see an annual summary of plan, forecast, and actuals broken out by quarter
Activities grid
Metrics
You will notice that there are metrics at the top left of each View that provide you with totals and comparisons between targets, plans and forecast depending on the View chosen.
Buttons
Category and Sub-Category
In the grid below, these are the items that show up in the Hierarchy column. You may organize these however is best for you to run your business.
The same categories (and line items) show up in this grid regardless of whether you are entering your bottoms up Plan for the quarter/year or if you are entering your Forecast as your expenses solidify throughout the quarter.
Line Item
There needs to be one line item for every contract that will be paid. That being said, if you have multiple charges that relate to the same vendor/ will get billed together, those can all show up on the same line item.
Organizing your line items? It’s tricky, but if you hold the little three line hamburger to the left of the line item once you add it, you can move it so it falls under the correct category or subcategory. You will need to see the arrow to show that it is rolling up. There is no sorting other than manual. The nice thing is that once you move them to where you want them, they will remain there.
Placeholder
The idea for the placeholder is if you know that there will be an expense but you have very little information about vendor, etc. It allows you to fully Plan your entire Investment Target dollars so that you know what is left to allocate of your tops down budget. Currently, the FM team would prefer not to use the placeholders. Any placeholders will need to be updated as more information is determined.
Delete
This button allows users to delete a line item or category.. The Delete button is only able to be used by Marketing Finance and Marketing Ops admins. If you need a line item, category, or sub-category deleted please reach out to Marketing Finance or Marketing Ops in the #allocadia-mktg-budget-holders slack channel and they can delete it for you. If a line item has previous months expense or invoice data, it cannot be deleted.
Request Transfer
This button can be used to request funds from another department. Specific approvers have been set up in Allocadia to be notified by email and can approve or deny the transfer. See more details in the Budget Reallocation link above. Note that on the Home page, the transfer will show in red until it has been resolved.
To see what transfers have been made, from the activity plan you’re interested in digging into, click the transfers column and sort by the status youre interested in learnign more about. Video walk through. (Must be logged into Unfiltered.)
Within the grid
- Hierarchy - this is where categories, subcategories and the line items are organized.
- Vendor - this needs to be the name of the Vendor for the expense so that it will match with our eventual PO system, Coupa. We have also added this to the Details Panel (and may remove from the main grid based on input) For common vendors, it’s important to note that you must use the same upper and lower case terminology, as well as spacing to conform to a standard naming convention if you’re trying to have the line items pull under the same vendor in any vendor report. A best practice is to visit the vendor’s website and use their exact naming convention. Examples of common vendors we use and how they should be written out for reporting:
- Demandbase
- SimplyDirect
- Tenandone
- Reachdesk
As we move to Coupa, that integration will allow us to use their list of standardized vendor names for ones that already exist in the system which should make this easier.
We have just moved the Vendor to the Details panel - for now it shows up in both and can be updated in either place - but we are considering taking it off the main grid if there are no objections.
- Comments - this can be used for any notes about the spend, but it is not reportable, sortable, nor does the budget holder (or anyone for that matter) receive a notification that a comment had been made.
- Months - this is where you enter the dollar amounts by month. You can use the cut and paste feature and tab between months for ease of entry. You can also enter formulas, such as 12000/12 if you have an annual $12K cost that you want calculating the $1K per month. Depending on the
View, there are columns for your bottoms upPlanand your ongoing ‘Forecast’. And then monthly as we load inActualsfrom NetSuite, those amounts will show in those columns.
Details panel
You access the Details Panel from the book like icon to the right of the line item name in the hierarchy column. If the book is red, it means that there are missing required details. It turns black once these are completed. The workflow that we’ve set up in the system once you add a line item should help us capture all the required fields.
Any line items within a category or subcategory default inherit the details from the parent (category/subcategory) AND can also be overwritten at any child line item as needed. Therefore, it makes the most sense to fill out the details panel at the highest category level and then adjust any individual line items that differ.
Details tab
- Spend type - relates to the account code, but slightly more granular detail to help the marketer.
- Field Marketing (FM) only - using the Allocadia Impact Modeller, the spend type you choose, will spit out the expected ROI based on historical conversion rates.
- Field Marketing (FM) only: If
Spend Typeis as follows, then you will be asked a Y/N on if the event isIn person.- Conferences
- Executive Roundtable
- Field Event
- Owned Event
- Speaking Session
- Vendor Arranged Meetings
- Workshop
- (FM only) Is a Channel Partner involved? Y/N. If the answer is Y, then you will need to manually enter in the Channel partner name.
- (FM only) Is an Alliance Partner involved? Y/N. If the answer is Y, then you will need to manually enter in the Alliance partner name.
- GitLab Marketing issue URL - a link to the issue where the marketer is managing the activity (not procurement issue - see below); leave blank if N/A
- Region - if the spend is for a specific region, choose it here
- (FM only) SubGeo - allows the field marketer to choose more detailed location
- (FM only) Geo - allows the field marketer to choose more detailed location
- (FM only) Country - allows the field marketer to choose more detailed location; is also tracked for Priority Country analysis
- Campaign Type - should match the type used in Marketo and SFDC; limited based on input in Spend Type above
- Existing SFDC campaign - this is a dropdown that includes all campaigns that align wit the hierarchy that have been set up in SFDC; if it does not relate to an actual SFDC event/campaign, this can be left blank.
- Note: If the SFDC campaign has not been created at the time of the entry you will not need to manually go back and add the campaign in the details panel. Once the SFDC campaign has been created the Allocadia<>SFDC synch will match the Allocadia line item to the SFDC campaign and your campaign will then show up in your details panel.
- Campaign Name to be Created - add the campaign name here that will be used to create the Marketo program and SFDC campaign utilizing the
ISO date_event namestructure (example - 20220520_TheBestEventEver) - Payment method - select the type of invoice or Naven Expense. Other will be rarely used.
- Segment - if the spend is for a specific segment or segments, choose it/allocate percentage to them here. If its for all, simply select all and save.
- Start Date - the date the expense begins. This will be used for accruals and can be pulled into reports to show timing of software renewals, etc.
- End Date - the date the expense ends. This will be used for accruals and can be pulled into reports to show timing of software renewals, etc. If you are unsure of what to use for the start or end dates, please reach out to our Finance Business Partners.
- GitLab Procurement issue URL - this will auto populate for you if you’ve created the issue with a click of a button within Allocadia
- GL Account - will be selected for you based on your input in Spend Type above. Note that we have three different fields for GL Account - one for FMM, one for Contribute and one for the rest of marketing. If there are any problems with the GL account during integrations, remind support of this fact to expedite a response.
Useful tricks inside the Activity Grid
- Do you find yourself wanting to copy & paste a line item from a differnt activity plan into your activity plan? If so, then you will need to (right click) Copy/Paste the line item within the same activity plan, and then use the right-click “Move” option to move the line item copy to the correct activity plan. Within the Field Marketing team, we ask FMMs to transfer dollars to the ALL plans for shared activity, vs. having multiple line items for the same activity in multiple activity plans. Those instructions can be found here pt. 12.
Channel Marketing Set up
Category: FY + Quarter Sub-categories: Partner_Activity Name (no need to add date, it will be listed in the details panel) Line Item: MDF 000 Partner_Activity Name (000 indicates being ‘bookedmarked’ once MDF has been approved and the funds request received in SFDC, the MDF Program Owner will change from 000 to the funds request number)
MDF that spans multiple months and quarters
- If the funding is all in the same quarter, then it put plan, and forecast in one month, regardless of amount, unless there are payment milestones built into the campaign. If there are milestones, then defer to the milestones agreed to.
- If the campaign is split between more than 1 quarter, then break the plan and forecast numbers out based on what is actually running. As an example, you have digital ads running in Sept, Oct, & Nov. totaling $12k, then $8k ($4k from Sept +$4k from Oct) would be in the plan and forecast for Sept, and then $4k would be November.
🗓 GitLab Internal Calendars
Certain groups within GitLab have the ability to create a calendar invite directly from the details panel within Allocadia.
- Groups who have calendar creation access
- Field Marketing
- Brand Activation
- How the calendar process is mapped
- You may ONLY create a calendar invite at the
line itemlevel. Meaning you CANNOT create a calendar invite at theCategoryORSub-categorylevel. - Based on the inputs from the details panel, the logic is built as follows:
- Question within Allocadia:
Is this an in person event?- If value is YES it uses the
in person events and sponsorshipscalendar - regardless of spend type, if it’s an in person event it WILL show up on this calendar. - If value is null or no, check next column
- If value is YES it uses the
- Next Column:
Spend Type(Campaign Type)- If value is
Self-Service Virtual Eventuse theGitLab Hosted Self-Service Virtual Eventscalendar - If value is any of the following:
Vendor Arranged MeetingsExecutive RoundtableSponsored WebcastVirtual Sponsorship- use the
External Virtual Eventscalendar
- use the
- All else, do not create calendar invite and present error message
Cannot create calendar invite for this Spend Type.
- If value is
- Question within Allocadia:
While Workshops & Webcasts DO require a calendar invite, we intentionally left the auto create calendar invite out of the plug in. We did this because the GitLab Hosted Zoom Webcasts calendar requires Zoom integration work and is a locked calendar, given the technical work required to run the campaign types. For more information on booking a GitLab-hosted Workshop or Webcast, please visit this handbook page.
The calendar invite is set for the entire day. If you would like the event to be on the calendar for a specific time, then you may go in and manually change the time.
Here is a quick video walk through to show you how the calendar invite gets created, if you’re more of a visual learner!
Impact Modeller
Today our Field Marketing team is the only team using this function. If you are interested in having this added to your view please open this issue for Marketing Ops.
We have loaded the previous fiscal years worth of influenced conversion data from campaigns run by field marketing for both the MQL>SAO conversion rates as well as SAO>Closed Won data.
If a region did not have a conversion rate for the campaign type (likely because the region did not run that campaign), then the global conversion rate was used. Also, because our MQLs can “skip” MQL status (meaning an SDR can work a lead BEFORE it’s actually hit our MQL scoring threshold), we used the MQL Inferred Date field to assume MQLs. We took a snap shot in time data, but the below widgets can be referenced
Live MQL>SAO regional data can be found here and live SAO>Won data can be found here.
The average deal size by campaign by region can be found here (you’ll have to refer back to dashboard to change the region if you want to see a specific regions data) are also loaded for calculation purposes. If there were less than 3 closed deals then we did NOT use that deal size information, but relied on the ASP from the TOPO model to fulfill that deal size.
A calculation is then done by then taking into account the MQLs, region, segment data and campaign type (specifically the GitLab Issue type) that has been given at the line item level in the details panel.
Video walk through (and yes, you know you need to be logged into Unfiltered to see! ;))
Showing low ROI - what now?
Because we’ve loaded historical conversion rates into the impact modeller, a marketer should feel empowered to build a business case justifying why an investment should be made even though the impact modeller is showing a lower ROI. The business case could include specific accounts who you will connect with, LAM (landed addresable market) of account, how the pre/post campaign follow-up will be different than in investments past, nuanced facts about the proposed investment vs. historical program, etc. We want to still test out programs, and at times we may fail, and that’s ok! Review your overall plan. Do you have a strong ROI built into a few campaigns that can afford a risk in a program you believe in?
📊 Insights
Most reporting is done within the Insights tab within Allocadia. Reports are built at the highest level and then use a drill down feature so each team does not have to recreate reports.
The reports in Allocadia make use of GoodData. The first time you attempt to access reports, you will be prompted to sign in to GoodData. Also, if you are using Safari as your browser, take note of the following:
Safari for OS X – Disable Blocking of Third Party Cookies Safari has moved away from their “Block Cookies” section. In order to make it work with the current version of Safari, you must have both “Prevent cross-site tracking” and “Block all cookies” checkboxes unchecked.
Dashboards
This section is where you can see the highest level of detail.
Reports
The reports are broken out in folder format and once you click into the folders, more reports open up.
Reports Field Marketing uses
- To view all videos posted, you must be logged in to GitLab Unfiltered.
Insights>Dashboards>1.Investment Planning SummaryTo understand your regions budget (referred to in Allocadia asCurrent Target)- Video walk through - https://www.youtube.com/watch?v=4hgTgpJLxVQ - Note this is the most useful ONLY when the plan is open from finance. Once the plan is locked and you’re making changes/numbers are becoming real, you’ll want to look at this second video.
Insights>Dashboards>1.Investment Tracking SummaryTo understand how much you’re on track to invest - Watch this video walk throughInsights>Dashboards>2. Pipeline>Quarterly Drill in Details All>Pipeline Plan by Campaign Type- This report allows you to see the ROI data (MQL, SAO, expected pipeline), based on the impact modeller -Insights>Dashboards>2. Pipeline>Quarterly Drill in Details All>Pipeline Plan by Motion- This report allows you to see how your plans are aligned to the Marketing GTM motions. Please be sure you are filtering by Activity plan, NOT by Region.- Monthly forecasting report - at the home screen, click into the
view roll-upbutton. Video walk through & select which view you’re looking for - i.e. Q1, Q2 etc. - Monthly/Qtrly Actuals review - To understand how much you planned for, forecasted for, and then actually spent. At the home screen, click into the
view roll-upbutton. Video walk through & select which view you’re looking for - i.e. Q1, Q2 etc.
Reporting folders breakdown
- Finance - reports the finance team uses
- Health Check - We aren’t using this folder in detail yet. More to come!
- Investment Planning
- Target vs. Plan Full - here you can view your target vs. plan in full detail - this is the same information that is reflected in the Investment Tracking Summary.
- Vendor Plan details - Management uses this section to understand how much we are spending with Demandbase because we open insertion orders (IOs) on a qtly basis this is essential for us to know how much we need to open. We also use this section to understand the
Back end names of useful fields
We do have a few fields within Allocadia which have a different name on the frontend (i.e. what you see on the screen) vs. what is used in reporting, for various, perhaps unknown reasons. Fields are as follows:
| Front end field name | Field name used for reporting |
|---|---|
| Start Date | Date (Line Item Start Date) |
| End Date | Date (Line Item End Date) |
| MQL | Estimated Outcome (First Funnel Level Total) |
| SAO | Estimated Outcome (Middle Funnel Level Total) |
| Closed Won | Estimated Outcome (Last Funnel Level Total) |
Nuances with fields + reporting
Allocadia comes with a lot of standard fields & definitions associated with those fields. At times our definitions may vary and we may have to create a new custom field. Unfortunately, we cannot delete out the Allocadia fields and only have our current fields available. This causes us to have many similar fields and a creates a need for us to document which field should be used when building reports. The list below should serve as the SSOT for fields when building reports.
- Campaign Type - should be used when you want to report out on both Spend Type and Spend Type (FM). These two fields have been merged into one in reporting.
- Do NOT use Campaign Tupe (DNU) OR Campaign Type (SF) as we do not capture data in those fields, therefore nothing will return on your report.
Integrations (behind the scenes)
Allocadia - GitLab Issue Integration
An efficiency we are able to gain by using Allocaida is that we create a GitLab issue and can push information gathered in the details panel directly to that issue. This saves the team’s time by not having to reenter information which has already been entered.
How to create a FMM issue from within Allocadia
-
Create a sub-category and fill in all information in the details panel
-
Add AT LEAST 1 line item
-
Go back up to the sub-category details panel and scroll all the way down to the
Actionssection where you will see a button called GitLab issue - click that - and 💥 - your issue is created
By creating the FMM issue at the sub category level, this still allows the marketer flexibility in terms of how they want to structure their activity plan. Another way to think about this is that everything under the sub category should align to the same campaign name to be created.
Please be mindful of where you are creating a sub-category. The system will allow you to create a sub-category within a sub-category, and you will realize this because upon creation of the what you believe to be a new sub category, you will notice the details panel is already filled in. Do NOT go through and start changing out the data in the details panel, as you are only allowed to create one FMM issue within the sub-category. What you’ll need to do is delete the newly already filled in sub-category and then ensure you’re in the category level and create a new sub-category.
FM Issue Date/Name Changes
Should a date on a campaign need to change and the issue has already been created, you can systematically change the date & name. In order to do so, all changes must be made in Allocadia and then overnight will push the change to the GitLab FMM issue. Should you want to manually change both the issue AND Allocadia, you should feel empowered to do so. The automation is there to help you.
Help! The feature to create a GitLab issue is missing from the details panel
You can ONLY create a GitLab issue from within a SUB-CATEGORY. Please double check you have created a subcategory, and a line item as listed in the instructions here.
Video walk through of how to diagnose this problem and then how to also correct the problem if you’ve created a Category and need to move it to a sub-category.
If you have tried to create from the subcategory and you’re still not able to create the issue, please ask in the #allocadia_mktg-budget-holders slack channel.
How to Create a Channel Marketing Epic/Issues from Allocadia
- Create a new subcategory with a naming convention:
YYYYMMDD Partner Name Activity Name - In the details panel under subcategory, input the following fields:
Spend Type=Partner RebatesStart DateandEnd DateIs a Channel Partner Involved?=YesChannel Partner Name=Select PartnerIs an Alliance Partner Involved?=NoWill there be MDF funding?=YesPartner MDF Region BudgetCampaign Owner=Select CMMOperational Program Owner=Select Operational Campaign Owner
- Create a Line Item with a naming convention:
MDF 000 Partner Name Details Related to SpendNote, 000 indicates being bookmarked once MDF has been approved and the fund request received in SFDC, the MDF Program Owner will change from 000 to the fund request number. - In the etails panel under Line Item, scroll to actions and select
Create MDF Epic & Issuesto create the corresponding epic and issues:- Marketing Campaign epic
- Proof of Performance issue
- List Import issue
- In the marketing campaign epic, update the campaign details, user journey, joint messaging and all sections.
Watch the video for a step to step walkthrough.
MDF Epic/Issues Auto Update
Allocadia runs two daily syncs at 1:30 am and 1:30 pm EST and you can manual push the changes using the button at the bottom of the line item details button: Create/Update MDF Epic/Issues. Doing so will update any Allocadia name and date changes to the epic/issues.
Please be aware that the Start and End Date updates will only go through if the format of the “Date(s)” section in the epic description is still in the original format (e.g. “Date(s):YYYY.MM.DD - YYYY.MM.DD”).
Making changes to the GitLab issues
If you find yourself needing to update a procurement issue template for any of the issues above - please submit an issue for the Marketing Operations team, as this must be done through our Allocadia CSM.
Wrong issue template was pushed…what now?
If you’ve hit the GitLab issue template button and the wrong issue template has been created, not to fear! Someone with owner or admin rights to your folder can assist you. To determine who has owner or admin rights to your folder from the home screen you would find your folder, click in the Users column that person icon with (number), from there, you see a list of people who have access + their rights. Search until you find Owner or Administrator and then slack that person in the #mktg-budget-holders slack room. Video walk through (must be logged into GitLab Unfiltered!).
SalesForce.com (SFDC)
As mentioned above, there is a listing of available FY23 SFDC campaigns to choose from in the detail panel. Once the initial connection has been made between Allocadia and SFDC on a given campaign (which is done by either manually connecting them via choosing a campaign from the drop down or by using your Allocadia sub-category ID to create your SFDC campaign, instructions in pt.2 & 5 here), Allocadia will push over all the fields that have been completed in the details panel.
In addition, we will be sending over planned amounts into the SFDC Campaign Budget field and actuals will synch nightly. This ONLY happens if the connection is there by having a campaign selected in the Existing SFDC Campaign field. If there are multiple line items for a given SFDC campaign, they will be combined for the updated SFDC Campaign Budget, since we use the Allocadia sub-category ID to sync Allocadia to the SFDC campaign.
Full detailed instructions on how to set this synch up, which does have to be done campaign by campaign, can be found here.
Influenced MQLs
If entered in, the MQLs entered used in the impact modeller will be pushed to the SFDC campaign to a field called Total Planned MQL in the planning section of the campaign. That data can then be pushed from SFDC into the company’s BI tool and displayed on the SFDC attribution reporting so we can understand how good we are at forecasting MQL impact.
Drop down in details panel
If you need to add a new value to the drop down selector options, in order for the new options to properly pulled through to SFDC correctly, you need to be sure the new drop down value has been added to Allocadia and SFDC. Once that’s been done, test the systems and you should be good to go!
Okta
Please login using SSO, so that all marketing budget holders can sign in easily without worrying about yet another login password. Note that we are on Allocadia’s eu1 server.
Adaptive
We will be using CSV transfer files to upload plans from Allocadia to Adaptive. Our finance business partner will be the DRI for this.
Marketo
There is no integration with Marketo. However, through the Marketo program/SFDC campaign creation process, Marketo will update the SFDC campaign description with an ID. Allocadia ingests this ID and in return, updates SFDC campaign fields to match.
NetSuite
Expenses are loaded from NetSuite to Allocadia by Marketing Finance, Instructions for Allocadia Admin to upload were prepared by Allocadia. Actual expenses will not be available though until after month end close for AP, so generally at the end of the month. These expenses will automatically map to the line items and show in the Actuals column in the Activity Plan if there was an Allocadia ID set up initially. However, until we have all set up, we will have to work through a manual process to map expenses to the line items. Allocadia will do it’s best guess but without the Allocadia ID, we will need to confirm or correct.
Mapping Expenses via Line Item IDs
The huge advantage of having an Allocadia ID tagged throughout the systems is that it can then be used to easily match line item plans/forecasts with actuals. Classifications (aka line item IDs) are no longer required to be created in NetSuite.
Think of each line item ID as its own budget line. Each Allocadia line item ID will represent that particular budgetary item (versus using one main line item ID for all event charges, as was our previous practice).
Example Event in Allocadia:
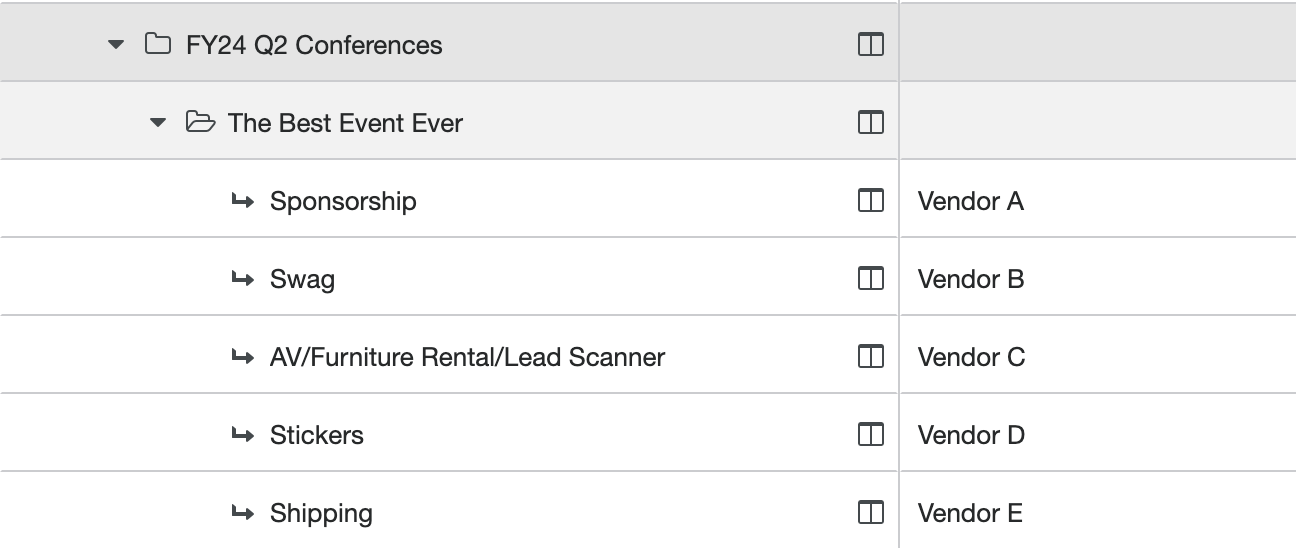
In this example, you would use your sponsorship line item ID when submitting your sponsorship contract through Zip. You would then use your swag line item ID when submitting your swag order through Zip. If you used your Navan card for shipping charges and additional booth charges, you would enter those individual line item IDs into Navan when submitting your receipts (see below for more information regarding the new Navan field.)
Submitting Expenses
For expenses submitted through Zip/Coupa:
- Populate the line item Allocadia ID in the Zip request - this will ensure the PO and invoice are both mapped to the correct Allocadia line item
- Marketing Finance will confirm the Allocadia line item ID is correct and is properly forecasted. Zip/Coupa requests without Allocadia IDs will not be approved until an ID is provided. See screenshot for example.
For expenses submitted through Navan:
- Enter the Allocadia line item ID in the
Allocadia ID (Marketing Only)field when submitting the expense. This will ensure the expense is mapped to the correct Allocadia line item ID. See screenshot for example.
To find expenses that need to be mapped after the NetSuite actual upload, go to the home page in Allocadia. In the Actuals column, see if your Map column has a Map (#) in red. If so, click on that link, and it will open a new screen to show you what needs to be mapped. Scroll over to see descriptions, invoice numbers, etc from NetSuite. All you do is select the hierarchy category and then the line item to match each one to. Then hit map. You can also bulk map by shifting /clicking several lines and then hit bulk map for a smaller screen with its own “map” button.
If you accidentally map something incorrectly, it can be corrected. You’ll need to go to the Activities grid for the line item where you accidentally mapped it, right click and select Go to Actuals. A new screen will appear where hopefully you see your error line and you can delete by scrolling to the far right.
Field Marketing Expense Mapping
We strive to have all monthly expenses mapped within 3 business days of actuals being loaded by Finance.
Deprecated Handbook Content
This section contains information we are not ready to delete just yet. The functionality is not currently being used, but if we do decide to bring it back in some form we want to have this information handy to reference.
Allocadia integration to Coupa
We have turned off the functionality to create Coupa purchase requests from the Allocadia details panel. We are working with Zip, the new procurment tool, to explore an integration between Allocadia & Zip to create similiar functionality that is described below.
Coupa
Via an integration of Allocadia and Coupa, Marketers are able to create a Coupa Request from within Allocadia. This is a one way push of data from Allocadia into Coupa, so if you make any changes within the Coupa request, please note it will not be updated automatically within Allocadia. Video walk through of how to create a Coupa requisition directly from Allocadia can be found here.
Prerequisites and Notes
- The vendor/supplier must be in Coupa in active status to submit a Coupa req through Allocadia. If you need to process a new supplier request, please follow instructions here.
- Coupa reqs are created on the line item level and cannot be created in a category or sub-category.
- Make sure your line item panel details are completed and you have a plan AND forecasted cost associated with your line item.
- There should only be 1 Coupa req per supplier. If you are submitting a multi line item req, you cannot add lines from a different supplier. The line items you create in your req should ultimately match the line items in the invoice the supplier provides.
Steps to Submitting a Coupa Req through Allocadia
- Click into the appropriate activity plan
- Click into the details panel of the line item in the activity for which you are creating the Coupa req
- Scroll to the bottom of the panel and click
Create PR in Coupaand your request form will appear. If it does not, the error message will inform you that you are missing required information. Go back to your panel and line item and make sure all required fields have been filled in. Created Bycan be left under your name, unless you would like the requisition to be submitted under someone else’s name, in which case, you can pull the person’s name in the drop down options in theOn Behalf OffieldSuppliershould pull over automatically based on the supplier you have provided in the Allocadia line item. Note: You must have the name of the supplier in your line item listed exactly as Coupa has the supplier listed. If not, the supplier will not pull through automatically, in which case, you can search the drop down for the supplier listing.Description of Purchaseshould provide details of your purchase - Example - Contract for ABC EventVendor has access to red or orange datais a required field, see linked handbook page in the form for more informationList data and system involvedis only a field that should be filled in if you select YES to the above data questionVendor’s Contact Emailis a required field and is generally utilized for contract countersignature requestsVendor’s Security Contact Emailis a field to be filled in if vendor has access to red or orange dataAttachmentis required and this where you would attach the appropriate contract- Click
Next - Select
AMTorQTYbased on the type of purchase (generally, you will be submitting a Coupa req based onAMT) Itemwill pull from the line item name you have listedUnit Pricewill pull from your total line item costNeed by Dateis the due date for the Coupa reqService Start,End Date,Chart of Accounts,Subsidiary,Department, andGL Accountwill all pull from your line item
If submitting a single line item Coupa req
- If you are submitting a single line item request, click
Submit - The system will provide you with the link to your Coupa req (this will also be linked in your Allocadia line item’s detail panel)
- PLEASE NOTE - This does NOT mean your Coupa req has been submitted. This is taking you to the actual req in Coupa to review and you will still need to submit the req in Coupa.
- Click on your Coupa req link and review
- At this point you can make any adjustments needed and even add an approver
- When you are ready to submit your req, click
Submit
If submitting a multi-line item Coupa req
- Click
Add Another - Use the drop down to find the additional line item you are linking
- Click
Add Item - Follow the instructions above for filling in the fields for that additional item
- Repeat until you have all of the line items added
- Click
Submit - The system will provide you with the link to your Coupa req (this will also be linked in your Allocadia line item’s detail panel for each line item of your Coupa req)
- PLEASE NOTE - This does NOT mean your Coupa req has been submitted. This is taking you to the actual req in Coupa to review and you will still need to submit the req in Coupa.
- Click on your Coupa req link and review
- At this point you can make any adjustments needed and even add an approver
- When you are ready to submit your req, click
Submit
7b4a0f37)
