Getting Started With CI/CD for Data Science Pipelines
Our Approach to Using CI/CD For Data Science
Training Models
When it comes to training models, there are trade-offs to training on your local machine vs. training via CI. Our approach is flexible to allow a user to do both.
-
When executing training runs on your local machine users will be able to:
- Execute training code using local resources and python builds specific to the machine
- Log experiments in your preferred experiment tracker
- Upload model artifacts to your preferred model/package registry
- Commit changes to the repository that will not trigger a CI pipeline
-
When executing training runs remotely using GitLab CI/CD, users will be able to:
- Select CPU or GPU compute instance based on the needs of your model
- Automatically detect and rebuild the training CI image based on changes to the Dockerfile
- Log experiments in your preferred experiment tracker
- Upload model artifacts directly to the GitLab package registry
- Automatically report model metrics in the training issue or merge request, for review by others.
- Commit changes to the repository and automatically trigger the training CI pipeline based on a specific commit message
- Training CI pipeline only executes with the following commit message:
train <path/to/notebook/your_notebook.ipynb> - Allows the pipeline to execute just the desired notebook
Advantages of Using CI for Training Data Science Models
- Reproducibility
- Automation
- Speed
- Model metrics reporting directly in Merge Request
- Scalable GPU and CPU resources
Getting Started
This section covers, in detail, the mechanisms behind how this pipeline is created and configured. If you are just interested in getting your data science CI pipeline up and running, skip directly to the Step-by-Step Instructions
Repository Files
Within our public GitLab Data Science CI Example repository are the following:
- .gitlab-ci.yml: This is the CI/CD configuration file that define the jobs that define the jobs that should be run in the pipeline
- Dockerfile: Instructions for creating the docker image. Here we are using python 3.9 running on Ubuntu 22.04 with CUDA drivers for GPU
- requirements.txt: The python packages to install in the docker container
- config.yaml: Configuration for training notebook
- notebooks directory: contains training notebook
The Pipeline Jobs
- build-ds-image: activated whenever changes are added to the Dockerfile or requirements.txt files. This will rebuild the image used to train the model
- train-commit-activated: To execute a training pipeline. Activated by using the
train <path/to/notebook/your_notebook.ipynb>commit message - cml (Optional): Write model metrics as a comment to the merge request.
The Setup
Let’s take a detailed look at the repository (Code -> Repository):
- In the notebooks directory, open training_example.ipynb. We do not need to change anything in here, but note the first cell of the notebook. Papermill will be used to execute this notebook in the CI pipeline and this cell has been tagged as
parametersto allow Papermill to change these values. There are 3 variables with preset values:is_local_development = True: The default assumption is that the notebook is being run locally. The CI pipeline will modify this value toFalseautomatically so the notebook can be optimized to run in CItree_method = 'auto': The default value for xgboost. The CI pipeline changes this value togpu_histwhen running in CI to take advantage of the GPU runners. The assumption that is the model will train via CPU when run locally due to lack of a compatible local GPUnotebook_dir = 'notebooks': The directory of the training notebooks. This value is the same locally as it is the CI pipeline.
- To see exactly how the CI pipeline changes these values, now let’s view .gitlab-ci.yml. Search for
train-commit-activated. This is the most important stage in the CI pipeline. A few things to note:image: $CONTAINER_IMAGE: The training job will use the container created in the build job (as defined bybuild-ds-image), using the Dockerfile and requirements.txt files in the repository.tags: - saas-linux-medium-amd64-gpu-standard: Specifies which runner to use. In this case, one of the GPU runners.script: ... - papermill -p is_local_development False -p tree_method 'gpu_hist' $notebookName -: Tells papermill to override the variable values defined in the first cell of the notebook with the values shown and discussed above.
- Finally, let’s look at the config.yml. Here we can configure certain variables for training our model:
outcome: Our outcome/target/dv variable. The example notebook is using the breast cancer dataset from scikit-learn and the outcome field in that dataset is namedtargetoptunaconfigurations: The example notebook runs an xgboost model with Optuna. There are a lot of customizations that are possible with this setup, but to keep it simple, we have only included:n_trials: Number of trails to run in the Optuna studymodel_file_name: The output name of the joblib model file
- `mlflow’: There are a few configurations you can make here if you like, but the defaults will also work fine
experiment_name: Name of your MLFlow Experimentrun_name: ID or name of the MLFlow Experiment Run
Step-by-Step Instructions
-
Fork the public GitLab Data Science CI Example repository. Forking will allow you to further customize the code to meet your own needs.
-
Optional (but recommended) Configurations:
- Experiment Tracker: This will allow you to log your experiments in the native Experiment Tracker (or MLFlow instance) and log the model artifacts to the package registry.
- Review the MLflow Client Compatibility Instructions to set up the
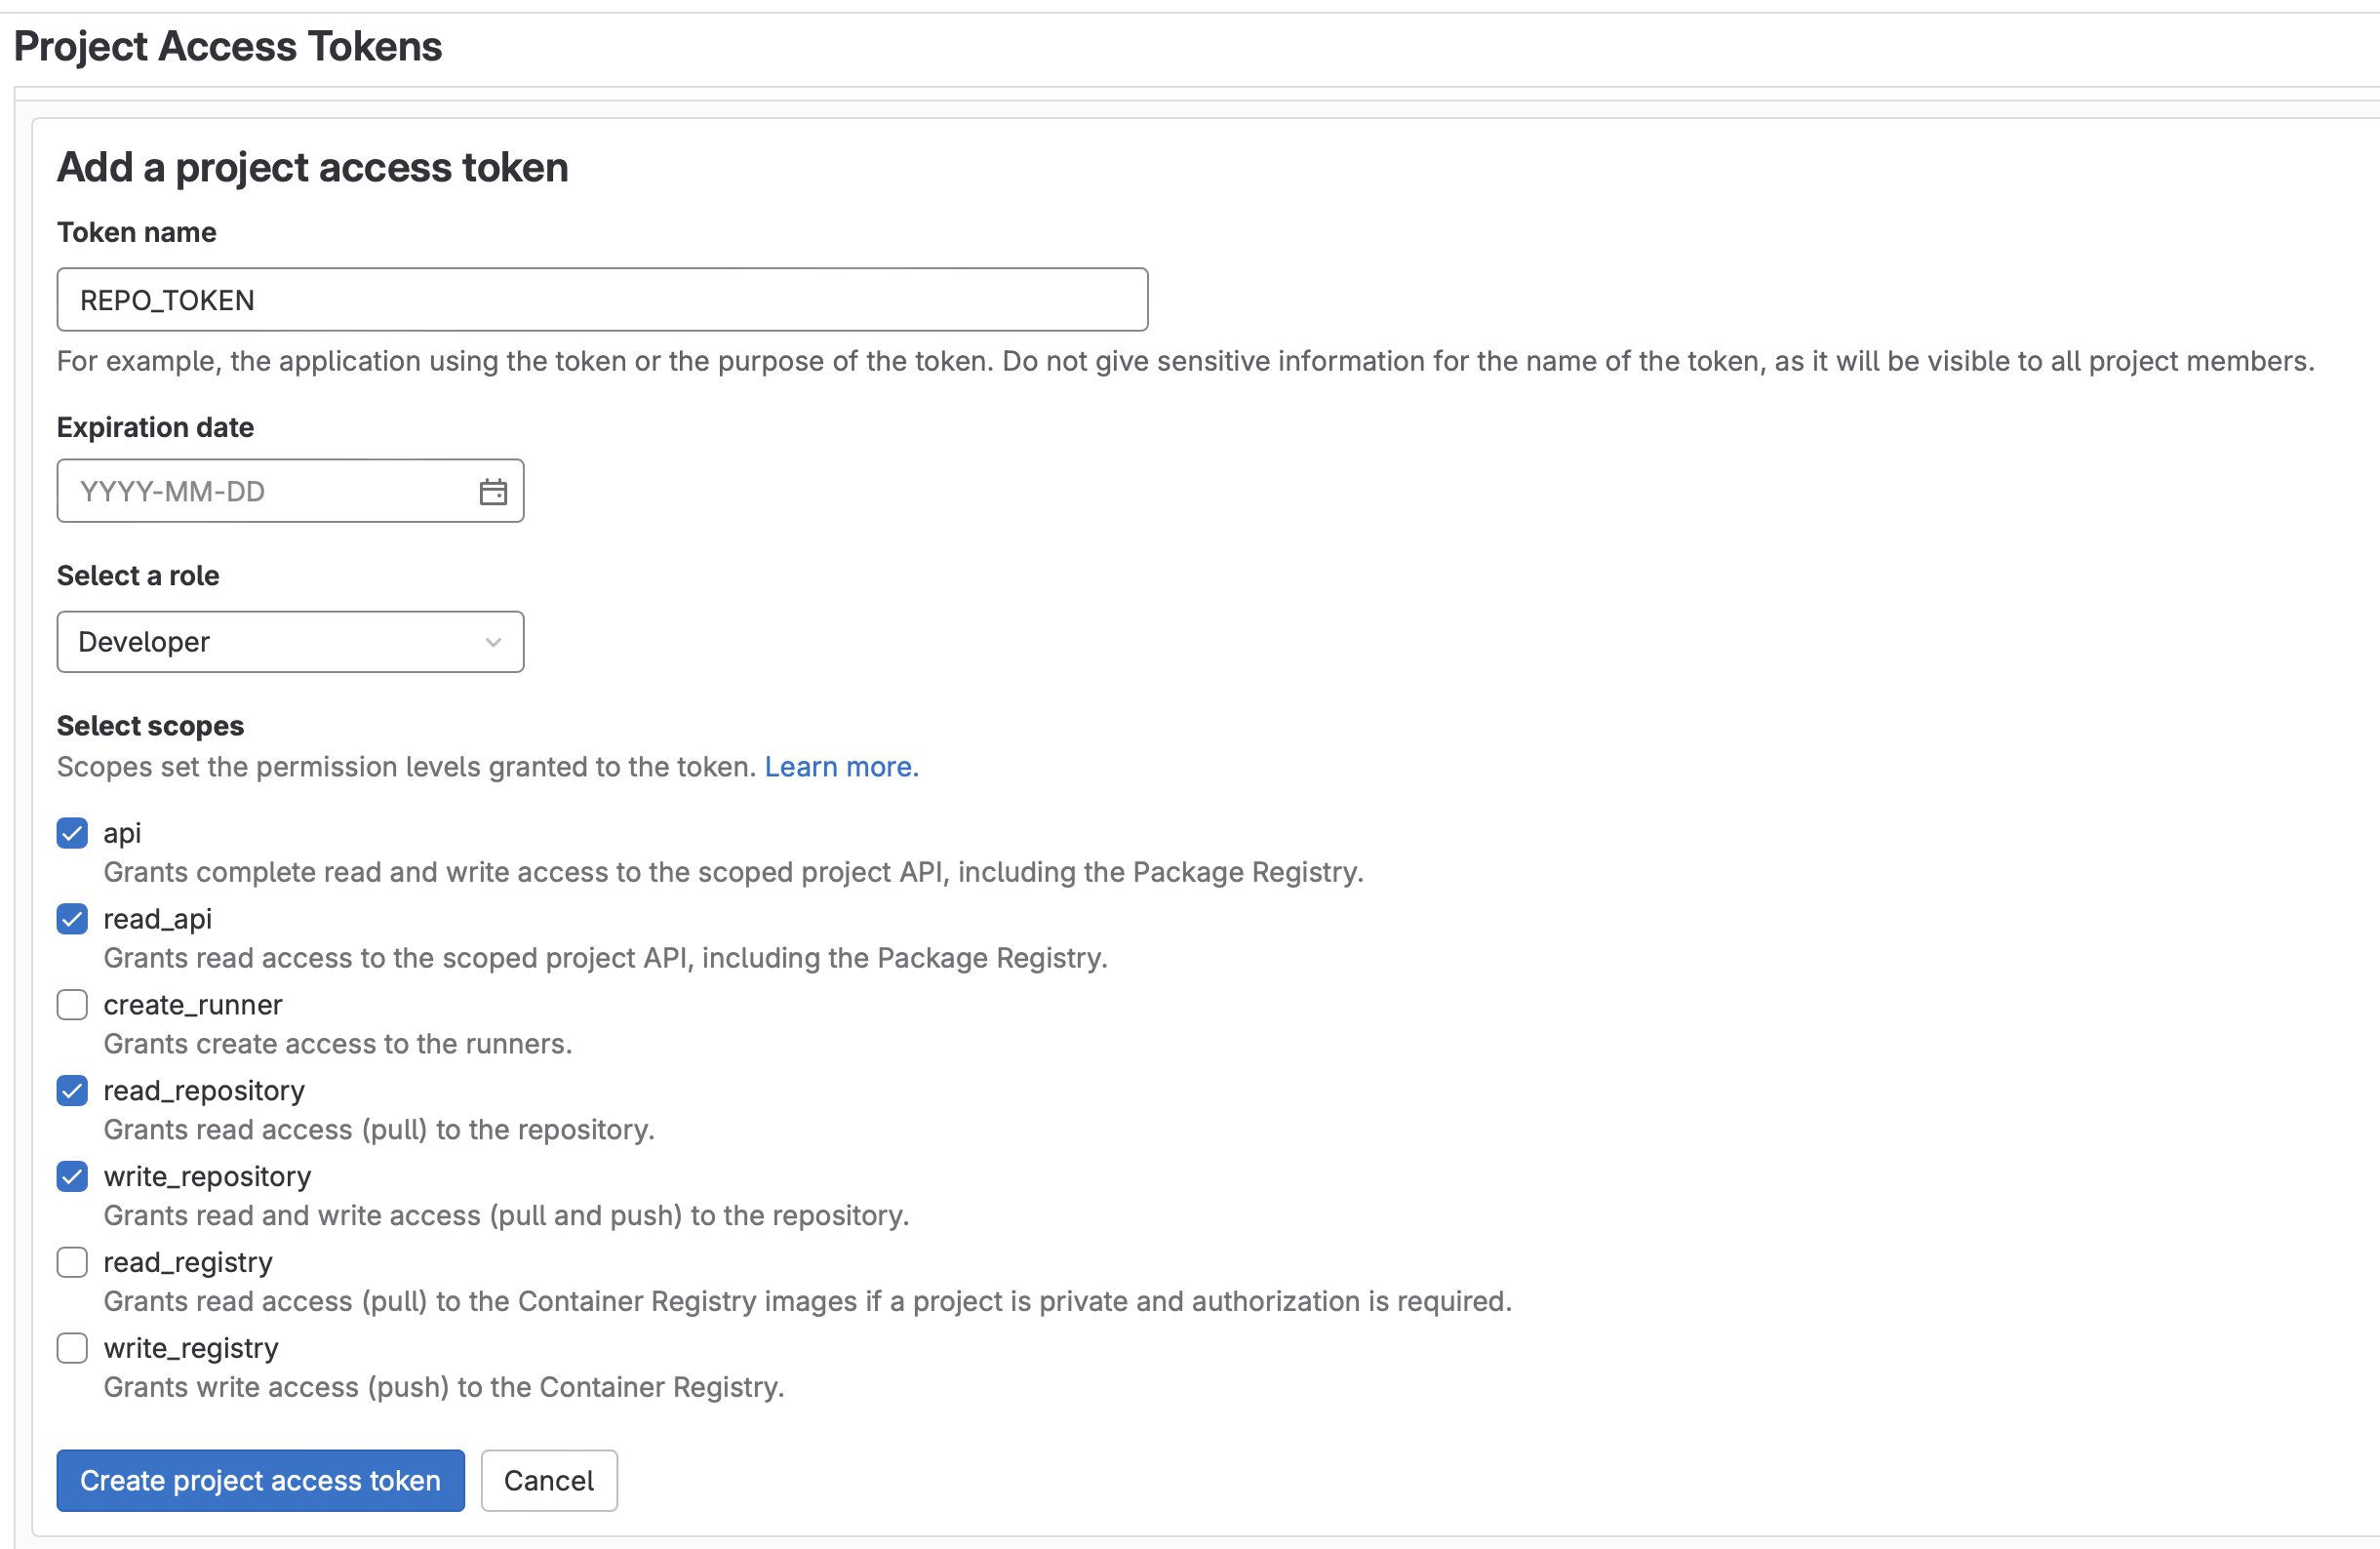
MLFLOW_TRACKING_URIandMLFLOW_TRACKING_TOKENCI/CI in your project. - Create a project access token (Settings -> Access Tokens -> Add New Token) named
REPO_TOKENwith aDeveloperrole and the following scopes:api, read_api, read_repository, write_repository. Be sure to copy this token- Note: Enabling group access tokens is a not available for SaaS Free accounts. If using a Free account, you will need to fork the project into a personal (instead of a group) namespace
- Note: Enabling group access tokens is a not available for SaaS Free accounts. If using a Free account, you will need to fork the project into a personal (instead of a group) namespace
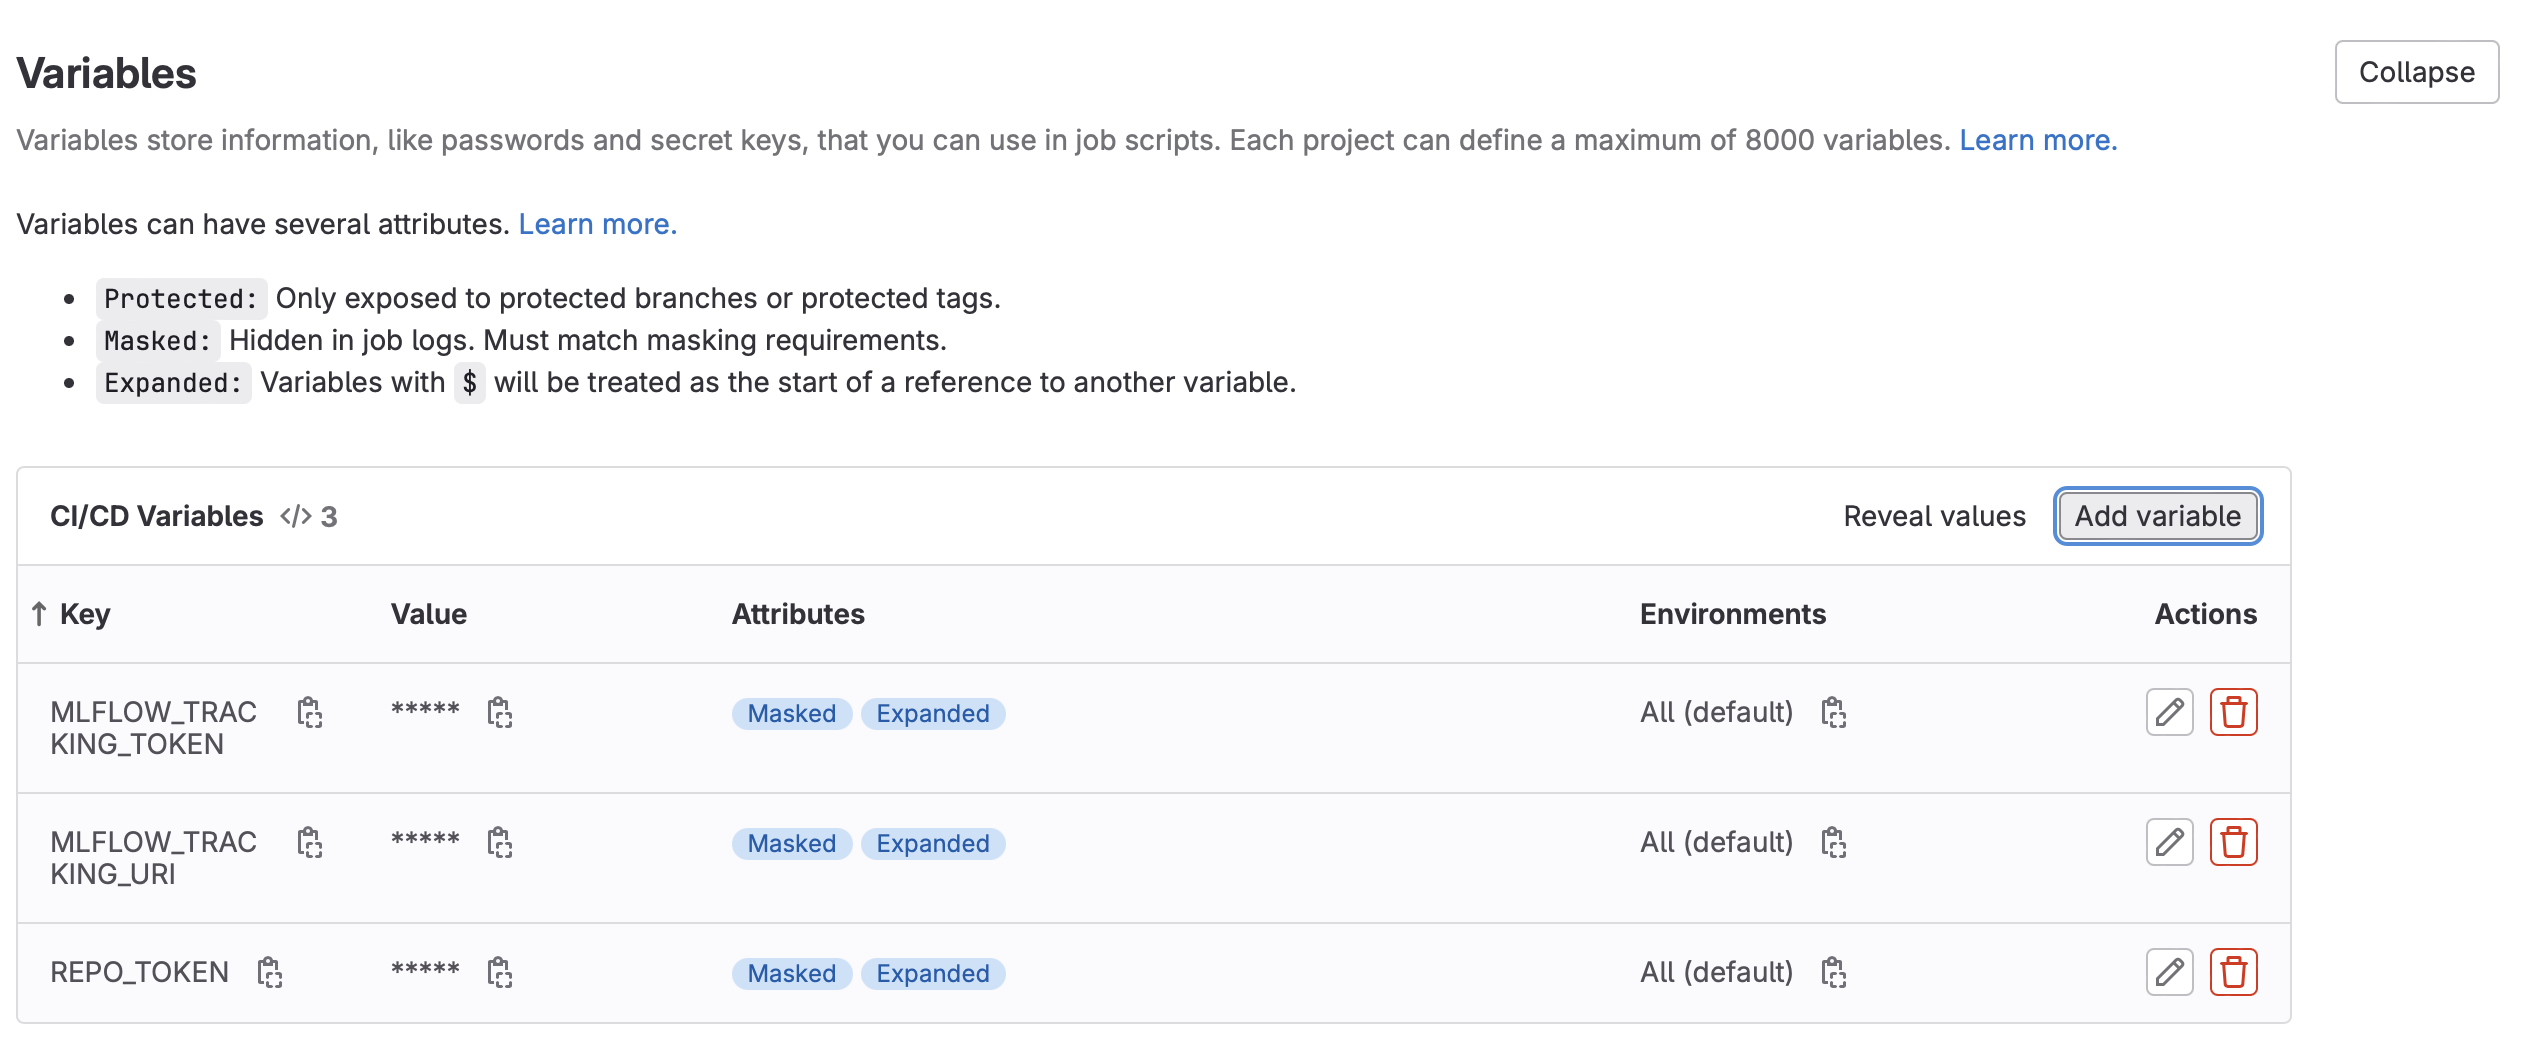
- Create the following new CI Variables (Settings -> CI/CD -> Variables -> Add New Variable):
MLFLOW_TRACKING_TOKEN: For the value, enter the project access token value created above.MLFLOW_TRACKING_URI: For the value, use the GitLab API MLFlow endpoint as outlined in the MLFlow instructions above. For example,https://gitlab.com/api/v4/projects/<your_project_id>/ml/mlflow. Project ID can be found in Settings -> General- Note: Untick the “Protect Variable” flag to enable experiment tracking on unprotected branches
- Review the MLflow Client Compatibility Instructions to set up the
- Write Model Metrics to Merge Request
- Create the following new CI Variable (Settings -> CI/CD -> Variables -> Add New Variable):
REPO_TOKEN: For the value, enter the project access token value created above.- Note: Untick the “Protect Variable” flag to enable experiment tracking on unprotected branches
- Create the following new CI Variable (Settings -> CI/CD -> Variables -> Add New Variable):
- Experiment Tracker: This will allow you to log your experiments in the native Experiment Tracker (or MLFlow instance) and log the model artifacts to the package registry.
-
Now, let’s make some changes to activate our training pipeline:
-
Create a new branch (Code -> Branches -> New Branch)
-
-
First let’s make sure the
build-ds-imagewill get triggered, which will build the container our model will run in. This job of the pipeline is only activated when changes are detected in Dockerfile or requirements.txt. So let’s make a change:- Edit Dockerfile, replacing the maintainer value with your GitLab handle and commit the change to your branch.

- Edit Dockerfile, replacing the maintainer value with your GitLab handle and commit the change to your branch.
-
If running from a Free account:
- GPU runners are available at the Premium and Ultimate tiers. If using a Free account, also edit
.gitlab-ci.ymlto switch to a shared CPU runner - Change the
train-commit-activatedtag:fromsaas-linux-medium-amd64-gpu-standardtosaas-linux-small-amd64. This can also be used to scale up or down the runner as needed. - Under
script, changepapermill -p is_local_development False -p tree_method 'gpu_hist' $notebookName -topapermill -p is_local_development False $notebookName -. This defaults the notebook to using CPU rather than GPU.
- GPU runners are available at the Premium and Ultimate tiers. If using a Free account, also edit
-
Edit config.yaml
- Change
n_trialsto a new value between10and20. - For the commit message enter
train notebooks/training_example.ipynb. This will tell the GitLab that you want to execute the training CI pipeline on the training_example.ipynb notebook found in the notebooks directory. Commit the change.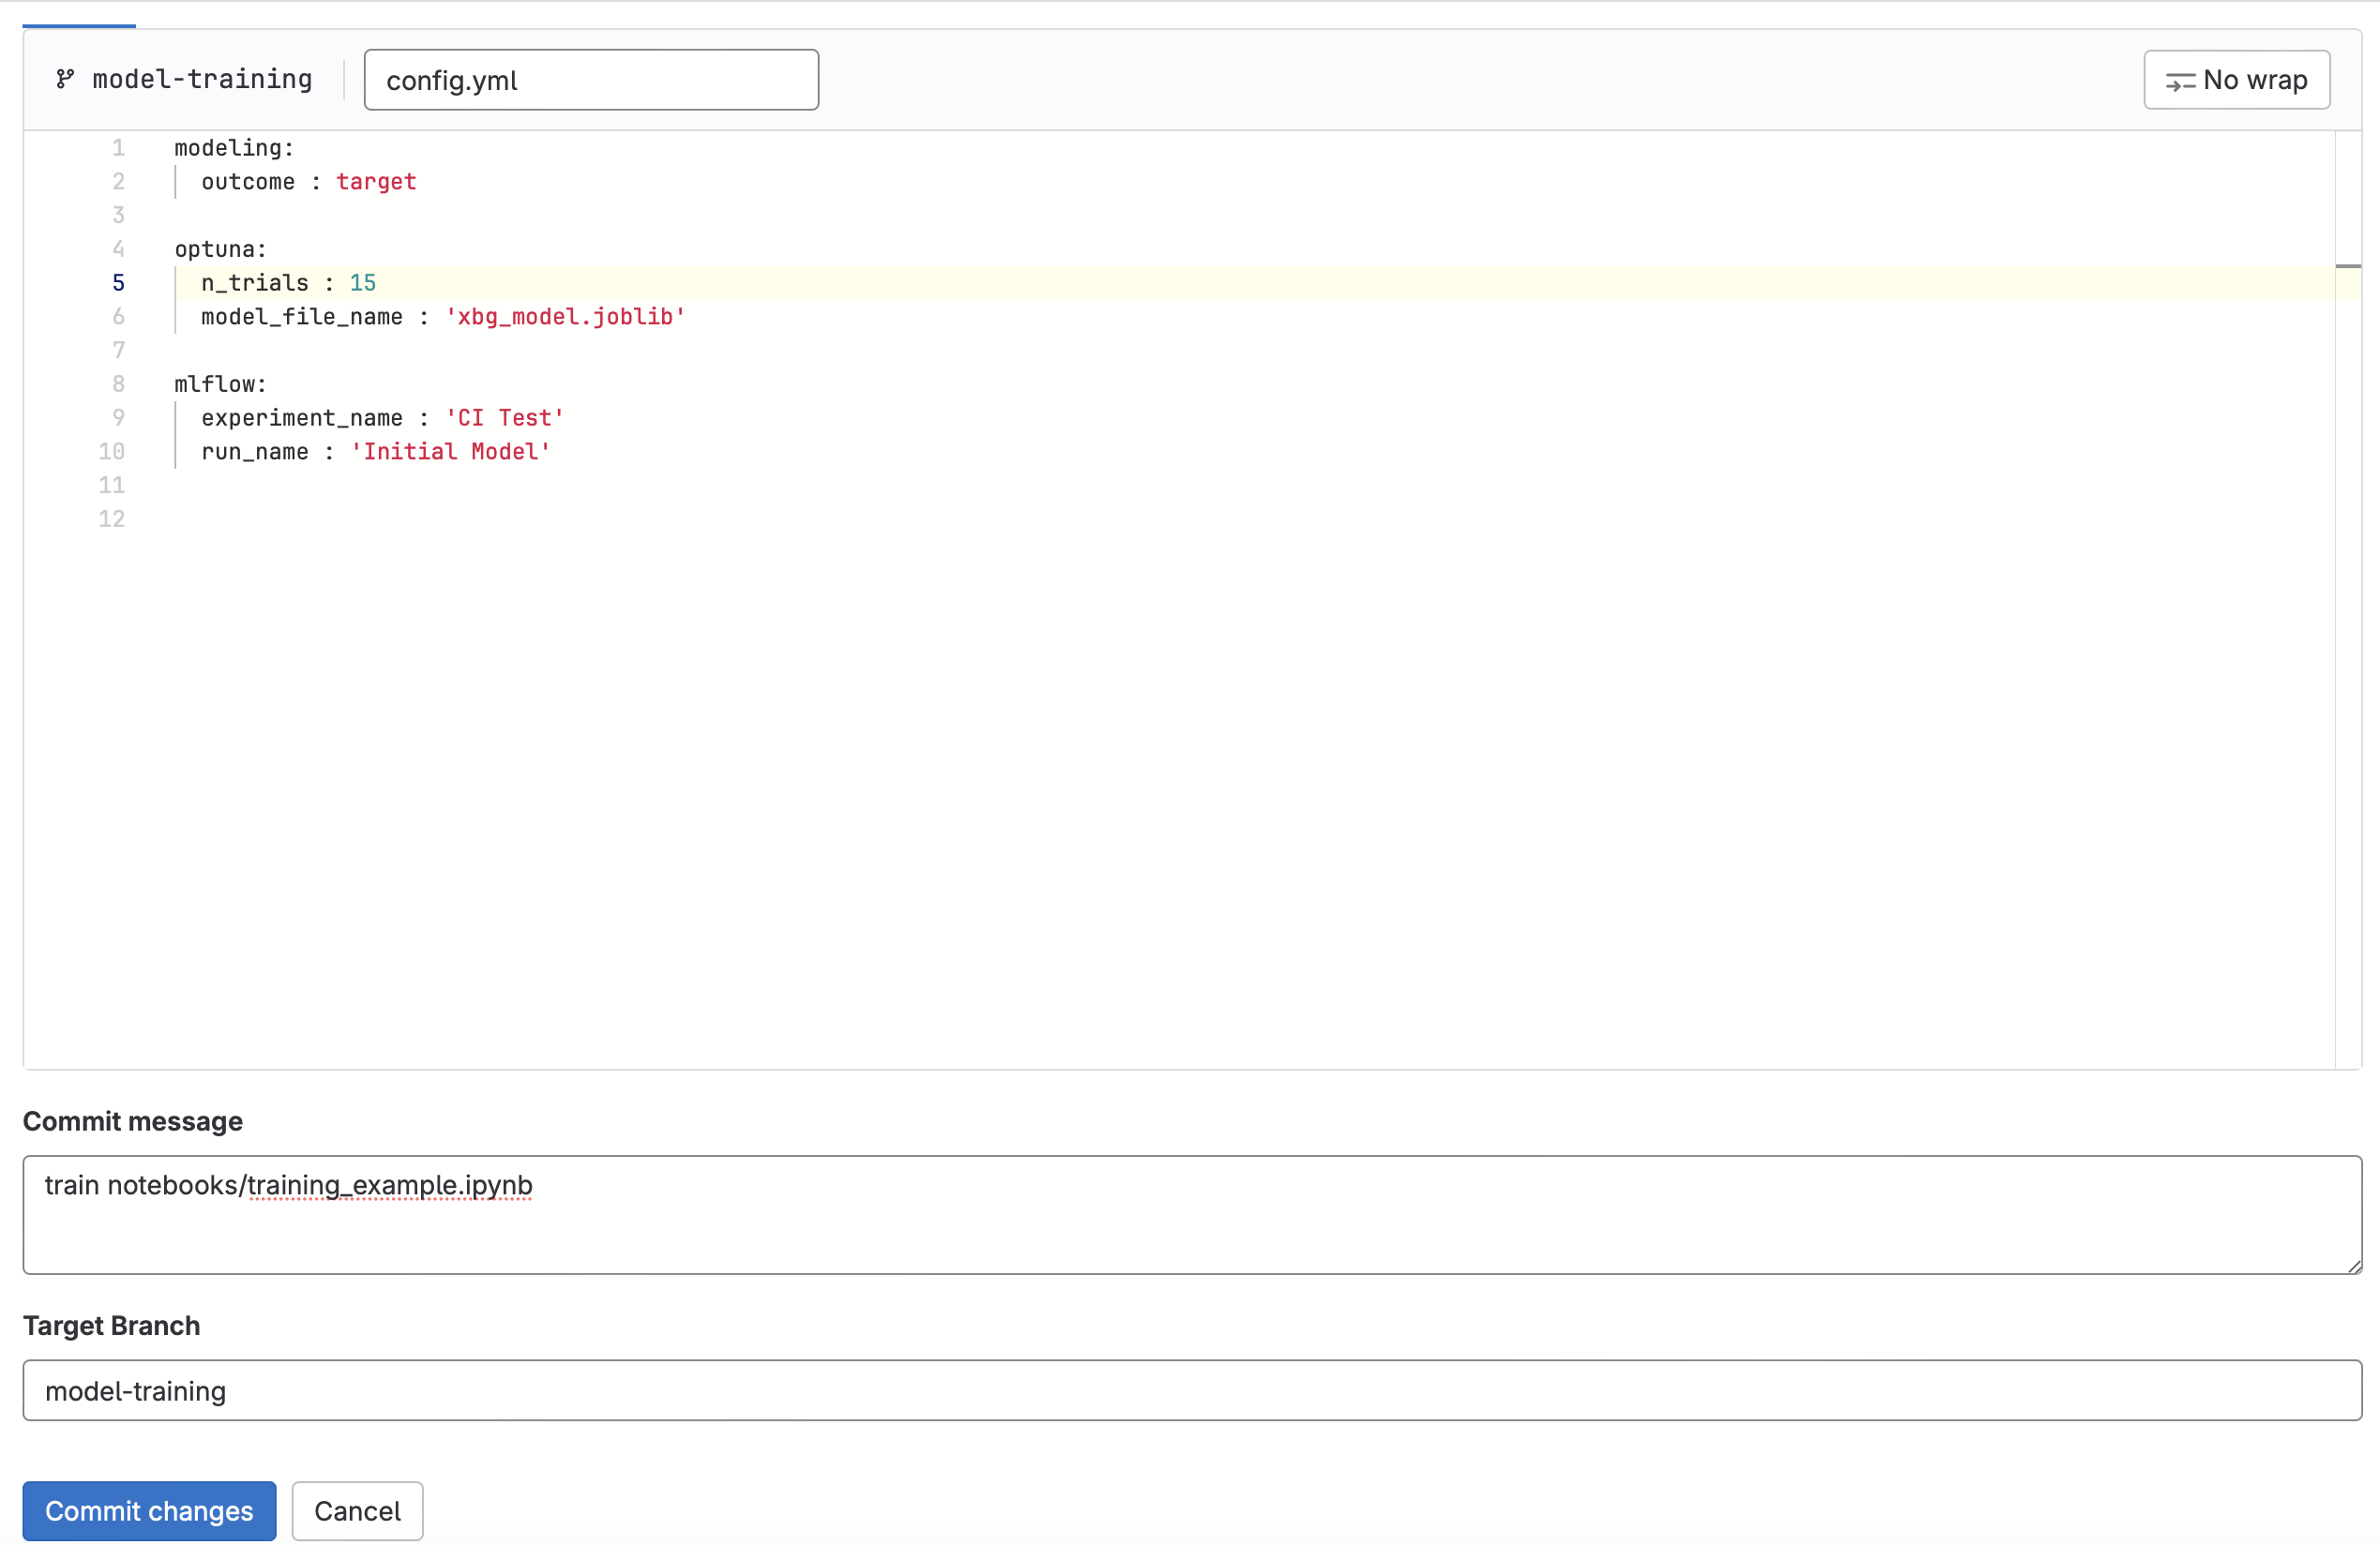
- Change
-
Click “Create merge request”. Make sure you are merging into your local fork and click “Create merge request” once again. This should activate the training CI pipeline for the newly created MR.
-
Click on “Pipelines” and you should see the training pipeline running. Click into the pipeline to see which which stage the pipeline is in.
- Note: If you did not set up Write Model Metrics to Merge Request above, then the
cmljob will fail. The pipeline will still pass with warnings
- Note: If you did not set up Write Model Metrics to Merge Request above, then the
-
Once the pipeline has finished, you will see a new comment posted on the merge request that contains some model metrics from the run (assuming you set up Write Model Metrics to Merge Request).
-
-
Now let’s look at the experiment run we just completed with our CI pipeline (Analyze -> Model Experiments)
- Click on your experiment name.
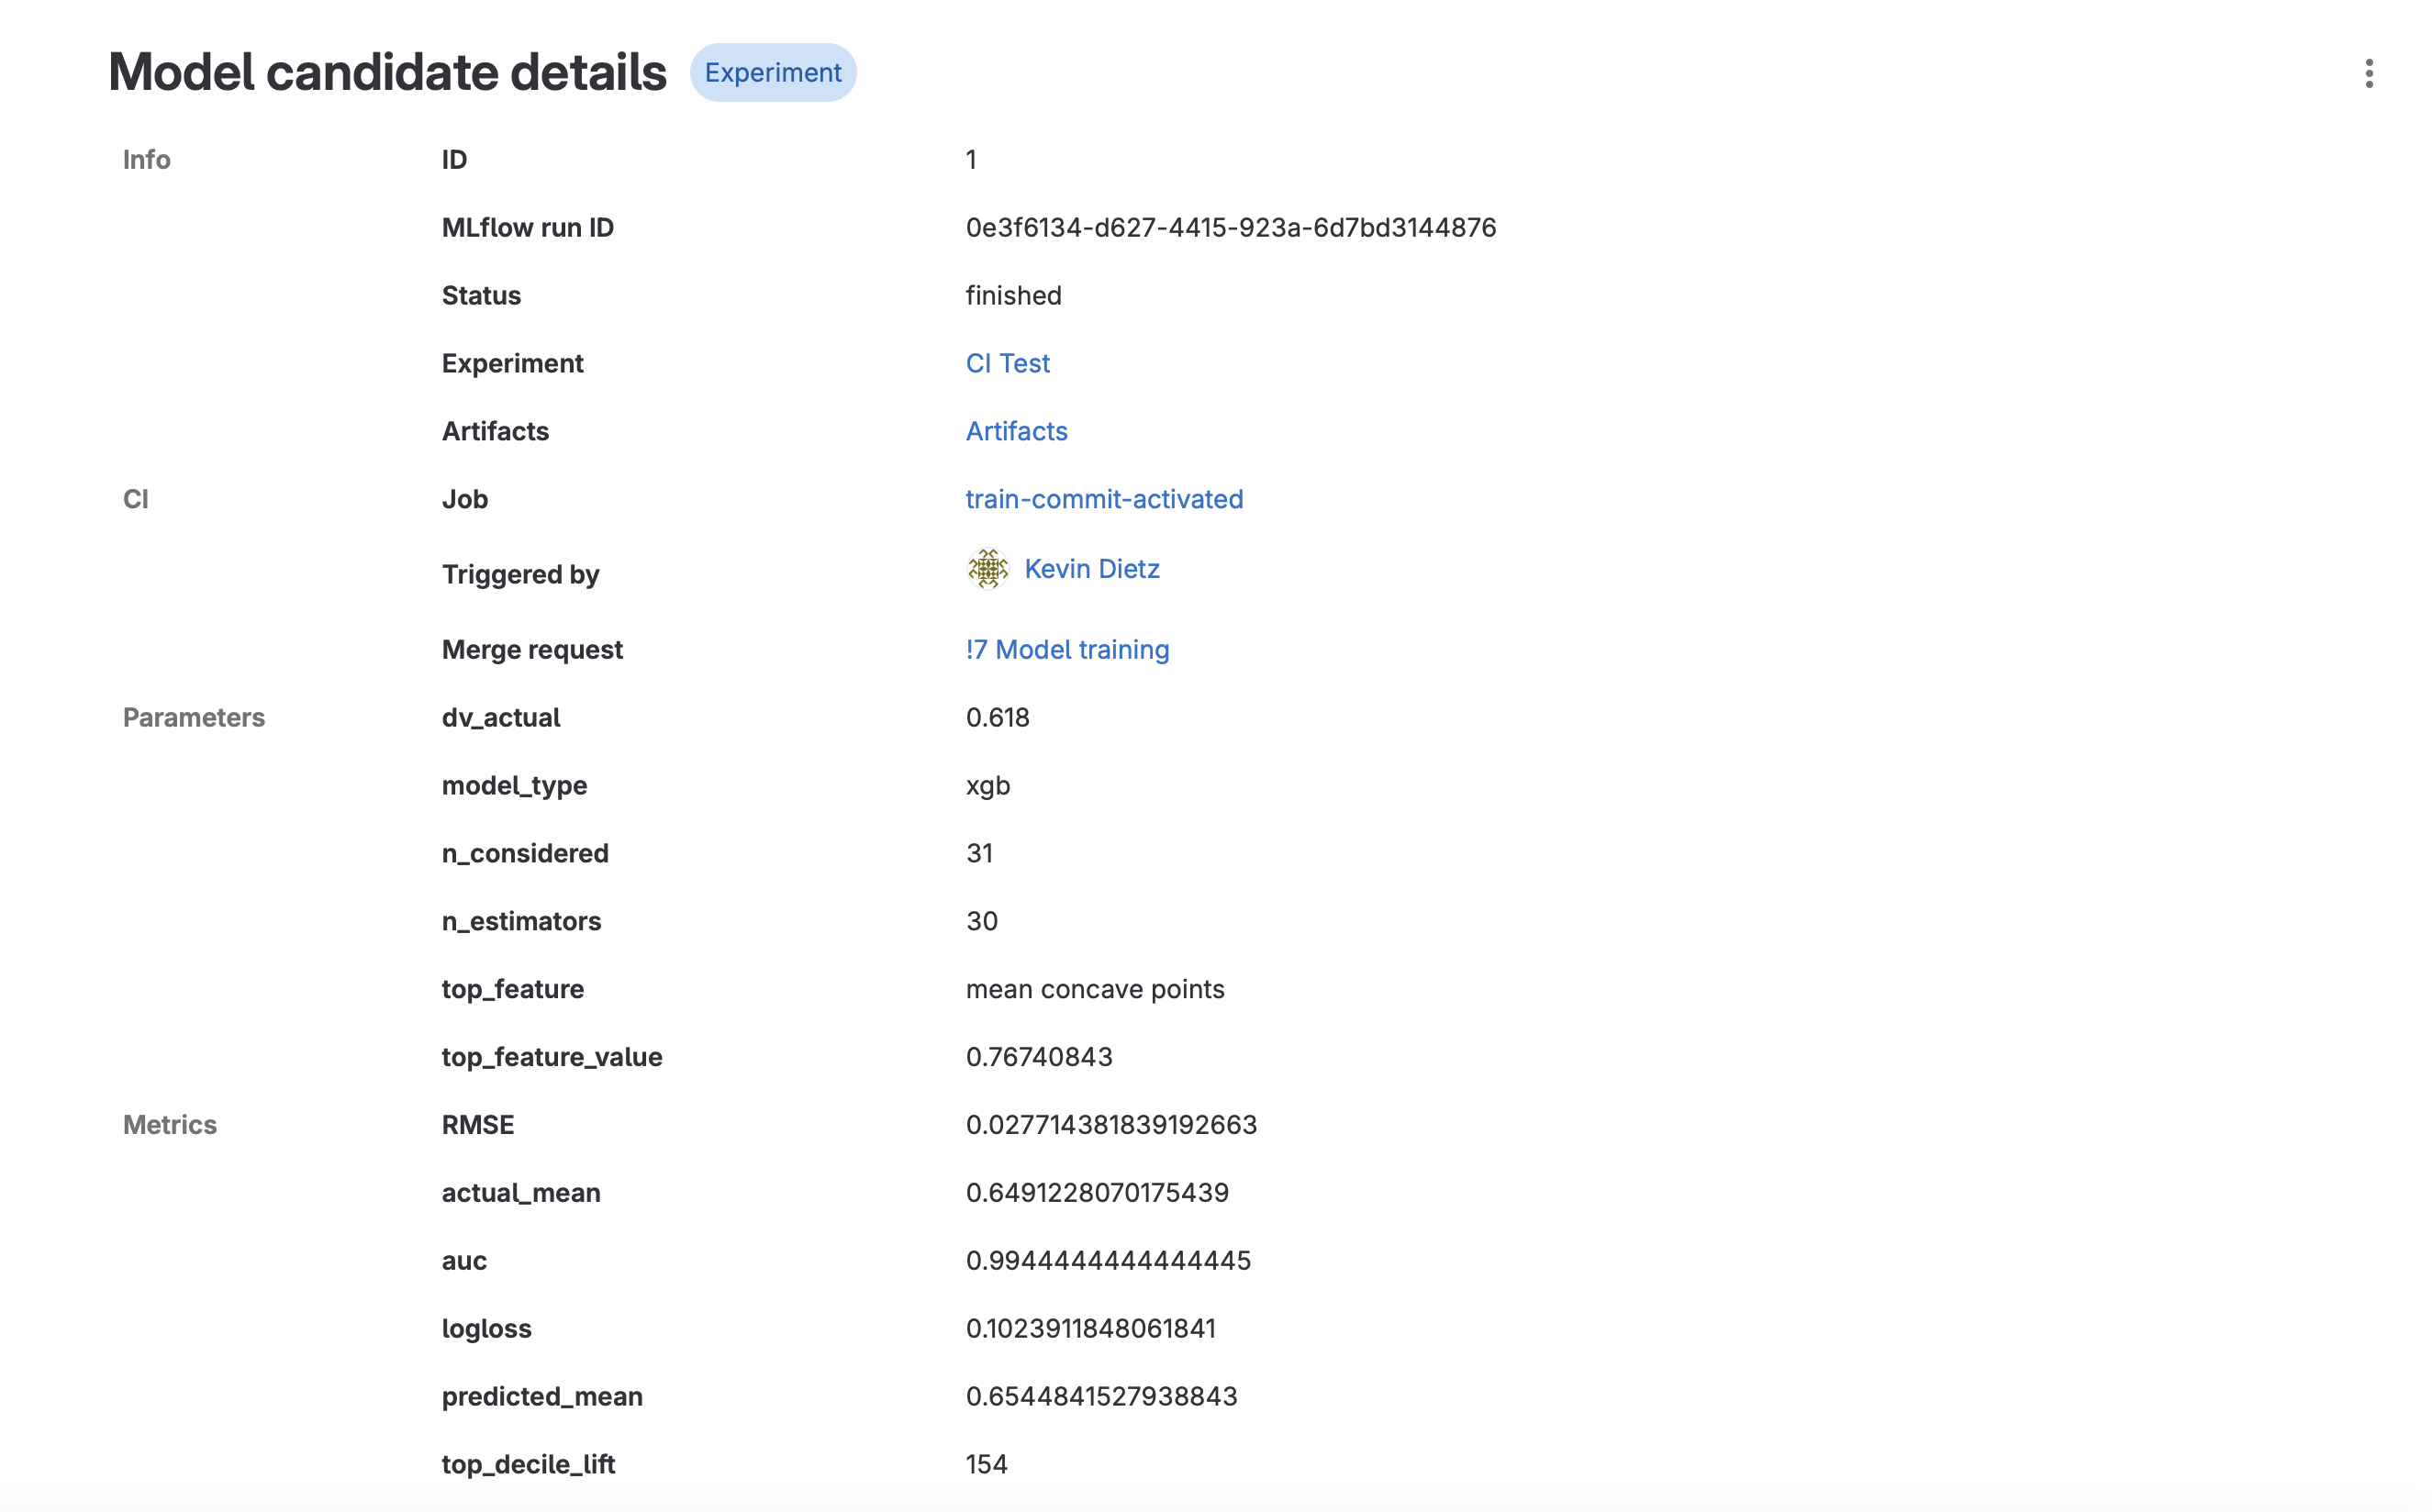
- You should see a new run logged from the CI Pipeline. Click into that run.
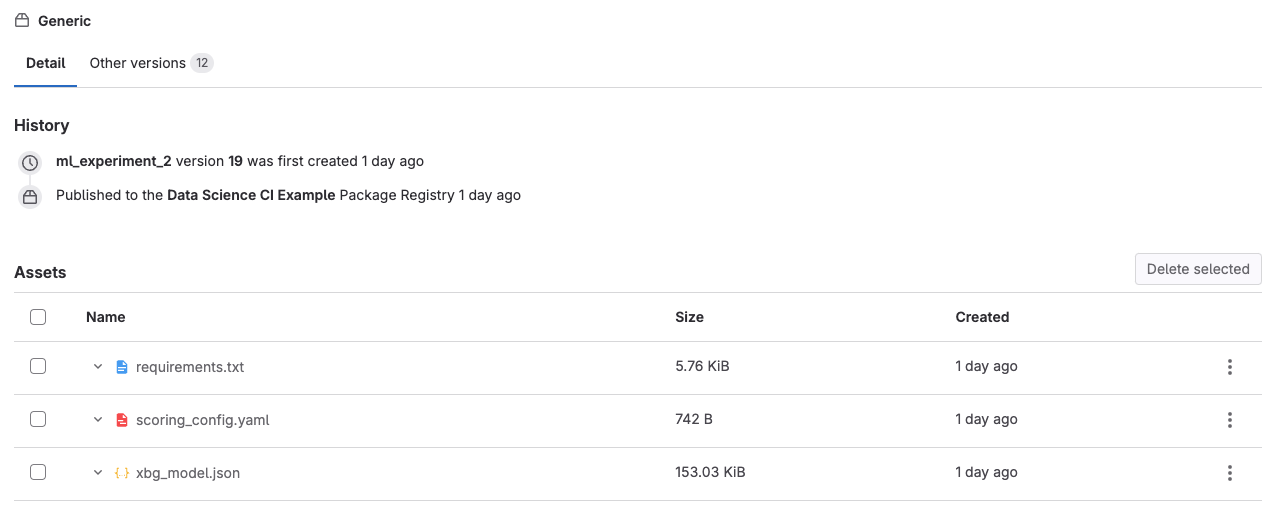
- Run details are displayed, including a link to the CI job, the merge request, various parameters and metrics, and model artifacts.
- Click on “Artifacts”. This will take you to the Package Registry, where all the artifacts associated with that particular model run are stored. You should see the joblib model file and a requirements.txt. These can be used later to deploy your model.
-
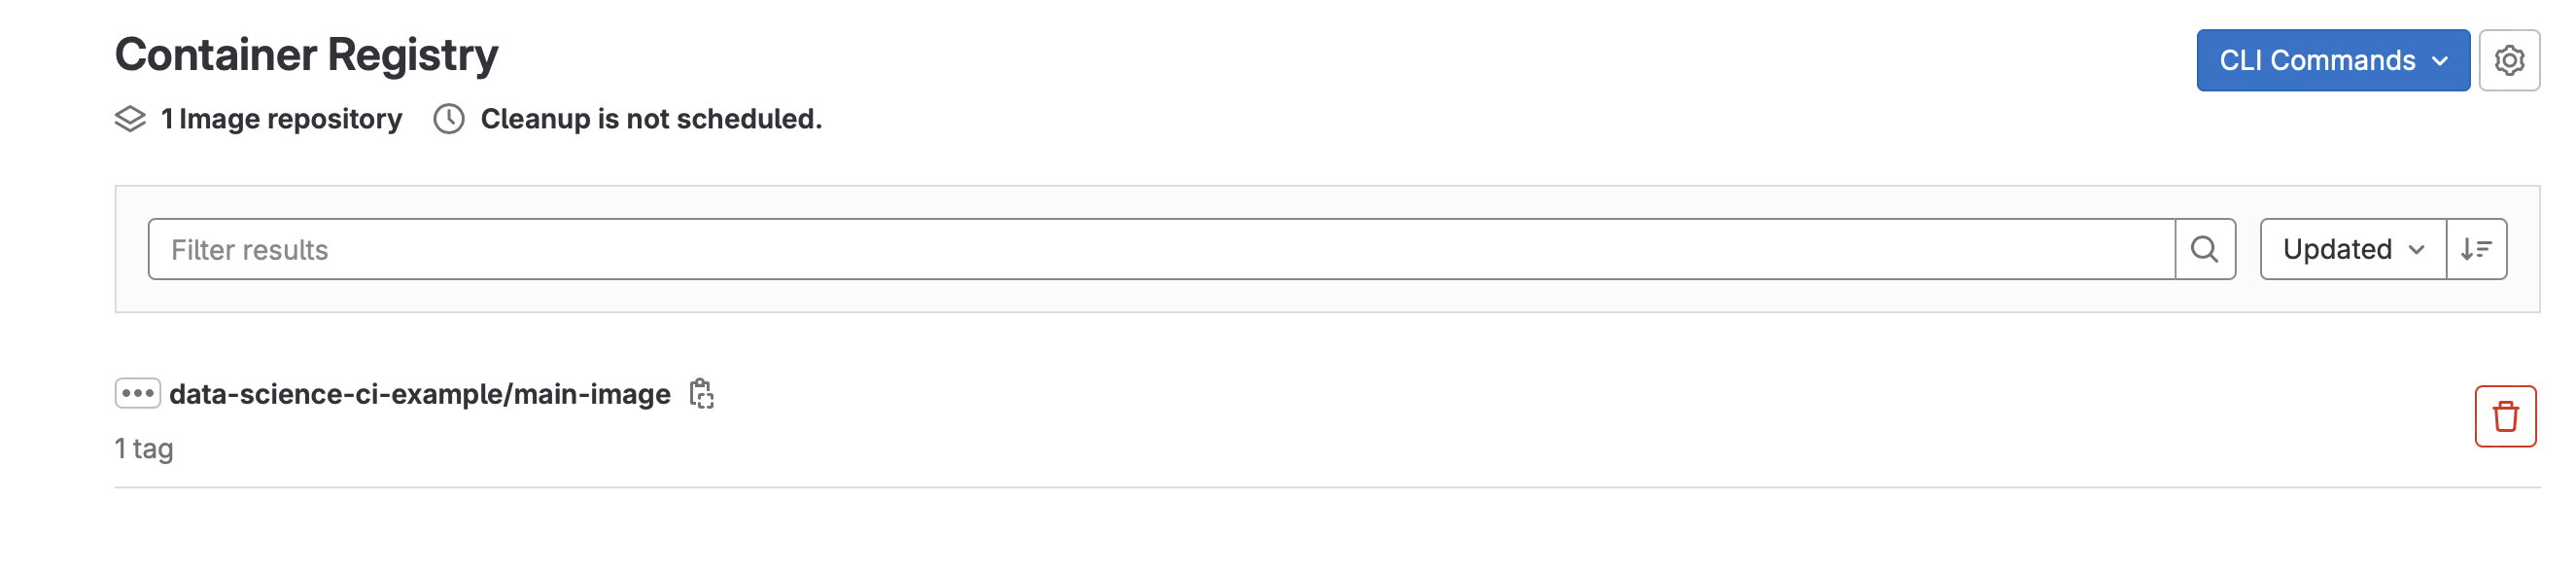
Finally, let’s look at the container that was used to train the model (Deploy -> Container Registry)
- This container will be used in subsequent runs of the model and will only get rebuilt when Dockerfile or requirements.txt are modified.
- This container will be used in subsequent runs of the model and will only get rebuilt when Dockerfile or requirements.txt are modified.


And that’s it! Feel free to modify this pipeline and notebook to fit your data science modeling needs. And be sure to check out all the other great data science resources on our Data Science Handbook Page. Happy pipelining!
3c222108)
