Zoom
In general
Zoom is an important part of GitLab’s strategy for communication between team members. As such, extra care needs to be given to ensure the safety and integrity of data.
A note on privacy and security
There have been a number of security researchers looking at Zoom, which has resulted in numerous articles (some quite sensational) regarding the privacy and security of the product. Here are a few important things to keep in mind, especially as you read through the Zoom tips below:
- Always ensure your operating system as well as the Zoom application are up-to-date with the latest patches.
- Ensure you’ve followed the laptop configuration guidelines.
- Make a customized Personal link.
- Enable the “Waiting Room” for your meetings.
- You can set a password for your meetings, but remember if your meetings are in your calendar, anyone who can view your calendar will see the password if you include it in the meeting invite. Calendars should only be made available to other GitLab team members. See this tip for more details. Use caution when sharing calendar events with customers and trusted third parties. Public meetings such as webinars can use a password if you prefer, but use this in conjunction with the Waiting Room so the meeting host can approve each attendee.
- It is recommended to include an embedded password in the URL, so if you’re using this option do not share this URL publicly.
- Starting 2020-09-27, all meetings will be required to have a Passcode or a Waiting Room enabled.
- With Zoom version 5.4.7, you can selectively turn on the requirement that meeting attendees must be authenticated to join a meeting (not recommended for customer-facing calls or recruitment interviews). There is a Zoom article with more information.
- Zoom supports end-to-end encryption if no Zoom connectors are in use. More details can be found here. GitLab makes use of Zoom connectors for telephones, whenever we do webinars, and the vast majority of group meetings that end up on YouTube. Any time we are livestreaming via YouTube, we are using a connector. Any time we are recording a meeting, we are using a connector. If you need to ensure end-to-end encryption in a Zoom meeting either because of a customer request or some possible compliance reason, only use Zoom clients, do not use telephony, and do not record the meeting.
- During a meeting, the host has a “Security” button at the bottom of the screen. This can be used to turn off and on the Waiting Room and to “lock” a meeting to prevent others from attending. Use these as needed to secure your meeting.
Also note there has been an increase in what is know as “Zoombombing” which involves an uninvited party trying to brute force their way into an existing Zoom meeting.
- At the time of this update, a global pandemic is occurring which has dramatically increased both the usage of Zoom for legitimate users, and the number of individuals doing Zoombombing.
- Zoombombing parties are occuring where individuals are sharing tips and information online regarding meetings to access.
- Tools are being written to automate some of the steps in finding open and unprotected meetings.
- Simple steps such as a Waiting Room, a meeting password, and only allowing authenticated meeting attendees can easily prevent such activity. To this end, by default we now turn on passwords for all meetings. To ensure these settings are in place, navigate to your Zoom browser extension settings, and ensure that both “One-time Meeting ID” and “Require Meeting password” are checked.
- Most of the recommendations given here are defaults as set by IT Ops, but always double-check to ensure a safe Zoom meeting.
GitLab’s Zoom account has End-to-End Encryption enabled. This may impact performance, so if you run into any issues, let People Ops know.
If there is a meeting active, a new meeting cannot start until the host ends the meeting or all participants leave, so you can only be in one meeting at a time. The People Ops or IT Ops teams can force end a meeting by logging into Zoom with the credentials in 1Password, going to My Meetings, finding the meeting they would like to end, then selecting “End.” This will allow the next meeting to begin.
Zoom Setup
Sign up for your default Zoom Pro account in Okta. All team members should have a Zoom Pro account by default. Before diving into sections below, please ensure that you’re logged into your GitLab account within your Zoom app.
Updating Zoom
Preferred minimum version for Zoom: 5.13.5
macOS
- Open the Zoom app on your computer.
- In the menu bar, click on
zoom.us(top left corner of your screen). - Click on
Check for Updates...
Linux
- Open the terminal, type in the following command and press Enter to install GDebi.
sudo apt install gdebi- Note: GDebi is usually installed by default on most Ubuntu-based distros. If you’re using Debian and get an error saying you are “not in the sudoers file”, run the following commands to install sudo, then try installing GDebi again.
su -thenapt install sudo
- Note: GDebi is usually installed by default on most Ubuntu-based distros. If you’re using Debian and get an error saying you are “not in the sudoers file”, run the following commands to install sudo, then try installing GDebi again.
- Enter your admin password and continue the installation when prompted.
- Download the DEB installer file from our Download Center.
- Double-click the installer file to open it using GDebi.
- Click Install.
- Enter your admin password and continue the installation when prompted.
Sign into the Zoom app
- Go to Okta
- Click on the
Zoom SSOtile. - Open the Zoom app on your computer.
- Click on
SSO. - Enter
gitlab.zoom.usfor the company domain.
Install the Zoom app (on your Mac)
- Open the
Self Serviceapp - Scroll down for the Zoom choices in the
Browsesection, or search forZoomusing the search box- On an Apple Silicon Mac (e.g. M1/M1 Pro/M1 Max) click
InstallonZoom M1 - On an Intel Mac click
InstallonZoom Intel
- On an Apple Silicon Mac (e.g. M1/M1 Pro/M1 Max) click
- Open the Zoom app and sign in
How to test audio and video in Zoom
Before using Zoom for the first time, it is recommended to test your audio as well as test your video. Zoom even has its own test that you can utilize to ensure everything is set up correctly.
Enable captions and live transcription
If you are the meeting host, consider enabling live transcriptions for accessibility. Live transcription is not enabled by default, and must be enabled manually for each meeting:
- In the Zoom toolbar, select CC (for closed captioning).
- Select Enable live transcription.
If the host is not present, no one can enable live transcription. If you’ve created a meeting but won’t be attending, consider assigning alternative host permissions to someone who will be present, so they can enable live transcription.
Making a customized Personal link
The personal link is used by talent acquisition to schedule interviews, so it is important the default naming convention is used and there is no password set.
- Navigate to the profile page.
- In the Meeting section, you can see your “Personal Link”. Select “Customize”.
- Customize it to
gitlab.firstnamelastname. - Select “Save Changes”.
- Navigate to the meetings page.
- Select the top tab “Personal Room”.
- Towards the bottom of the page, select “Edit” and uncheck the “Passcode” box.
- Select “Save”.
Don’t forget to enable the Waiting Room so unauthorized attendees cannot join your zoom room.
Adding your title to your name
Since Zoom doesn’t display the job title field during meetings, it is recommended that you add your job title, department, and team name (if applicable) as part of the display name field.
For example, if your name is Art VanDelay and your role is Backend Engineer within the Source code group, you can write display name: Art VanDelay - Backend Engineer (Create:Source Code).
- Navigate to the profile page
- Click on
Editon the far right of your avatar/name - Populate
Display Name - Click on “Save”
While you’re here, you can also choose to set your pronouns and the display options associated. Given our display names include our title, the default behavior of Zoom will put the pronouns at the far right potentially behind an ellipsis if you set How would you like to share your pronouns? to Always share in meetings and webinars or Ask me every time after joining meetings and webinars and choose to share then. You can alleviate this by setting your display name to include your pronouns earlier, for example, Art VanDelay (They/their) - Engineer and then select Do not share in meetings and webinars.
Join meetings with muted microphone
Joining an ongoing meeting with your microphone not muted can cause disruptions. As we sometimes forget to quickly mute ourselves, Zoom provides an option to join calls muted:
- Navigate to
Zoom > Preferences > Audio. - Scroll down and select the box
Mute my mic when joining a meeting.
Set up a shortcut for muting in Zoom
Sometimes you need a hot key to mute/unmute, even when Zoom is not the selected window. Follow these steps to set it up:
- Navigate to
Zoom > Preferences > Keyboard Shortcuts - Tick the box for
Enable Global ShortcuttoMute/Unmute My Audio - You can map it to any keyboard shortcut such as
F1(Cmd 1)
Recording Zoom meetings in HD
- Navigate to your Zoom profile settings.
- Click on the
Meetingtab in the top menu. - Click on the
In Meeting (Advanced)side tab. - Scroll down to the
Meeting-HD Video Qualitysection and press the toggle. - Select the
Full HD (1080P)radio button. - Press the
Savebutton.
Your settings will now be updated to record zoom meetings in full HD.
Enabling the “Waiting Room” for your Personal Meeting Room
It’s recommended you enable the Waiting Room feature for your personal meeting room to prevent others from joining (in the event of back-to-back meetings, for example). There are a few steps to get this enabled for personal meetings:
- Navigate to the settings page in your browser.
- In the “Meeting” tab under “Security”, find the option “Waiting room” and enable it for all participants.
- Navigate to the meetings page.
- Select the top tab “Personal Room”.
- Towards the bottom of the page, select “Edit” and check the “Waiting Room” box.
- Select “Save”.
Now all meetings that use your Personal Meeting ID (PMI) will require you to “admit” anyone who joins the meeting. If you use this feature, please be sure to note in the meeting invite itself that this has been enabled.
Enable passcodes for all meetings
- Please keep in mind that starting 2020-09-27, all meetings will be required to have a Passcode or a Waiting Room enabled
- Please remember that if you are part of an interview team, your personal meeting room that is used for scheduling interviews should not have passwords on them but should have the waiting room enabled.
- Sign into the Zoom web portal and navigate to Settings.
- In the Security section, verify that your passcode settings are enabled for new meetings, personal meeting ID meetings and instant meetings.
- If the settings are disabled, click the toggle to enable them. If a verification dialog displays, choose Turn On to verify the change.
Enable passcodes for existing meetings
- Please remember that if you are part of an interview team, your personal meeting room that is used for scheduling interviews should not have passwords on them but should have the waiting room enabled.
Method 1 (recommended):
- Once you have identified the meetings that need to be updated and have enabled passcodes for all meetings, go to your Google Calendar
- Edit the calendar event
- Remove the zoom meeting
- Add a new meeting
- Save for This and following events or All events
Method 2:
- Log into Zoom
- Go to
Meetings>Upcoming meetings - Click on the meeting you want to update and scroll to the bottom of the page to find the
Edit this meetingbutton - Under the Security section, check the Passcode box
- KEEP IN MIND: If you add Passcodes within Zoom to an existing meeting, calendar invites will need to be resent to include the Passcode.
Enable authenticated-only meeting attendees
As an added security measure, you can restrict the meeting by requiring any attendee to be authenticated to Zoom with a GitLab zoom account. This is meant to ensure only people who have logged in to Zoom can attend the meeting. This is not recommended for meetings with attendees that are not GitLab team members such as customers or someone interviewing for GitLab employment. It should be noted that this needs to be set up before the meeting, not during the meeting.
Here is a quick video tutorial how to do this:
Steps for a new meeting:
- During the meeting creation, in the Security section there is an option in the Zoom client that says: “Only authenticated users can join: GitLab Internal Only” or select the “Sign in to Zoom” option so users with any Zoom account can join. Click the check box next to this option.
- If you are in Zoom via the browser, the option is still in the Security section but is labeled: “Require authentication to join”.
- Proceed as normal with your meeting creation, and click Save.
- This process only works in the Zoom client or from the gitlab.zoom.us website. If you’re scheduling it within Google calendar, schedule as normal and edit the meeting following the steps in the next section for an existing meeting.
Steps for editing an existing meeting:
- Authenticate into Zoom, either via the client or via the web in a browser.
- Navigate to “Meetings”. In the Zoom client this is at the top, in the browser this is on the left side.
- Find the meeting you wish to change and click on it.
- Click on the Edit button.
- In the Security section, select the option to require authentication, and click Save.
Enable for all future meetingss
- Authenticate into Zoom via the browser at gitlab.zoom.us.
- Select Settings on the left menu.
- In the Security section, scroll down and find “Only authenticated users can join meetings”. Click on the button on the right to turn this on.
- Save your settings with the Save button at the bottom.
- You can still selectively turn it off for a specific meeting by editing that meeting using the steps in the previous section and turning it off.
Meeting Surveys
Enable for all Meeting Surveys
Meeting Surveys is enabled for everyone at GitLab, however to get this to work, you will need to Meeting Surveys feature within your account.
- Sign in to the Zoom web portal.
- Go to your account settings.
- Search for
Meeting Surveyand toggle the feature on.
Add a survey to your meeting
- Go to your meetings.
- Select one of your meetings or schedule a new one.
- If you are editing an existing meeting, click the
Surveytab. If you are scheduling a new meeting, clickSave, then click theSurveytab.- Note: Meeting ID must be generated automatically for this to work, surveys does not work with personal meeting IDs.
- Click
Create new survey. - At the end of the meeting, people will receive the survey to fill out.
Viewing Survey Results
- Go to Reports > Meeting > change the
Registration Reportdrop down toSurvey Report.
Zoom Clips
Enable Zoom Clips
Zoom Clips is enabled for everyone at GitLab, however to get this to work, you will need to enable the feature within your account.
- Sign in to the Zoom web portal.
- Go to your account settings.
- Search for
Clipsand toggle the feature on.
How to Create a Clip
- Open the Zoom app on your computer.
- On the top menu bar, click
Clips.- Note: If you have many products on your menu bar, click the More icon `(…)`` to access Clips.
- Click on
Create Clip.
How to Access Your Clips
- Sign in to the Zoom web portal.
- Go to Clips in the left sidebar.
Setting up a Zoom Meeting
To set up a Zoom meeting, sign in via Okta and share the link for your “personal meeting room” with your participants.
Using your personal link versus a unique/random link
Your personal link is a great way to provide a consistent, easy-to-read-and-remember meeting room for colleagues and customers. However, there are some drawbacks to reusing the same meeting, such as participants joining an ongoing meeting when two are scheduled back to back. In some cases it may be better to use a unique meeting link.
Here are some good use cases for the personal link:
- Recurring or standing meetings, especially those with a large or frequently changing attendee list.
- First meeting with a customer, where a simple and readable link is helpful for ease of participation and branding.
- Webinar or training session where your Zoom link may be shared in a display (non-clickable) format, and will need to be typed in manually by attendees.
- Interviews so the candidate can see your name for the meeting link, not a random number. Keep in mind candidates may be scheduled for 3-5 interviews all at once and we don’t want to create confusion.
Here are some good use cases for a unique link:
- Meetings scheduled in rapid succession or back-to-back, to ensure only the invitees for each meeting arrive to the right session.
- A meeting where privacy is a principal concern (this dovetails with the first bullet point)
- A meeting where most attendees will be joining via a shared link or calendar invite, and will not need to type the link manually.
Use your best judgement on when to use each type of link. Not all situations will fit cleanly into any of the given scenarios, and your needs may vary.
Allow for browsers
Not everyone has a Zoom client, so you can allow for invitees to choose to use Zoom from the browser. Go to Settings > In Meeting (Advanced) and click next to “Show a ‘Join from your browser’ link” to make this option available in your meeting invites. The browser version of Zoom is not as full-featured as the regular client, but it doesn’t force an invitee to download the Zoom client. This also mitigates the issue of potential weak communication encryption since the browser uses HTTPS instead of Zoom’s proprietary encryption scheme.
Large meeting considerations
It can be distracting when a call with a large number of attendees has folks joining unmuted. For Assembly, CEO AMAs, and other meetings in which we expect an attendance of over 25 folks, meetings should be scheduled, so that folks enter on mute. These folks can then opt to unmute as required to participate in the conversation.
If a team member in a meeting is not on mute but creating sound that is distracting, any other team member should feel empowered to put this person on mute. A person must be a co-host or host to put someone on mute. If you are the host and you’d like help with muting people, ensure that “co-host” is enabled in your Zoom settings. During meetings, you can click on individuals in the meeting and designate them as “co-hosts.”
During your Zoom Meeting
Zoom can be minimized during a meeting (cmd-m on macOS) to a small window staying on top of all applications.
This tip is very handy when using a small screen: it allows to see the participant(s) and use other applications at the same time without worrying about the screen layout.
Recording in Zoom
In order to be able to record your Zoom meetings you must first enable recordings in your Zoom profile. You can access this page at Recording Settings. You need to be signed in to have the ability to record.
To auto-record meetings set up cloud recording. You can also configure Zoom to save to the cloud automatically. Go to “My Meeting Settings” and find the “Recording” section, then click on “Cloud Recording”. Setting the topic of the meeting is important, otherwise all meetings will be recorded with a generic name. Once recording is complete, your videos will not appear in the “Recordings” section of your Zoom account.
If the meeting topic in Zoom (editable by logging into https://zoom.us/) contains the text [REC], these recordings will
automatically be saved to a folder on Google Drive under GitLab Videos Recorded (accessible from Google Hidden shared drives).
The name of the folder will be prefixed by the host’s e-mail
address. For example, if the host is someuser@gitlab.com and the
meeting title is Company Training [REC], the folder will appear as
someuser@gitlab.com-Company Training. The script (from the zoom-sync project) will sync the recordings every hour.
To make it easier for meetings to be uploaded automatically without changing the title, the sync script also uses an allow list. If a meeting title matches the provided regex with the given host’s e-mail address, the meeting will also be uploaded to Google Drive. File a merge request to change the current list.
Consider setting your default recording view to “Gallery view”.
To do this:
- Login to zoom.us.
- Click the Settings tab on the left side bar, then the Recording tab on the top horizontal options.
- Make sure you have
Record gallery view with shared screenselected - Unselect
Record active speaker with shared screenandRecord active speaker, gallery view and shared screen separately. Remember to save.
You can also read through General information on recording on the zoom support here
How to identify the meeting host with the permission to record
You can use one of the below methods to find this information after joining the meeting.
- Via participants sidebar.
- Navigate to the participants icon on the bottom of the window.
- You will be presented with the list of participants on the right panel of the window.
- The host will be listed in parentheses at the end of their name. (A resize of the participants window may be needed).
- Via meeting info pop-up.
- Navigate to the upper left corner, where you will be presented with an i icon.
- Select the icon to locate the meeting host who will have the ability to record the call.
How to allow recording when the host is not present
This usually happens on recurring meetings where the host can’t always attend.
The meeting creator should add colleagues as “Alternative Hosts” in case they can’t attend so that others can still start the recording.
Using the website:
- Navigate to
https://gitlab.zoom.us/meeting/<meeting id>/edit. - Scroll to the bottom to find “Alternative Hosts”.
- Add the email address for one or more colleagues separated by a comma.
- Click Save.
Using the Zoom app:
- Click “Meetings”.
- Find your meeting on the left-hand side of the app.
- Click “Edit” on the right-hand side of the app.
- Expand the “Advanced Options” drop-down on the bottom of the window.
- Find the “Alternative Hosts” box at the bottom.
- Add the email address for one or more colleagues separated by a semi-comma.
- Click Save.
Recording video transcripts
Closed captioning and live transcription is enabled by default for all users, however the subtitles will not show for participants unless a host manually enables it once the meeting starts.
At the end of a recorded meeting, the transcription will be available in a text file under the same folder as the other recording files.
For local recordings, a transcription is saved to closed_caption.txt but only if enabled by
a co-host.
For cloud recordings, the file name ends with .transcript.txt and the full transcription is always
available. Processing takes about 15 minutes, so the video files appear before the transcription.
Zoom AI Companion
Meeting Summary with AI Companion
- Start a meeting with the Zoom desktop client.
- Click
AI Companionin the meeting control toolbar. - Click
Start summary. - Participants will see a notification that AI Companion is active and analyzing the discussion.
- Once the meeting ends, the summary will be emailed to the meeting host and meeting invitees in our organization.
Accessing AI Companion Meeting Summaries
- Go to your Zoom account’s profile.
- In the sidebar expand
AI Companionand then click onMeeting Summary. - To edit or share, click on a meeting topic and you will have the option to
Share,Edit, orDeletemeeting summaries.
Accessing AI Companion Smart Recordings
- Go to your Zoom account’s profile.
- In the sidebar click on
Recordings, your smart recordings will be underCloud Recordings.
Enabling email notifications for hosts when attendees join first
- Go to your Zoom account settings.
- Click the
Meetingtab. - Under
Email notification, click theWhen attendees join meeting before hosttoggle to enable or disable it.
How to share a presentation in Zoom
At some point, you may need to give a slide presentation using Zoom. Ideally, you should be able to see your speaker notes while participants see your slide show. This is fairly easy to do with two monitors by using presenter view and sharing the monitor which contains the slides. If you have only one monitor, it is still possible using the following steps:
- Open your slide deck in Google Slides. Make sure to close any other tabs you may have open. Participants will be able to see these tabs when it comes time to present.
- Select
Presenter view. This will make your presentation take up the entire window for participants, but not your entire monitor. If you want to switch to this view from the standardPresentview you can simply press theakey. - Hover near the bottom of your presentation and you will see a pop up menu.
From this menu, select the
Toggle Full Screenoption, third button from the right, next to settings. This will end full screen mode without leaving the presenter view. - To see your speaker notes, hover at the bottom of your presentation window again and select
Presenter Viewfrom the menu. - You will now have a presenter view pop-up window which allows you to see your speaker notes as well as advance the slides.
- In another browser window enter the Zoom meeting room.
- Once in the meeting, select
Share Screenfrom the options at the bottom of the screen. - Do not share your desktop. From the options, select the browser window containing your Google Slides deck. This will allow you to share just the browser window containing your slides.
- If you would also like to see the Zoom chat, hover your cursor at the top of the screen containing your Zoom meeting. A menu will appear, from this menu select More > Chat.
- Position the windows any way you need to see the presentation and speaker notes.
- Make sure to change slides using the presenter view pop up window. This will advance the presentation for your viewers as well as advancing your speaker notes.
- Make sure the minimum font size of text is large enough so that it can easily be read by everyone.
If you would like to practice presenting, you can do so using your own private Zoom room.
- Open the Zoom app and click
Start with video. - Click
Record. - Repeat the steps above.
- Stop and watch the recording. You’ll see what the participants would see.
Sharing your screen in Zoom
Sharing a document is not recommended in Zoom. Instead, participants can follow along in the document themselves. The link to the document should be included in the meeting invite.
If you share your screen (for a document despite above recommendation, for a web based application demo, for an ssh session, etc.) it is recommended that you increase the font size so that the text can easily be read by those who are farsighted.
If you share your screen in zoom, please wait until after introductions have been completed to allow participants to see each other clearly during introductions. This is especially important during external calls when participants are meeting each other for the first time.
Using a phone to connect to audio
Especially when talking with customers, it’s good to make a good impression! One way is to use a phone to dial in, which can increase reliability of your audio connection and reduce latency. In general, a landline has the lowest latency, a mobile phone is next, and internet audio is variable. Here are some tips for quick and effective telephone connections to Zoom meetings.
- Some meeting rooms have the “Call me” option; others don’t. To make it easier to dial in, keep Zoom as a contact so you can dial it quickly.
- If you dial in, Zoom will ask for the Meeting ID. If the meeting hasn’t started yet, the Meeting ID won’t appear in the Zoom client. But it’s in the URL, and you can still connect to the audio with the phone. Then when the meeting starts, your audio and video will both connect instantly.
- If the meeting URL has a name rather than an ID, just click the URL and get the ID from the browser URL bar (might not work in Safari?); the name is just a redirect, and with the Meeting ID you can connect on the phone quickly.
- The phone will also ask for your Participant ID.
If you don’t give it when you first connect, your audio and video might appear in separate boxes in the Zoom window, as if you’re in the meeting twice.
That’s confusing to others, as your video won’t be highlighted when you talk.
To merge the two connections, on your phone, press the
#, followed by your Participant ID, followed by#again. Zoom will merge the two connections without annoying others on the call. - Even if you’re using the phone for audio, use the mute button in the Zoom client for muting. That tells others on the call that you’re muted.
Considerations when presenting on Zoom
Maintaining audience engagement
Check in with your Audience: There are multiple stages throughout your Zoom presentation or video conference which are prime points to engage the audience with a simple check-in.
- At the beginning of the presentation: You could check in with your audience as soon as you have explained the upcoming meeting/presentation agenda, this will help to make sure that everyone understands the journey you’re about to take them on.
- After delivering the initial value prop: You should most certainly check in after delivering GitLab’s value proposition or key message. It’s generally best to use people’s names e.g. John, Ryan, please let me know if there is anything you would like me to clarify in more detail? By using names in this way will force a response, show that you are engaged with them directly and keep the audience tuned in.
Involve the remote audience when presenting
There are a number of simple methods presenters can use to involve the participants throughout your presentation.
- Direct Reference: ‘As most of you will be aware…’ or ‘Some of you might be wondering…’ and good phrases to grab your participants’ attention and make them feel involved as well as reinforce your own position as a subject matter expert.
- Rhetorical Questions: Rhetorical questions generally encourage the participant to formulate answers to your question for discussion at a later point in the presentation. This method can be good to highlight a point that you want the participant to recall later during the presentation.
- Acknowledge Challenges: Acknowledging the impact of your message upon the audience to help enforce you as a trusted GitLab representative of their interests.
Keeping a Remote Audience on Track
- Always have an agenda: Having a clear agenda will help set expectations. With longer presentations, you may wish to summarize where you’ve been and where you are up to within your agenda.
- Put emphasis on your key message: Because of the constant barrage of emails, texts, calls, and social media updates, participants joining via Zoom (or any video conferencing tool) can easily get distracted and quickly tune out. Bring their attention back to you and your presentation by making sure you really emphasize your key message. You will sound much more focused, and thereby, help remote attendees relate points and examples back to the core of your presentation or meeting.
- Refer Directly to Your Slides: Refer directly to your presentation or meeting slides, particularly those that are more complex and which you should spend more time explaining (e.g. with graphs graphics or flow diagrams). It’s important to verbally indicated to the audience where you are on the slide by using the mouse cursor or virtual laser dot.
Remember to Breathe
Harness the power of pausing to help people keep up and absorb what you’re sharing is even more important in a removed presenting environment. That’s because, without an audience in front of us, we tend to speed up and truncate our pauses even more. So be extra mindful of this and of your audience. At the end of the day, listeners lost means a missed opportunity to get your message across.
Make the participant experience an enjoyable one
Video calling via Zoom and other technologies is incredibly useful and convenient but can make presentations dull and boring for both the audience and the presenter. For this reason, it’s even more important to find ways to build rapport and to have fun and inject some humor into the meeting (if possible). It’s important that you give yourself, and the audience, the permission to have some banter and moments of ’lightness’ during the presentation. Don’t take the entire experience too seriously or you’ll bleed the presentation dry of any interactivity.
Therefore it is good to allow your natural personality to shine through. This will refresh the presentation with an air of genuine spirit, much needed when your audience is remote and cannot interact with you in person. Remember, if you sound like you’re enjoying hosting the meeting, the audience is more likely to enjoy listening to it. Find other tips for increasing user engagemnet from our live speaker series with Lorraine Lee on all-remote video and presentation tips
Provide links rather than sharing while you present or edit
Provide links (to merge requests, issues, documents, etc) rather than sharing your screen while you present/edit. This allows participants to follow along at their own pace and indepenently make comments/edits.
Additional Zoom tips
Zoom on Linux using FOSS (Firejail)
While Zoom works on Linux, the application is not free software. As a result, some might be wary of running this directly on their computer. One way of running Zoom without worrying about what it does is to use firejail.
To use Zoom with Firejail, first install Zoom or download the archive. Zoom offers standalone binaries that you can download should your distribution not have a package for Zoom. Once installed, install firejail.
Once both firejail and Zoom are installed we need two things:
- A firejail profile for Zoom
- A directory we can use as the home directory for Zoom, preventing it from messing with your home directory
You can use the following firejail profile and store it in ~/.config/firejail/zoom.profile:
noblacklist ~/.config/zoomus.conf

include /etc/firejail/zoom.local
include /etc/firejail/disable-common.inc
include /etc/firejail/disable-programs.inc
include /etc/firejail/disable-devel.inc

whitelist ~/.zoom

caps.drop all
netfilter
nonewprivs
noroot
protocol unix,inet,inet6,netlink
seccomp

private-tmp
Next we need a home directory for Zoom.
For this example we’ll use /opt/zoom/home:
sudo mkdir -p /opt/zoom/home
sudo chown -R $USER /opt/zoom
firejail --quiet --profile=~/.config/firejail/zoom.profile --private=/opt/zoom/home /path/to/zoom/ZoomLauncher
Note that you must start the ZoomLauncher binary and not the shell script wrapper called zoom.
Virtual background
With or without a physical green screen.
Consider using a customizable GitLab Background (Google Drive access available to GitLab team members who are logged in).
- In your Zoom In Meeting (Advanced) settings, enable
Virtual background - In your Zoom application on your computer, open settings and click on the
Virtual Backgroundsetting - Select a background you want to use, or click the [+] to add a picture from your computer.
- A video on how to set up a
Virtual Backgroundwith Zoom is available here - If you do not have a green screen, consider using a
Virtual Backgroundthat is a similar color to whatever is behind you.
Applying Video Filters
- Sign into the Zoom desktop client.
- Click on your profile picture >
Settings. - Click the
Background & Effectstab. - Click the
Video Filterstab. - Select the desired filter. (We have GitLab themed filters!)
- (Optional) Scroll down and select the
Apply to all future meetingscheckbox to set this filter as a default for all meetings you join or host.
External webcams and DSLRs
It is possible to achieve high quality video output with a professional bokeh effect by using a DSLR or external webcam. External webcams are generally a good alternative to your built in Macbook webcam as they allow for more control such as advanced color and light correction including white balance and contrast adjustments. External webcams also allow you to crop your live image concentrating on a certain part of your video i.e. your face.
- An up to date list of Mac compatible external webcams can be found here.
- Setting up a DSLR to work as a webcam with your Mac can be quite complicated and will generally require additional hardware such as adapters. A simple video tutorial of how to set up your DSLR as a webcam with your Mac can be found here.
Zoom and silencing the Chrome “Open Zoom Meetings” popup
Video calling with Zoom and Chrome often has the annoying popup before every call where you have to click the popup “Open Zoom Meetings”.
There used to be a checkbox in Chrome that you could select in order to tell Chrome to Always open thse types of links in the assocated app - Zoom.
The checkbox option was removed in Chrome in September 2019 according to this Chrome support thread, this meant that every time you started a Zoom meeting from Chrome, you would have to click the popup and ‘Open Zoom Meetings’ a second time for the meeting to actually start the meeting.
In the above Chrome support thread, the following macOS solution is listed:
For macOS:
Open Terminal and enter:
defaults write com.google.Chrome ExternalProtocolDialogShowAlwaysOpenCheckbox -bool trueQuit and restart Chrome to see the checkbox
Once you do this, when you start your next Zoom meeting, just check the box to always trust Zoom and you’ll never see it again.
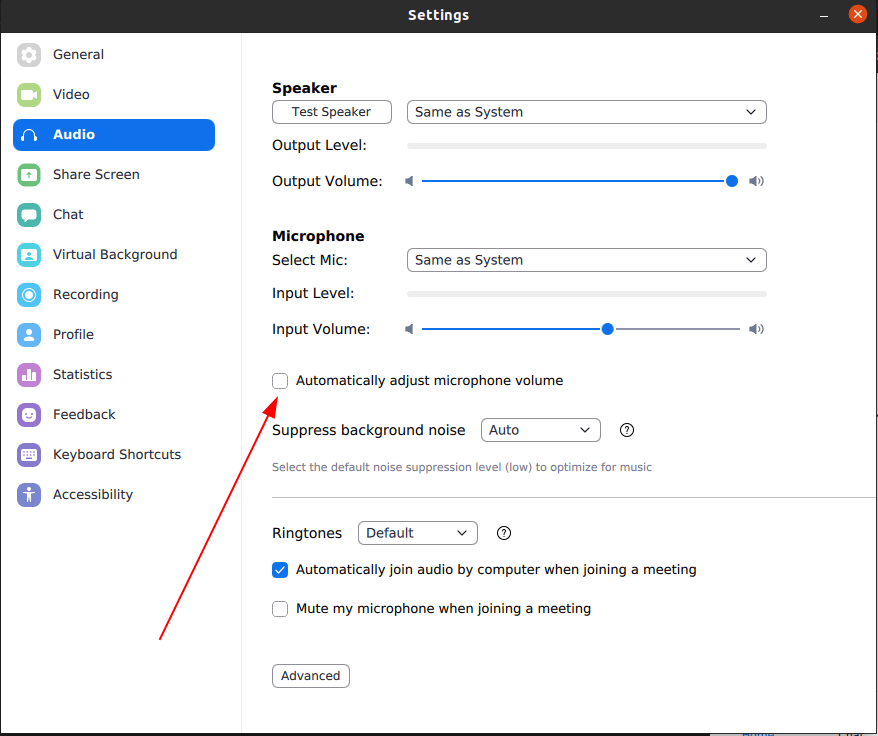
Zoom automatically lowering your microphone input volume
If you have a loud keyboard or a fan in your office, Zoom may try to automatically reduce your microphone input volume. This can be frustrating because then other participants have trouble hearing you speak later in the call. If you are experiencing this issue, go into your Zoom client settings and uncheck “Automatically adjust microphone volume”.
Google Calendar Add-on for Zoom
To make it easy to set up Zoom sessions for your calendar events, enable the Google Calendar add-on for Zoom. This adds a dropdown option right inside of Google Calendar to add Zoom to the event. When users view the event, they will see specially formatted Zoom details that includes the link to the meeting, and a clickable phone number if they are dialing in. The add-on will also follow your preferences in your Zoom account for using your personal link or a unique link.
Create a Persistent Zoom Room
If you find yourself wanting to have a persistent Zoom “Room” for shared use by anybody on your team at any time, do this:
- Login to the Zoom website
- Go to the Meetings section
- Click “Schedule a Meeting”
- Enter the desired topic (title)
- Click “Recurring meeting”
- Under “Recurrence”, select “No Fixed Time”
- In the options area, be sure to select “Allow participants to join anytime”
- Click “Save”
- Share the link to the room with your intended users
Settings for smaller meetings
If you have a smaller meeting (4 or fewer participants) and want to allow for quicker starts, you could change the settings on a per meeting basis to remove the waiting room, or default audio to on (can be overridden by participants local settings). To quickly do this, you can:
- Install the Zoom Scheduler Chrome Extension
- When creating a meeting, click on
Make it a Zoom Meeting - Uncheck
Waiting Room - Ensure Host and Participant Video is
On - Ensure
Mute participants upon entryis unchecked - Click
Continue
This should allow for a bit more of a seamless transition into beginning a smaller meeting. The defaults for larger meetings are still what’s documented above.
1418d490)
