
StartCom certificates have recently been distrusted by Mozilla Firefox and Google Chrome. Certs issued prior to October 21st, 2016 don't seem to have been affected and are therefore still trusted.
In response to my contact, StartCom affirmed they're working hard to revert this situation and hope to have a resolution by the end of January, 2017.
Update by Marcia Ramos, on 2016/12/20.
With GitLab Pages you can host your static website under your custom domain. With a StartSSL digital certificate you can secure it. And that's all for free!
In this post, first we'll give you a quick overview on SSL/TLS certificates and StartCom CA, then we will show you a comparison between StartSSL Class 1 and Let's Encrypt to facilitate your decision to choose one over another.
Finally, we will guide you through the process of securing your GitLab Pages site with StartSSL Class 1 free certificates.
Note: We assume you are familiar with web development and web hosting.
What's in this tutorial?
- TOC
HTTPS: a quick overview
Why should I care about HTTPS?
Perhaps this might be your first question. If our sites are hosted by GitLab Pages, therefore they are static, hence we are not dealing with server-side scripts nor credit card transactions, so why do we need secure connections?
Back in the 1990s, where HTTPS came out, SSL1 was considered a "special" security measure, necessary just for big folks, like banks and shoppings sites with financial transactions. Now we have a different picture. According to Josh Aas, ISRG Executive Director:
We’ve since come to realize that HTTPS is important for almost all websites. It’s important for any website that allows people to log in with a password, any website that tracks its users in any way, any website that doesn’t want its content altered, and for any site that offers content people might not want others to know they are consuming. We’ve also learned that any site not secured by HTTPS can be used to attack other sites.
How about taking Josh's advice and protecting our sites too? We will be well supported, and we'll contribute to a safer internet.
Organizations supporting HTTPS
There is a huge movement in favor of securing all the web. W3C fully supports the cause and explains very well the reasons for that. Richard Barnes, a writer for Mozilla Security Blog, suggested that Firefox would deprecate HTTP, and would no longer accept unsecured connections. Recently, Mozilla published a communicate reiterating the importance of HTTPS.
Free SSL/TLS Certificates
As individuals, dealing with small sites for promoting ourselves and our work, we might not be interested in buying a premium2 TLS1 certificate issued by a robust Certification Authority (CA), like Comodo or Symantec. But now we have a choice! We can use free certificates, like the ones issued by Let's Encrypt and StartCom.
Note 1: SSL stands for Secure Sockets Layer, which is the predecessor of Transport Layer Security (TLS).
Note 2: Premium certificates examples: Comodo SSL/TLS, StartSSL SSL Class 2, Symantec SSL. They offer support for e-commerce and grant a huge warranty to their customers.
StartCom
Start Commercial Ltd. (StartCom) was founded by Eddy Nigg in 2005, who wanted to engage in a "revolution" of the digital certification industry, making certificates more affordable and with better quality. StartCom has become the world's sixth largest Certificate Authority, covering nearly one million registered subscribers, and more than 400,000 websites.
StartSSL™ is the StartCom service brand of its digital certificates issuing division, it offers free SSL certificates and free email encryption certificates for worldwide subscribers. Thus, on this post, StartCom refers to the Certificate Authority, while StartSSL is attributed to certificates issued by StartCom.
Among four classes of StartSSL certificates, there is one free, called Class 1. This is the one will be referencing to in this post. But, of course, you are free to choose their premium products too. On their website, you can find a comparison chart for their certificates.
StartCom Certificate Policy & Practice Statements covers a lot of procedures to make sure they can trust their customers information. That document states rules, obligations, validations, etc. General information can be found through their documentation.
StartSSL Class 1 Features
- Certificates can be issued in minutes
- There are two methods of domain verification: email, or code file validation3
- Certificates are valid for 1 year, with unlimited renewal allowance
- The CSR (Certificate Signing Request) can be generated from any O.S. (Linux, Mac or Windows)
- S/MIME Client4 + Authentication
- Supported by all browsers and servers
- Live chat support 24/7
Note 3: Code file validation is a file provided by an institution, which needs to be uploaded to the site root. It's a simple HTML file containing a token to verify that we hold that particular domain. It's not used just by CAs. For example, it is also used by Google, as a method for site ownership verification.
Note 4: S/MIME client certificates are used for client authentication to websites and for the signing, encryption and decryption of personal data. Most commonly they are used for email signing and encryption, but also PDF and office documents. Higher validated certificates can be used to sign contracts in digital format. Source: StartCom UI - Certificates (you'll need to be logged into StartCom to have access to this link).
StartSSL Class 1 Limitations
StartSSL Class 1 certificates cover a lot of attractive features, but have some limitations:
- There is no support for wildcard DNS record,
*.example.com - We are limited to issue certificates for up to 5 domains
- We can't use commercial "sensitive" names for our domains or subdomains (e.g, "store", "buy", "shop", etc)
- Revocations carry a handling fee of currently US$ 9.90. Though we may use a different subdomain in order to create additional certificates without the need to revoke a previously created certificate
StartSSL vs Let's Encrypt
Let's Encrypt is a free, automated, and open Certificate Authority (CA), provided by Internet Security Research Group (ISRG). They are the first CA to offer exclusively free certificates. They are great, their product is awesome. However, they have some limitations too. To facilitate our overview and compare Let's Encrypt to StartSSL Class 1 certificates, let's take a look at the table below.
| Feature | StartSSL Class 1 | Let's Encrypt |
|---|---|---|
| Cost | Free | Free |
| Expiration | In 1 year (365 days) | In 3 months (90 days) |
| Client Install / CSR | All OSs | Complicated on Windows |
| CSR method | Desktop App or command line | Command line only |
| Browser Support | All | Most of them |
| Server Support | All | All, with plugins |
| Revocation | Paid | Free |
| S/MIME Client Auth | Supported | Not supported |
| Insurance | $ 10,000 USD | None |
| Customer support | Live Chat, Phone, Ticket | Forum |
| Hash Algorithm | SHA-256, SHA-384, SHA-512 | SHA-256 |
| Domain validation | Email or Code file Validation | Code file validation |
| Domains limit | 5 domains | Limited |
| Subdomains | Supported | Supported |
| Free domains | Supported | Supported |
| Domain name | Non-commercial names | Unrestricted |
| Wildcard support | No | No |
| Support EV certificates | Upgrading (paid) | No |
The information gathered within the table above is available across StartCom website, their FAQ and their Policy.
For additional info on Let's Encrypt, you can read their Certificate Policy, their documentation, and this post Tutorial: Securing your GitLab Pages with TLS and Let's Encrypt.
StartSSL with GitLab Pages
Digital certificates are applicable to your GitLab Pages project only when you
se a custom domain, as all standard https://namespace.gitlab.io urls are secure by default.
With GitLab Pages we can host our static website, use custom domains (and aliases), and secure our domains with SSL/TLS certificates for free. Cost zero, no credit card, no hidden fees! This is detailed in the tutorial "Hosting on GitLab.com with GitLab Pages". Also, you can read the quick start guide, and the documentation for GitLab Pages.
GitLab Pages supports PEM certificates issued by any CA, though we need to make sure that the certificate is compatible with NGINX, the server where GitLab runs on.
StartCom certificates are retrievable from their User Interface (UI), where you have access to your own information, certificates requests, expiration dates, etc.
Before getting started
For the following steps, we assume:
- You already have your custom domain
- Your project is configured for GitLab Pages
- Your site is accessible under
http://example.comorhttp://your.example.com
If you don't know how to do that, please check this tutorial first: Hosting on GitLab.com with GitLab Pages.
Step-by-step
The scheme below illustrates the steps we'll take to secure our GitLab Pages sites with StartSSL Class 1 certificates:

Step 1: Getting started with StartCom
Sign up
StartCom login is certificate-based, which is considered a high-security user authentication method. Unlike other mechanisms for web-based authentication, certificates ensure the person or machine is who they claim to be. Certificate-based authentication also provides data encryption capabilities between the client and the server.
- Navigate to StartCom and sign up
- Enter your country and email address to the respective fields
- Verify your e-mail (follow their instructions, which are very simple)
- The system will issue a certificate for your email and save it locally, which will be your user authentication to log in. Choose "The system generate private key and CSR", enter your password, and download the file
- Import the certificate to your browser. This will allow you to log into your account in one click from then on
On the next screen, StartCom will present all their certificate options. Choose the box "Free - Class 1 SSL".
Domain Validation
Domain validation is necessary to make sure that the domain you are issuing the certificate for, is really yours.
- Open the tab Validation Wizard -> Domain Validation -> add your domain to the field -> Continue.
- Choose the method for domain validation (a or b):
- (a) e-mail: take a look at the default emails presented on the box and see if you have access to one of them. If you don't, jump to "method b". Otherwise, first open your email account and keep it opened. Then, choose one of the radio buttons correspondent to your email and click on Send verification code. The code will be sent to your email, and it will be valid for only 60 seconds. Switch to your email, copy the code, switch back to StartCom, and paste it to the field Verification code -> Validation. Done!
- (b) code file: choose website control validation -> download the code file and leave StartCom opened. Push the code file to your site root in your GitLab Pages project. Wait until the build succeeds. Go back to StartCom and click on the verification file is ready on website, Continue. Done!
- Once your domain was verified, click on the link To "Order SSL Certificate"
Certificate Request
-
In the box Please enter the full hostname for SSL certificate, enter your domain name. There are a few options:
- you can enter only the root domain
- enter the root domain and some subdomains
- enter multiple domains (up to 5).
Suggestion? Issue one different certificate per domain or subdomain; if something goes wrong, it will be just one to fix.
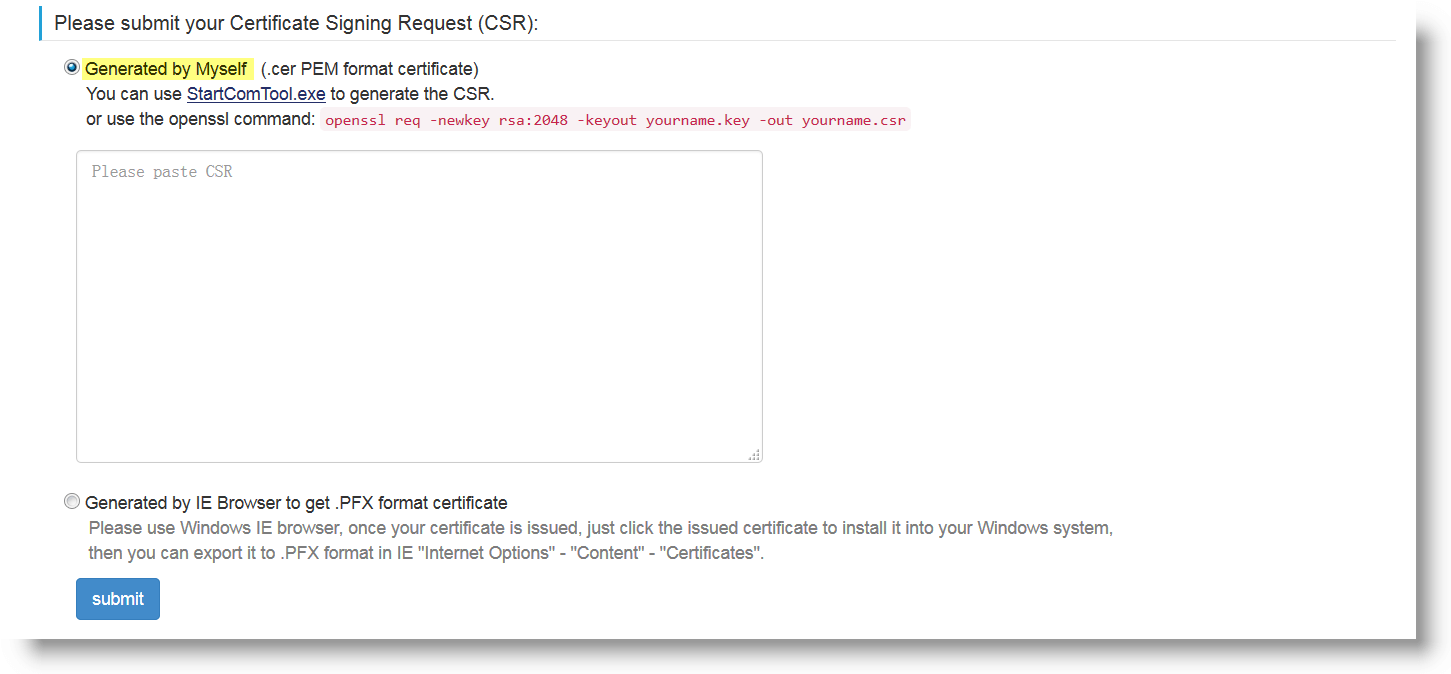
-
Choose the first option: the radio button for PEM certificates Generate by myself. It will open a text area where you'll add the CSR we'll generate next. Leave the tab opened.
Step 2: Generate the CSR
For this particular step, we have two different approaches: Linux and Mac (Unix), or Windows.
On Linux and Mac
-
Open the terminal and check if you have OpenSSL installed:
$ openssl version. If the response is notOpenSSL x.x.x date, install it before continue -
Run the command recommended by StartCom:
openssl req -newkey rsa:4096 -keyout yourkeyname.key -out yourkeyname.csrUse
sudoif needed. Alternatively, you can keep the key length atrsa:2048. The file name (yourkeyname) can be chosen at your will -
Enter the PEM passphrase (it's like a password)
-
Verify it by typing the same passphrase again. Memorize it or make a note.
-
The terminal will ask you questions. Answer the first, then you can leave the others blank if you want (hit Enter/Return). Done!
The files you'll need next will be in the ~home directory. Open in a text editor both yourkeyname.key
and yourkeyname.csr. The first is your private encrypted key. The last is the CSR. The .key file will
be necessary for Step 5 ahead.
On Windows
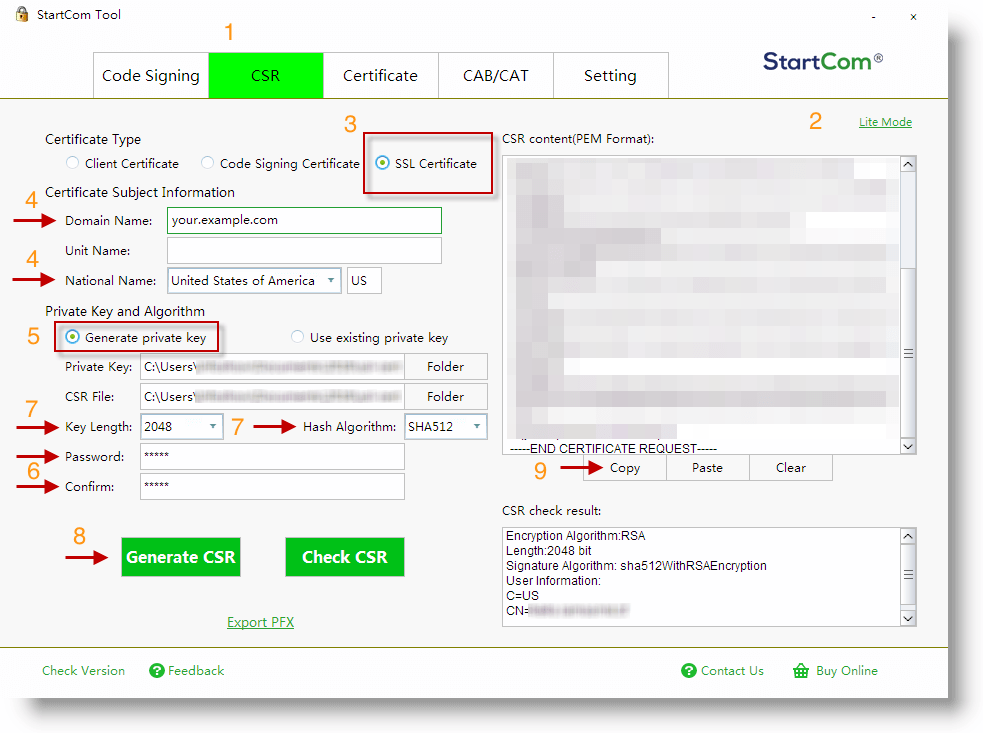
Note: the numbers in the parentheses correspond to the numbers on the image below.
- Download the binary file StartComTool.exe and launch it
- Go to the tab CSR (1)
- On the top right, click a small link Professional mode (2)
- Choose the radio button SSL Certificate (3)
- Enter the Domain name to its field and fill the country information (4)
- Choose the radio button Generate private key (5)
- Enter a password (passphrase) and repeat it below (6). Memorize or make a note
- Choose the hash algorithm and the key length (7)
- Click Generate CSR (8)
- You will be prompted to choose a file name, and a directory to store both
yourkeyname.keyandyourkeyname.csr. The.keyfile will be necessary for Step 5 ahead.
The CSR will be shown in the box on the right of the application. Copy all the content (use the button Copy) (9).
The image below illustrates how the desktop application looks like:
Alternatively, you can follow these instructions to generate the CSR via command line on Windows.
Step 3: Issue your certificate
- Go back to StartCom
- Copy the content of the file
yourkeyname.csr - Paste it into the text-area we had left opened on Step 1
- Click Submit
- Done! Your certificate must have been issued!
Step 4: Retrieve your certificate
When you download your certificate, you'll notice that it comes within a zipped folder with 4
options for you to use: Apache, Nginx, IIS, Other. The certificate you'll use for GitLab Pages
is the one in the NginxServer directory.
- On your StartCom UI, go to Tool Box -> Certificate List -> Retrieve
- Download and unzip the file
- Unzip the folder named
NginxServer, your certificate will be there. It has a.cf_bundleextension - Open the certificate with a text-editor and leave it opened. We'll need it for Step 6 ahead
The certificate looks like the code below.
-----BEGIN CERTIFICATE-----
MQswCKIhggfrOJmJJTDEWjkfhMNU3RhcndfjdfnuNJFHUnjfhjEGJSNSInjsnxLg
...
nEFH63o+ycNl2jR29jd8c8c+MBIWrYGH8TPy0GCIguwTEzY=
-----END CERTIFICATE-----

-----BEGIN CERTIFICATE-----
MQswjsdbsfbdsfnKJHUNAIHoihushdiKHJUhcnRDsjdhJBSD786523987JHSDxLg
...
3KSjh872631903rjfefy47fh49fjjqjdjqd9e8fuufe8MbLm==
-----END CERTIFICATE-----
Step 5: Decrypt your private key
The key we'd generated on Step 2, yourkeyname.key, is our private encrypted key.
This key should not be used nor exposed. It's necessary to decrypt it before using. To make it easier to
recognize theses keys, observe that the code for an encrypted private key will always begin with
BEGIN ENCRYPTED PRIVATE KEY, while a decrypted private key will always begin with BEGIN RSA PRIVATE KEY.
There are two ways to proceed in this case: via command line (option A) and via StartCom UI (option b). Choose whichever option you feel more comfortable with.
Option A: Via command line
In your terminal, type
openssl rsa -in yourkeyname.key -out yourkeyname-decrypted.key
where yourkeyname is the name of the encrypted key and yourkeyname-decrypted.key will be the name of the decrypted key.
Use the same password you set up before (on Step 2) when prompted. Your new key will be in your ~home directory.
On Windows, proceed likewise, but cd path/to/folder before beginning. The decrypted key will be stored in the same
directory you've just navigated to.
Option B: Via StartCom UI
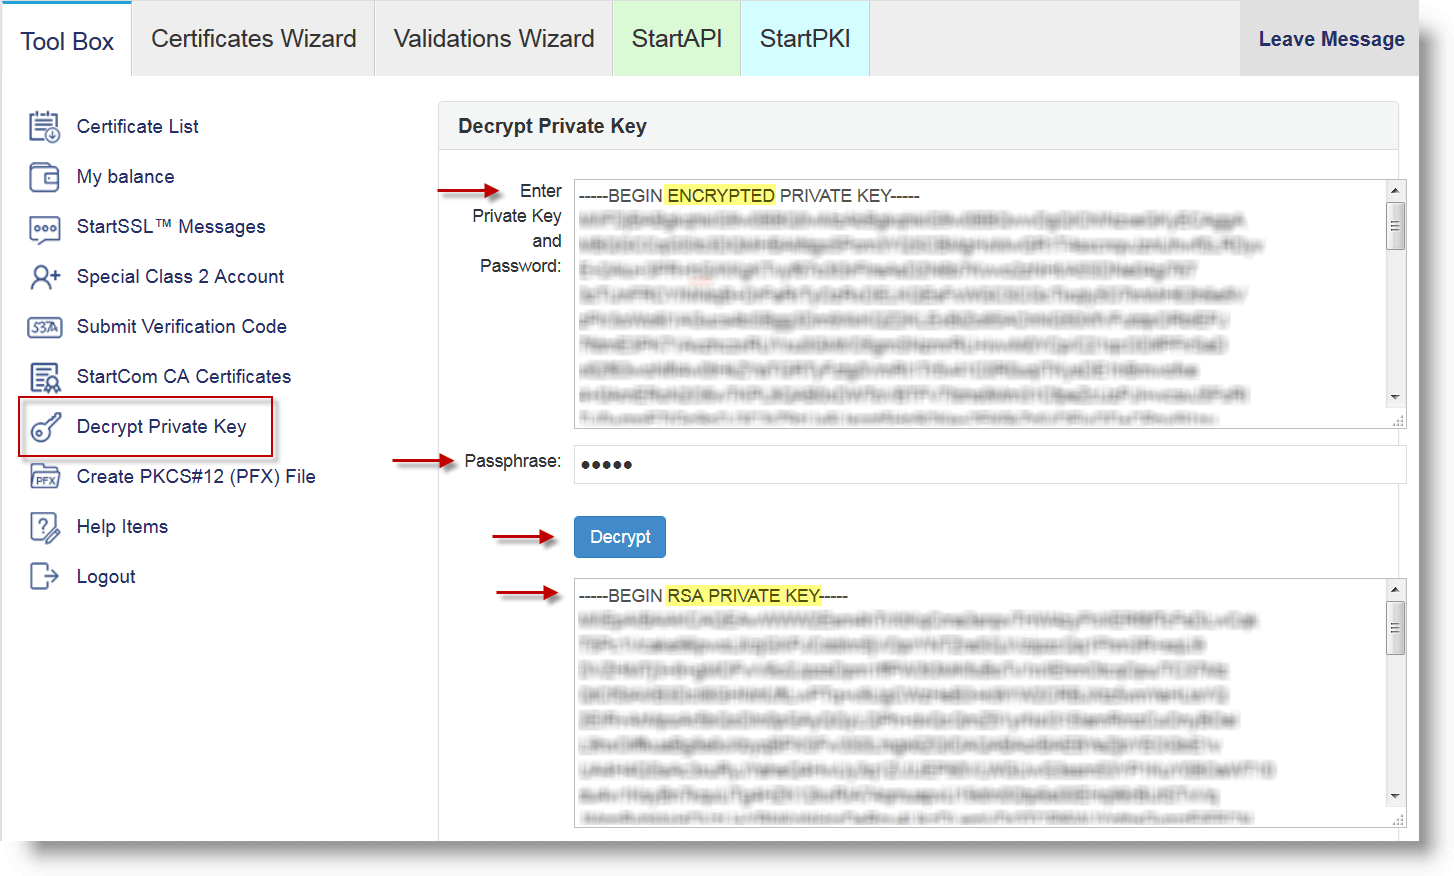
- On your StartCom UI, navigate to the Tool Box tab and click Decrypt Private Key
- Locally, open the private encrypted key in a text-editor. Copy all its content.
- Back to the UI, paste the content to the text-area and type your passphrase (used on Step 2)
- Click Decrypt
- Copy the decrypted key from the new box
- Paste the key in a new document and save it. Leave it opened, we'll need it for the next step
- Done!
The image below illustrates the result of the steps above.
Step 6: Add domain and certificate to your project
Finally, let's add the key and the certificate to our project:
- On your GitLab UI, open your Project's Settings () and navigate to Pages
- If your domain (the one you just issued the certificate for) is already added to that project, remove it. Don't worry, we'll add it back
- Click + New Domain
- Add the domain to the first field
- Copy the certificate from Step 4, and paste it to the second field
- Copy the decrypted private key from Step 5, and paste it to the third field
- Click Create New Domain
- Done!
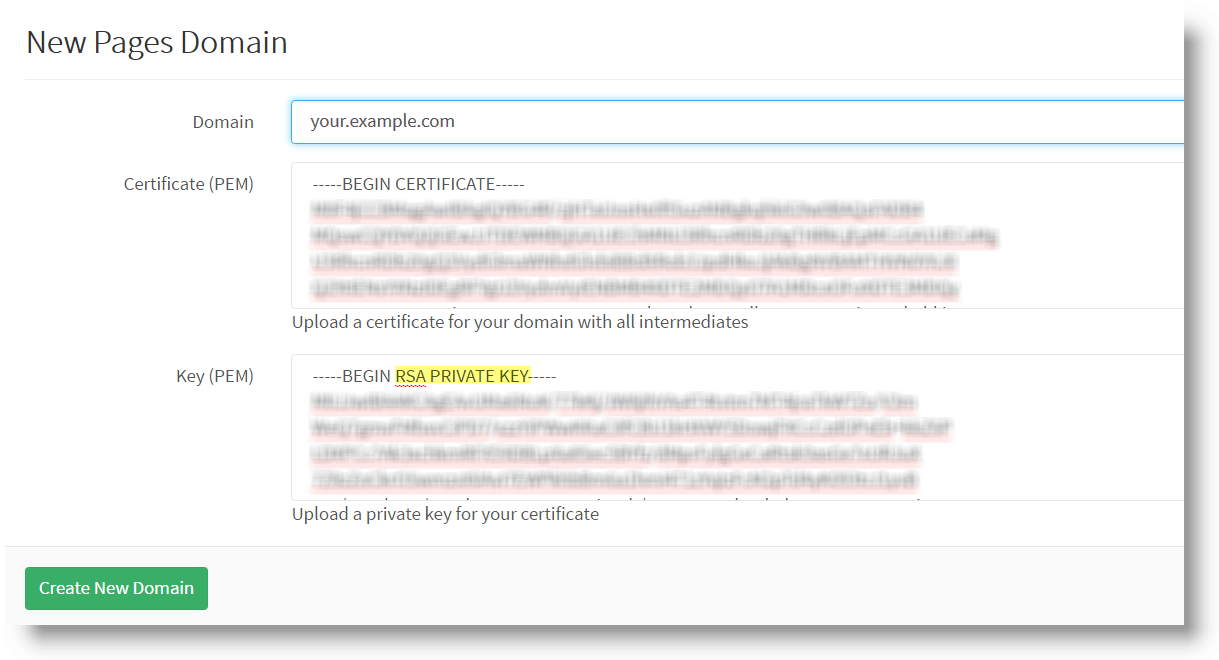
If we've set up everything correctly, this is the screen we'll see on our GitLab UI:
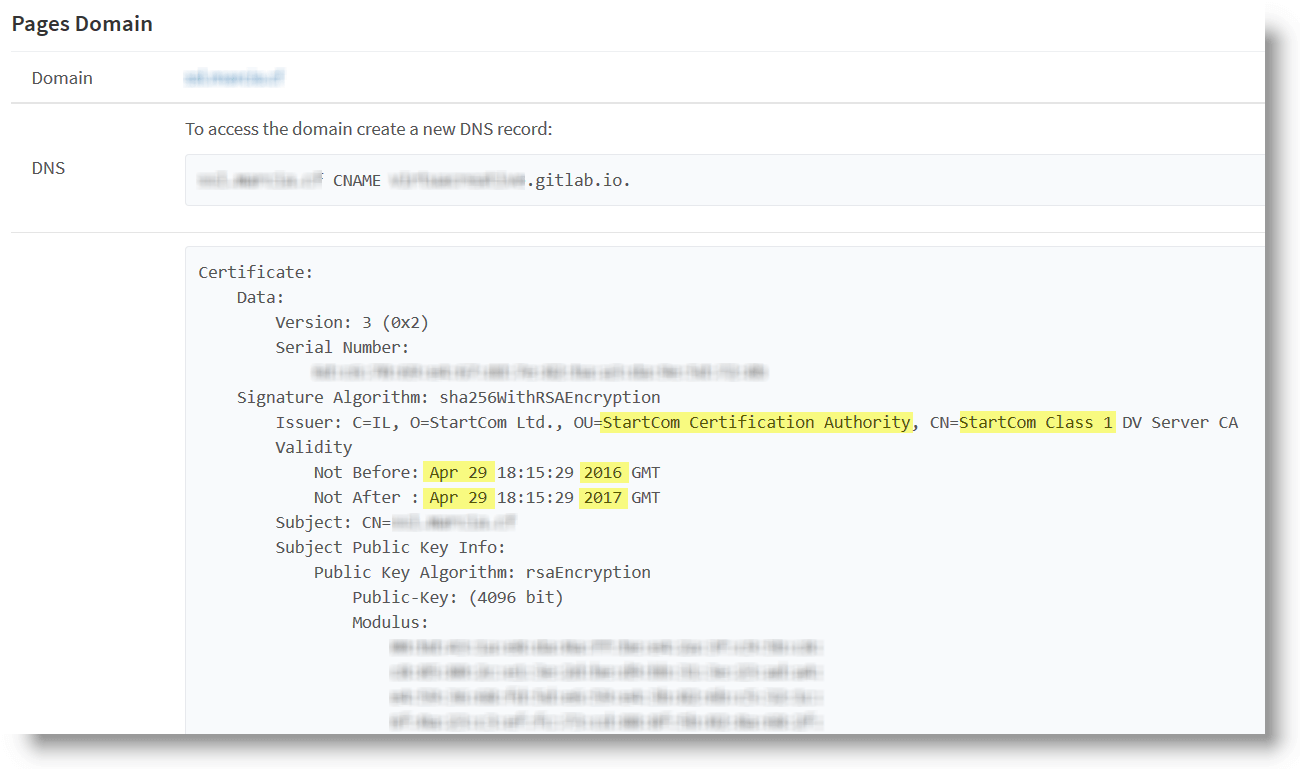
Now your domain will be accessed under secure HTTPS protocol and will display on the browser the green lock we were looking forward to see! You can perform a test to check your certificate with Site 24x7, if you want.
Do you want to see a working example of a GitLab Pages Project secure with StartSSL Class 1? Visit https://gitlab.virtuacreative.com.br and click on the green lock () to check the certificate. This URL is an alias for https://virtuacreative.gitlab.io.
Getting Help
If you need some help regarding GitLab Pages on GitLab.com, feel free to use one of our channels. You can also open an issue on the Pages group.
Conclusion
Hopefully, now you understand why HTTPS protocol is important even for static sites, and you know how to issue a free certificate from StartCom. With secure urls, we are contributing to a better and safer internet!
Don't you have an account on GitLab.com yet? Let's create one! Remember, we can use GitLab Pages to build any SSG for us, and host any static site for free!
Follow @GitLab on Twitter and stay tuned for updates!


