

It is possible to use GitLab as a best-in-class GitOps tool, and this blog post series is going to show you how. These easy-to-follow tutorials will focus on different user problems, including provisioning, managing a base infrastructure, and deploying various third-party or custom applications on top of them. You can find the entire "Ultimate guide to GitOps with GitLab" tutorial series here.
In this article, we will see how you can access a Kubernetes cluster using GitLab CI/CD and why you might want to do it even if you aim for GitOps.
Prerequisites
This post assumes that you have a Kubernetes cluster connected to GitLab using the GitLab Kubernetes Agent. If you don't have such a cluster, I recommend consulting the previous posts (linked above) to have a similar setup from where we will start today.
Meet the CI/CD Tunnel
The GitLab Kubernetes Agent is not just a GitOps tool that will enable pull-based deployments and be one more application to maintain beside the other 70 in your DevOps stack. The GitLab Kubernetes Agent aims to serve the GitLab vision of providing you a single application for the whole DevSecOps lifecycle. As a result, the Agent's goal is to provide an integrated experience with every relevant GitLab feature.
What GitLab features does the Agent integrate with today?
- GitLab CI/CD
- Container network security
- Container host security
- Container scanning
In this post, we will focus on the GitLab CI/CD integration. Given the power and flexibility of GitLab CI/CD, the majority of our users have been using it for years successfully and, until the Agent appeared, they often had to manually script their cluster connections and deployments into it. If the previous setup sounds familiar, I recommend checking out the Agent's CI/CD integration features, the CI/CD tunnel. The CI/CD tunnel enables a cluster connection to be used from GitLab CI/CD, thus you need only minor adjustments to your existing setup, and will receive a GitLab supported component that we are continuously expanding to provide more and more integrations on top of it.
The CI/CD tunnel is always enabled in the project where you register and configure the Agent, and the given connection can be shared by other groups and projects, too. This way, a single connection can be reused throughout the organization to save on resource and maintenance costs.
GitLab automatically injects the available Kubernetes contexts into the CI/CD runner environment's KUBECONFIG. As a result, you can activate a context and start using it without much setup.
How to configure the CI/CD tunnel
As already mentioned, the CI/CD tunnel is always enabled in the project where you register and configure the Agent. If you would like to use the tunnel in the same repository, no configuration is needed. If you would like to share the connection with other repositories, open your agent configuration file and add the following lines:
ci_access:
   projects:
   - id: path/to/project
   groups:
   - id: path/to/group
Change the placeholder paths here to your project or group path. Sharing a connection with a group enables access to all the projects within that group. Once you save the configuration file, you can turn your attention to your application project repository, and use the following job to list and select an agent:
deploy:
   image:
     name: bitnami/kubectl:latest
     entrypoint: [""]
   script:
   - kubectl config get-contexts
   - kubectl config use-context path/to/agent-configuration-project:your-agent-name
How to install GitLab integrated applications into your cluster
As an application of the above, let's install some applications into the cluster. As various GitLab features require applications in your cluster to be installed and configured for GitLab, Gitlab provides a cluster management project template to help you get started. One can easily install these GitLab integrated applications into their clusters using this template. Let's see how to use it with the CI/CD tunnel and the Agent!
Create the cluster management project
First, let's create a new GitLab project using the "Cluster Management Project" template. Open the create new project from template page, search for "GitLab Cluster Management", and start a new project with that template.
You will receive a project that already contains quite a lot of things! It comes with a ready-made .gitlab-ci.yml file and helmfile based setup for 11 applications that integrate with various GitLab functionalities. Each application might require different configurations. You can read about these in the linked documentation.
As part of this article, we will install NGINX Ingress and GitLab Runners using the cluster management project.
How to share the CI/CD tunnel
This newly created project needs access to one of your clusters. Let's share an Agent's connection with this project as described above. Edit your agent configuration file and add:
ci_access:
   projects:
   - id: path/to/your/cluster/management/project
Pick the right Kubernetes context
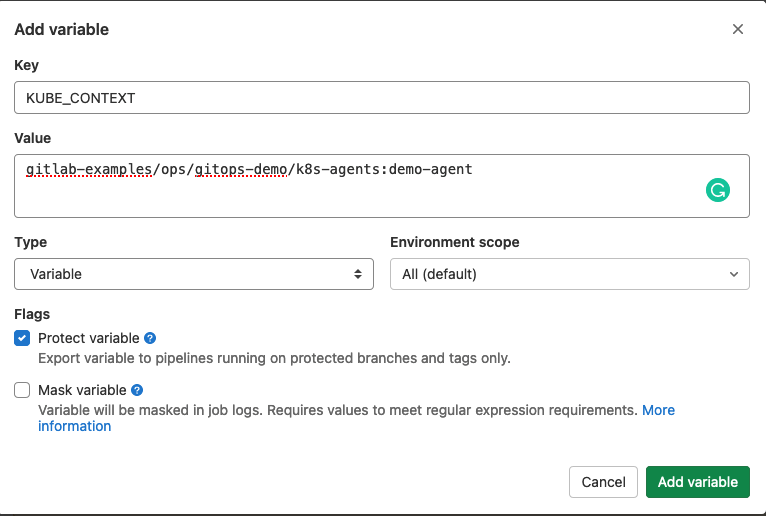
The CI/CD tunnel is already available from within your cluster management project. We tried to make it simple to start using a cluster connection without the need to edit .gitlab-ci.yml. For simple setups, you can just set a KUBE_CONTEXT environment variable with the path to and name of your agent.
Set an environment variable under "Settings" / "CI/CD" / "Variables"
How to install NGINX Ingress
We are ready to install any of the supported applications using this agent connection! Let's start by installing NGINX Ingress as it does not require any application-specific configuration.
In your cluster management project, edit helmfile.yaml and uncomment the line that points to the ingress application. Commit the changes and wait for GitLab magic to happen!
This was really easy!
How to install GitLab Runner
As GitLab Runner is more integrated with GitLab, it needs a little bit of configuration. The Runner should know where it can find your GitLab instance and needs a token to authenticate with GitLab.
To make it simple for you to install a Runner fleet, you can configure these as environment variables. By default the CI_SERVER_URL variable is used to specify the GitLab url. You can overwrite this if needed. For the token, you should create GITLAB_RUNNER_REGISTRATION_TOKEN as a masked and protected environment variable with the value of your Runner registration token. Feel free to use either a project or a group registration token.
Finally, as with the Ingress installation, uncomment the related line in the helmfile.yaml.
The full potential of the cluster management project
The cluster management project you created is yours. Thus, you are free to change it, extend it, or get rid of it. In this section, I would like to share with you a few ideas of how you might benefit the most from it.
Did you move away from Helm v2 already?
The .gitlab-ci.yml file in the cluster management project has a job that supports users to upgrade their Helm v2 installations to v3. If you never had these applications installed through a cluster management project with Helm v2, then you don't need that job. Feel free to delete it from your CI yaml.
Extend the project with your own apps
The cluster management project is self-contained as is. You can add your own helm/helmfile based application setups to it. To get started, I recommend to check out the helmfile README.
Stay up to date
We want you to own the cluster management project, so you can upgrade the applications independently of GitLab releases. Still, you might prefer to follow GitLab releases, too, as you can expect improvements to the cluster management project template. How can you do that?
If you followed the kpt based Agent installation setup, you know that kpt can check out a git subtree and merge local changes with upstream changes when you request an update. You can use kpt here, too!
As you manage the cluster management project, you can replace selected applications with their kpt checkouts. For example, you can start following the upstream template with:
cd applicatioins
rm -rf prometheus
kpt pkg get https://gitlab.com/gitlab-org/project-templates/cluster-management.git/applications/prometheus prometheus
and update to the most recent version by running:
kpt pkg update applications/prometheus
Recap
As we have seen in this article, the GitLab Kubernetes Agent provides way more possibilities than focused GitOps tools do. Besides supporting pull-based deployments, we support GitLab users with integrating into their existing CI/CD based workflows. Moreover, a Cluster Management Project template ships with GitLab that supplements the various GitLab integrations to simplify getting started with them.
What's next
Building on our knowledge of the CI/CD tunnel, in the next article we will look into how to use Auto DevOps with the Agent.
Click here for the next tutorial.

