
Obsidian.md is a "knowledge base" application that uses plain text Markdown files stored in a local folder to organize your notes. The product has been growing in popularity, partly because of how extensible it is. There are a lot of community built plugins to help users configure the application to support their specific workflow. There are many people that use Obsidian to write their blog posts. Obsidian offers a paid service to publish your notes directly and is completely compatible with features Obsidian offers. I suggest you support the Obsidian developers if their product works for you. If you are looking for an alternative way to publish, this blog post provides a tutorial for how to publish your notes using GitLab Pages.
You can find an Obsidian.md example in this demonstration project which deploys a GitLab Pages site.
What is Obsidian markdown?
Obsidian is markdown-based system, which means it incorporates tags, plugins and backlinks to create an easy-to-use system. It makes it possible for you to use symbols inside the text that are interpreted as text formatting. This link is a cheat sheet of all the mardown syntax elements.
Benefits of Obsidian.md
Perhaps the most significant benefit of Obsidian markdown (md) is its simple, straightforward design and the excellent support provided. It is also extensible, with plenty of community plugins available.
There is no proprietary formatting, encoding. This gives you greater control over how you backup files and manage change tracking.
Obsidian doesn't support git right out the box, it requires a community plugin called Obsidian Git. However, one the plugin is installed, “you end up with the greatest change tracking/archiving tool at your disposal,” one user raves.
How is Obsidian.md different from other markdown languages?
Obsidian markdown differs from other markdown editors in that it uses the “Linked Thought” feature, which refers to a group of note-taking applications that allow you to link thoughts and notes together seamlessly. Because it is based on the Markdown language, it is light-weight. The tool expands on the markdown language with additional functionality, such as creating links between files, offering "hover over preview" of links and easy inclusion and management of sources.
For example, Obsidian lets you hover over any links added to a document and see a small preview of what the links refers to. You just need to position your mouse over the "Format your notes" link.
Some notable features of Obsidian.md
There’s a visually-striking graph view that’s acts as a map of all your files stored in Obsidian. There is also a markdown format importer that can find and replace certain Markdown syntax elements in your files, and support for math and diagram syntax.
Also noteworthy is that Obsidian makes it easy to publish notes online and it stores all of your files in plaintext markdown files.
Obsidian supports CommonMark and GitHub Flavored Markdown (GFM) so you can embed notes and other files. It stores data in folders of markdown files so you can access your notes with other text editors or markdown apps. Obsidian also lets you open existing folders of markdown files.
Is Obsidian good for notes?
Obsidian is a very capable, free note-taking app (with advanced, paid tiers available as well). It touts itself as a “second brain” that is good for creating a knowledge base, markdown file editor and linking notes together. It is designed to take notes quickly and is easy to use, making it an ideal app. You just open the app, create a new note and start typing.
It works across multiple platforms, including Windows, iOS, Android and Linux.
Obsidian has been called the “most advanced note-taking app.”
Setting up Obsidian notes
Once you download the app, you will see the main Obsidian window, which has the different options on the left, then the folder/files panel and the composition area where you an create and edit your notes.
There are four icons on the left side: collapse panel, open quick switcher, open graph view, and open markdown importer. The collapse panel shows (or hides) the left panel.When you tap the open quick switcher button, it brings up a text box where you can begin to type. The open graph view shows a graph listing the connections each page has. The open markdown importer lets you import markdown files into Obsidian from other applications.
You’ll also see three buttons:
- Open another vault
- Help
- Settings
The vault refers to a collection of notes that you can open or create.
You have the option of either creating a note directly or creating a note via a link. In the former instance, in the folder panel, click on the “new note” button or use the keyboard shortcut for Windows: Control N, or for Mac: Command N. Now you’ve created a new note.
An interesting time-saving feature is that you can create a note via a link and assign a name to that new note. You have to click on the link to actually create it.
You can find a helpful guide here.
Organizing an Obsidian note using folders
When you begin using Obsidian you have to designate where you want to keep your notes. If you already have your notes in markdown format in a folder, you would choose the “open folder as vault” option. Otherwise, you can create a new vault and choose a location to store your notes.
You can drag and drop notes to move them around. There are three icons at the top pane that allow you to create a new note, make a new folder, or change the sorting order.
Obsidian has a powerful search feature that checks the content of your notes and returns all results very quickly. Access it by clicking on the magnifying glass icon at the top to begin a search of your notes.
You’ll already be in editor mode by default when you open Obsidian and you can edit your notes or write new ones. All markdown syntax is visible in this mode. Press Ctrl + E to switch to preview mode, and the syntax will disappear and the note will appear formatted.
If you type a hashtag before a word, Obsidian will detect it and assign it to the note, regardless of where it is in your text.
Get going with Obsidian.md
Obsidan.md, at it's core, is an application that helps manage your markdown files. You can download the application via their site and create a "workspace" folder when you first start the application. When using the application, all of your notes will be created in the folder you choose as your "workspace".
Workspace file structure
Inside your Obsidian workspace, you can have any number of folders and markdown files. When you open a folder in Obsidian as your "workspace",
Obsidian will automatically add a folder .obsidian, which contains your workspace configuration such as application styles and plugins.
A basic workspace file structure could look something like this:
.
├── workspace_folder/
│   └── Other pages/
│   │   └── Another page.md
│   └── .obsidian
│   └── index.md
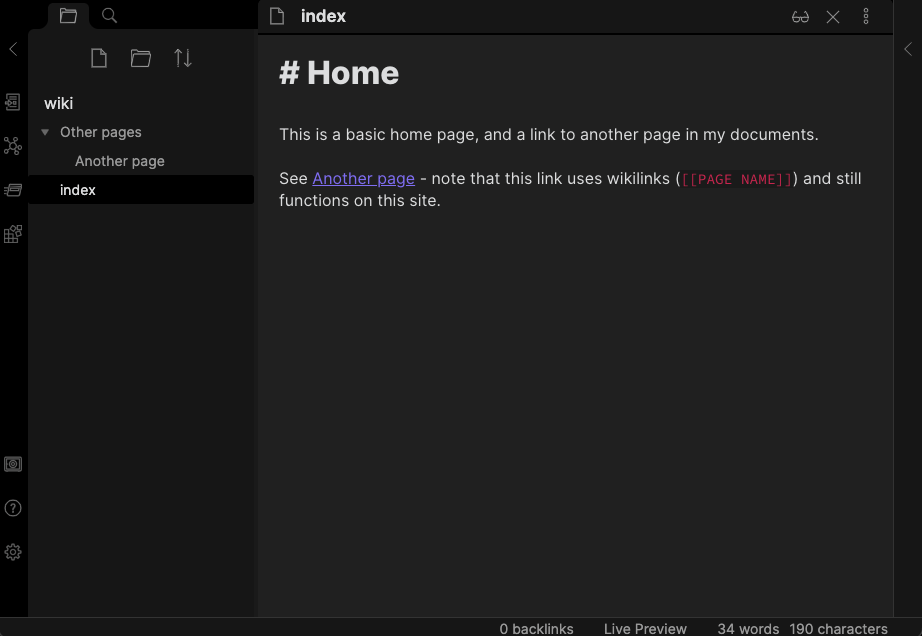
index.md
# Home

This is a basic home page, and a link to another page in my documents.

See [[Another page]] - note that this link uses wikilinks which Obsidian uses to help you easily link to other notes in your workspace.
Other pages/Another page.md
# Another page

This is another page besides the home page.
Generating a static site to host your notes
In order to publish your notes to GitLab Pages, you need to create a static site to show and navigate your notes. There are several open source tools that generate static sites from Markdown documents. After experimenting with a few, I found MkDocs to be the easiest and most compatible with Obsidian.
If you would like to use MkDocs locally, you can install it with pip install mkdocs
(Python and pip as package manager are required).
This is not necessary, because in this tutorial we'll utilize GitLab CI pipelines to install MkDocs and build our site.
There are two small steps you need to make in order to get your existing Obsidian notes working with MkDocs.
File structure
All files that are not your workspace notes will be created outside of your workspace folder. The following folder structure is how this final demo project is going to look.
.
├── wiki/
│   └── .obsidian
│   └── index.md
├── .gitlab-ci.yml
├── mkdocs.yml
└── requirements.txt
wiki/- this is your Obsidian workspace folder.obsidian- the application configuration folder Obsidian uses for your workspace. This will not affect the site.index.md- MkDocs looks forindex.mdin your workspace folder to use as your site's home page..gitlab-ci.yml- the GitLab CI configuration file used to deploy your site.mkdocs.yml- the MkDocs configuration file use to build and customize your site.requirements.txt- this file defines the Python package dependencies for MkDocs.
Basic MkDocs Configuration
You'll need to create a configuration file mkdocs.yml for MkDocs to know how you would like your site to look.
Here are the first four lines we need to configure our notes.
site_name: My Obsidian Notes
site_url: https://group-name.gitlab.io/repo-name
site_dir: public
docs_dir: ./wiki
site_name- is what will be used as the main title for the web site.site_url- is used as the "canonical URL" of the site. You will need to use the default URL provided by GitLab Pages or your custom domain here.site_dir- GitLab Pages requires HTML source code to be contained in apublicfolder. This setting tells MkDocs to put the generated files in thepublicfolder.docs_dir- this is the relative path to your workspace folder. I like to name minewikibecause it's my personal wikipedia. You can name this folder whatever you want.
We'll come back to this configuration file later to add more custom styles to your site.
Configuring GitLab CI
We need to configure a GitLab CI job to install MkDocs and build the web site based on our Obsidian notes. The following
.gitlab-ci.yml file has the basic setup for this:
image: python:3.8-slim

pages:
  stage: deploy
  script:
    # Install all of the python packages for mkdocs
    - pip install -r requirements.txt
    # Build the site using mkdocs
    # --strict aborts the build on any warnings
    # --verbose enables verbose output so that it's easier to see what mkdocs is doing
    # neither --strict nor --verbose are necessary if you choose not to use them
    - mkdocs build --strict --verbose
  artifacts:
    paths:
      - public
  only:
    - main
This job will only run when a change is made to the default branch (main in this case).
Python Packages
Note the line pip install -r requirements.txt in the above .gitlab-ci.yml file. This line is installing MkDocs and any
additional plugins you use to customize your site. You'll need to create a requirements.txt file for this script to work:
# Documentation static site generator & deployment tool
mkdocs>=1.1.2
We'll come back to this requirements.txt file to add a couple more packages to customize our site later.
Customizing your site
One of the benefits of using MkDocs is that it has a lot of extensions you can add on to customize your site. You can change the theme of the site, which adjusts the colors and layout. You can also add extensions that improve how your markdown notes are displayed and interacted with on the site.
Theme
MkDocs includes two built-in themes (mkdocs and readthedocs), as documented on their website.
There are also a lot of community built themes you can search through and choose to use.
My current favorite theme is Material. You can install it by adding it our requirements.txt and choosing
it as your theme in the mkdocs.yml configuration file, or if you are installing it locally you can install it with pip install mkdocs-material.
requirements.txt
# Material theme
mkdocs-material>=8.1.7
mkdocs.yml
theme:
  name: material
  palette:
    scheme: slate
I have chosen the slate scheme for the material theme which makes it darker. You can choose more configuration options
based on their website documentation.
Extensions
MkDocs includes built-in extensions that you can add to your mkdocs.yml configuration file. The
Material theme package also comes with many more extensions that we can use. Below are some of my favorite
for working with Obsidian:
# Extensions
markdown_extensions:
  - footnotes
  - attr_list
  - pymdownx.highlight
  - pymdownx.superfences
  - pymdownx.details
  - pymdownx.magiclink
  - pymdownx.tasklist
  - pymdownx.emoji
  - admonition
  - toc:
    permalink: true
footnotes- adds the ability to define inline footnotes, whech are then rendered below all Markdown content of a document. See documentation here.attr_list- allows you to add HTML attributes and CSS classes to almost every Markdown inline and block-level element with special syntax. See documentation here.pymdownx.highlight- adds support for syntax highlighting of code blocks. See documentation here.pymdownx.superfences- allows for arbitrary nesting of code and content blocks inside each other. See documentation here.pymdownx.details- allows for creating collapsible content blocks. See documentation here.pymdownx.magiclink- provides a number of useful link related features such as auto-link HTML and emails. See documentation here.pymdownx.tasklist- adds support for tasklist syntax. See documentation here.pymdownx.emoji- adds support for inserting emoji via simple short names enclosed within colons (:short_name:). See documentation here.admonition- allows you to create "callouts" in your documentation. See documentation here.toc:permalink- adds a table of contents to your page based on your markdown document, and ensures each link is a permanent link that can be reused. See documentation here.
Plugins
MkDocs also has a community of plugins that add more features when building your site. MkDocs includes some plugins by default that you can use in the configuration file, but in order to use community plugins you have to add them to the
requirements.txt file to be installed as packages. The following two plugins are ones that I've found useful, but you
can look at the list of community plugins here:
plugins:
  - search
  - roamlinks
search- provides a search bar at the top of your site to easily search your documents. See documentation here.roamlinks- adds support for Obsidian's wikilinks feature. See documentation here.
requirements.txt
# Wikilinks support
mkdocs-roamlinks-plugin>=0.1.3
If installing locally, you can install roamlinks with pip install mkdocs-roamlinks-plugin.
Combining it all together
After all of the above work is done, you should have a file structure that looks like this:
.
├── wiki/
│   └── .obsidian
│   └── index.md
├── .gitlab-ci.yml
├── mkdocs.yml
└── requirements.txt
Here are the contents of the three main files that you've been editing:
.gitlab-ci.yml
image: python:3.8-slim

pages:
  stage: deploy
  script:
    - pip install -r requirements.txt
    - mkdocs build --strict --verbose
  artifacts:
    paths:
      - public
  only:
    - main
mkdocs.yml
site_name: My Obsidian Notes
site_url: https://group-name.gitlab.io/repo-name
site_dir: public

theme:
  name: material
  palette:
    scheme: slate

# Extensions
markdown_extensions:
  - footnotes
  - attr_list
  - pymdownx.highlight
  - pymdownx.superfences
  - pymdownx.details
  - pymdownx.magiclink
  - pymdownx.tasklist
  - pymdownx.emoji
  - admonition
  - toc:
    permalink: true

plugins:
  - search
  - roamlinks
requirements.txt
# Documentation static site generator & deployment tool
mkdocs>=1.1.2

# Material theme
mkdocs-material>=8.1.7

# Wikilinks support
mkdocs-roamlinks-plugin>=0.1.3
Now that your files are all finished, the last step is to push your changes to your GitLab repository and wait for your pipeline to finish. Once finished, you can go to your default domain provided by GitLab or you can configure GitLab Pages to use a custom domain.
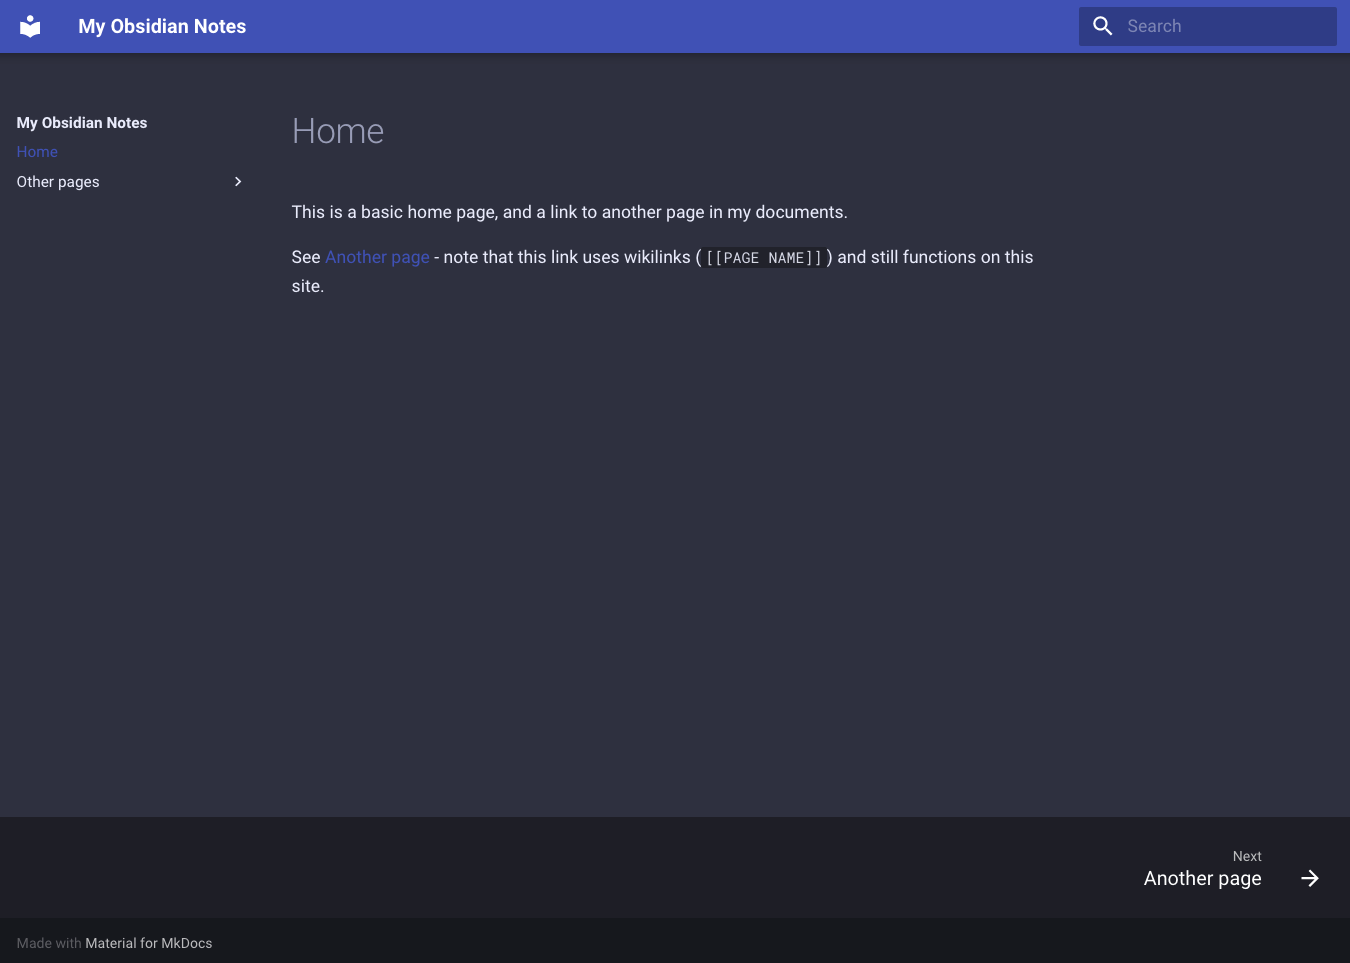
Here's a screenshot of the demonstration site created in this tutorial:
Is the Obsidian note-taking secure?
Users overall believe Obsidian is safe to use. One user said you maintain full control over your notes and it provides the ability to encrypt your vault.
This lawyer maintains that Obsidian is the most-secure note-taking app available. Others claim there are no security threats with Obsidian and users don’t have to worry about data being lost or transferred to third parties.
Because your files are stored on your own computer, this keeps your data safe and private according to another user.
Where to find more information on Obsidian markdown
You can find more information in this Obsidian markdown guide. An Obsidian roadmap is available here. Of course, you can also go to the Obsidan website.
Share your Obsidian.md deployments in the comments.


