Published on: April 12, 2021
11 min read
How to achieve a GitLab Jira integration
Check out how to integrate GitLab self-managed with Atlassian Jira to connect your merge requests, branches, and commits to a Jira issue.
This is the second in a series of posts on GitLab Jira integration strategies. The first post explains how to integrate GitLab.com with Jira Cloud.
The advantages of a GitLab Jira integration are clear:
- One GitLab project integrates with all the Jira projects in a single Jira instance.
- Quickly navigate to Jira issues from GitLab.
- Detect and link to Jira issues from GitLab commits and merge requests.
- Log GitLab events in the associated Jira issue.
- Automatically close (transition) Jira issues with GitLab commits and merge requests.
Here's a step-by-step guide of everything you need to know to achieve a GitLab Jira integration.
Pre-configuration
As you approach configuring your GitLab project to Jira, you can choose from two options that best fit your company or organization's needs. You can either:
- Use a service template by having a GitLab administrator provide default values for configuring integrations at the project level. When enabled, the defaults are applied to all projects that do not already have the integration enabled or do not otherwise have custom values enabled. The Jira integration values are all pre-filled on each project's configuration page for jira integration. If you disable the template, these values no longer appear as defaults, while any values already saved for an integration remain unchanged.
- Configure integrations at a specific project level that will contain custom values specific to that project and that project alone.
It should be noted that each GitLab project can be configured to connect to an entire Jira instance. That means one GitLab project can interact with all Jira projects in that instance, once configured. Therefore, you will not have to explicitly associate a GitLab project with any single Jira project.
GitLab offers several different options that allow you to integrate Jira in a way that best fits you and your team's needs based on how you’ve set up your Jira software. Let’s take a deeper look into how to set-up each of these available options.
How to configure Jira
The first step in setting up your Gitlab Jira integration is having your Jira configuration in order.
Jira Server supports basic authentication. When connecting, a username and password are required. Note that connecting to Jira Server via CAS is not possible. Set up a user in Jira Server first and then proceed to Configuring GitLab.
Jira Cloud supports authentication through an API token, and in order to begin the process you need to start by creating one within Jira. When connecting to Jira Cloud, an email and API token are required. Set up a user in Jira Cloud first and then proceed to Configuring GitLab.
Create an API token here: https://id.atlassian.com/manage-profile/security/api-tokens
- Log in to id.atlassian.com with your email address. It is important that the user associated with this email address has write access to projects in Jira
- Click Create API token.

Jira API token creation
- Click Copy, or click View and write down the new API token. It is required when configuring GitLab.
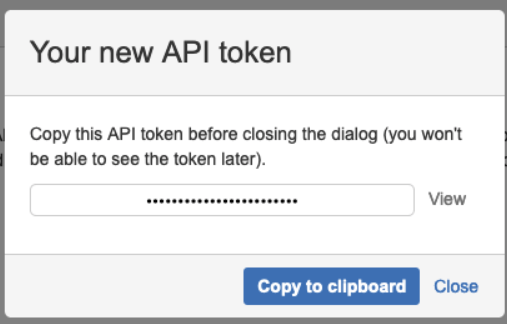
Jira API token copy to clipboard
How to configure GitLab
As mentioned above, you can begin setting up the Jira integration either by using a service template that defaults all GitLab projects to pre-fill Jira values or you can set up at an individual project level.
To set up a service template:
- 1a. Navigate to the Admin Area > Service Templates and choose the Jira service template.
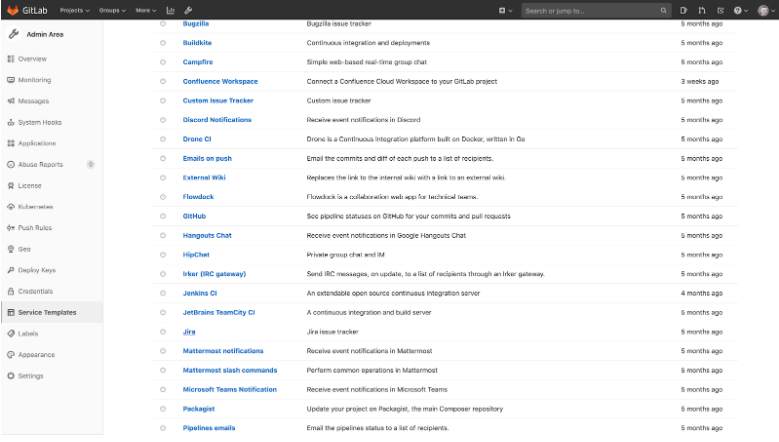
GitLab Service Templates
2a. For each project, you will still need to configure the issue tracking
URLs by replacing
![]()
Issue Tracker ID
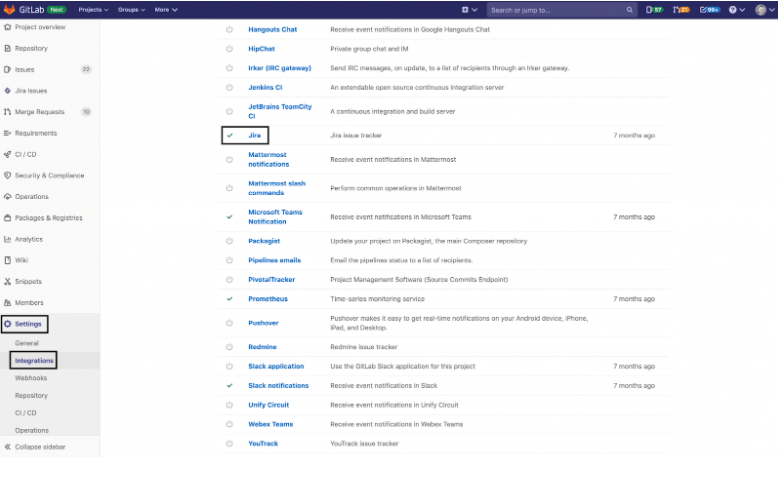
To set up a individual project template:
- 1b. To enable the Jira integration in a project, navigate to the Integrations page and click the Jira service.
Enable Jira Integration
- 2b. Select a Trigger action. This determines whether a mention of a Jira issue in GitLab commits, merge requests, or both, should link the Jira issue back to that source commit/MR and transition the Jira issue, if indicated.
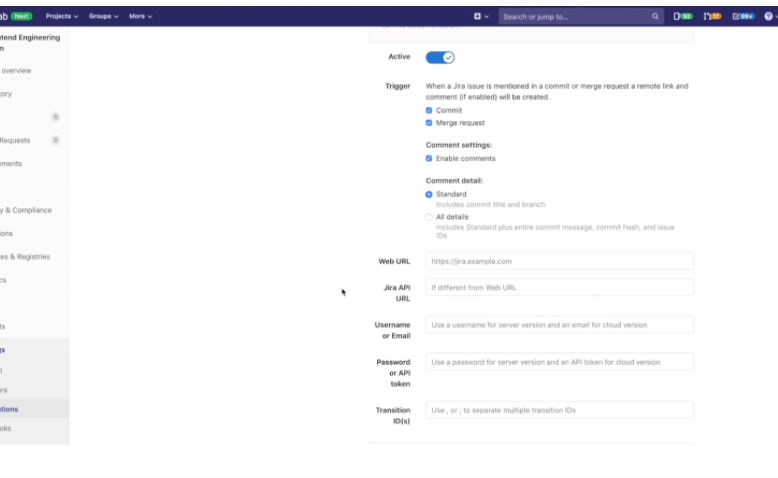
Select Trigger Action
- 3b. To include a comment on the Jira issue when the above reference is made in GitLab, check Enable comments.
- 3c. Enter the further details on the page as described in the following table: | Field | Description | | --- | --- | | Web URL | The base URL to the Jira instance web interface which is being linked to this GitLab project. E.g., https://jira.example.com. | | Jira API URL | The base URL to the Jira instance API. Web URL value will be used if not set. E.g., https://jira-api.example.com. Leave this field blank (or use the same value of Web URL) if using Jira Cloud. | | Username or Email | Use username for Jira Server or email for Jira Cloud | | Transition ID | Required for closing Jira issues via commits or merge requests. This is the ID of a transition in Jira that moves issues to a desired state. If you insert multiple transition IDs separated by , or ;, the issue is moved to each state, one after another, using the given order. (See below for obtaining a transition ID) |
In order to obtain a transition ID, do the following:
- By using the API, with a request like https://yourcompany.atlassian.net/rest/api/2/issue/ISSUE-123/transitions using an issue that is in the appropriate “open” state
Note: The transition ID may vary between workflows (e.g., bug vs. story), even if the status you are changing to is the same.

Transition ID
Your GitLab project can now interact with all Jira projects in your instance and the project now displays a Jira link that opens the Jira project.
When you have configured all settings, click Test settings and save changes.
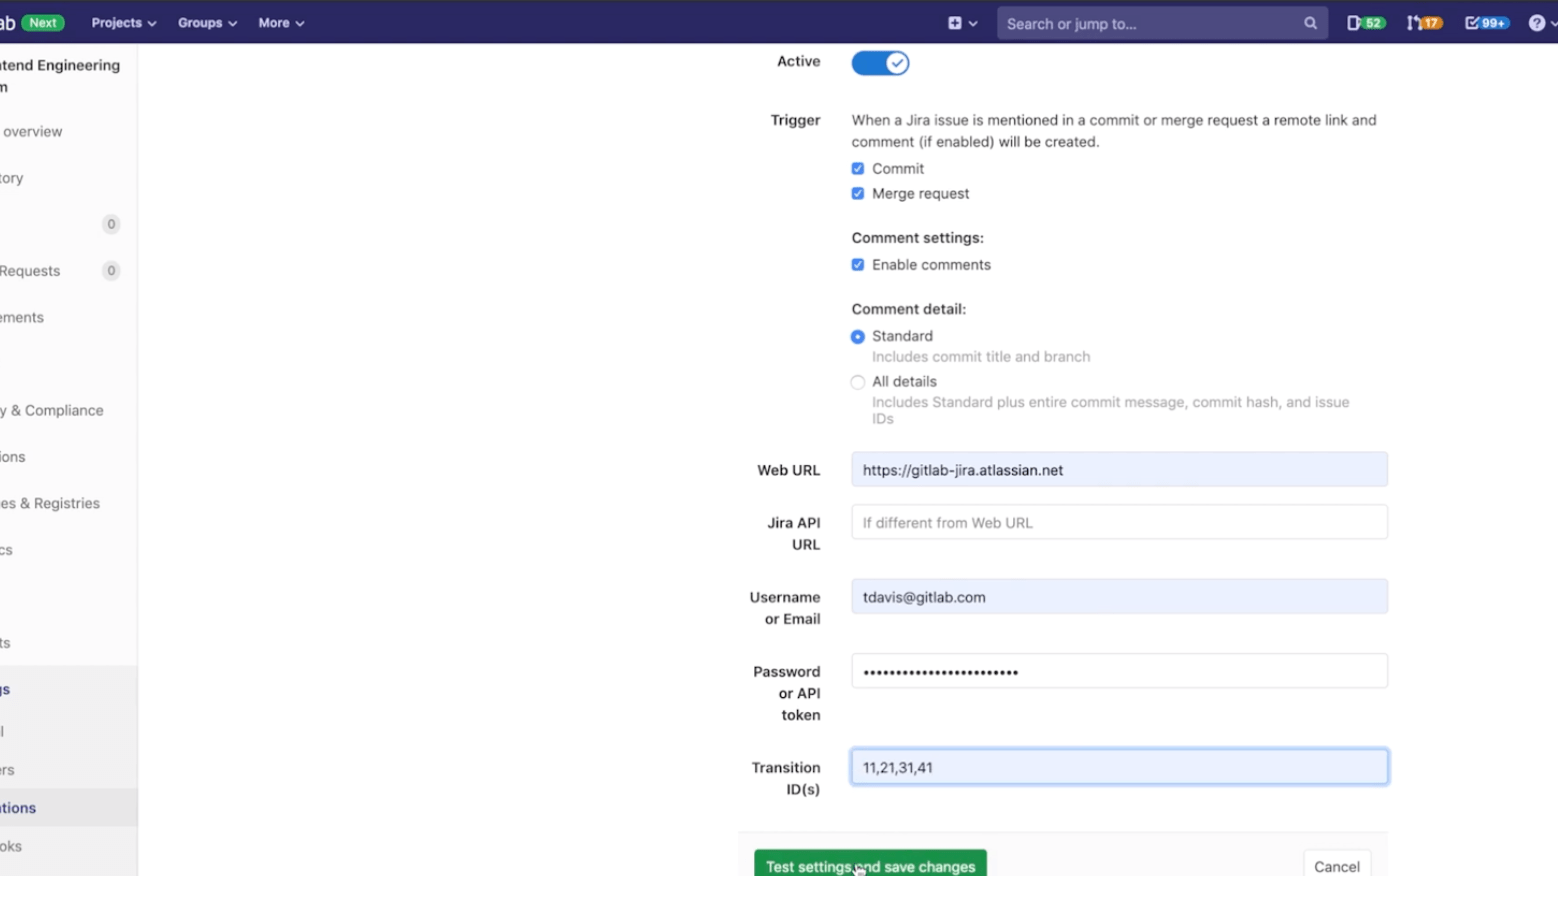
Test settings and save changes
It should be noted that you can only display issues from a single Jira project within a given GitLab project.
The integration is now activated:
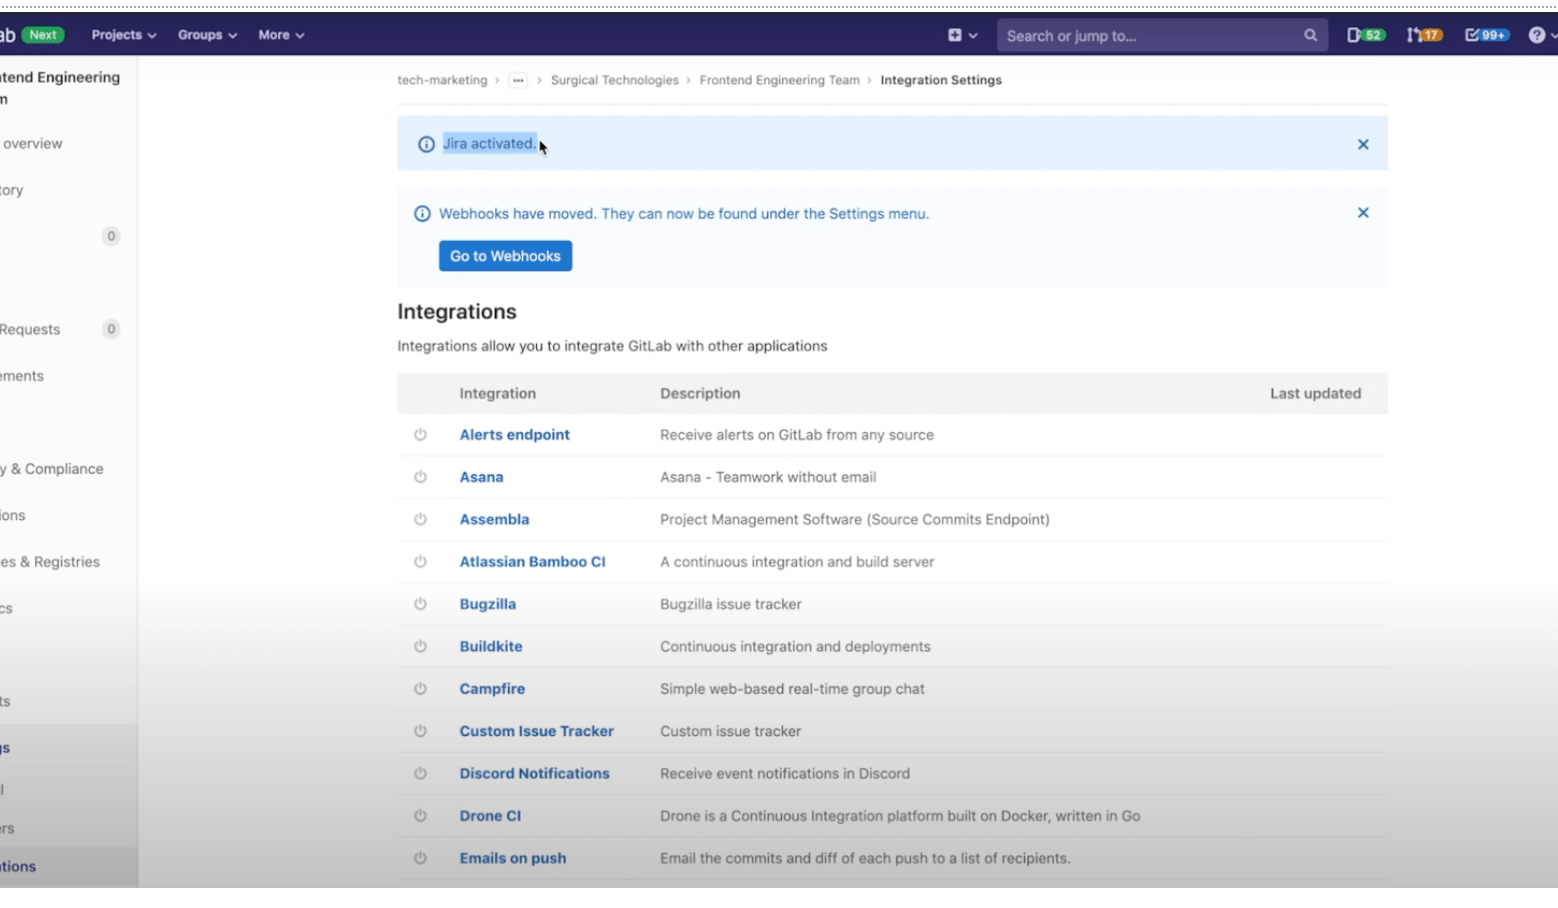
Active Jira Integration
Jira Issues
By now you should have configured Jira and enabled the Jira service in GitLab. If everything is set up correctly you should be able to reference and close Jira issues by just mentioning their ID in GitLab commits and merge requests.
Jira issue IDs must be formatted in uppercase for the integration to work.
1.How to reference Jira issues
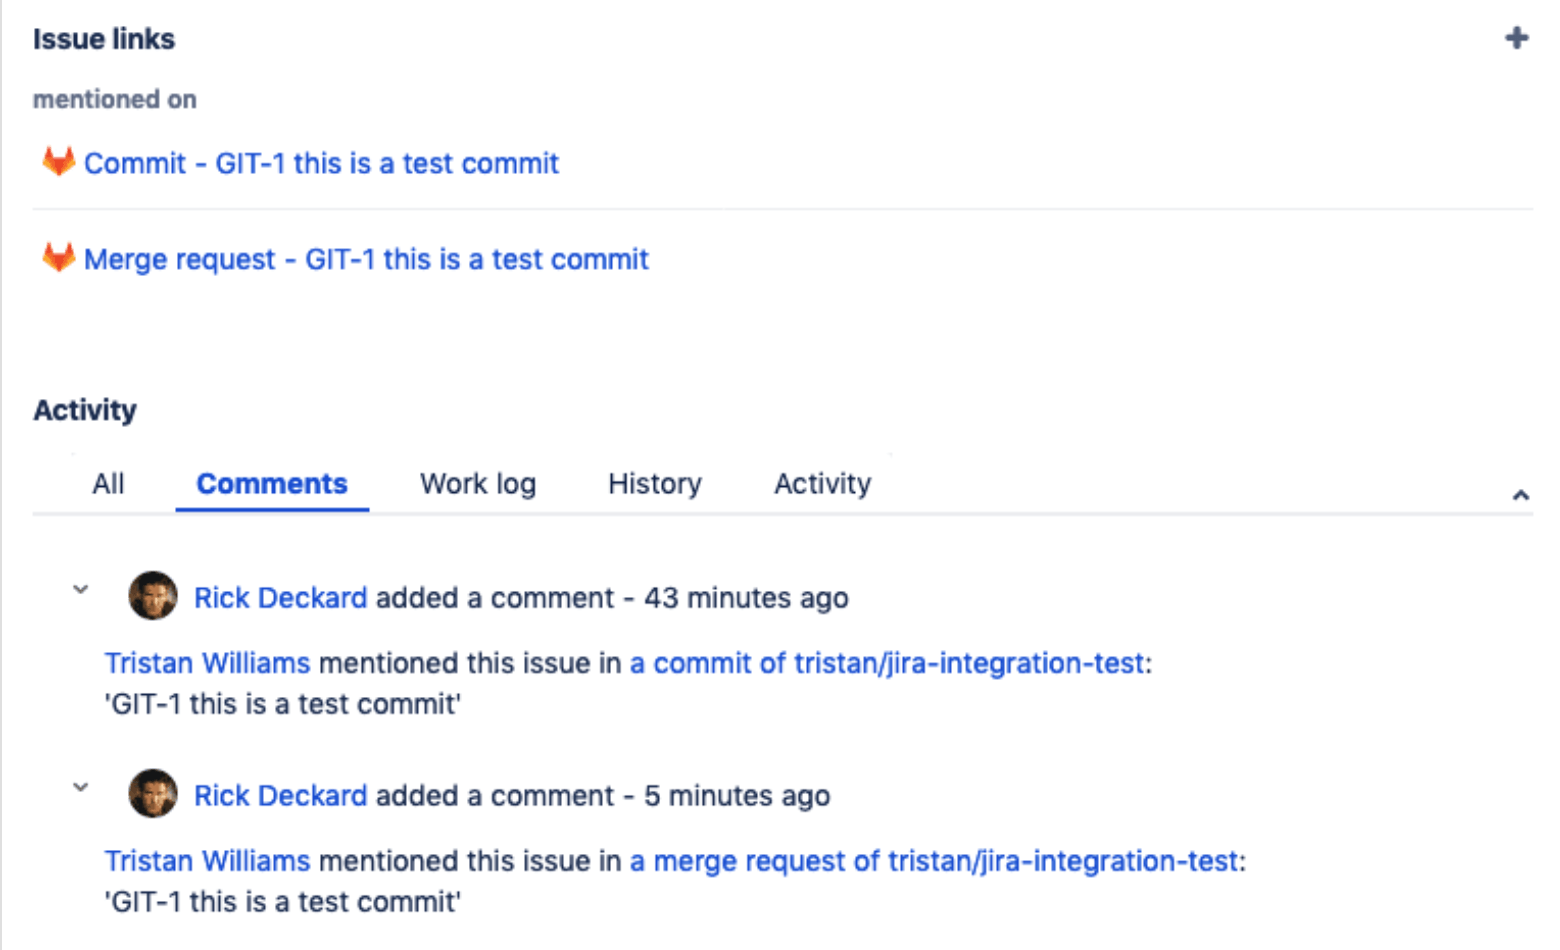
When GitLab project has Jira issue tracker configured and enabled, mentioning Jira issue in GitLab will automatically add a comment in Jira issue with the link back to GitLab. This means that in comments in merge requests and commits referencing an issue, e.g., PROJECT-7, will add a comment in Jira issue in the format:
USER mentioned this issue in RESOURCE_NAME of PROJECT_NAME|LINK_TO_COMMENT:
ENTITY_TITLE
- USER A user that mentioned the issue. This is the link to the user profile in GitLab.
- LINK_TO_THE_COMMENT Link to the origin of mention with a name of the entity where Jira issue was mentioned.
- RESOURCE_NAME Kind of resource which referenced the issue. Can be a commit or merge request.
- PROJECT_NAME GitLab project name.
- ENTITY_TITLE Merge request title or commit message first line.
Reference Jira issues
For example, the following commit will reference the Jira issue with PROJECT-1 as its ID:
git commit -m "PROJECT-1 Fix spelling and grammar"
Closing Jira Issues
Jira issues can be closed directly from GitLab when you push code by using trigger words in commits and merge requests. When a commit which contains the trigger word followed by the Jira issue ID in the commit message is pushed, GitLab will add a comment in the mentioned Jira issue and immediately close it (provided the transition ID was set up correctly).
There are currently three trigger words, and you can use either one to achieve the same goal:
- Resolves PROJECT-1
- Closes PROJECT-1
- Fixes PROJECT-1
where PROJECT-1 is the ID of the Jira issue.
Notes:
- Only commits and merges into the project’s default branch (usually main or master) will close an issue in Jira. You can change your projects default branch under project settings.
- The Jira issue will not be transitioned if it has a resolution.
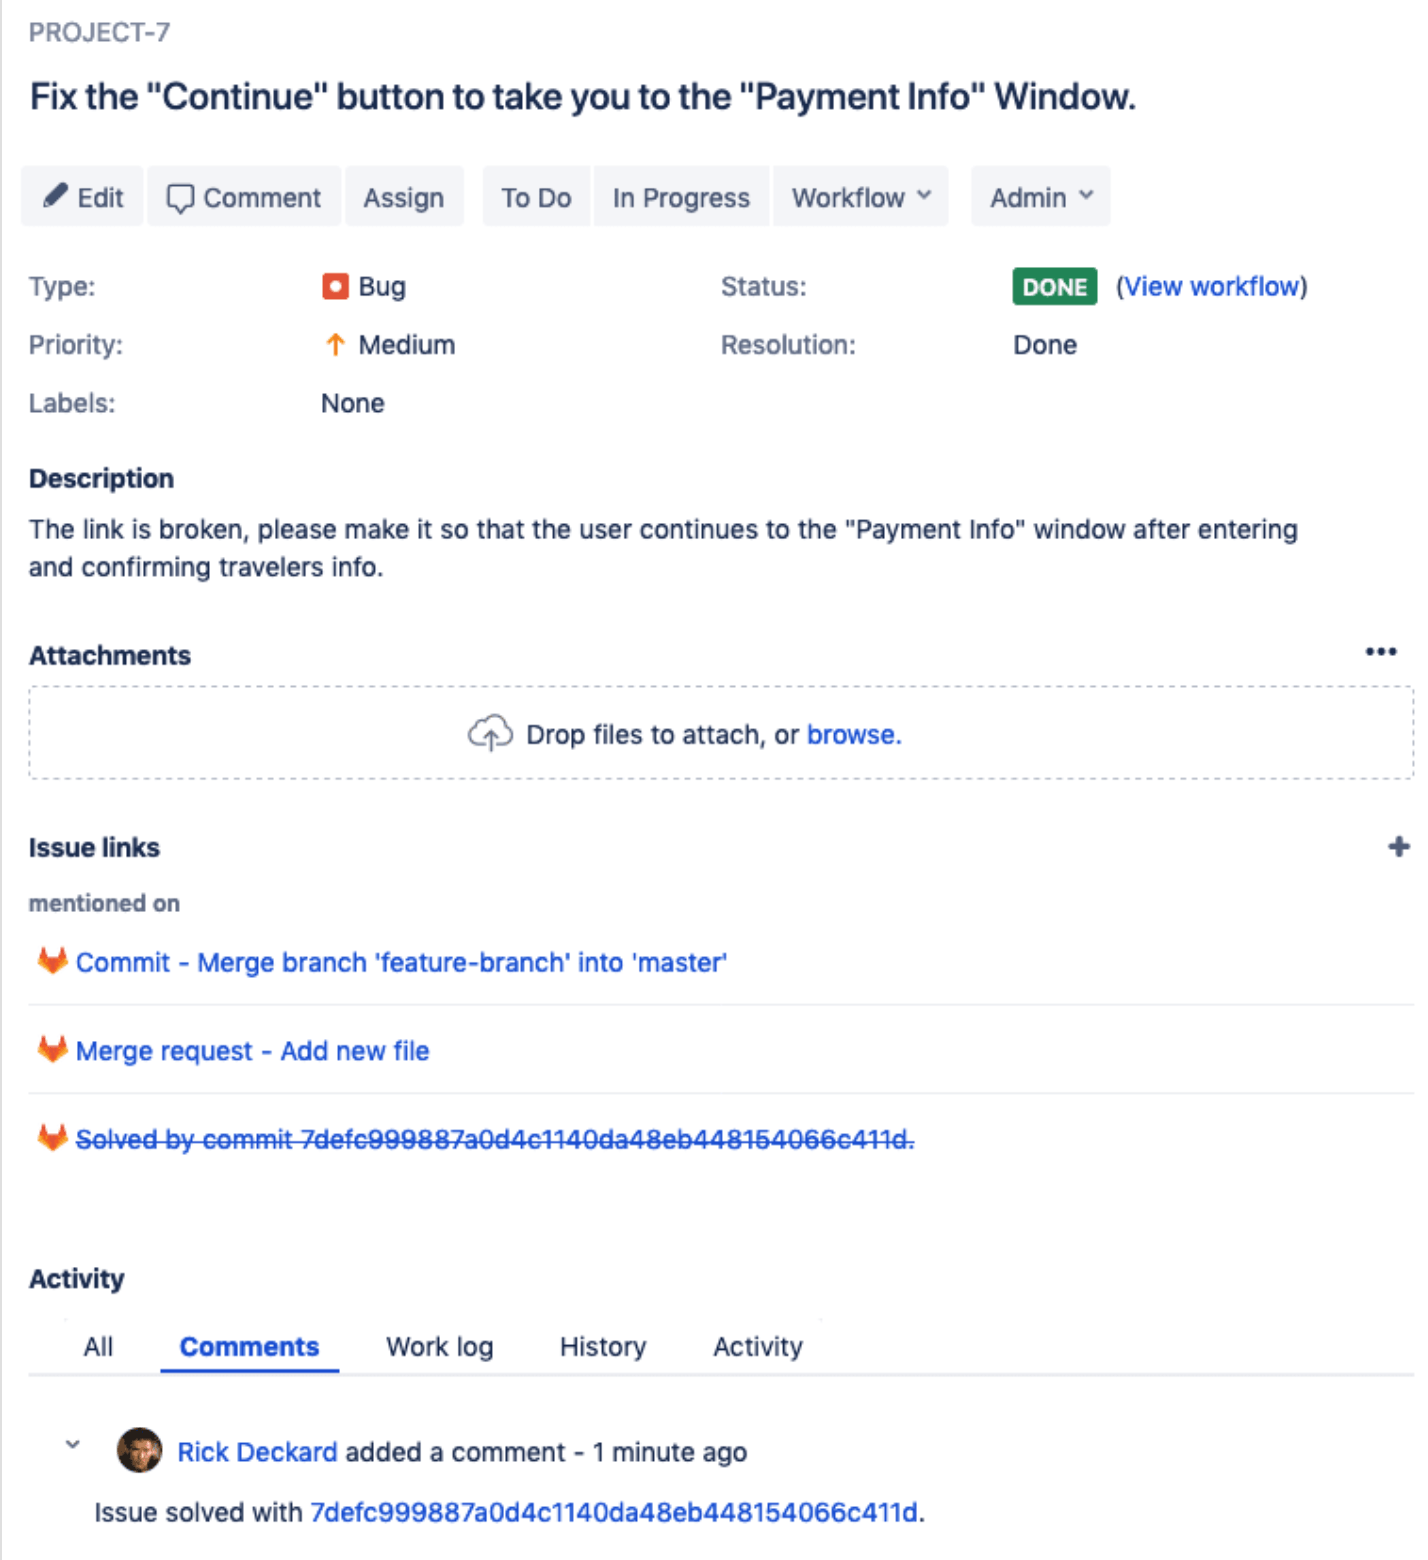
Let’s consider the following example:
- For the project named PROJECT in Jira, we implemented a new feature and created a merge request in GitLab.
- This feature was requested in Jira issue PROJECT-7 and the merge request in GitLab contains the improvement
- In the merge request description we use the issue closing trigger Closes PROJECT-7.
- Once the merge request is merged, the Jira issue will be automatically closed with a comment and an associated link to the commit that resolved the issue.
In the following screenshot you can see what the link references to the Jira issue look like.
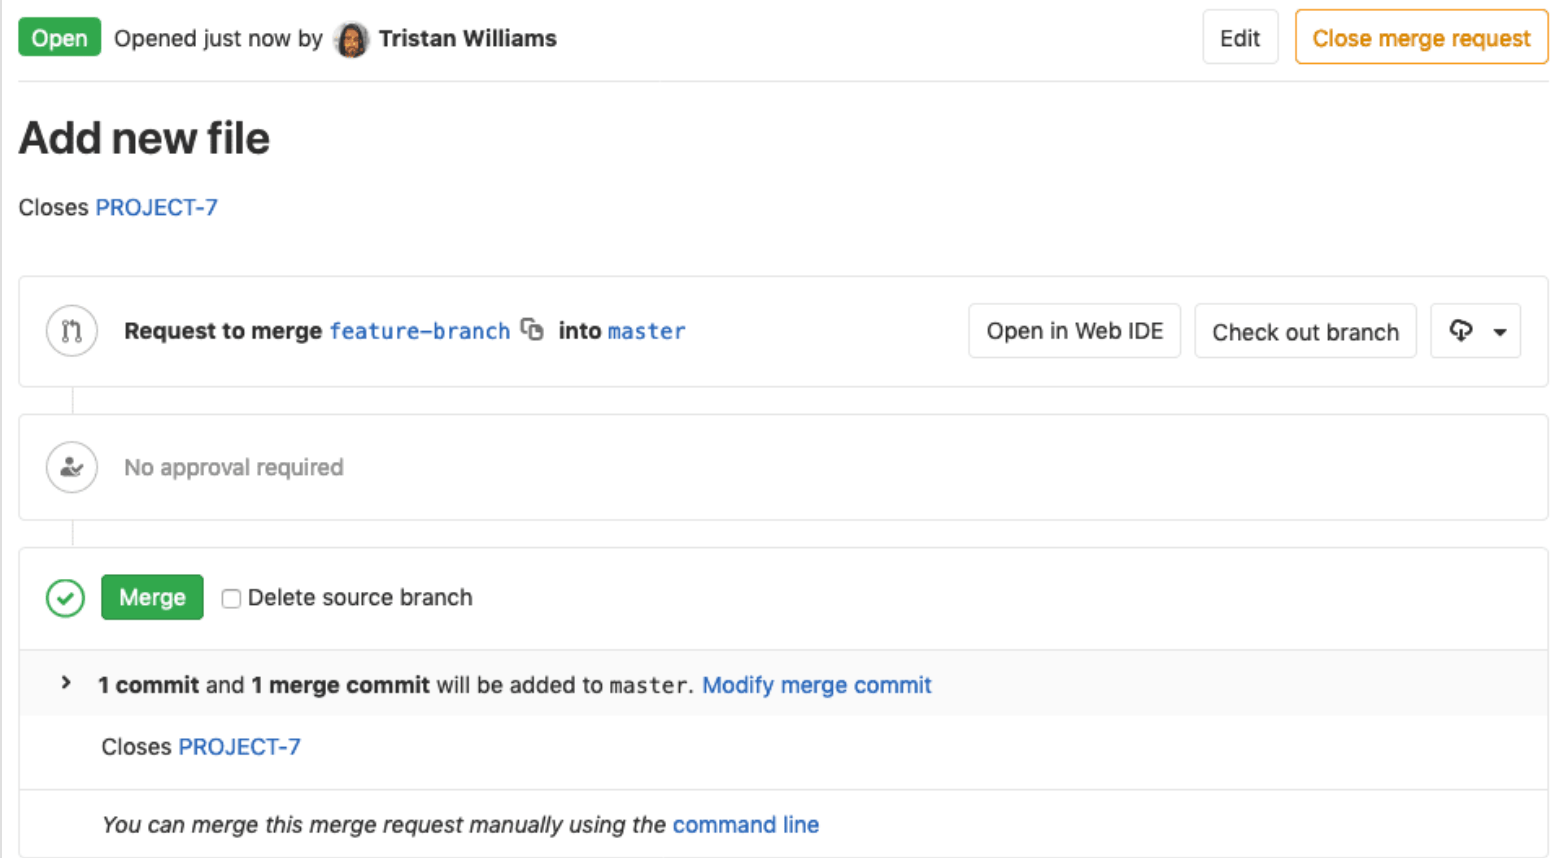
GitLab link references
Once this merge request is merged, the Jira issue will be automatically closed with a link to the commit that resolved the issue.
Jira Issue auto closes when GitLab MR merges
Development Panel Integration Set-Up
A. Jira DVCS configuration
When using the Jira DVCS configuration, there are several different configurations you can make that are dependent on how your Jira/GitLab instances are managed.
- If you are using self-managed GitLab, make sure your GitLab instance is accessible by Jira.
- If you’re connecting to Jira Cloud, ensure your instance is accessible through the internet.
- If you are using Jira Server, make sure your instance is accessible however your network is set up.
B. GitLab account configuration for DVCS
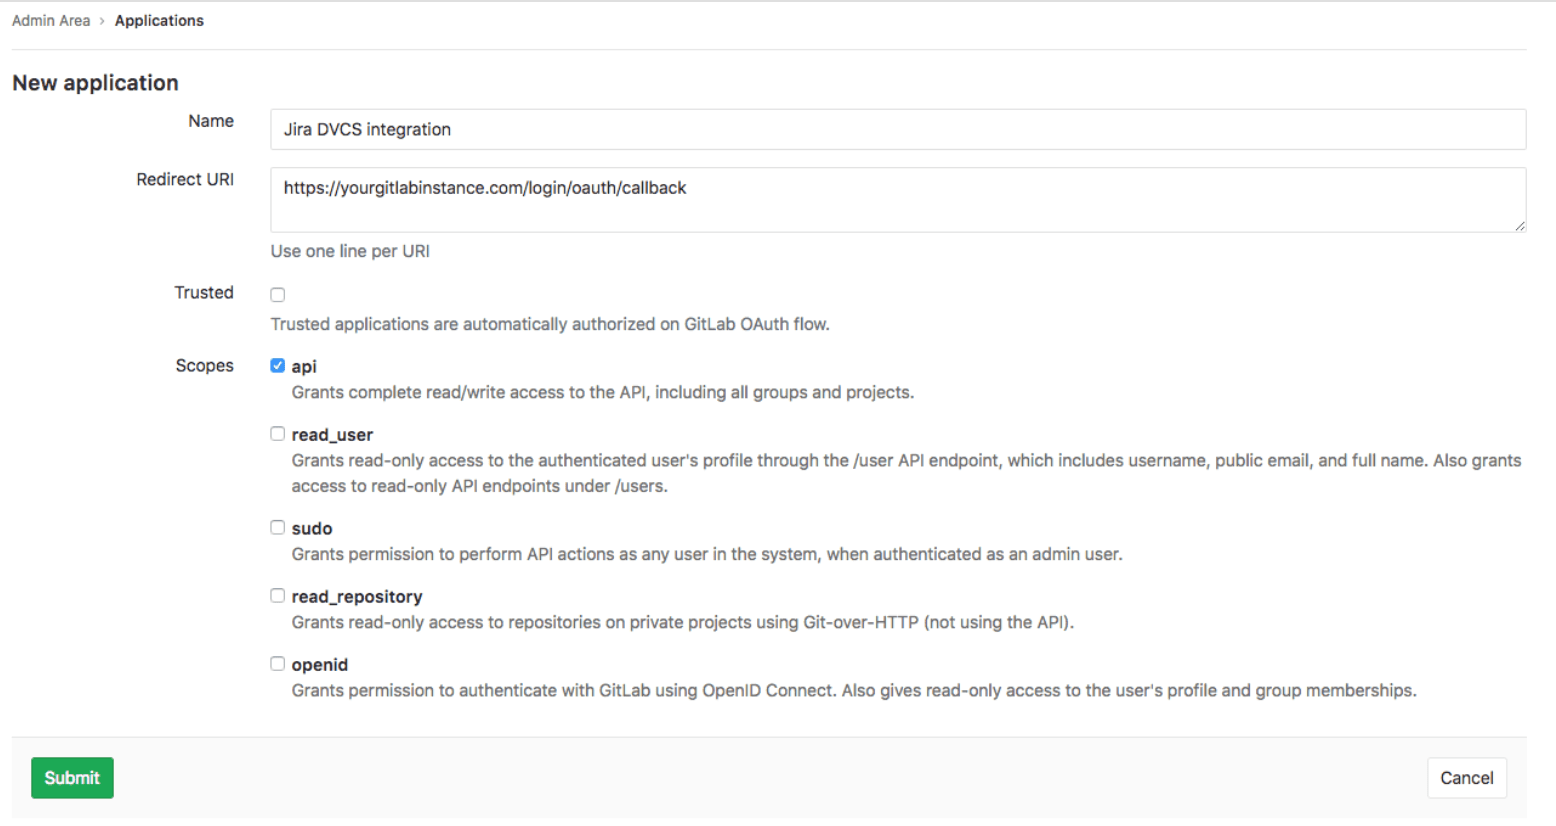
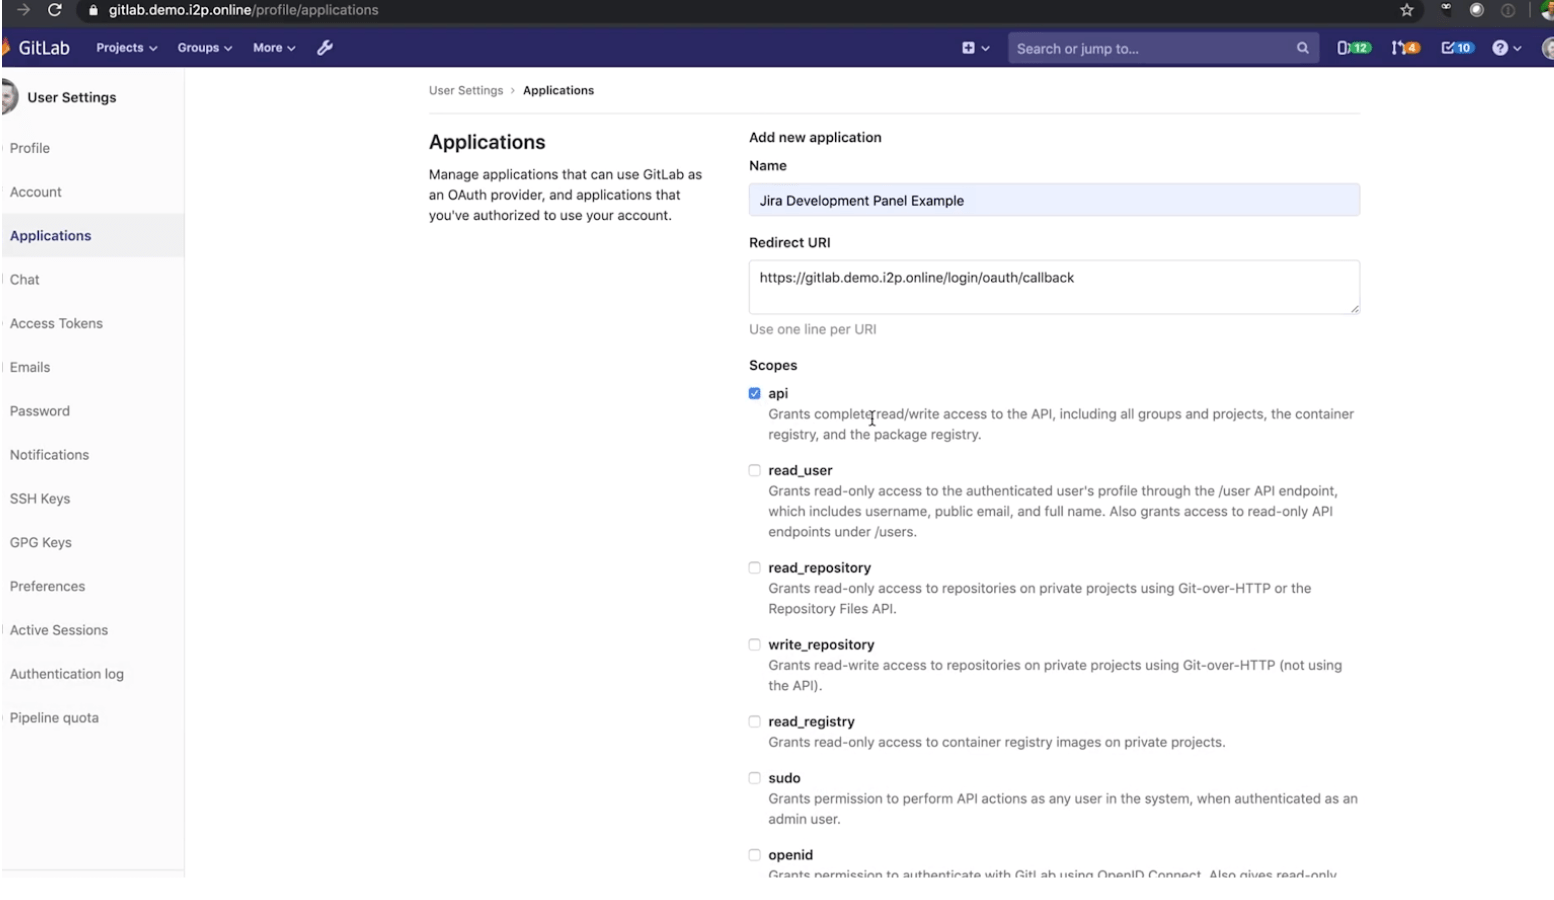
- In GitLab, create a new application to allow Jira to connect with your GitLab account.
While signed in to the GitLab account that you want Jira to use to connect to GitLab, click your profile avatar at the top right, and then click Settings > Applications. Use the form to create a new application.
- In the Name field, enter a descriptive name for the integration, such as Jira.
For the Redirect URI field, enter https://<gitlab.example.com>/login/oauth/callback, replacing <gitlab.example.com> with your GitLab instance domain. For example, if you are using GitLab.com, this would be https://gitlab.com/login/oauth/callback.
Note: If using a GitLab version earlier than 11.3, the Redirect URI must be https://<gitlab.example.com>/-/jira/login/oauth/callback. If you want Jira to have access to all projects, GitLab recommends that an administrator create the application.
Admin Creates Integration
- Check API in the Scopes section and uncheck any other checkboxes.
- Click Save application. GitLab displays the generated Application ID and Secret values. Copy these values, which you will use in Jira.
Tip: To ensure that regular user account maintenance doesn’t impact your integration, create and use a single-purpose jira user in GitLab.
Jira DVCS Connector setup
Note: If you’re using GitLab.com and Jira Cloud, we recommend you use the GitLab for Jira app, unless you have a specific need for the DVCS Connector.
- Ensure you have completed the GitLab configuration.
Check api in Applications
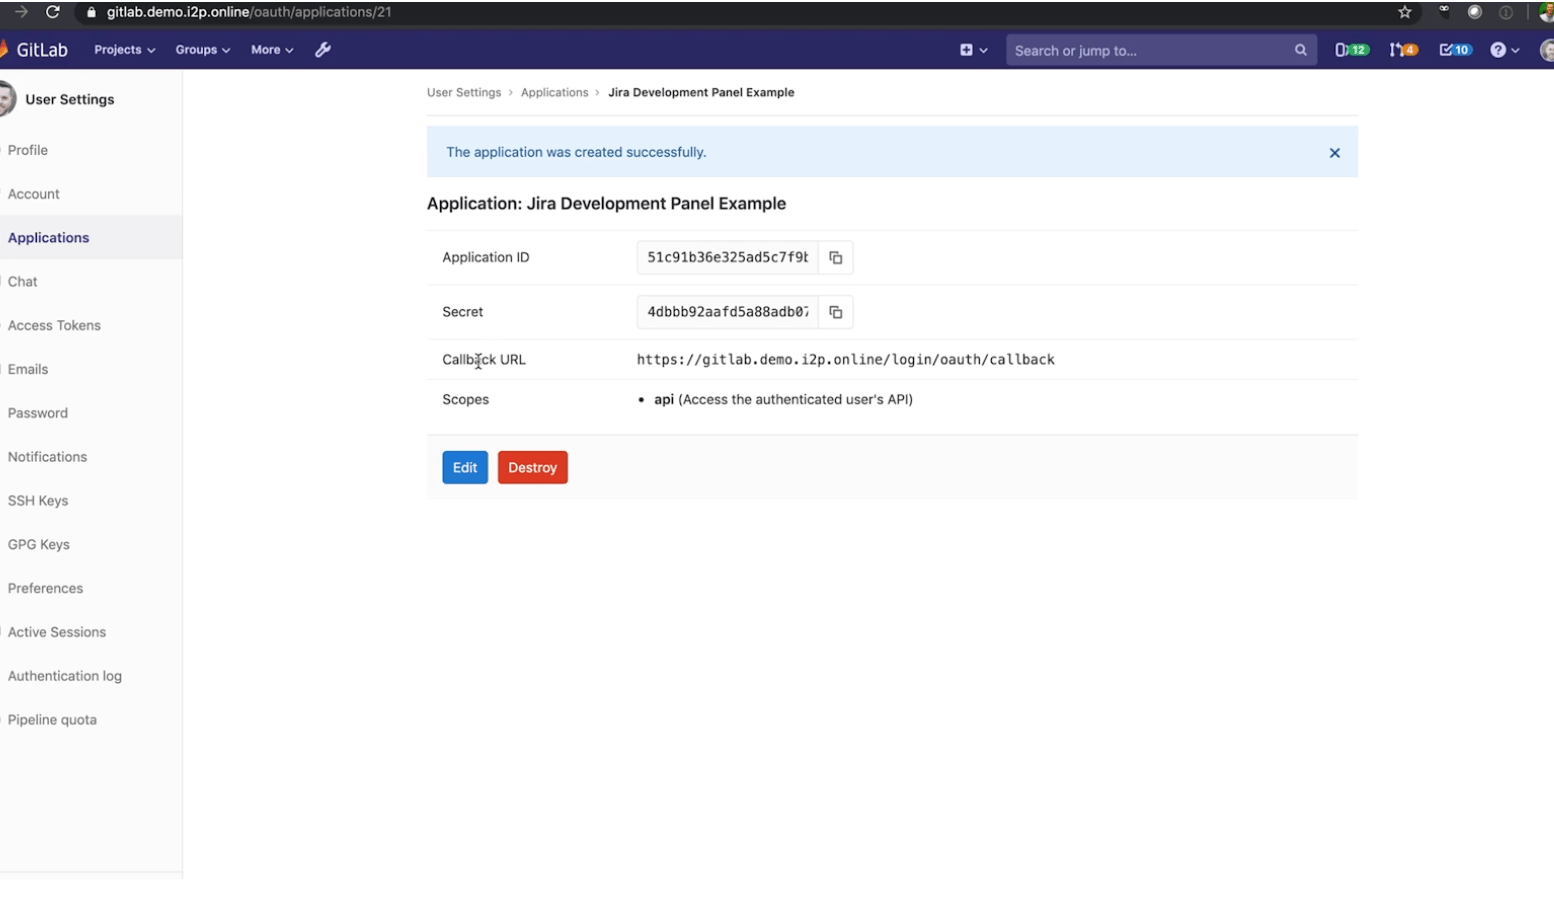
Application was created successfully
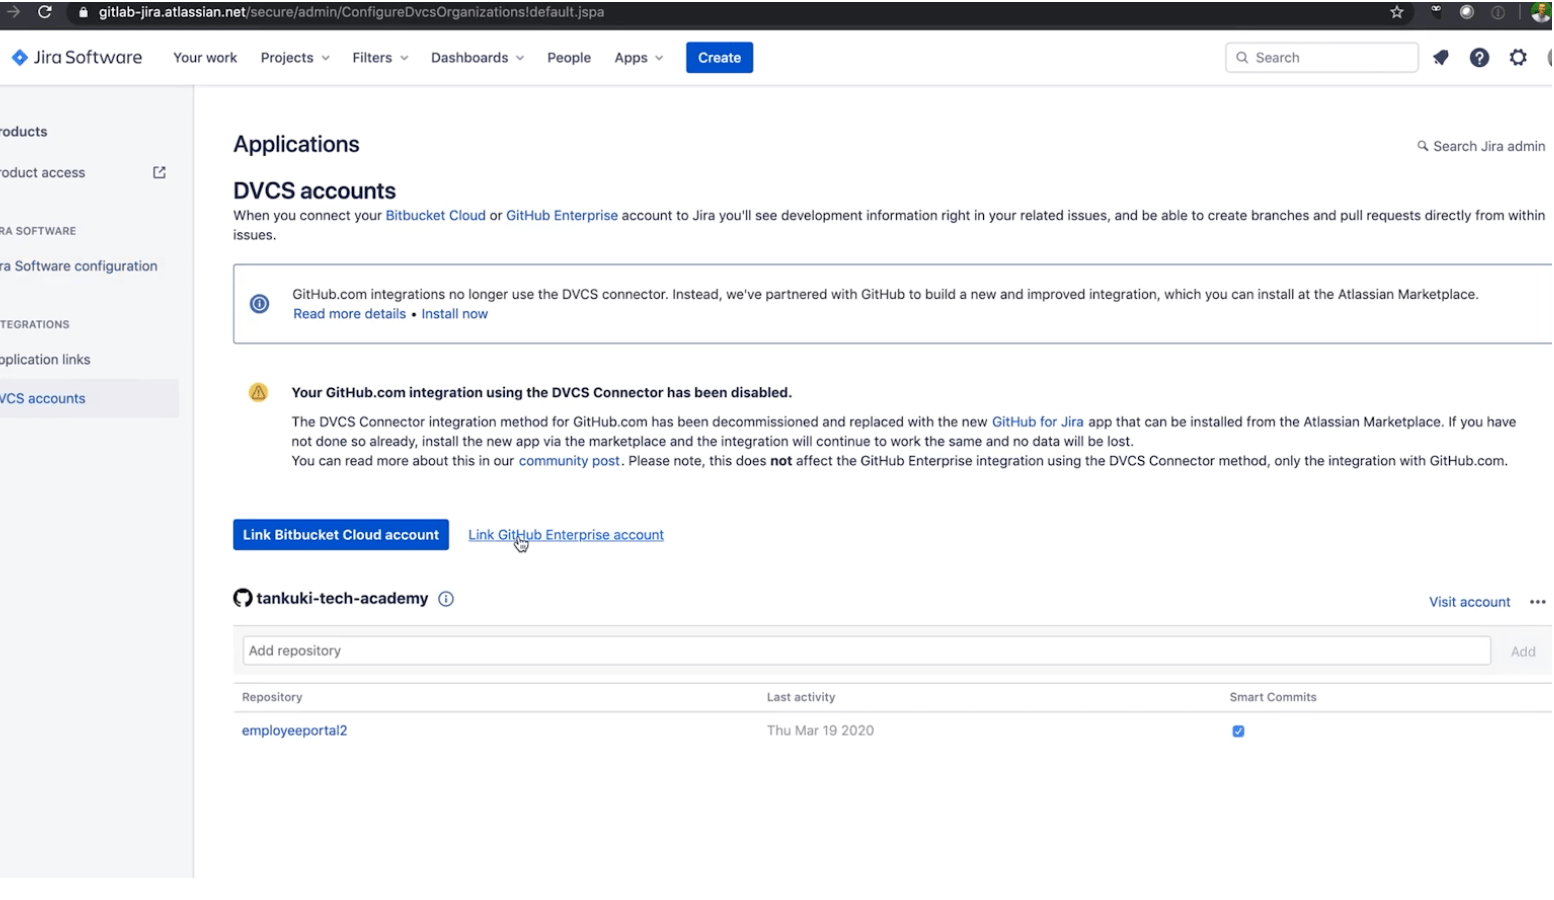
- If you’re using Jira Server, go to Settings (gear) > Applications > DVCS accounts. If you’re using Jira Cloud, go to Settings (gear) > Products > DVCS accounts.
Go to DVCS in Settings
- Click Link GitHub Enterprise account to start creating a new integration. (We’re pretending to be GitHub in this integration, until there’s additional platform support in Jira.)
Click Link to start new integration
- Complete the form:
Select GitHub Enterprise for the Host field.
In the Team or User Account field, enter the relative path of a top-level GitLab group that you have access to, or the relative path of your personal namespace.
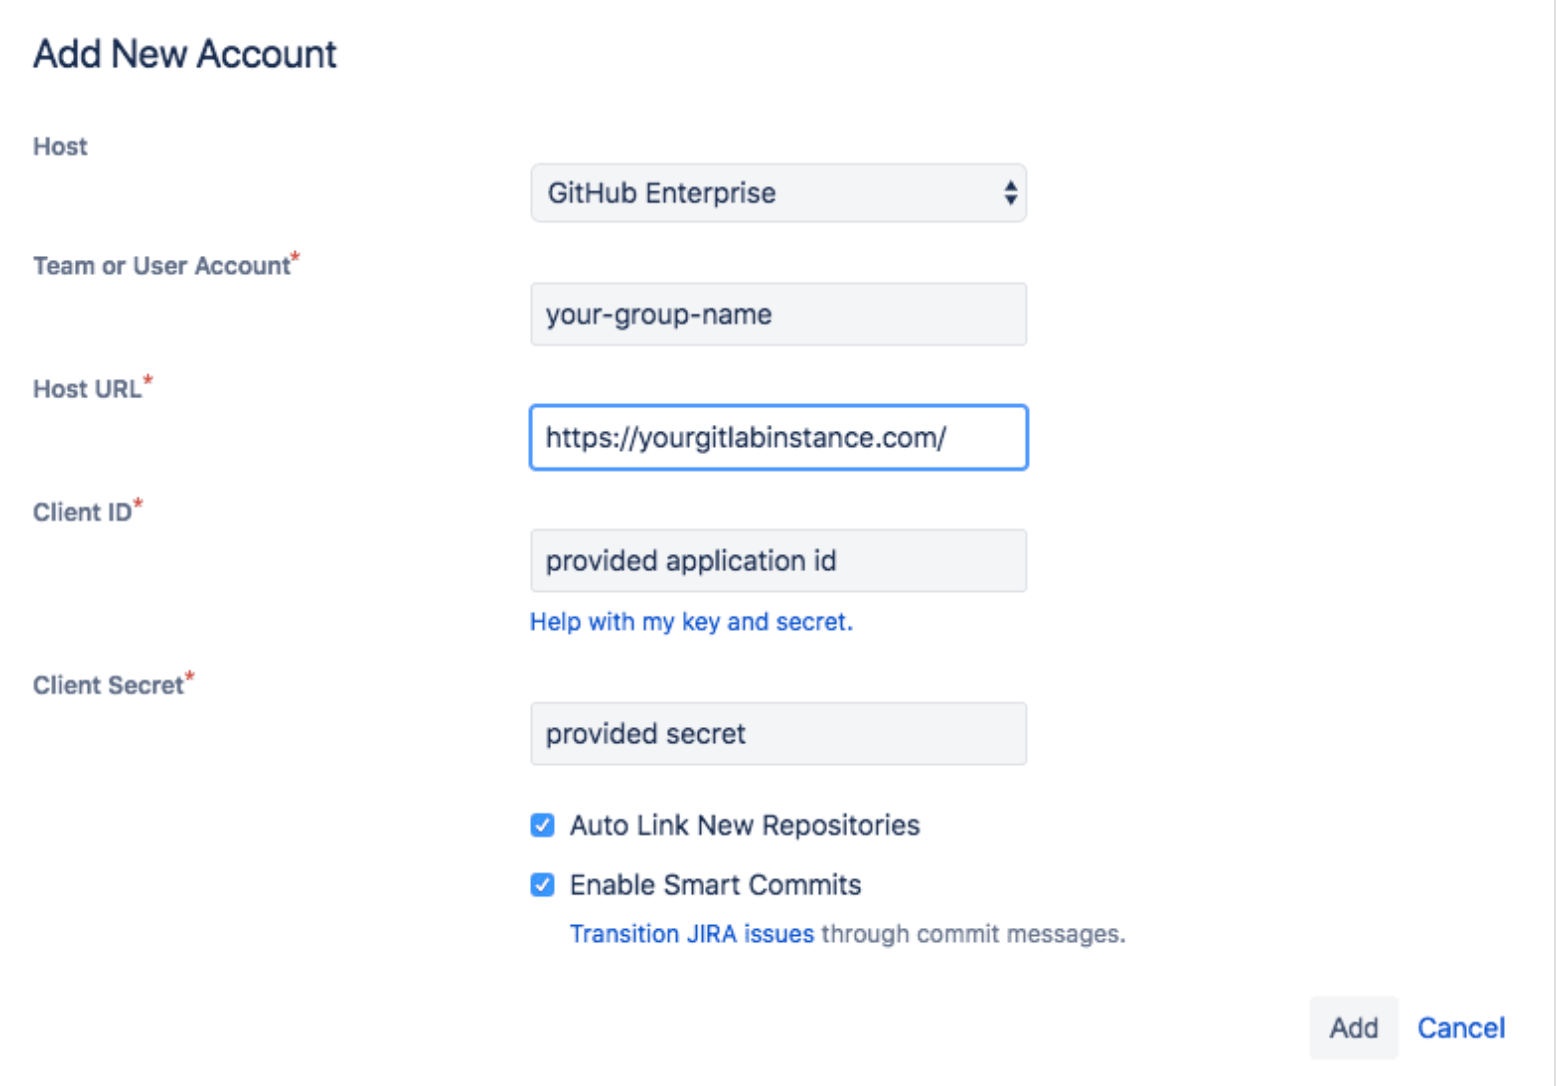
Add new account
In the Host URL field, enter https://<gitlab.example.com>/, replacing <gitlab.example.com> with your GitLab instance domain. For example, if you are using GitLab.com, this would be https://gitlab.com/.
Note: If using a GitLab version earlier than 11.3 the Host URL value should be https://<gitlab.example.com>/-/jira
For the Client ID field, use the Application ID value from the previous section.
For the Client Secret field, use the Secret value from the previous section.
Ensure that the rest of the checkboxes are checked.
- Click Add to complete and create the integration.
Jira takes up to a few minutes to know about (import behind the scenes) all the commits and branches for all the projects in the GitLab group you specified in the previous step. These are refreshed every 60 minutes.
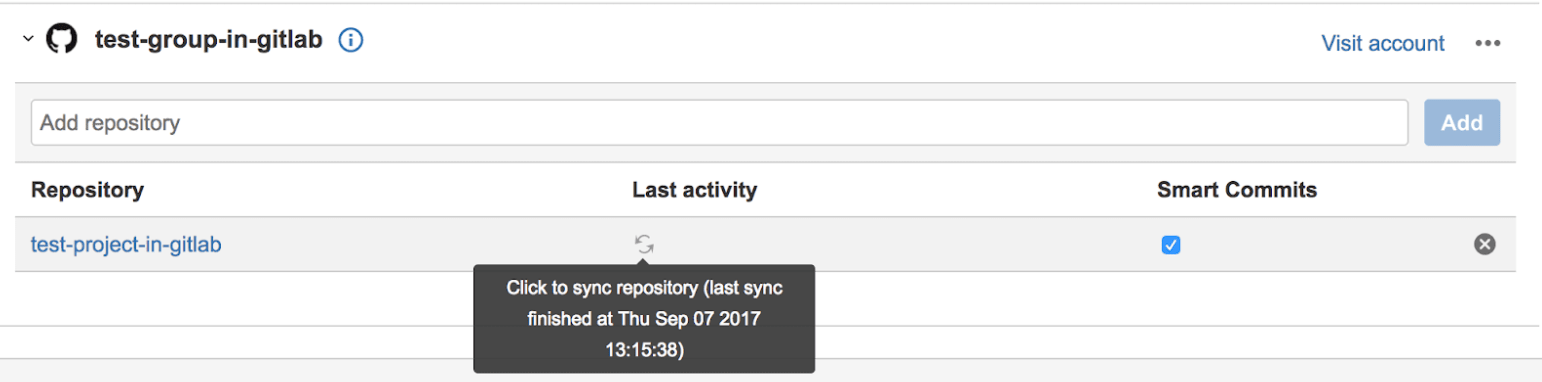
In the future, we plan on implementing real-time integration. If you need to refresh the data manually, you can do this from the Applications -> DVCS accounts screen where you initially set up the integration:
Refresh data manually
To connect additional GitLab projects from other GitLab top-level groups (or personal namespaces), repeat the previous steps with additional Jira DVCS accounts.
For troubleshooting your DVCS connection, go to GitLab Docs for more information.
In our next blog post we'll look at Usage.
Cover image by Mikołaj Idziak on Unsplash.
More to explore
View all blog posts


We want to hear from you
Enjoyed reading this blog post or have questions or feedback? Share your thoughts by creating a new topic in the GitLab community forum.
Share your feedback