
The CI/CD Tunnel, which leverages the GitLab Agent for Kubernetes, enables users to access Kubernetes clusters from GitLab CI/CD jobs. In this blog post, we review how you can securely access your clusters from your CI/CD pipelines by using generic impersonation. In addition, we will briefly cover the activity list of the GitLab Agent for Kubernetes, a capability recently introduced by GitLab, that can help you detect and troubleshoot faulty events.
Using impersonation with your CI/CD tunnel
The CI/CD Tunnel leverages the GitLab Agent for Kubernetes, which permits the secure connectivity between GitLab and your Kubernetes cluster without the need to expose your cluster to the internet and outside your firewall. The CI/CD Tunnel allows you to connect to your Kubernetes cluster from your CI/CD jobs/pipelines.
By default, the CI/CD Tunnel inherits all the permissions from the service account used to install the Agent in the cluster. However, fine-grained permissions can be used in conjunction with the CI/CD Tunnel to restrict and manage access to your cluster resources.
Fine-grained permissions control with the CI/CD tunnel via impersonation:
-
Allows you to leverage your K8s authorization capabilities to limit the permissions of what can be done with the CI/CD tunnel on your running cluster
-
Lowers the risk of providing unlimited access to your K8s cluster with the CI/CD tunnel
-
Segments fine-grained permissions with the CI/CD tunnel at the project or group level
-
Controls permissions with the CI/CD tunnel at the username or service account
To restrict access to your cluster, you can use impersonation. To specify impersonations, use the access_as attribute in your Agent's configuration file and use Kubernetes RBAC rules to manage impersonated account permissions.
You can impersonate:
- The Agent itself (default) = The CI job that accesses the cluster
- A specific user or system account defined within the cluster
Steps to exercise impersonation with the CI/CD Tunnel
Let's go through the steps on how you can exercise impersonation with the CI/CD Tunnel.
Creating your Kubernetes cluster
In order to exercise the capabilities described above, we need a Kubernetes cluster. Although, you can use any Kubernetes distribution, for this example, we create a GKE Standard Kubernetes cluster and name it "csaavedra-ga4k-cluster". We select the zone and version 1.21 of Kubernetes and ensure that our cluster will have three nodes. We leave the security and metadata screens with their defaulted values and click on the create button:
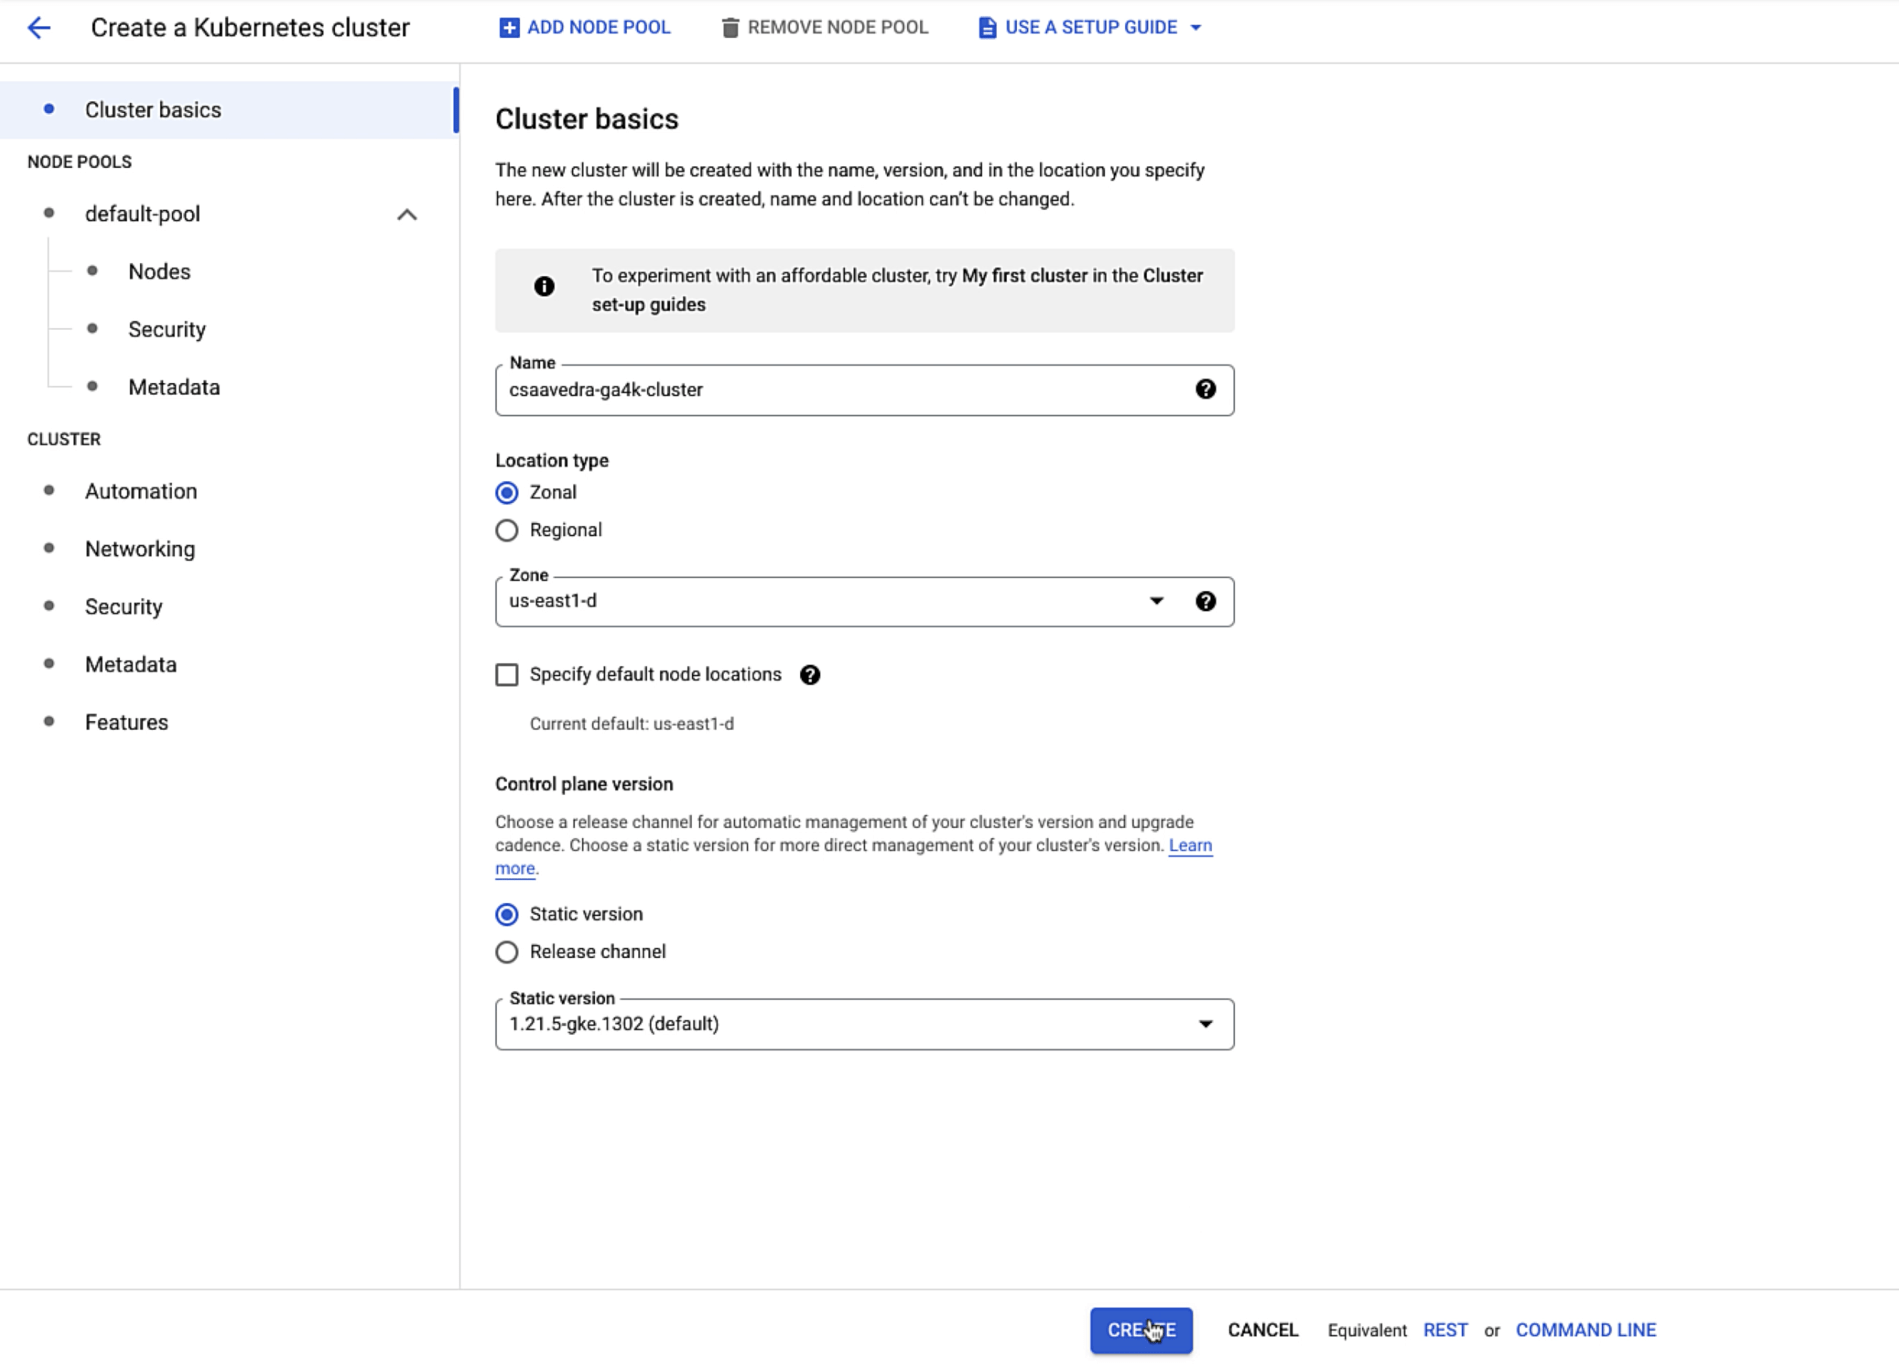 Creating a GKE cluster
Sample projects to be used
Let's proceed now to this top-level group, which contains three projects, which we will use to show impersonation with the CI/CD tunnel. You can do this at the project or group level. In this example, we will show setting impersonation at the project level:
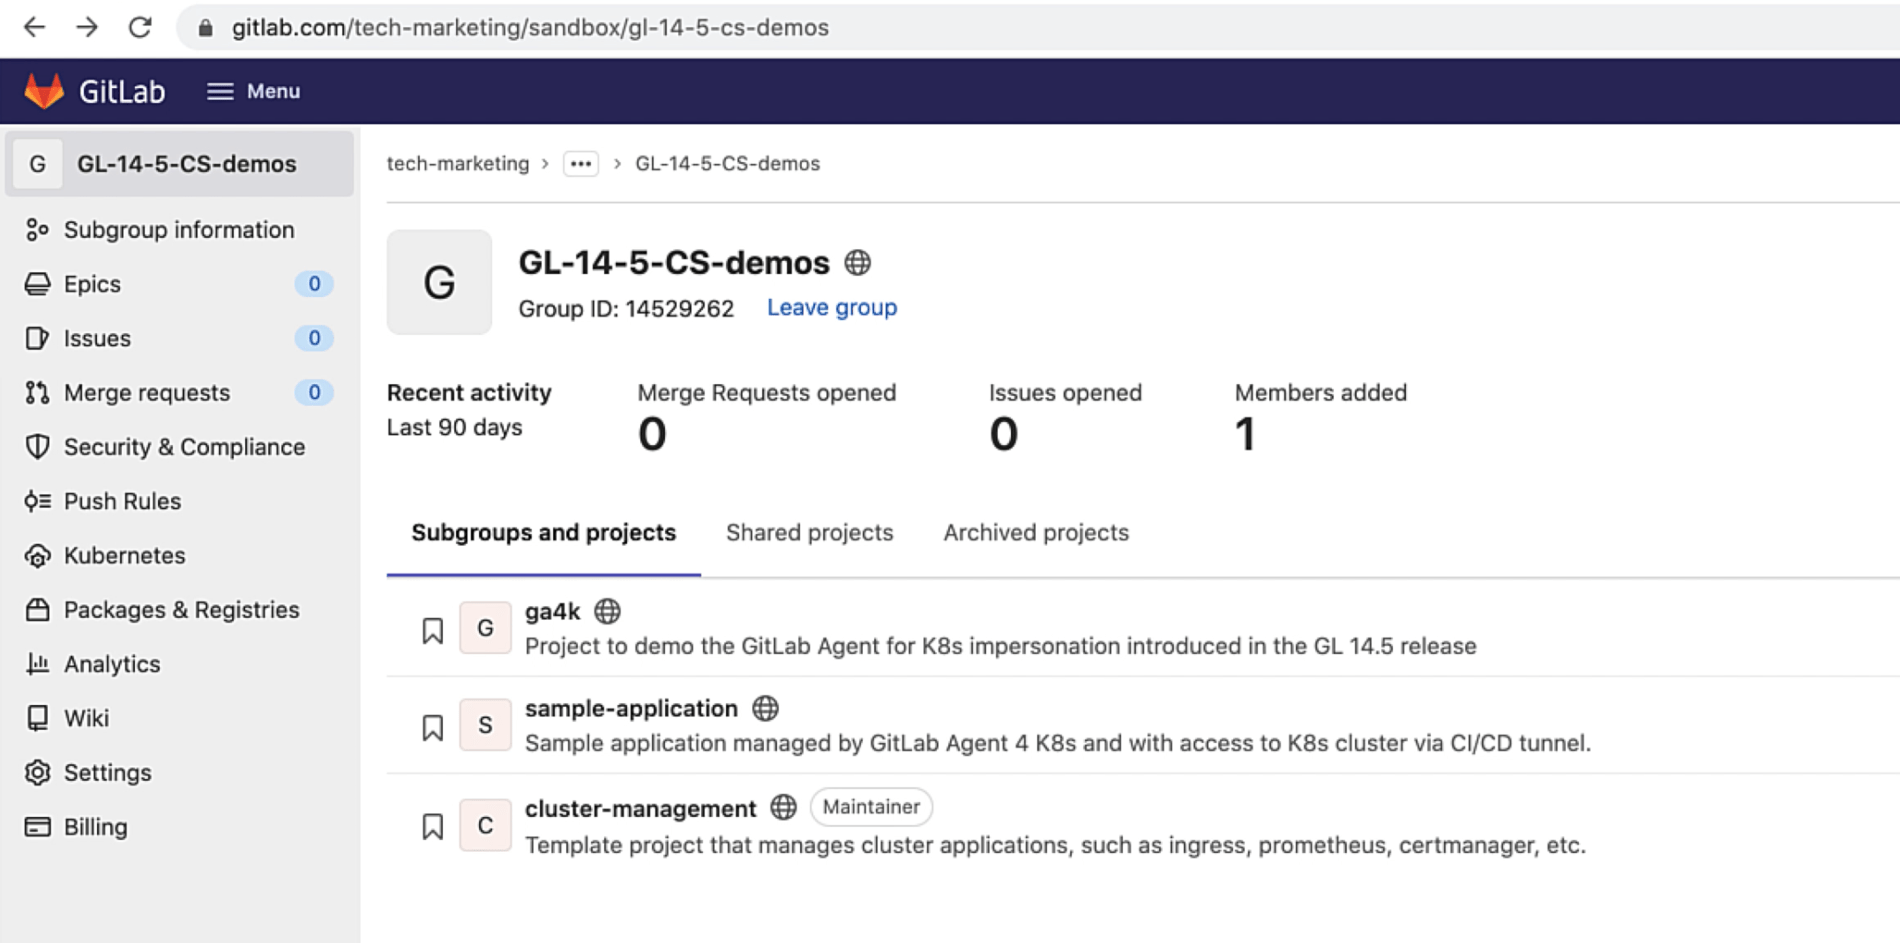 Project structure in GitLab
Project "ga4k" will configure the GitLab Agent for Kubernetes and also set impersonations with the CI/CD tunnel. Project "sample-application" will use the CI/CD tunnel, managed by the agent, to connect to the Kubernetes cluster and execute a pipeline using different impersonations. Project "cluster-management" will also use the CI/CD tunnel to connect to the cluster and install the Ingress application on it.
Not only does the CI/CD tunnel streamline the deployment, management, and monitoring of Kubernetes-native applications, but it also does it securely and safely by using impersonations that leverage your Kubernetes cluster's RBAC rules.
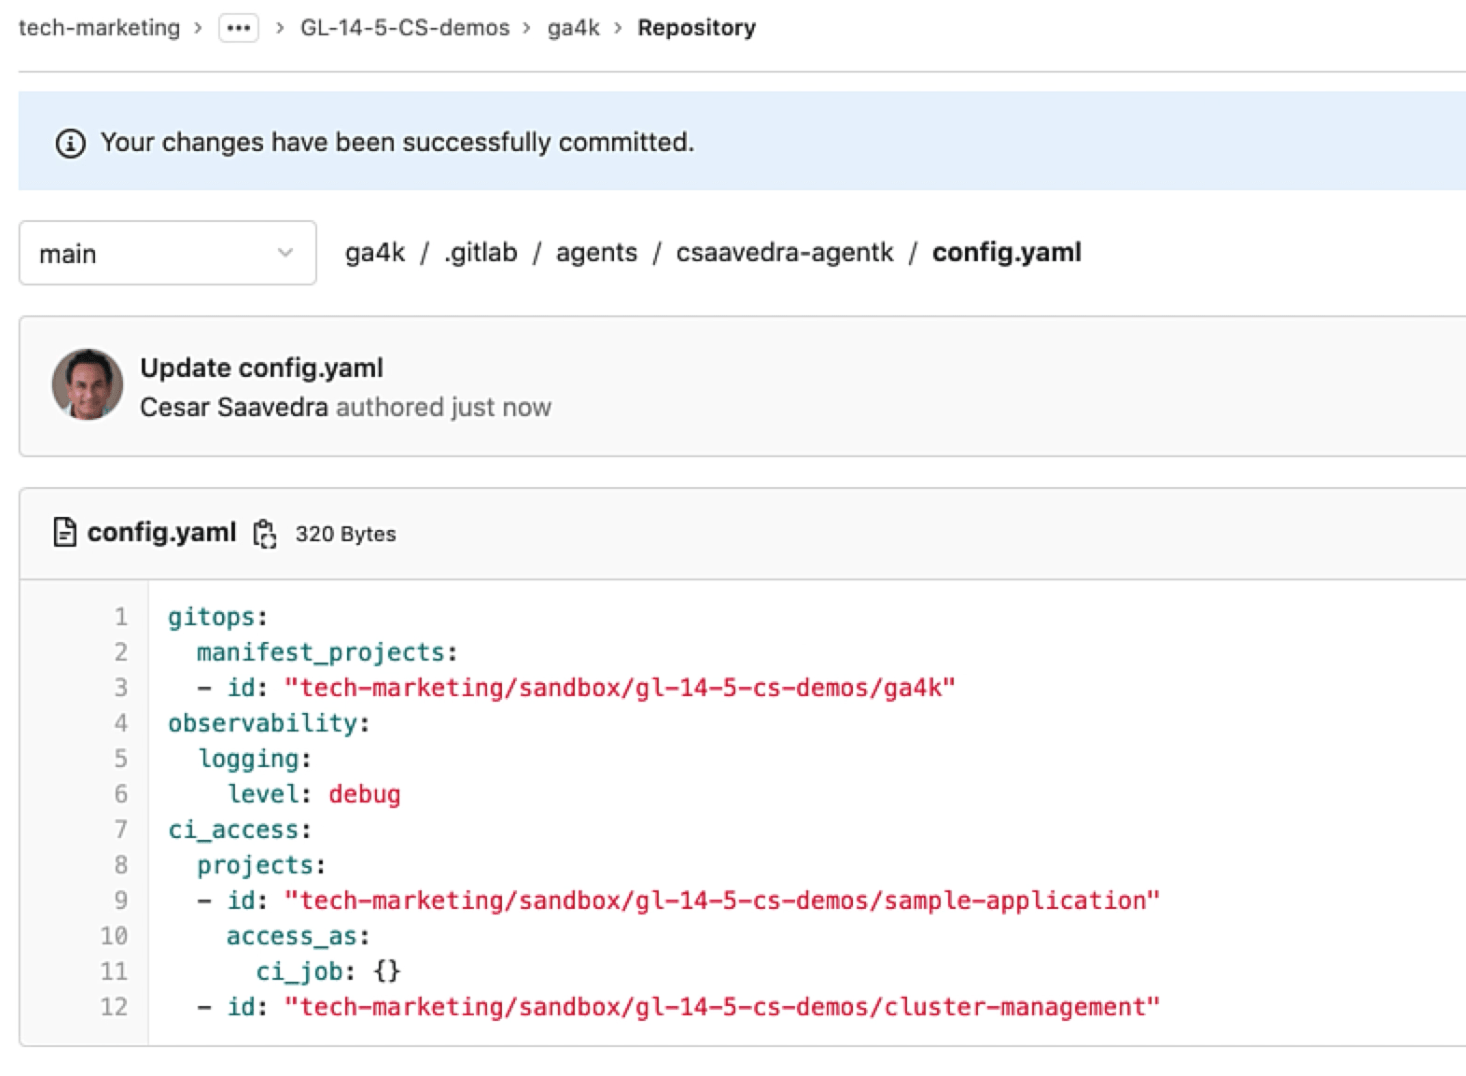
Project "ga4k" contains and manages the configuration for the GitLab Agent for K8s called "csaavedra-agentk". Looking at its "config.yaml" file, we see that the agent points to itself for manifest projects, but most importantly, it provides CI/CD tunnel access to two projects: "sample-application" and "cluster-management". This means that these two projects' CI/CD pipelines will have access to the K8s cluster that the agent is securely connected to:
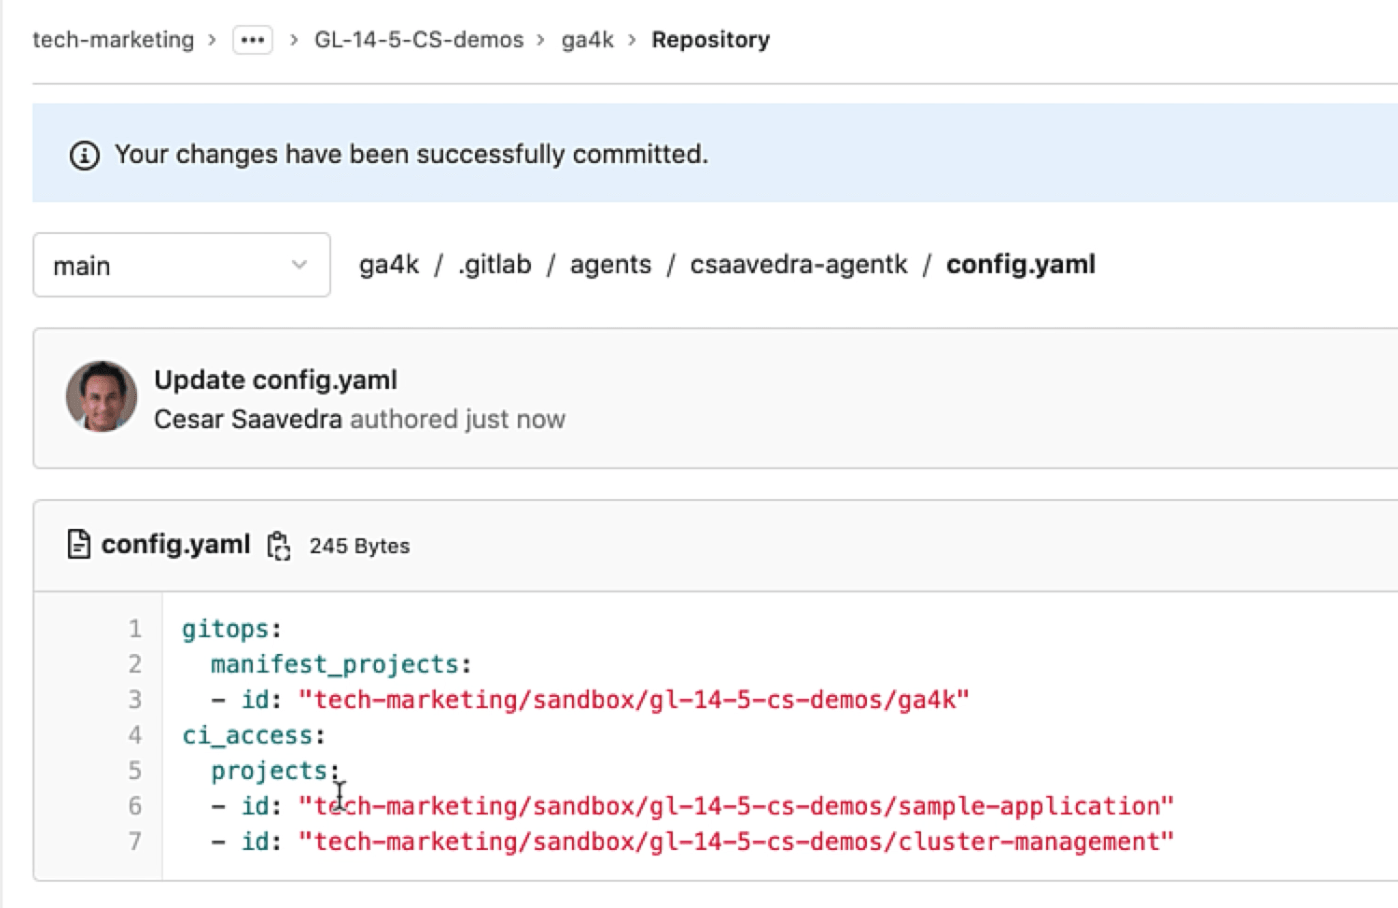 The GitLab Agent for K8s configuration
Project "sample-application" has a pipeline, which we will later execute under different impersonations. And project "cluster-management" has a pipeline that will install only the Ingress application on the Kubernetes cluster, as configured in its helmfile.yaml file:
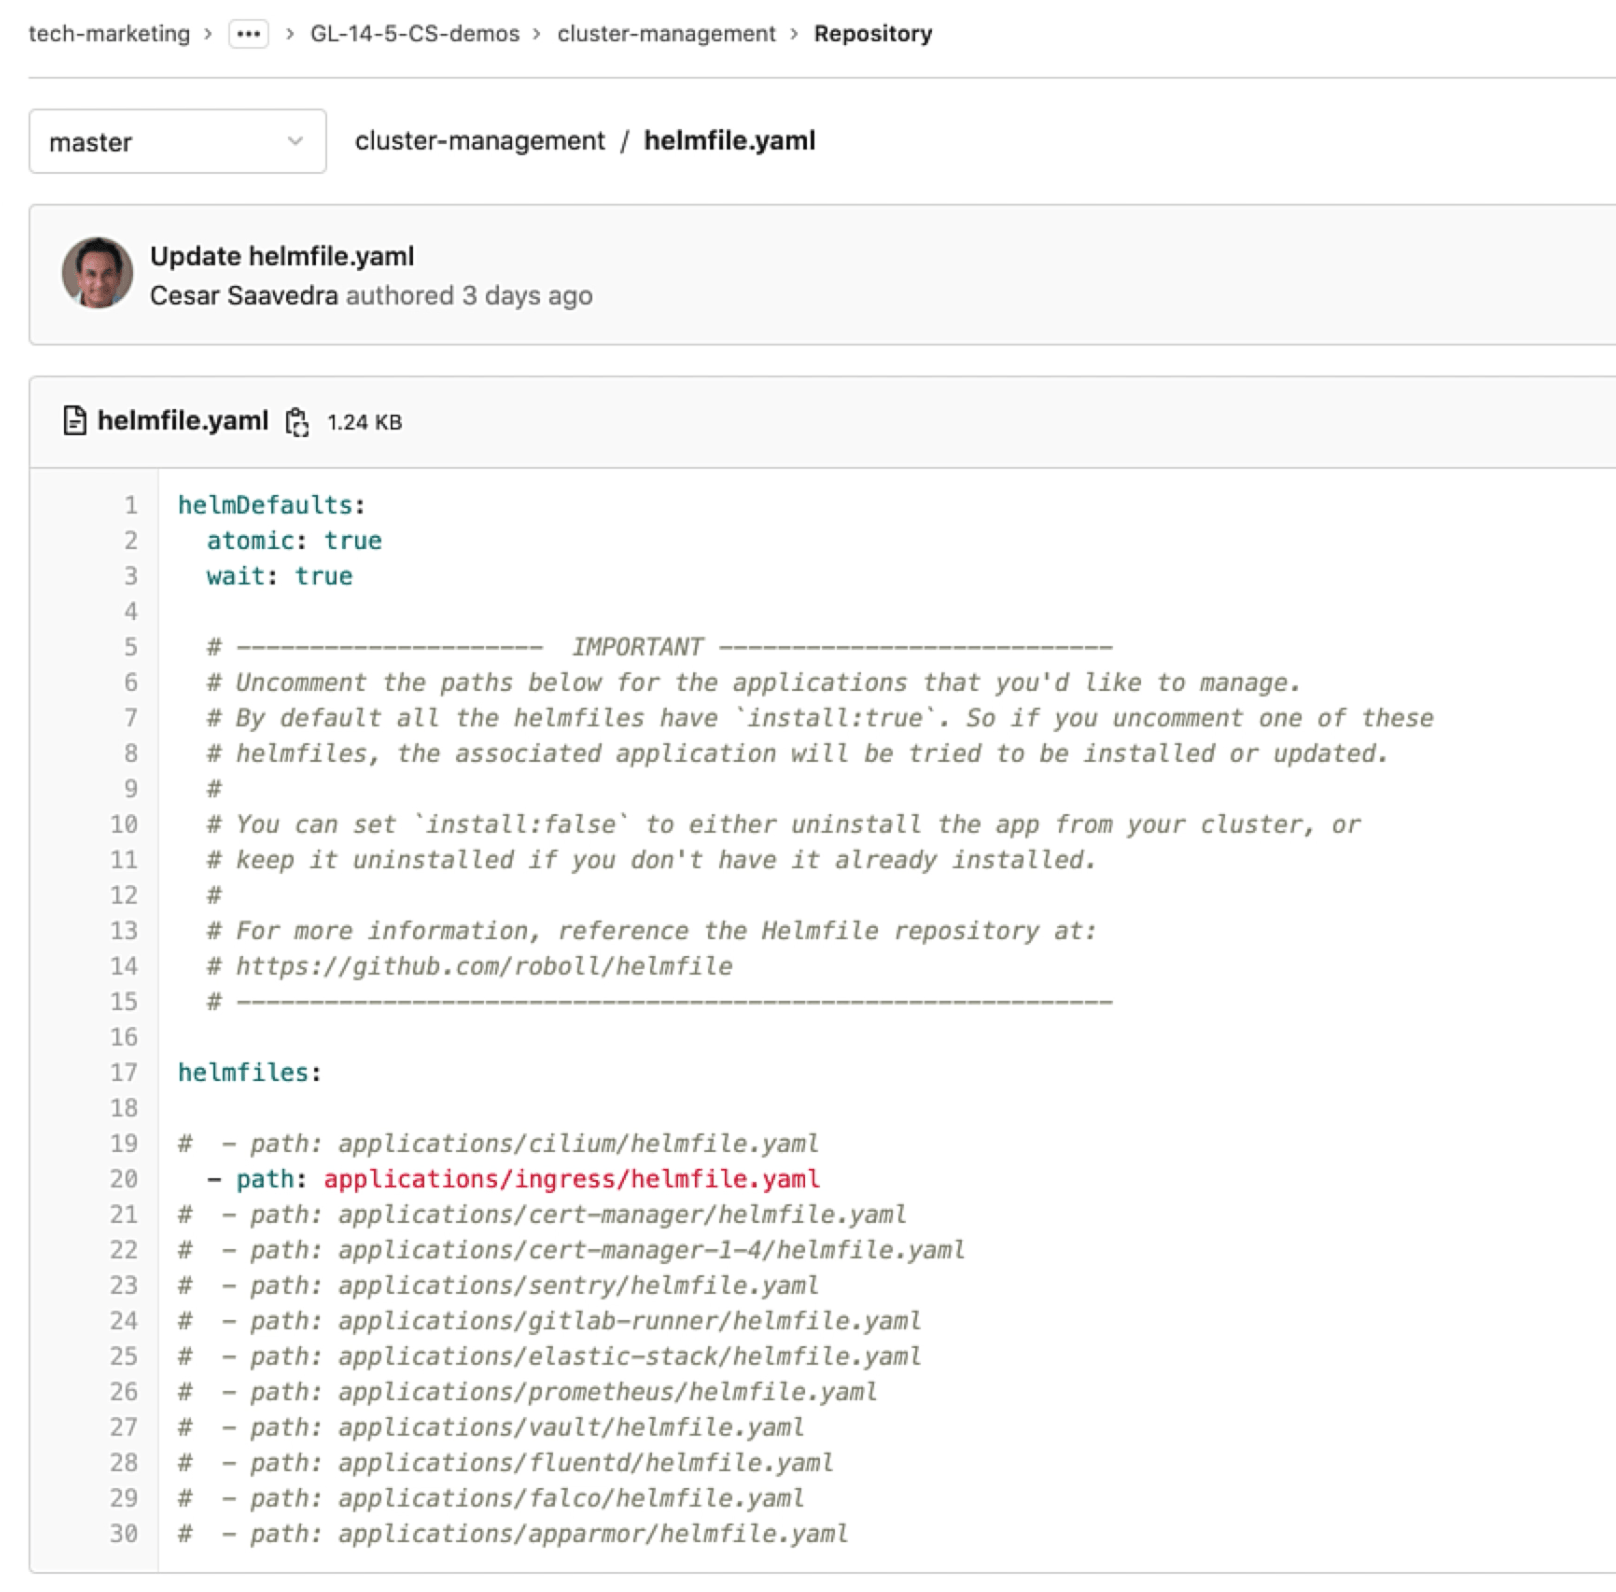 Deployable applications in cluster-management project
Connecting the Agent to your Kubernetes cluster
Let's head back to project "ga4k" and connect to the Kubernetes cluster via the agent. We select agent "csaavedra-agentk" to register with GitLab:
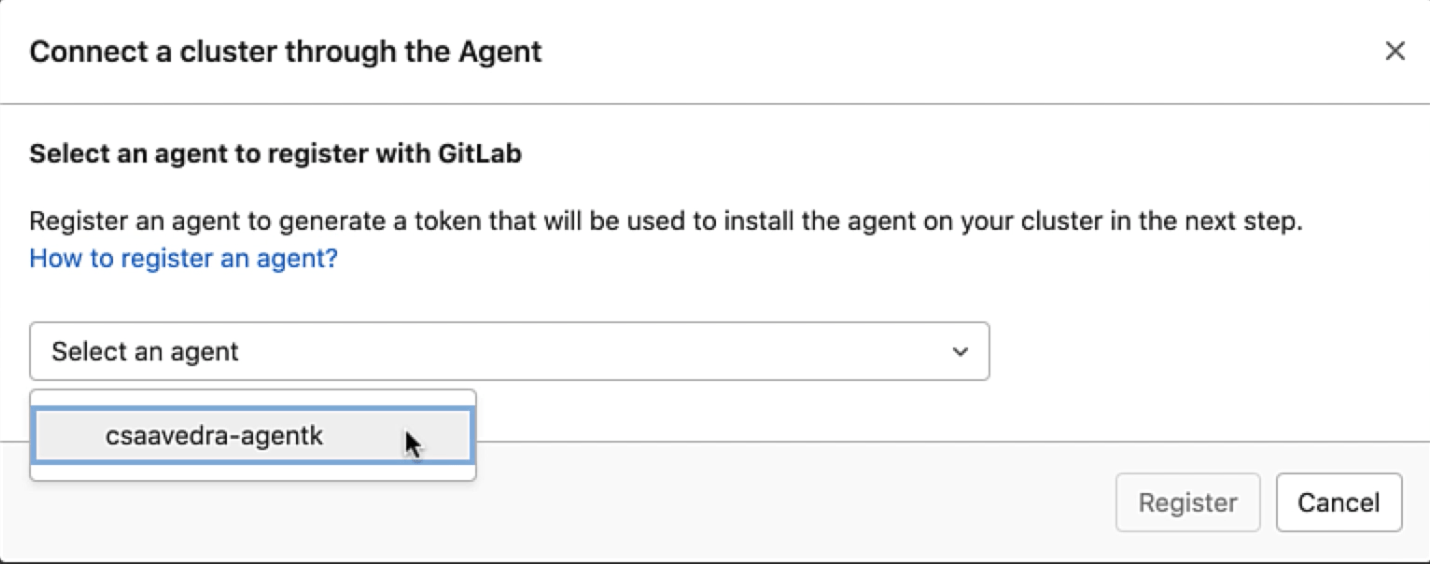 List of defined agents
This step generates a token that we can use to install the agent on the cluster. We copy the Docker command to our local desktop for later use. Notice that the command includes the generated token, which you can also copy:
 Docker command to deploy agent to your K8s cluster
From a local command window, we ensure that our connectivity parameters to GCP are correct:
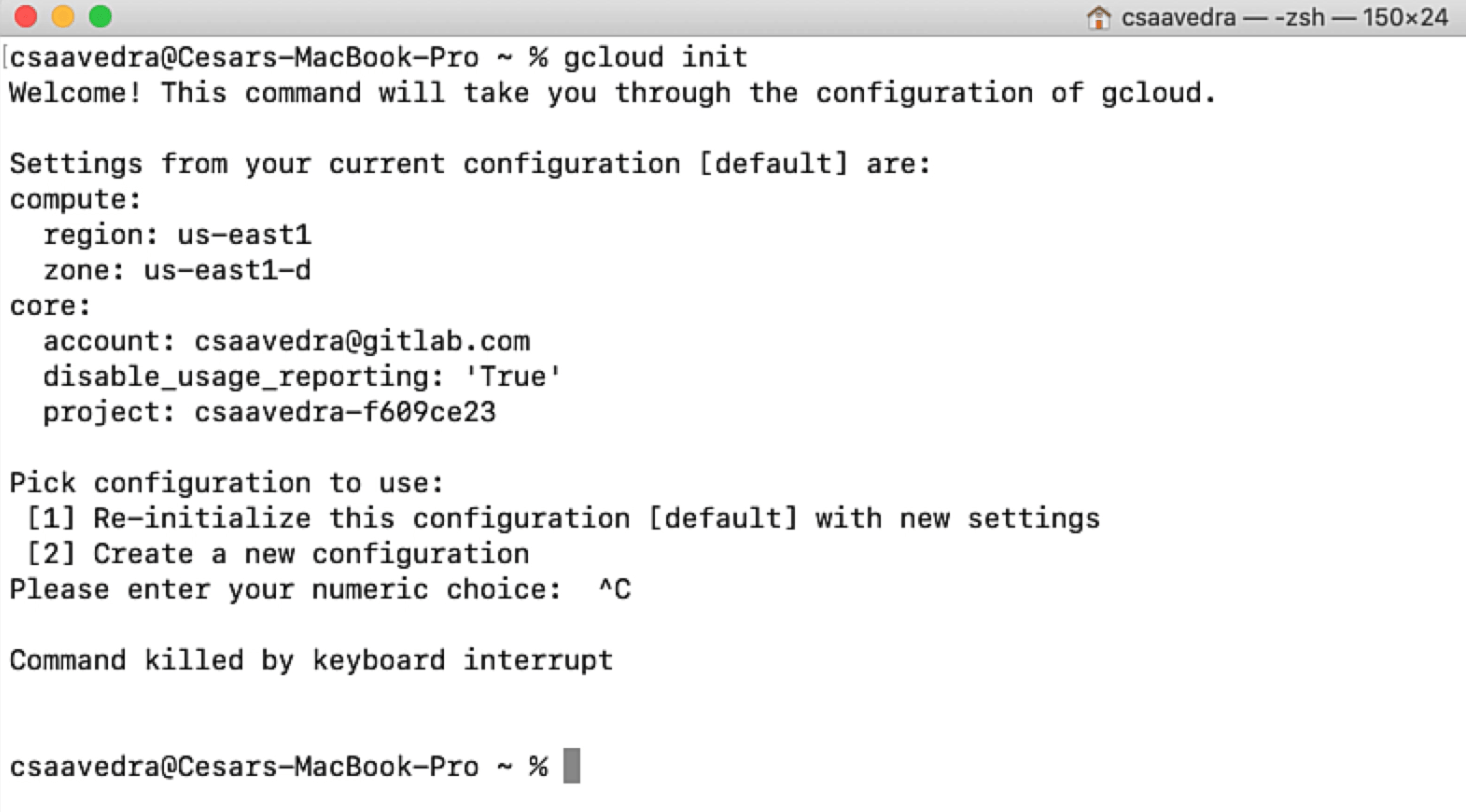 Checking your GCP connectivity parameters
We then add the credentials to our kubeconfig file to connect to our newly created Kubernetes cluster "csaavedra-ga4k-cluster" and verify that our context is set to it:
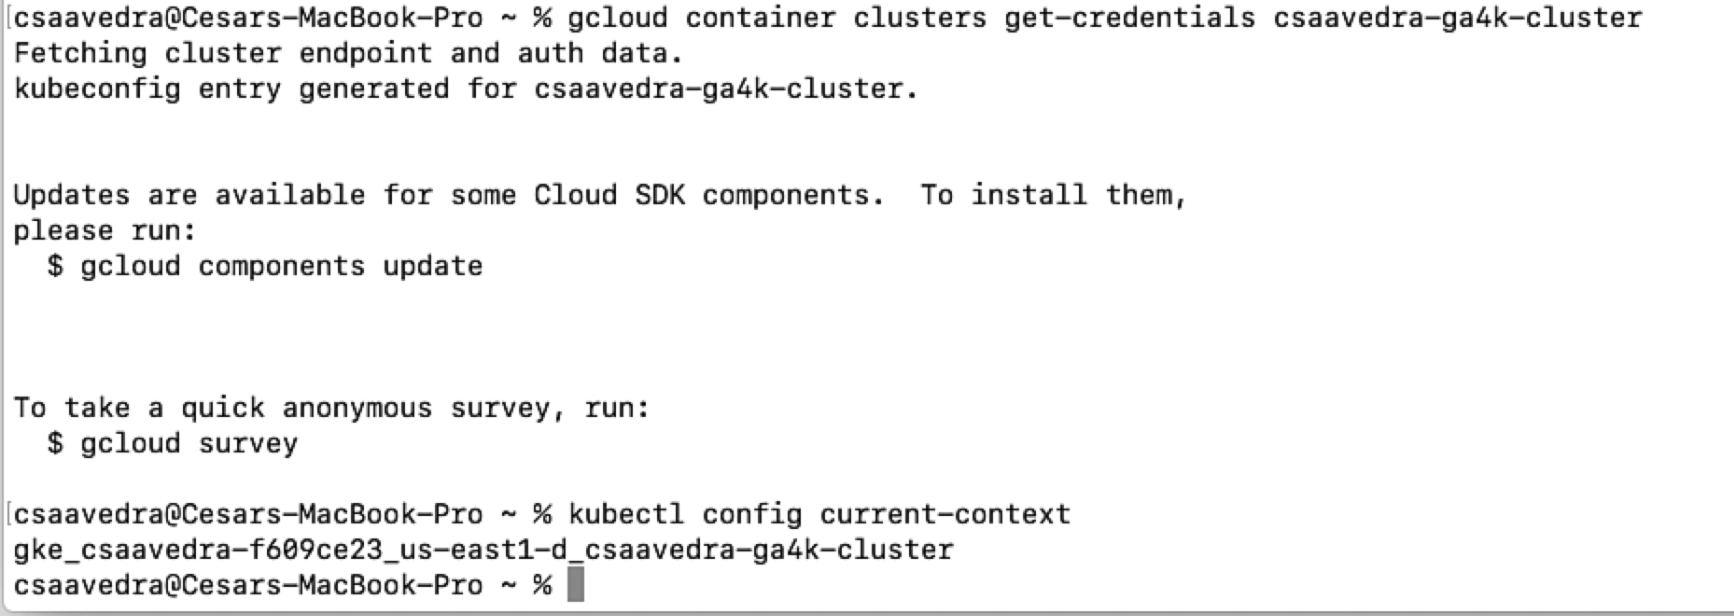 Adding the credentials of your cluster to your kubeconfig
Once this is done, we can list all the pods that are up and running on the cluster by entering kubectl get pods –all-namespaces:
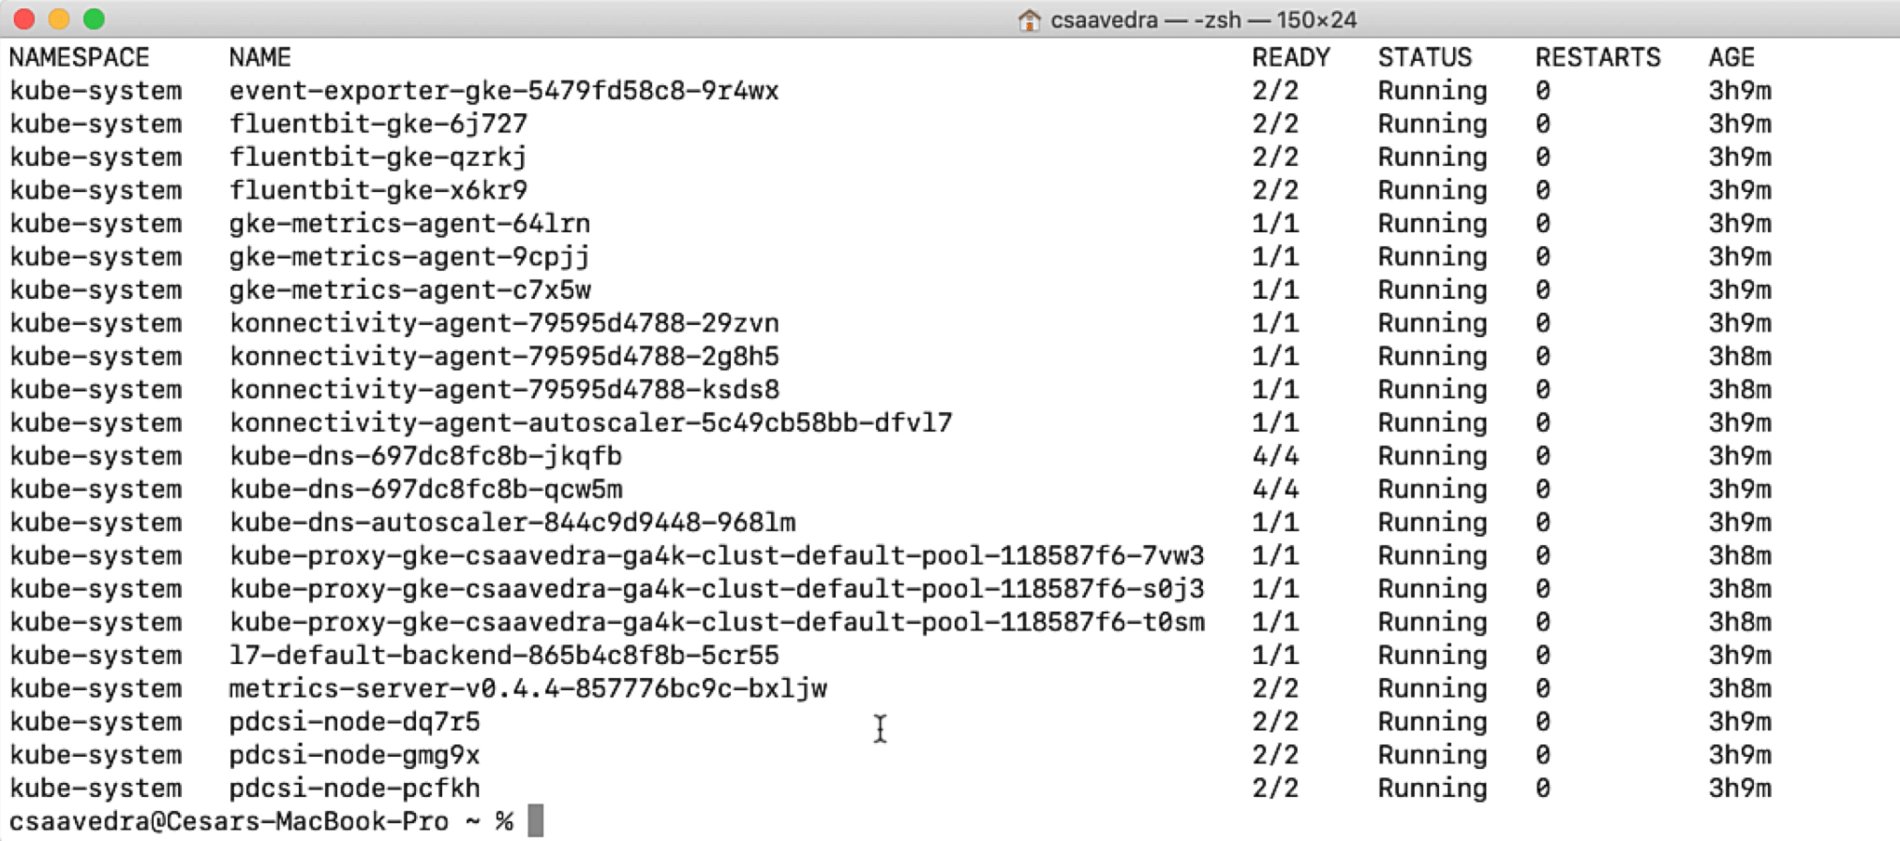 Listing the pods in your running cluster
Finally, we paste the docker command that will install the GitLab Agent for Kubernetes to this cluster making sure that its namespace is "ga4k-agent":
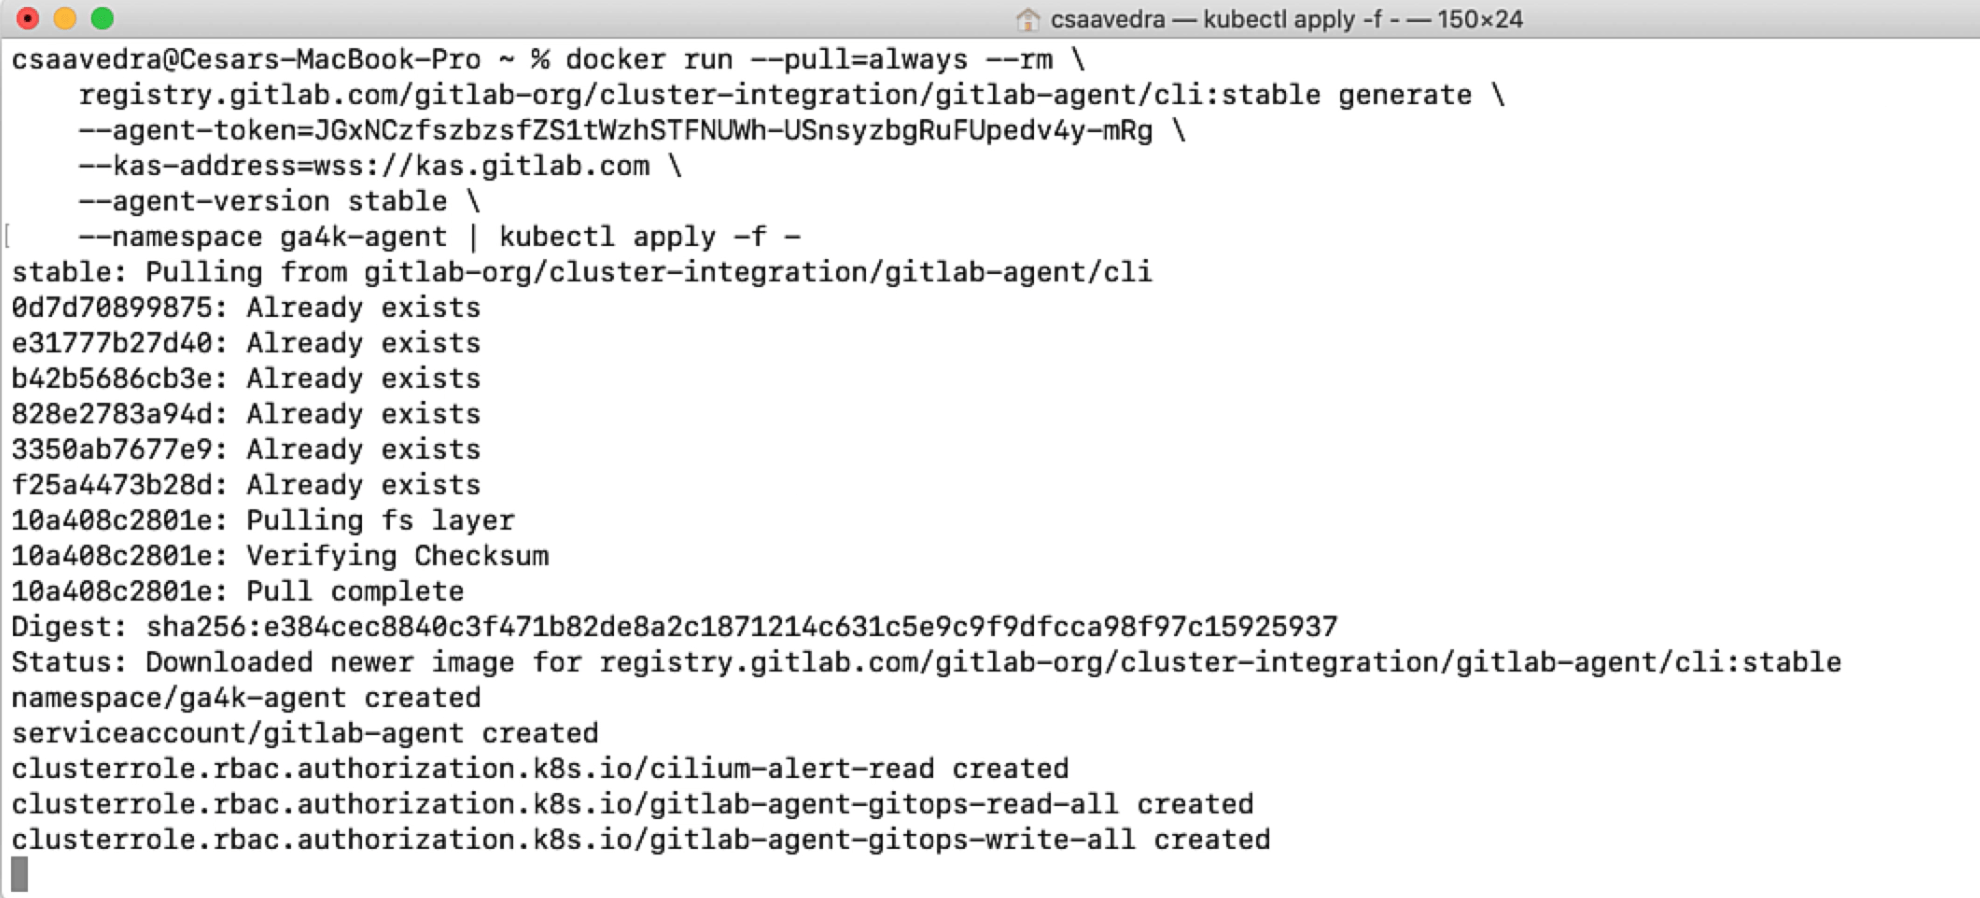 Deploying the agent to your K8s cluster
We list the pods one more time to check that the agent pod is up and running on the cluster:
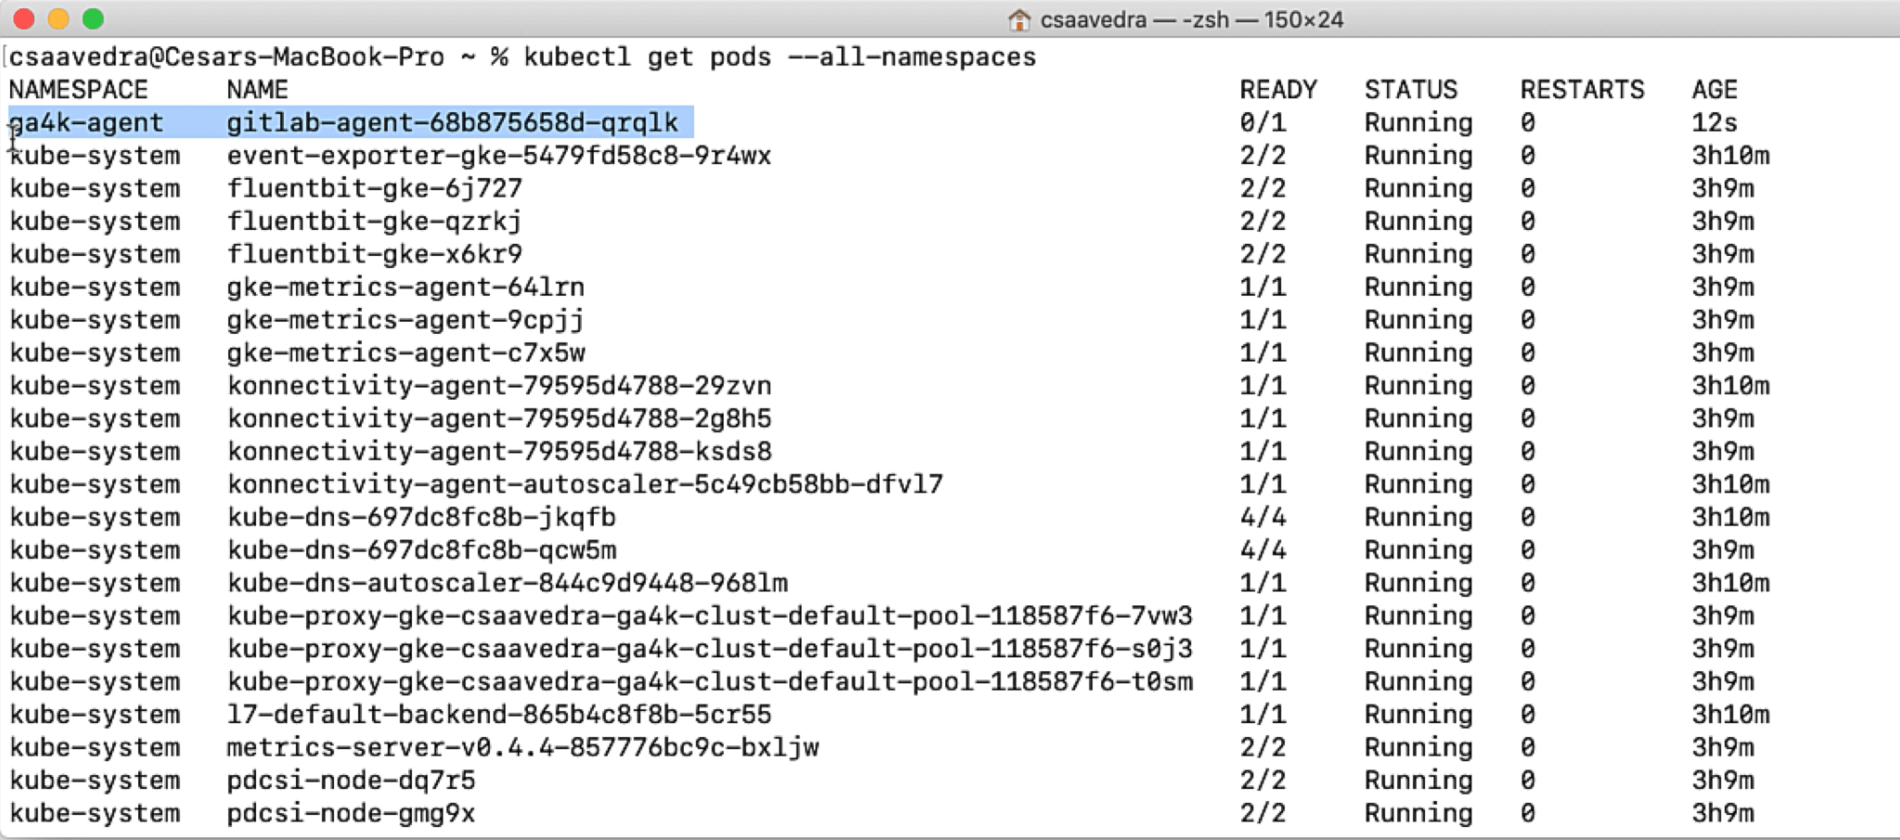 Agent up and running on your K8s cluster
The screen will refresh and show our Kubernetes cluster connected via the agent:
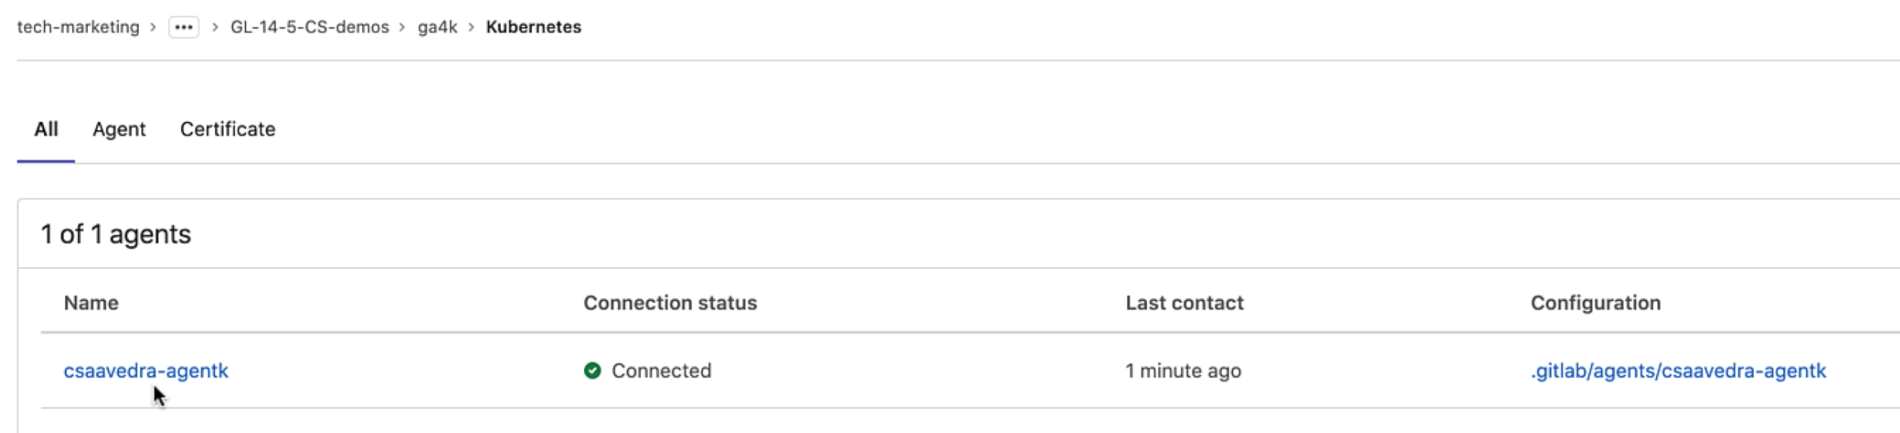 Agent connected to your K8s cluster
The Agent's Activity Information page
Clicking on the agent name takes us to the Agent's Activity Information page, which lists agent events in real time. This information can help monitor your cluster's activity and detect and troubleshoot faulty events from your cluster. Connection and token information is currently listed with more events coming in future releases:
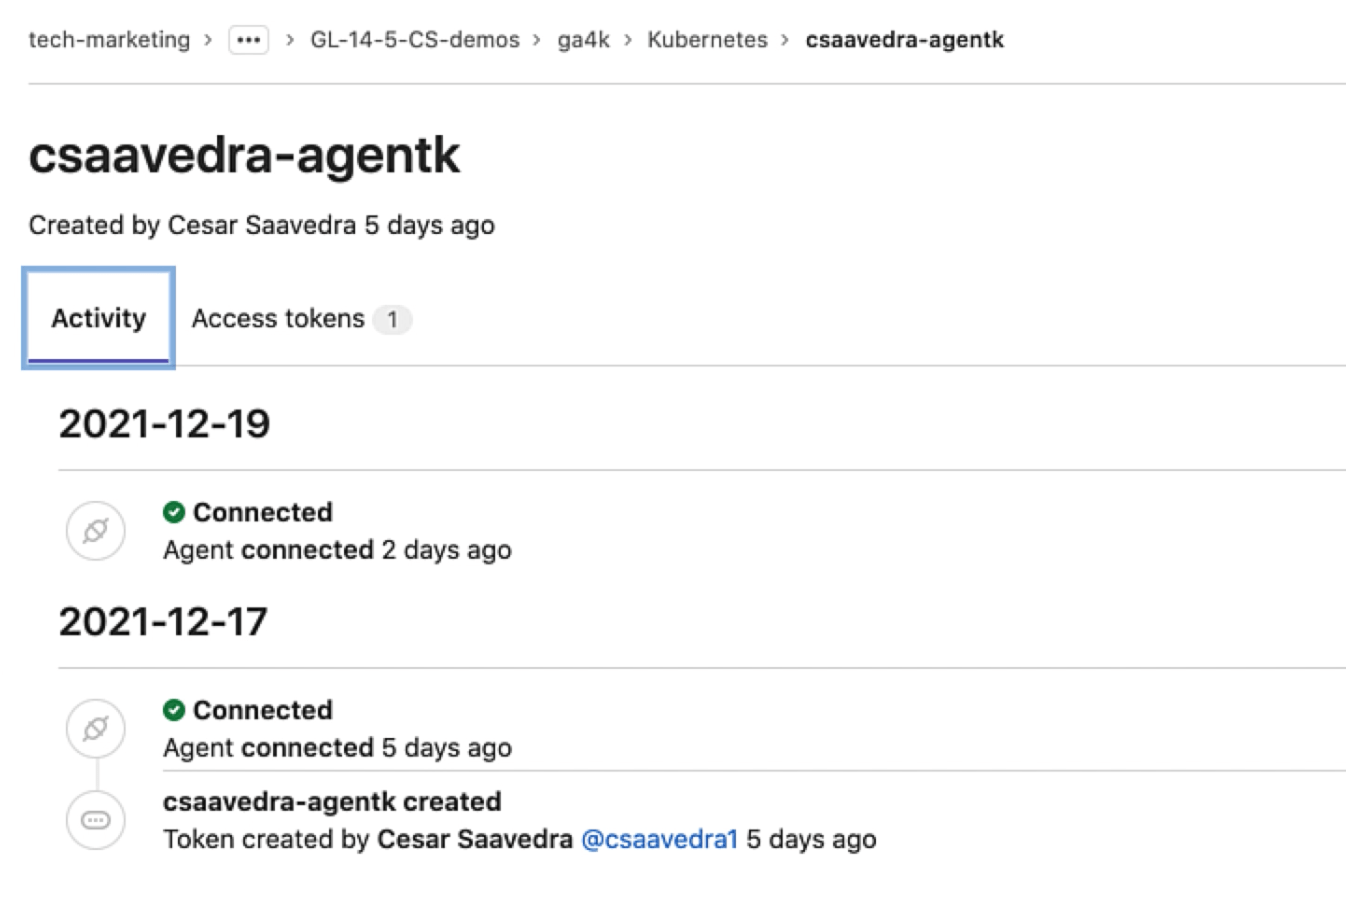 Agent activity information page
Deploying Ingress to your Kubernetes cluster using default impersonation
By default, the CI/CD Tunnel inherits all the permissions from the service account used to install the agent in the cluster. Per the agent's configuration, the CI/CD pipelines of the "cluster-management" project will have access to the K8s cluster that the agent is securely connected to. Let's leverage this connectivity to deploy the Ingress application to the Kubernetes cluster from project "cluster-management". Let's make a small update to the project pipeline to launch it. Once the pipeline launches, we navigate to its detail view to track its completion:
 Project "cluster-management" pipeline completed
and check the log of its apply job to verify that it was able to switch to the agent's context and successfully ran all the installation steps:
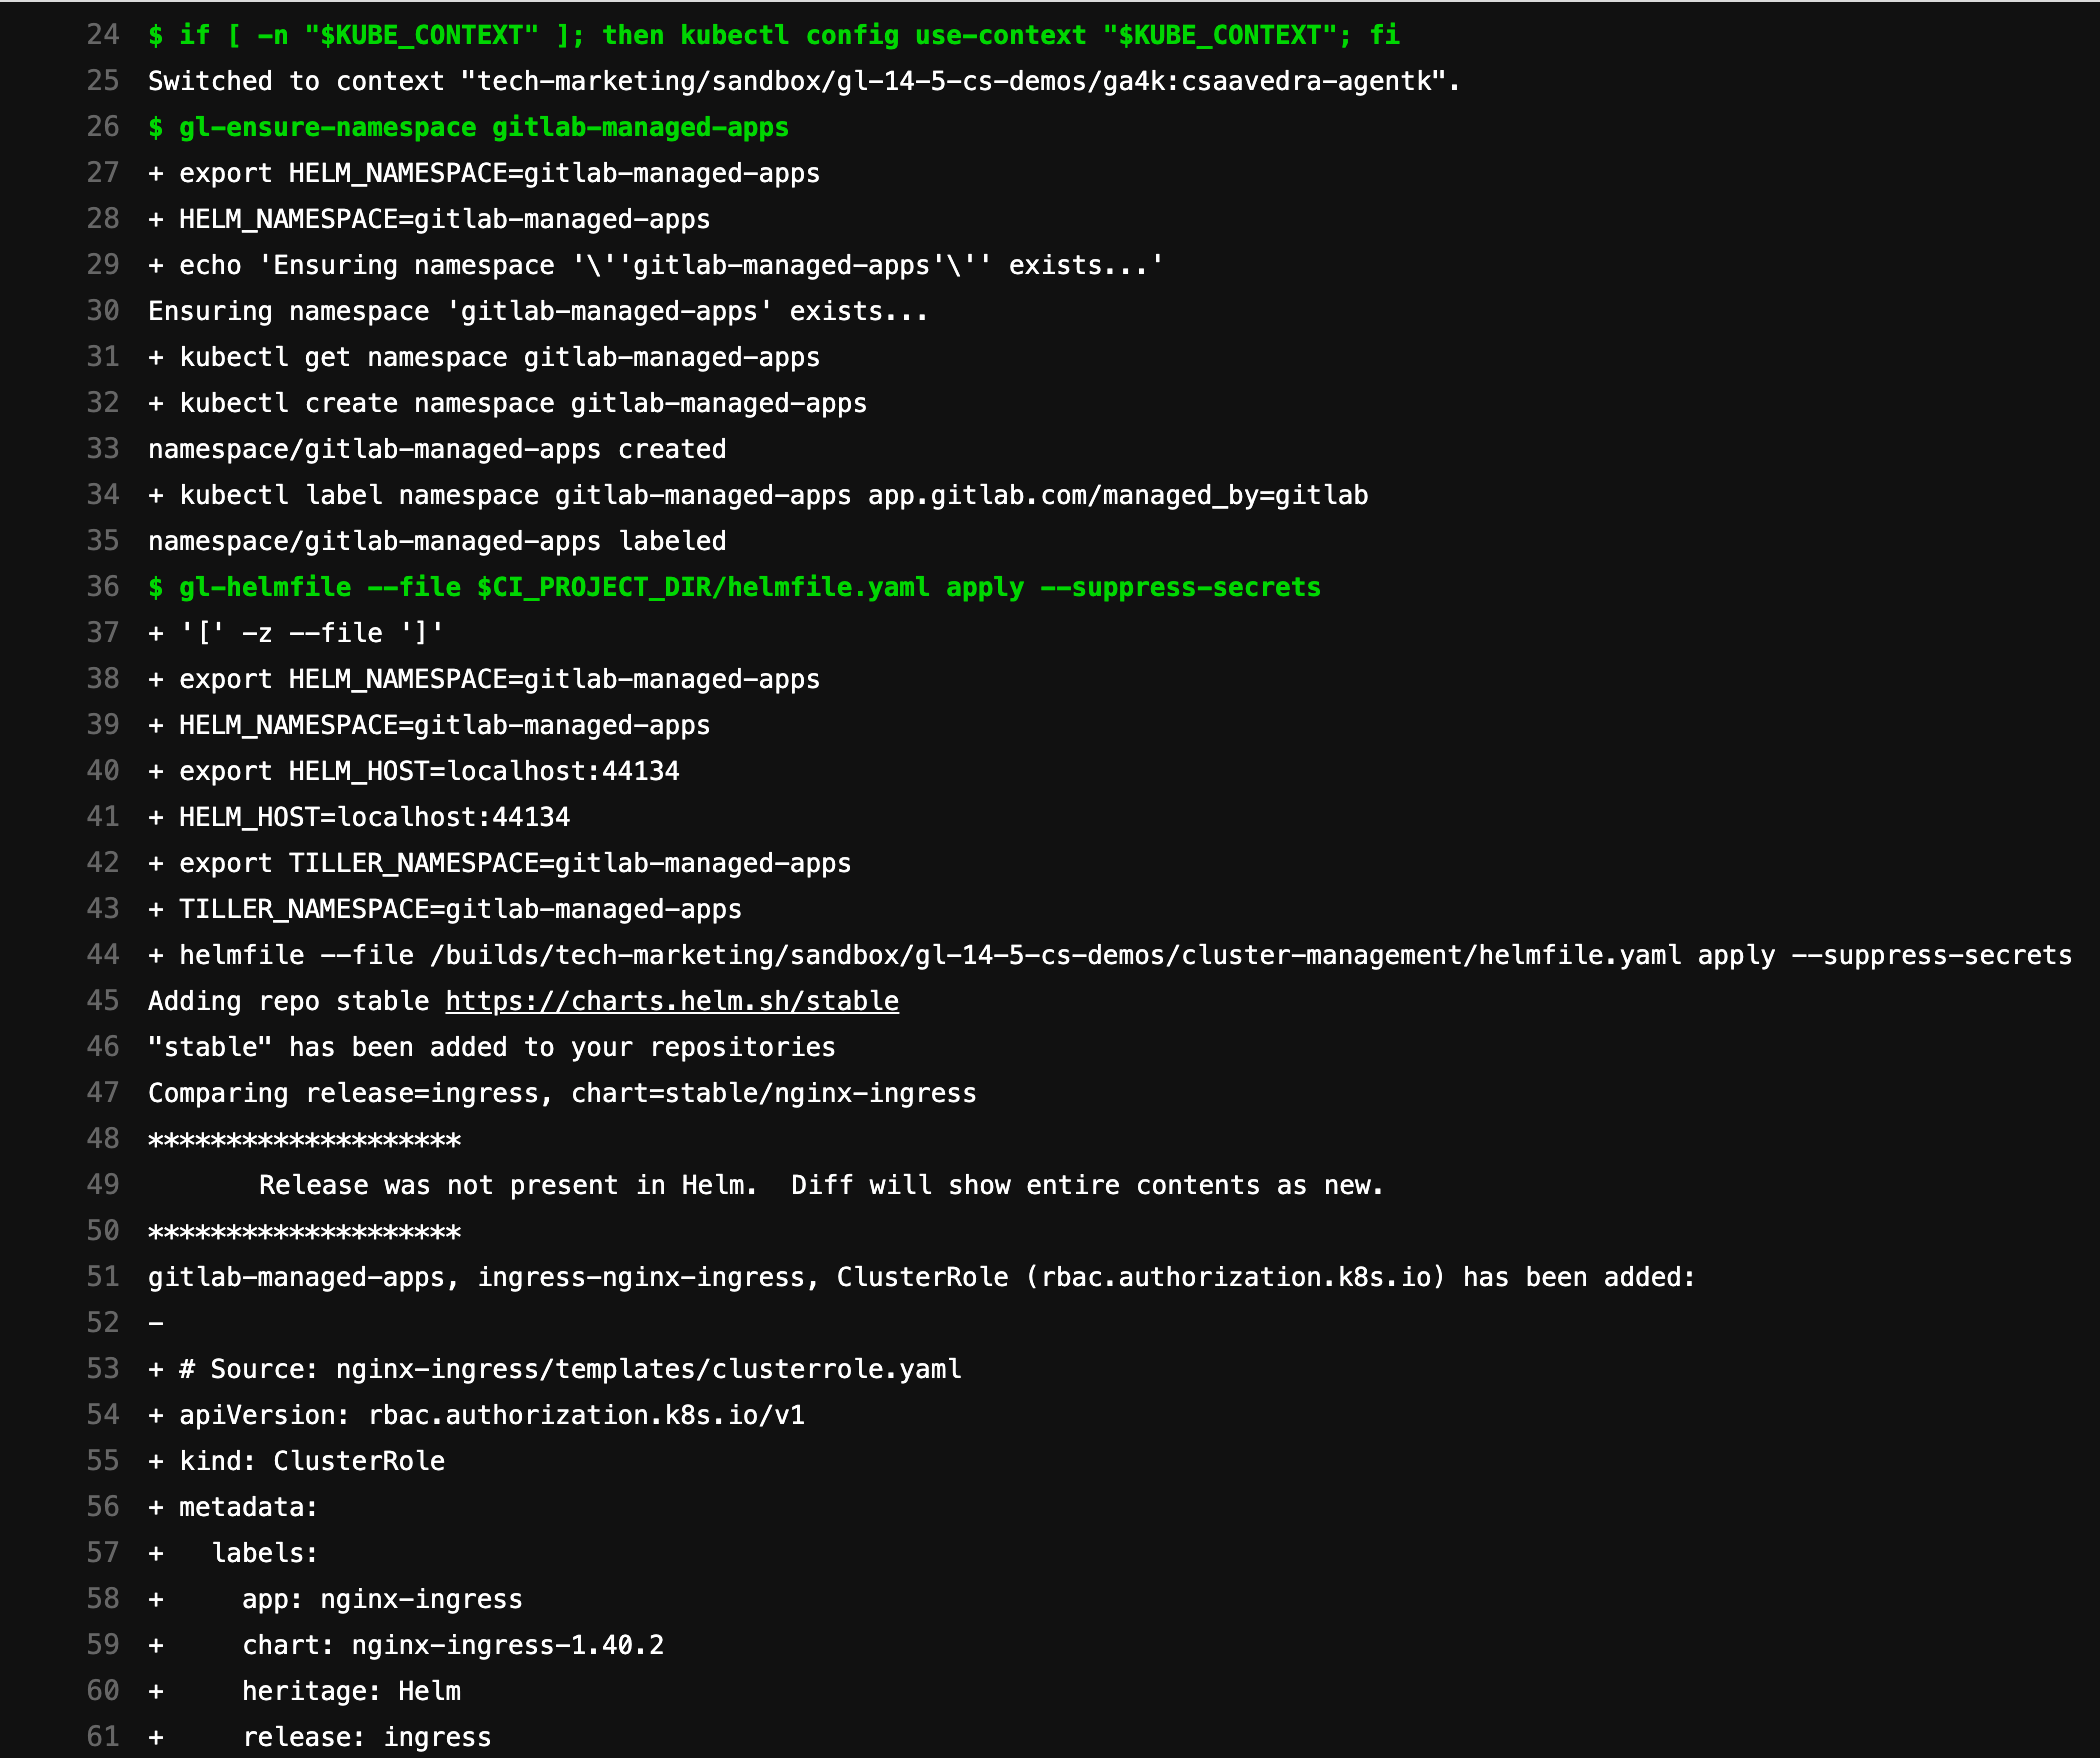 Ingress deployed to your cluster via CI/CD Tunnel using default impersonation
For further verification, we list the pods in the cluster and check that the ingress pods are up and running:
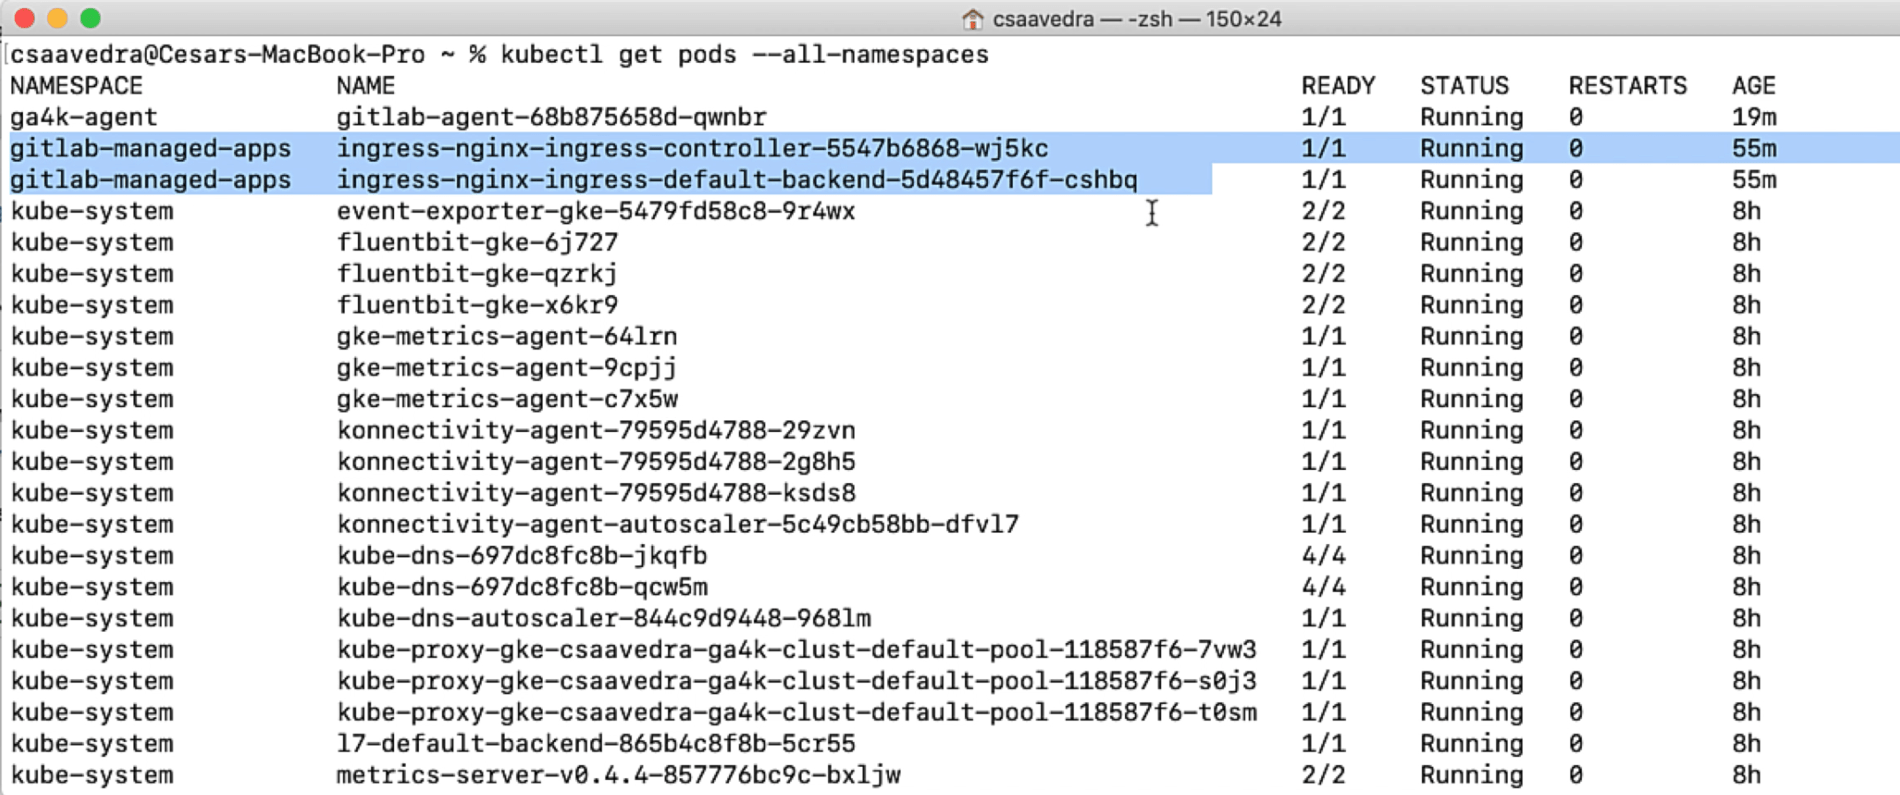 Ingress pods up and running on your cluster
Start trailing the agent's log file to watch updates
Before we start the impersonation use cases, let's start trailing the agent's log file from a command window:
 Trailing agent log from the command line
And also let's increase its logging to debug:
 Increasing the agent log level to debug
Running impersonation using access_as:ci_job
Let's now impersonate the CI job that accesses the cluster. For this, we modify the agent's configuration and add the "access_as" attribute with the "ci_job" tag under it:
 Impersonating the CI job
As we save the updated configuration, we verify in the log output that the update has taken place in the running agent:
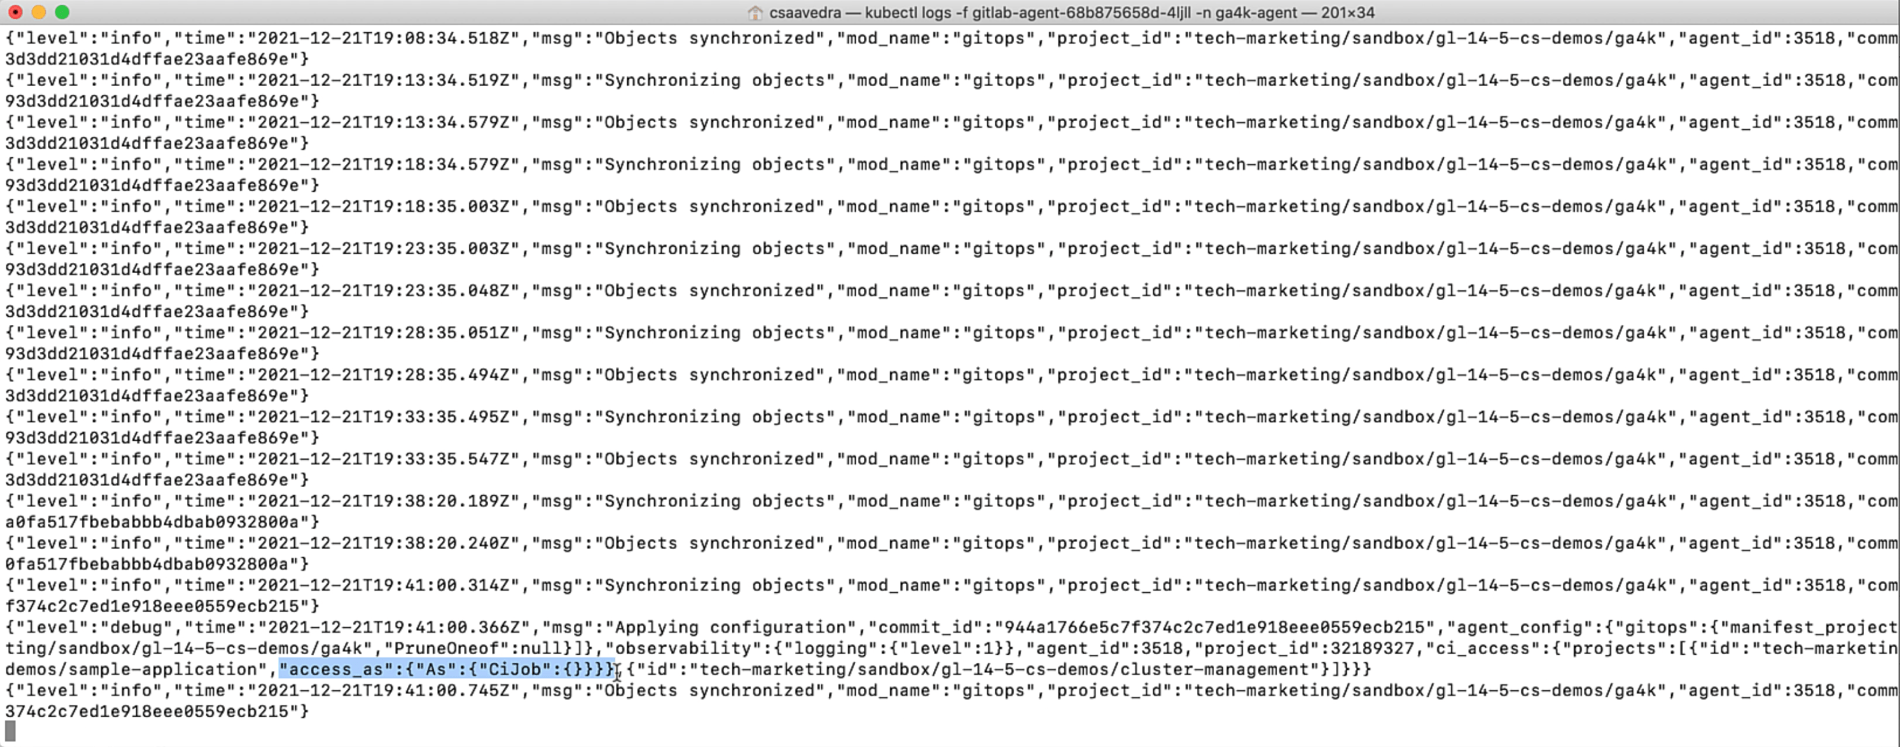 Agent updated with CI job impersonation
Notice that the pipeline of the "sample-application" project has a test stage and a test job. It sets the variable KUBE_CONTEXT first, loads an image with the version of kubectl that matches the version of the K8s cluster, and executes two kubectl commands that access the remote cluster via the agent:
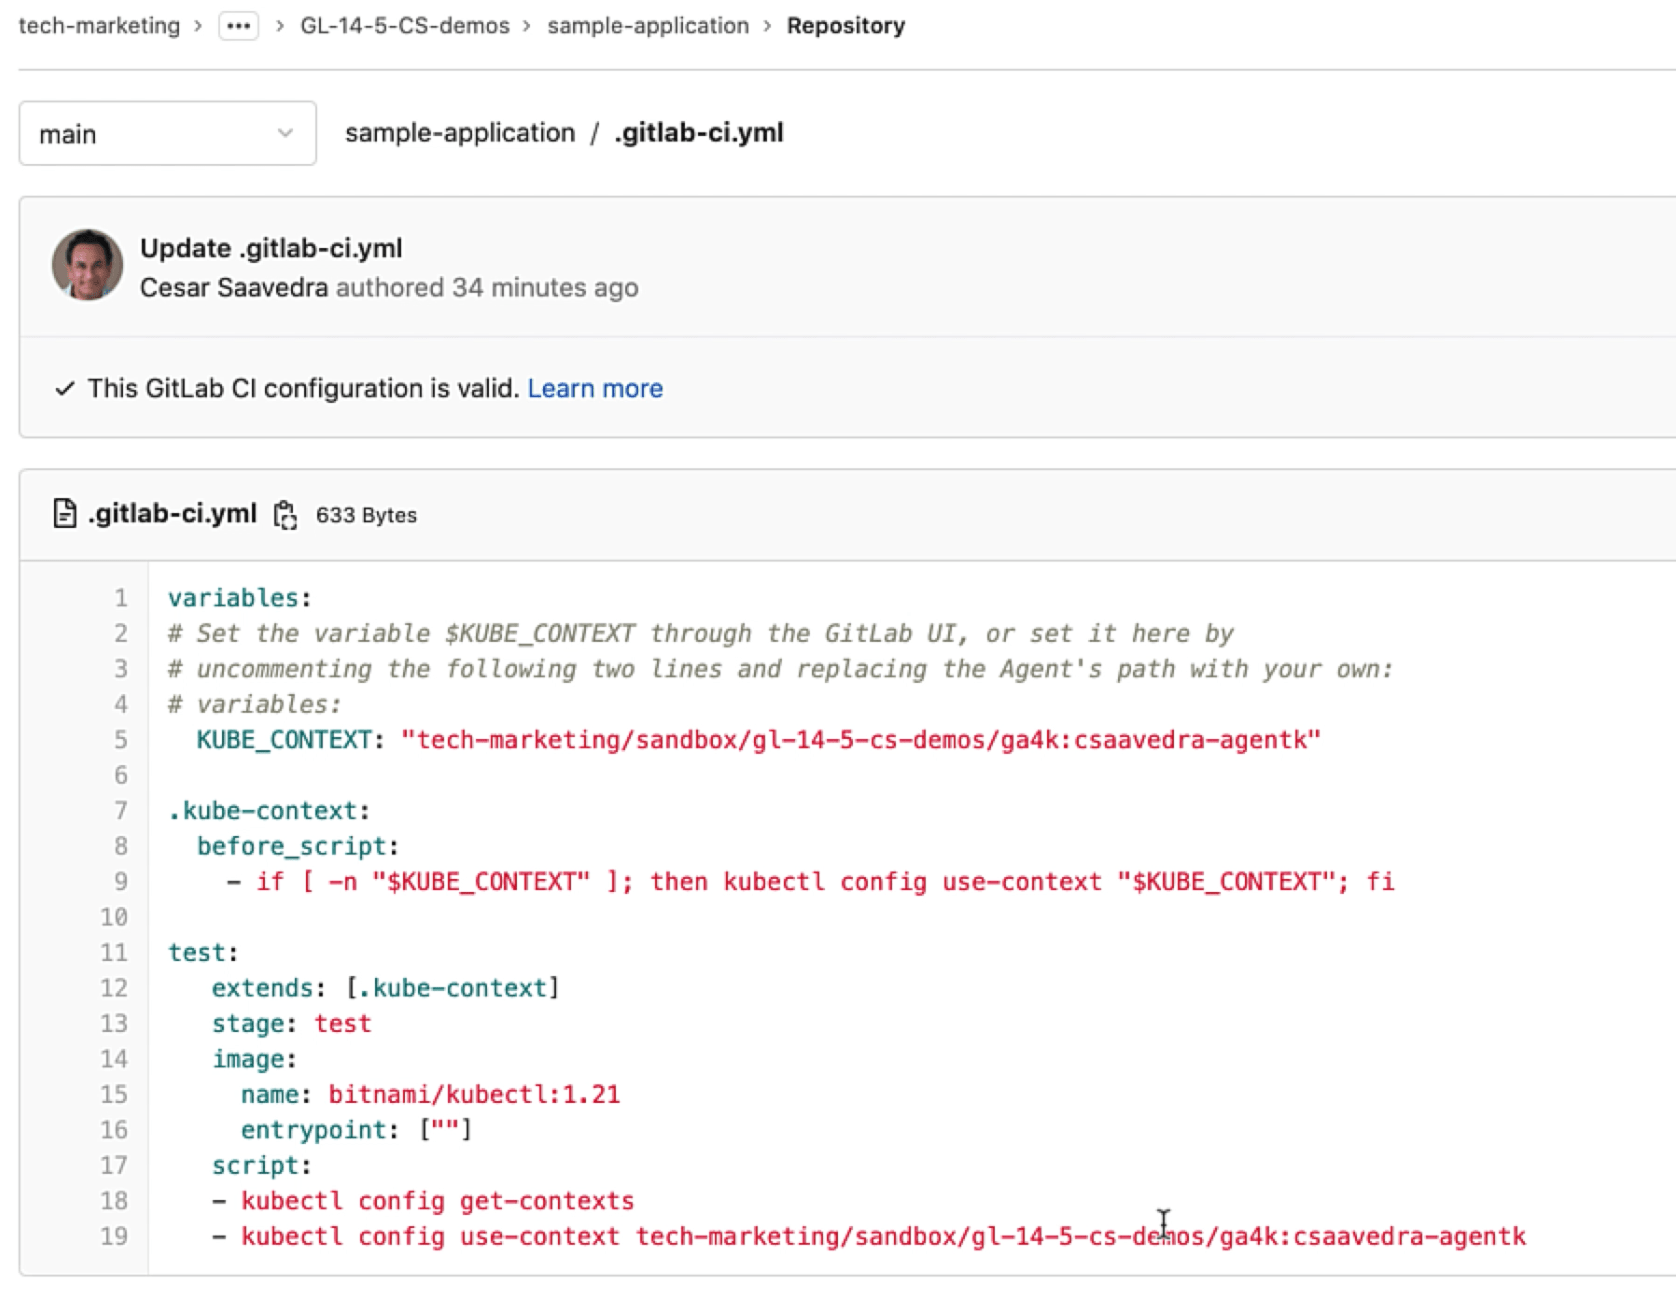 Project "sample-application" pipeline
We manually execute the pipeline of the "sample-application" project and verify in the job log output that the context switch was successful and that the kubectl commands executed correctly:
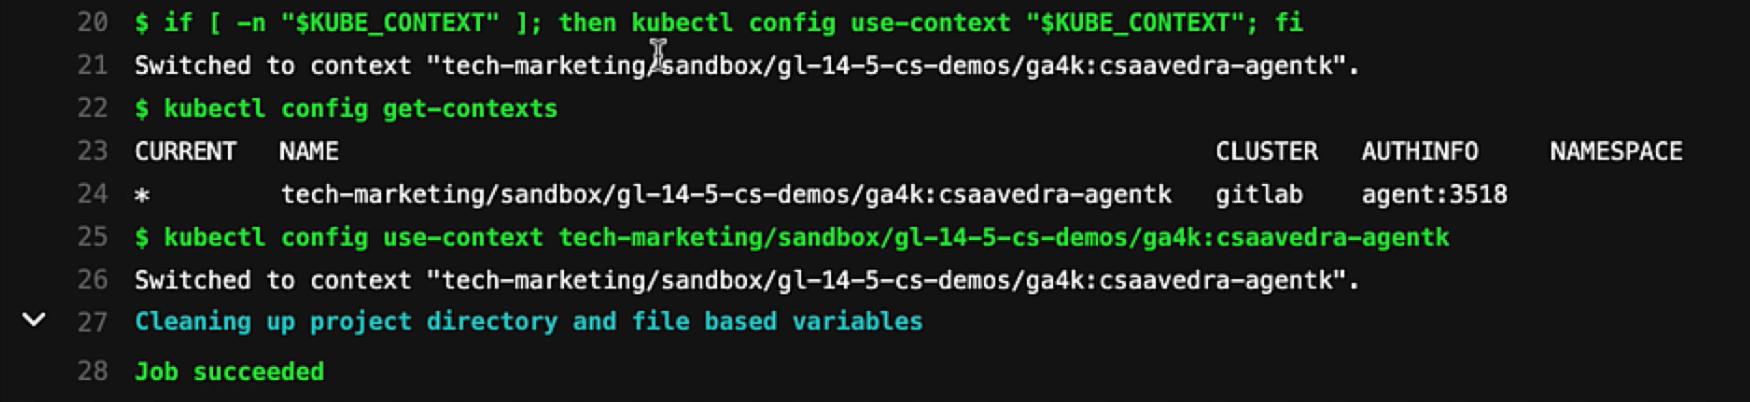 Job log output with CI impersonation
Running impersonation using access_as:impersonate:username
The last use case is the impersonation of a specific user or system account defined within the cluster. I have pre-created a service account called "jane" on the Kubernetes cluster under the "default" namespace. And "jane" has been given the permission to do a "get", "list", and "watch" on the cluster pods as you can see by the output in the command window:
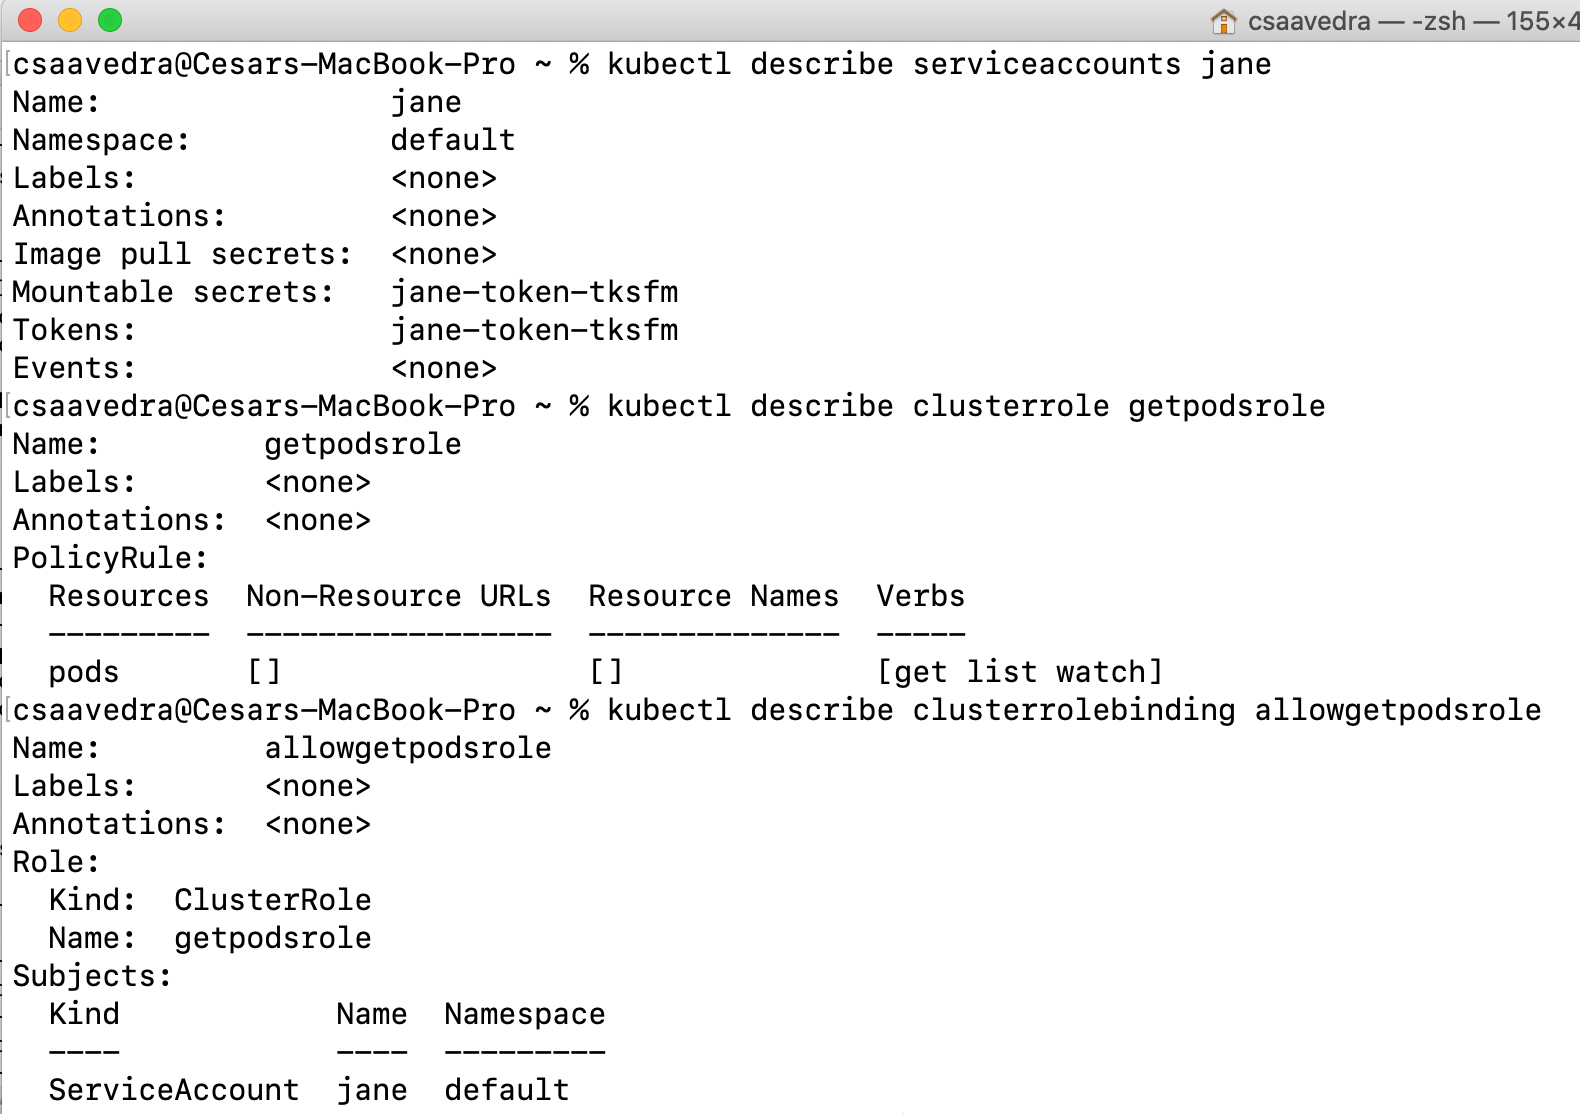 Jane user with permission to list pods
Remember that the service account "gitlab-agent" under namespace "ga4k-agent" was created earlier when we installed the agent by running the Docker command. In order for the agent to be able to impersonate another service account or user, it needs to have the permissions to do so. We do this by creating a clusterrole "impersonate" for impersonating users, groups, and service accounts, and then create a clusterrolebinding "allowimpersonator" to give these permissions for the "default" namespace to the agent "gitlab-agent" in the "ga4k-agent" namespace:
 Giving impersonation permission to agent
We then edit the agent's configuration and add the "impersonate" attribute and provide the service account for "jane" as the parameter for the "username" tag:
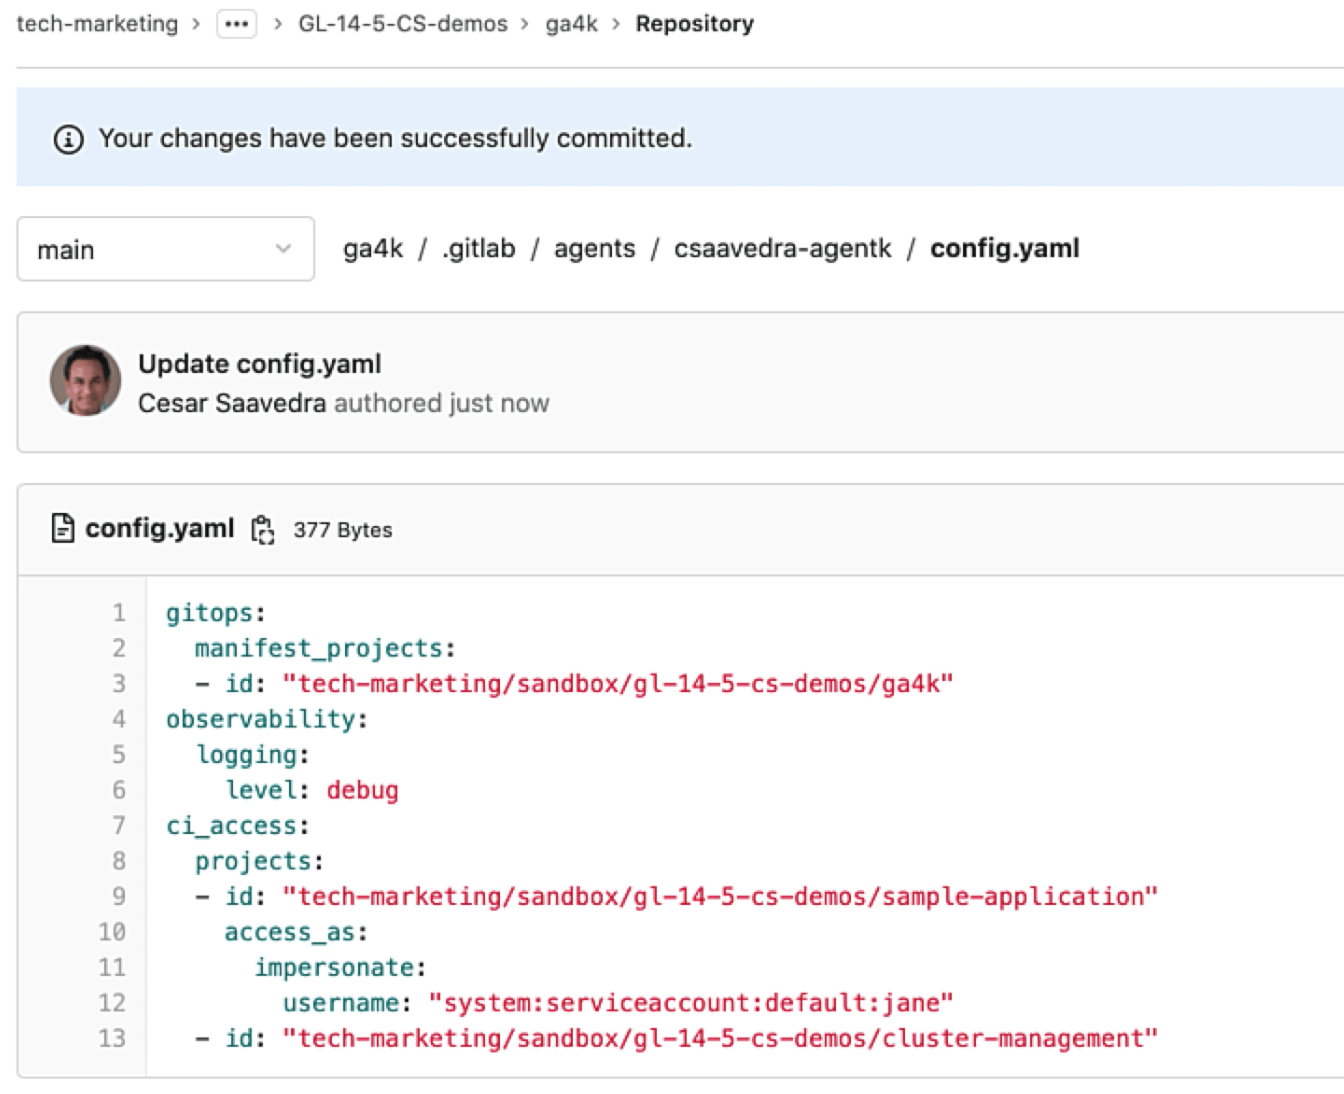 Impersonating a specific user called jane
As we commit the changes, we check the log output to verify that the update has taken place in the running agent:
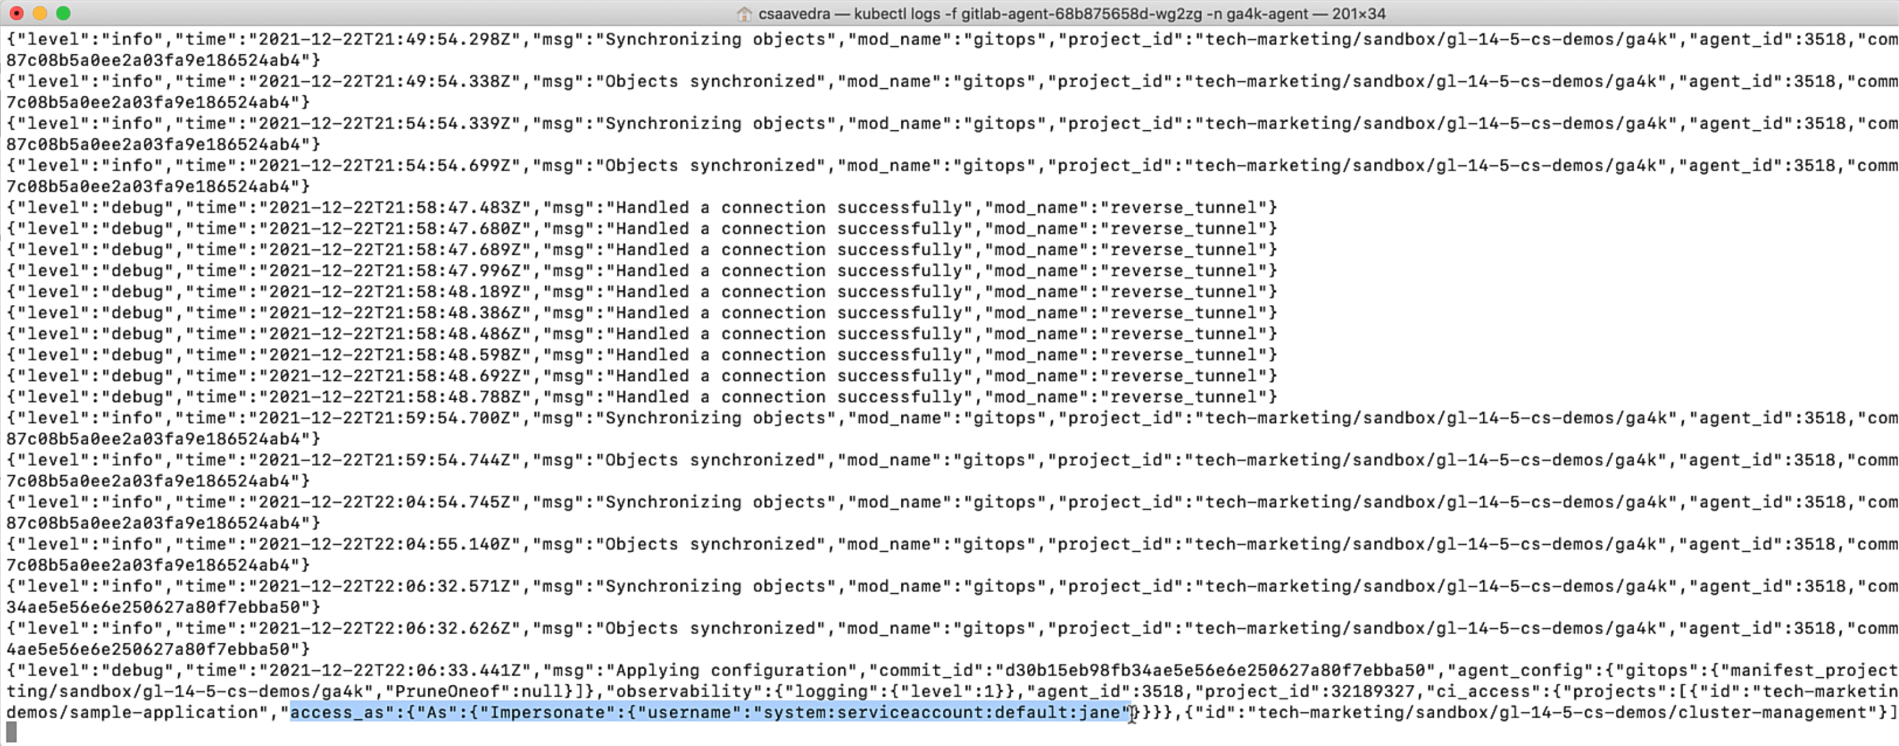 Agent updated with user impersonation
Since we know that "jane" has the permission to list the running pods in the cluster, let's head to the project "sample-application" pipeline and add the command "kubectl get pods –all-namespaces" to it:
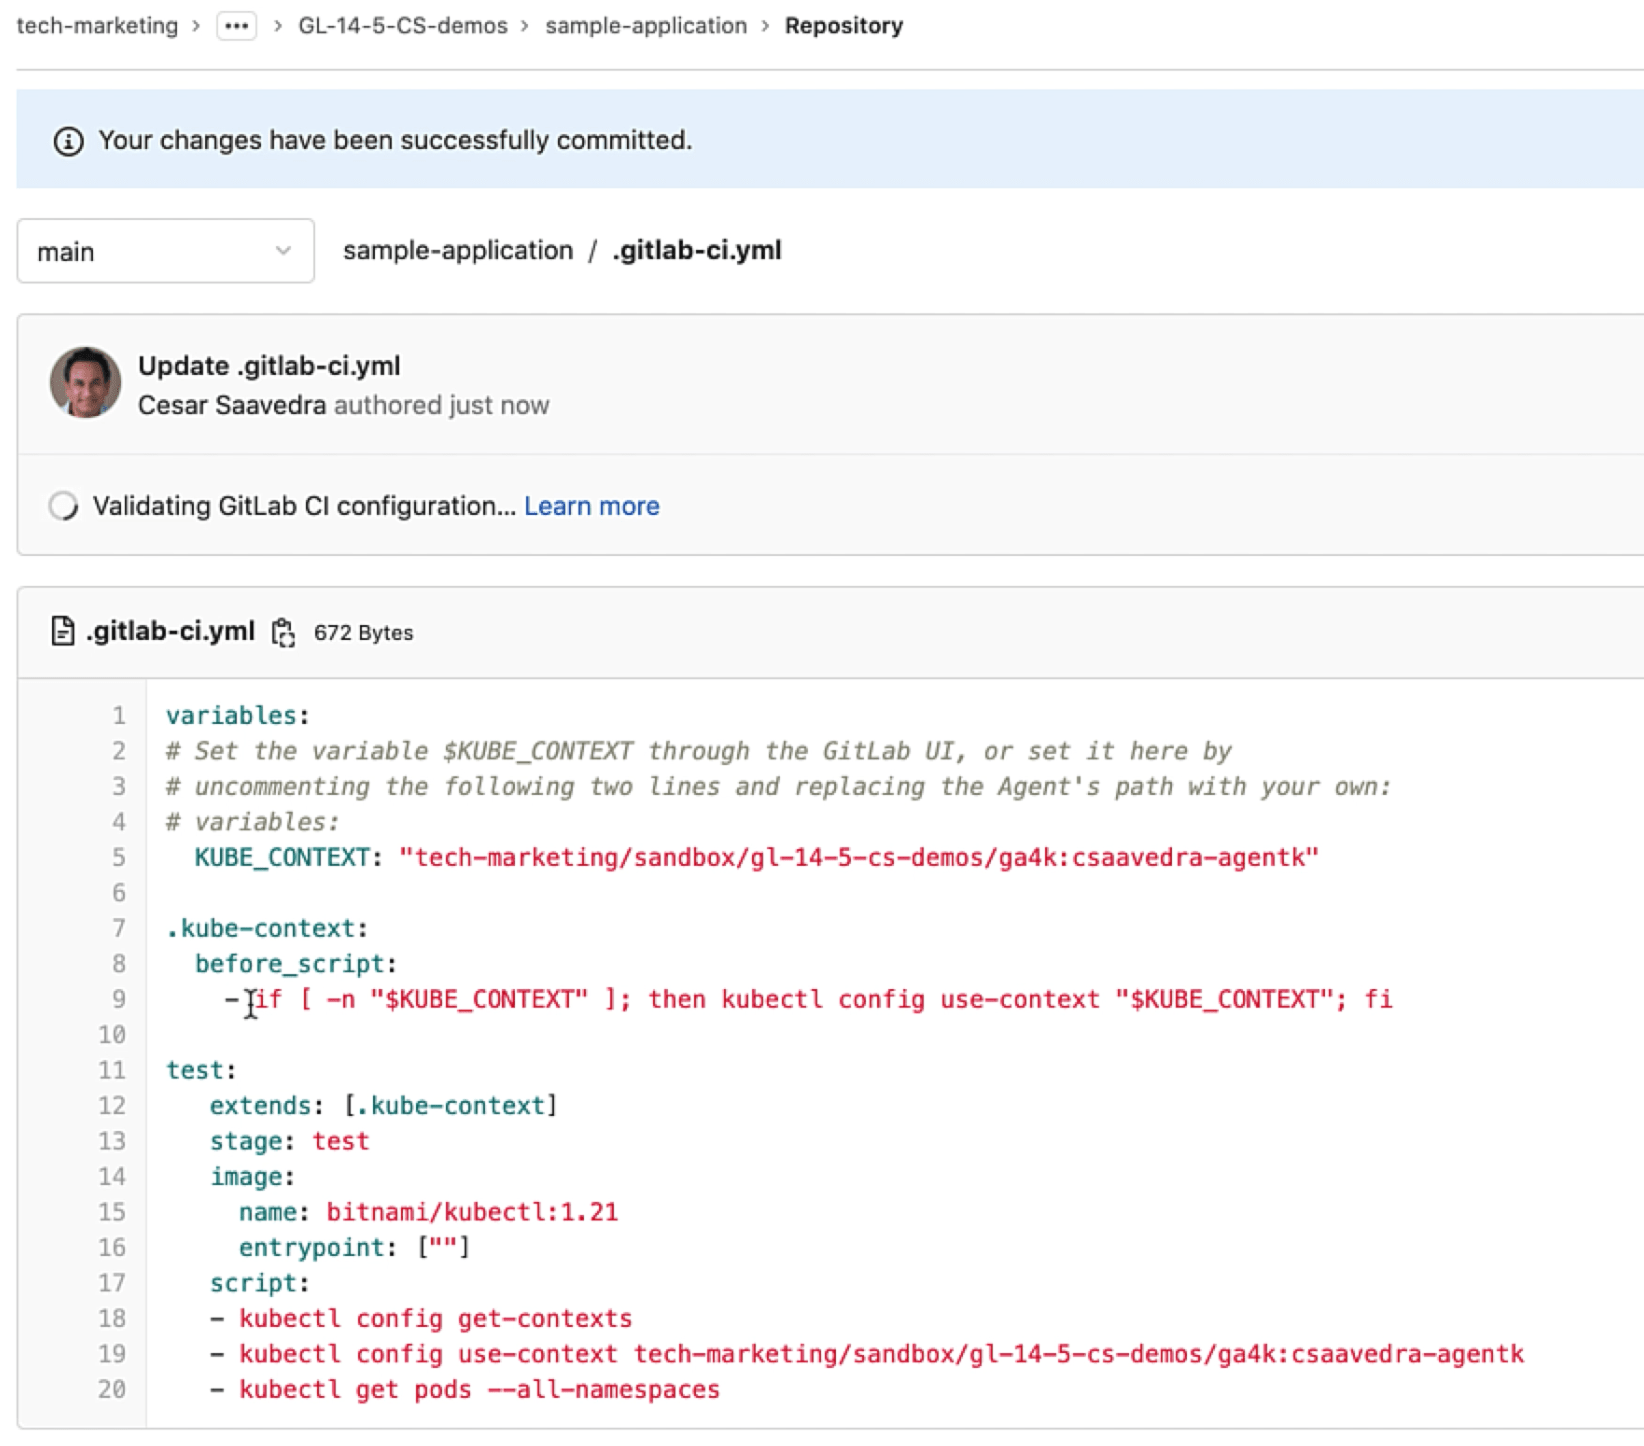 Adding get pods command that jane is allowed to run
We commit the update and head over to the running pipeline and drill into the "test" job log output to see that the context switch was successful and that the kubectl commands executed correctly, including the listing of the running pods in the cluster:
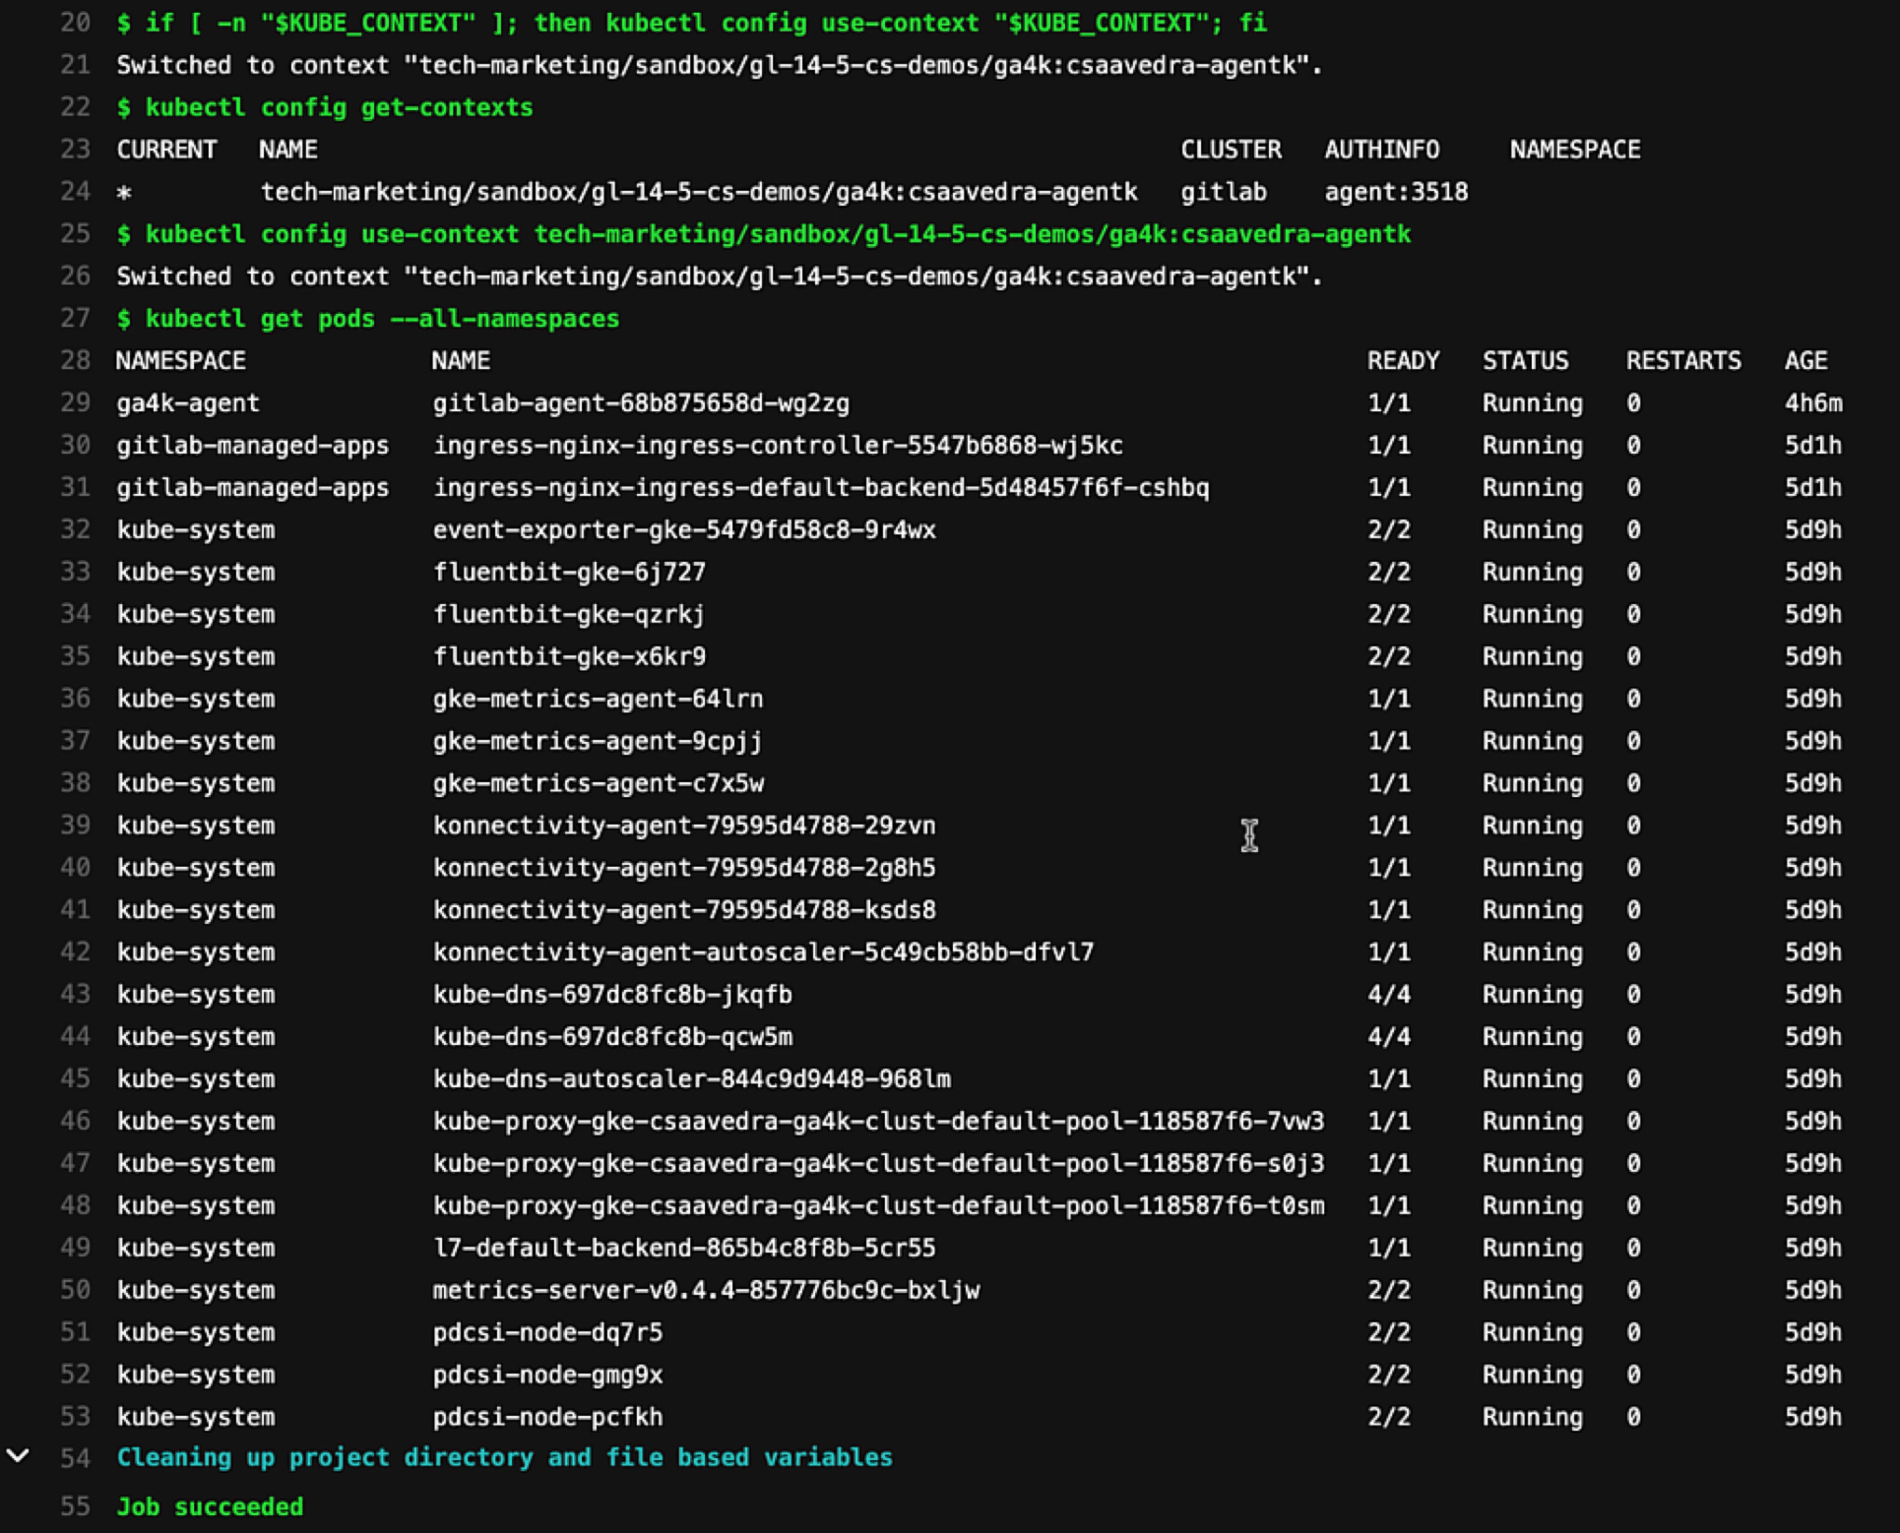 Job output for pipeline impersonation jane
Conclusion
In this blog post, we reviewed how you can securely access your Kubernetes clusters from your CI/CD pipelines by using generic impersonation. In addition, we showed the activity list of the GitLab Agent for Kubernetes, which can help you detect and troubleshoot faulty events from your cluster.
To see these capabilities in action, check out the following video:
Cover image by Jakob Søby on Unsplash


