To be successful with DevOps, teams must use automation, and CI/CD pipelines are a big part of that journey. At its most basic level, a pipeline gets code from point A to point B. The quicker and more efficient the pipeline is, the better it will accomplish this task.
What is a CICD pipeline?
A pipeline is the lead component of continuous integration, delivery, and deployment. It drives software development through building, testing and deploying code in stages. Pipelines are comprised of jobs, which define what will be done, such as compiling or testing code, as well as stages that spell out when to run the jobs. An example would be running tests after stages that compile the code.
A CI/CD pipeline automates steps in the SDLC such as builds, tests, and deployments. When a team takes advantage of automated pipelines, they simplify the handoff process and decrease the chance of human error, creating faster iterations and better quality code. Everyone can see where code is in the process and identify problems long before they make it to production.
Before we dive in, let's cover some basics:
The GitLab pipeline glossary
Commit: A code change.
Job: Instructions that a runner has to execute.
Pipeline: A collection of jobs split into different stages.
Runner: An agent or server that executes each job individually that can spin up or down as needed.
Stages: A keyword that defines certain stages of a job, such as build and deploy. Jobs of the same stage are executed in parallel.
Pipelines are configured using a version-controlled YAML file, .gitlab-ci.yml, within the root of a project. From there, you can set up parameters of your pipeline:
- What to execute using GitLab Runner
- What happens when a process succeeds or fails
Not all jobs are so simple. For larger products that require cross-project interdependencies, such as those adopting a microservices architecture, there are multi-project pipelines.
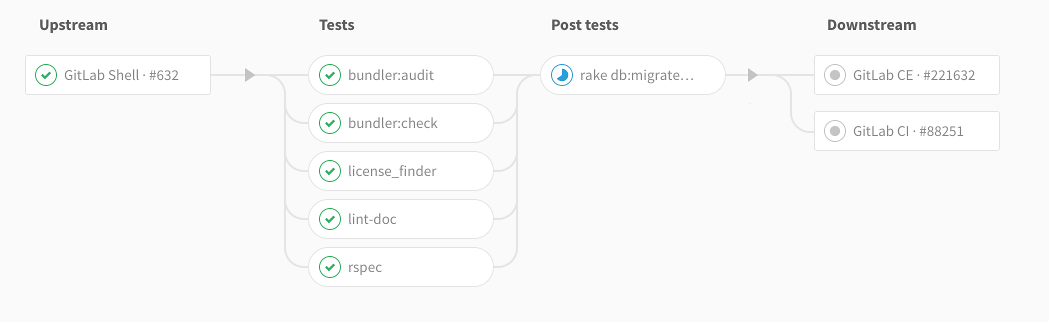
In GitLab 9.3 we made it possible to display links for upstream and downstream projects directly on the pipeline graph, so developers can check the overall status of the entire chain in a single view. Pipelines continue to evolve, and in our CI/CD product vision we’re looking into making pipelines even more cohesive by implementing Multiple Pipelines in a single .gitlab-ci.yml in the future.
Pipeline as code
Defining deployment pipelines through source code such as Git, is known as pipeline as a code. The pipeline as code practice is part of a larger “as code” movement that includes infrastructure as code. Teams can configure builds, tests, and deployment in code that is trackable and stored in a centralized source repository. They can use a declarative YAML approach or a vendor-specific programming language, such as Jenkins and Groovy, but the premise remains the same.
A pipeline as code file specifies the stages, jobs, and actions for a pipeline to perform. Because the file is versioned, changes in pipeline code can be tested in branches with the corresponding application release.
The pipeline as code model of creating continuous integration pipelines is an industry best practice. There are multiple benefits, such as the ability to store CI pipelines and application code in the same repository. Developers can also make changes without additional permissions, working with tools they’re already using.
Other benefits are more efficient collaboration and the ability to keep information accessible so team members can act on their decisions. Pipeline changes are subject to a code review process, avoiding any break in the pipeline migration.
Deployment pipelines are in a version control system independent of continuous integration tools. Pipelines can be restored if the continuous integration system goes down. If a team wants to switch CI tools at another point, pipelines can be moved into a new system.
In the early iterations of CI/CD, DevOps tools set up pipelines as point-and-click or through a GUI. This originally presented a number of challenges:
- Auditing was limited to what was already built in
- Unable to collaborate
- Difficulty troubleshooting
Something as simple as rolling back to the last known config was an exercise in futility. CI/CD pipelines during this time were prone to breaking, lacked visibility, and were difficult to change.
The pipeline as code model corrected a lot of these pain points and offered the flexibility teams needed to execute efficiently. With source code, teams could use Git to search and introspect changes.
Today, many tools have adopted YAML configuration as a best practice. GitLab CI/CD has used code, rather than GUI, since the beginning for pipeline configuration. "Pipeline as code" comes with many of the same benefits the other "as code" trends have:
- Version control – keep track of changes over time and revert to previous configurations easily
- Audit trails – know when and what changes were made to the source code
- Ease of collaboration – code is available to the team for improvements, suggestions, and updates
- Knowledge sharing – import templates and code snippets so teams can share best practices
- Built-in Lint tool – ensures YAML file is valid and assists new users
The principles of software development apply not only to the applications we deliver but also to how we build them. The pipeline as code model creates automated processes that help developers build applications better and faster. Having everything documented in a source repository allows for greater visibility and collaboration so that everyone can continually improve processes, which is what DevOps is all about.
What are the different stages of a GitLab CI/CD pipeline?
Pipelines are comprised of jobs, which define what to do, such as compiling or testing code; stages, which define when to run the jobs; and runners, which are agents or servers that execute each job, and can spin up or down as needed.
Pipelines are generally executed automatically and don’t need any intervention once they are created.
A typical pipeline generally consists of a few stages in the following order:
Test
The test stage is where the code is assess to ensure there are no bugs and it is working the way it was designed to before it reaches end users. The test stage has a job called deploy-to stage. Unit testing on small, discrete functions of the source may also done. All unit tests running against a code base are required to pass. If they don’t that creates a risk that must be addressed right away.
Deploy
The staging stage has a job called deploy-to-stage, where a team can conduct further tests and validation. It is followed by a production stage with a job called deploy-to-production. If the code passes a series of automated tests, often the build will automatically deploy. The endpoint is typically pre-production deployment. Once the build’s integrity is completely validated by stakeholders, it can be deployed to an actual production environment. Once the build passes pre-deployment testing, in a continuous deployment pipeline, it is automatically deployed to production.Then, it is monitored. To do so effectively requires collecting and analyzing metrics such as deployment frequency, deployment time and lead time for changes.
How do I set up a GitLab CI/CD pipeline?
Pipeline templates are useful because writing them from scratch is a time-consuming and onerous process. GitLab has pipeline templates for more than 30 popular programming languages and frameworks. Templates to help you get started can be found in our CI template repository.
A GitLab pipeline executes several jobs, stage by stage, with the help of automated code.
A continuous integration pipeline involves building something from the scratch and testing the same in a development environment. It might occur to the developers to add something after building the application and pushing it into production. This can be done with the help of continuous integration where we can add the code even after it is deployed.
This phase includes testing as well where we can test with different approaches in the code.
CD Pipeline prerequisites
To get started, you need to set up an Ubuntu 18.04 server along with a sudo non-root user and firewall. You also need at least 1 GB RAM and 1 CPU.
Docker must be installed on the server. A user account on a GitLab instance with an enabled container registry. The free plan of the official GitLab instance meets the requirements. You can also host your own GitLab instance by following the How To Install and Configure GitLab on Ubuntu 18.04 guide. Then you should create a GitLab project, adding an HTML file to it. Later, you’ll copy the HTML file into an Nginx Docker image, which in turn, you will deploy to the server.
- Log in to your GitLab instance and click new project.
- Give it a proper Project name.
- Optionally add a Project description.
- Make sure to set the Visibility Level to Private or Public depending on your requirements.
- Finally click Create project
Building better pipelines with Auto DevOps
CI/CD pipelines have automated so much of the development process, however, it will still take time to do the initial work of building and configuring them in your environment. But what if you aren’t sure what all the parts of your CI/CD pipeline should be? What are the best practices you should know at every stage?
In the past, there have only been two choices: Time-consuming configuration from scratch with complete customization, or an easier auto-configuration with much less flexibility. Developers have longed for the moment where they could click a button and have a complete pipeline with code quality, language detection, and all scripts included with very little manual work.
Auto DevOps is our solution to this problem. It is a pre-built, fully-featured CI/CD pipeline that automates the entire delivery process. Instead of having to choose between time and flexibility, GitLab offers both. In addition to the Auto DevOps template, GitLab offers several CI templates that can be modified as necessary, or you can override specific settings. Want all the power of Auto DevOps for a custom test job? Just override the script block for the test job and give it a try. Since templates are also modular, teams have the option to pull in only the parts they need.
We hope this blog post gives you some insight into how we approach pipeline as code and our larger vision for how we’re improving the CI/CD pipeline experience in the future. Automated pipelines increase development speed and improve code quality, and we’re actively working on making them even better and easier to use.
Cover image by Gerrie van der Walt on Unsplash