At GitLab, our Red Team conducts security exercises that emulate real-world threats. By emulating real-world threats, we help assess and improve the effectiveness of the people, processes, and technologies used to keep our organization secure. To operate effectively, we must utilize professional development practices like the threat actors we emulate.
Threat actors use open source command and control (C2) tools such as Merlin. While convenient, these tools have intentionally detectable features to discourage illegitimate use. Red Teams often need to customize and combine different open source options to evade detections in the environments they target.
In this blog, you'll learn how our team applies professional development practices to using open source C2 tools. We'll share how we implement continuous testing for the Mythic framework, our design philosophy, and a public project you can fork and use yourself.
Our solution, available in this public project, improves our Red Team operations in two ways. First, it contains a suite of pytest tests for the Mythic C2 framework. These validate functionality of both the Mythic server and multiple Mythic-compatible agents. Second, it leverages GitLab CI/CD pipelines to automatically run these tests after each code change. This enables iterative development and rapid validation of updates to Mythic or Mythic-compatible C2 agents.
Prerequisites
Currently, a few prerequisites fall outside the scope of test automation:
- A Linux VM with Mythic, its Python requirements, and the HTTP profile installed. See the Mythic installation guide. We suggest binding Mythic's admin interface to localhost only.
- A fork of the ContinuousMage GitLab project in GitLab.com or your own GitLab instance. You'll build on top of this to run your own automation. We highly suggest making this fork private, so you don't expose your test infrastructure or C2 code changes.
- GitLab Runner installed on the VM (configured with the shell executor) and registered with your GitLab instance. See the docs on installing and registering a runner or follow the instructions provided when configuring your pipeline later in this blog. You'll assign this runner to your project when we configure CI/CD.
- Your forked project cloned onto your VM. This allows testing code changes (or new tests) before triggering the pipeline.
Project structure
The project contains three main portions that we will detail in this blog post:
pytesttest code for running integration tests for Mythic and Mythic-compatible C2 agents- The source of those Mythic-compatible C2 agents, as git submodules
- The GitLab CI/CD pipeline configuration that ties it all together
Part 1: pytests
pytest is a framework for writing tests in Python. We can leverage pytest to do integration testing of Mythic since it has its own Python package. The test suite goals are:
- Be simple and atomic.
- Provide adequate coverage to validate tool readiness.
We'll walk through a simple test verifying an agent can run the ls command, highlighting key code sections for customization.
Implementation
pytest file
When run on a directory, pytest automatically discovers tests in files prefixed with test_ and test functions starting with test_. Our tests are asynchronous, needing the pytest.mark.asyncio decorator, because the Mythic APIs we are testing are asynchronous. If your machine is missing test dependencies, run python3 -m pip install mythic pytest pytest-asyncio.
A test function skeleton is as follows:
@pytest.mark.asyncio
async def test_agent_ls():
    # Will do the test here
    continue
The GlMythic class
The GlMythic class wraps Mythic APIs for ease of use in testing. Because its init function is async, a coroutine creates the object:
@pytest.mark.asyncio
async def test_agent_ls():
    glmythic = await gl_mythic.create_glmythic()
By default, it connects to the Mythic DB using the MYTHIC_ADMIN_PASSWORD environment variable and is configured to test the agent specified via the AGENT_TYPE environment variable. We will set these in the CI/CD config later.
Interacting with Mythic via GlMythic
We'll include the remainder of the test code here, with comments, and then discuss the most important parts.
As a reminder, one of the key goals of this project was to make completely atomic tests. Each test only relies on a running Mythic server with the specific agent and HTTP containers loaded. As the test suite grows, it may be worth running a secondary set of tasks that relies on an already-existing agent connection. Currently, every test creates, downloads, and executes a new agent.
Test and deploy
@pytest.mark.asyncio
async def test_agent_ls():

    glmythic = await gl_mythic.create_glmythic()

    # Unique payload_path per test
    payload_path = "/tmp/test_agent_ls"

    # Wraps agent create, download, and execute
    proc = await glmythic.generate_and_run(payload_path=payload_path)

    # Wait for callback
    time.sleep(10)

    # Uses the display_id field to determine most recent callback
    # Assumes that the most recent callback is the one created by this test
    callback = await glmythic.get_latest_callback()

    # Issue the ls command, blocking on output
    output = await mythic.issue_task_and_waitfor_task_output(
        mythic=glmythic.mythic_instance,
        command_name="ls",
        parameters="",
        callback_display_id=callback["display_id"],
        timeout=20,
    )

    # Clean up (no longer need the agent)
    proc.terminate()
    os.remove(payload_path)

    # If the ls failed, there will be no output
    # This test could also look for files in the repo (where the agent runs)
    assert len(output) > 0
The longest running portion of this test will be the call to generate_and_run, as agent builds within Mythic can take from seconds to minutes or even hang altogether. For your initial set of tests, sign in to the Mythic server and watch the Payloads screen for potential issues. In our testing, agent builds failed to complete around 5% of the time, depending on the agent. If you experience repeated build failures, reload your agent container with sudo ./mythic-cli install folder <agent_directory> -f.
To run the tests, run pytest <testfile_directory>.
Part 2: Agent source as submodules
Because Mythic agents are often updated, we include the agent repos as git submodules in our test project. This allows us to update to new agent versions when they are released and use our project's version control to keep tool versions static for known good builds. These submodules are all located in the agents folder.
We'll discuss adding more agents to this project later in this blog.
Part 3: GitLab CI/CD pipeline
Now that you have working pytests, you can automate your tests to run whenever you want. In our case, we chose to run our tests on merge requests and tagged commits (which are likely to be tool releases). We will be using GitLab CI/CD pipelines to perform our automated tests.
Configuring the pipeline
Now is the time to set your GitLab CI/CD settings. To find these settings, go to your repository -> Settings -> CI/CD.
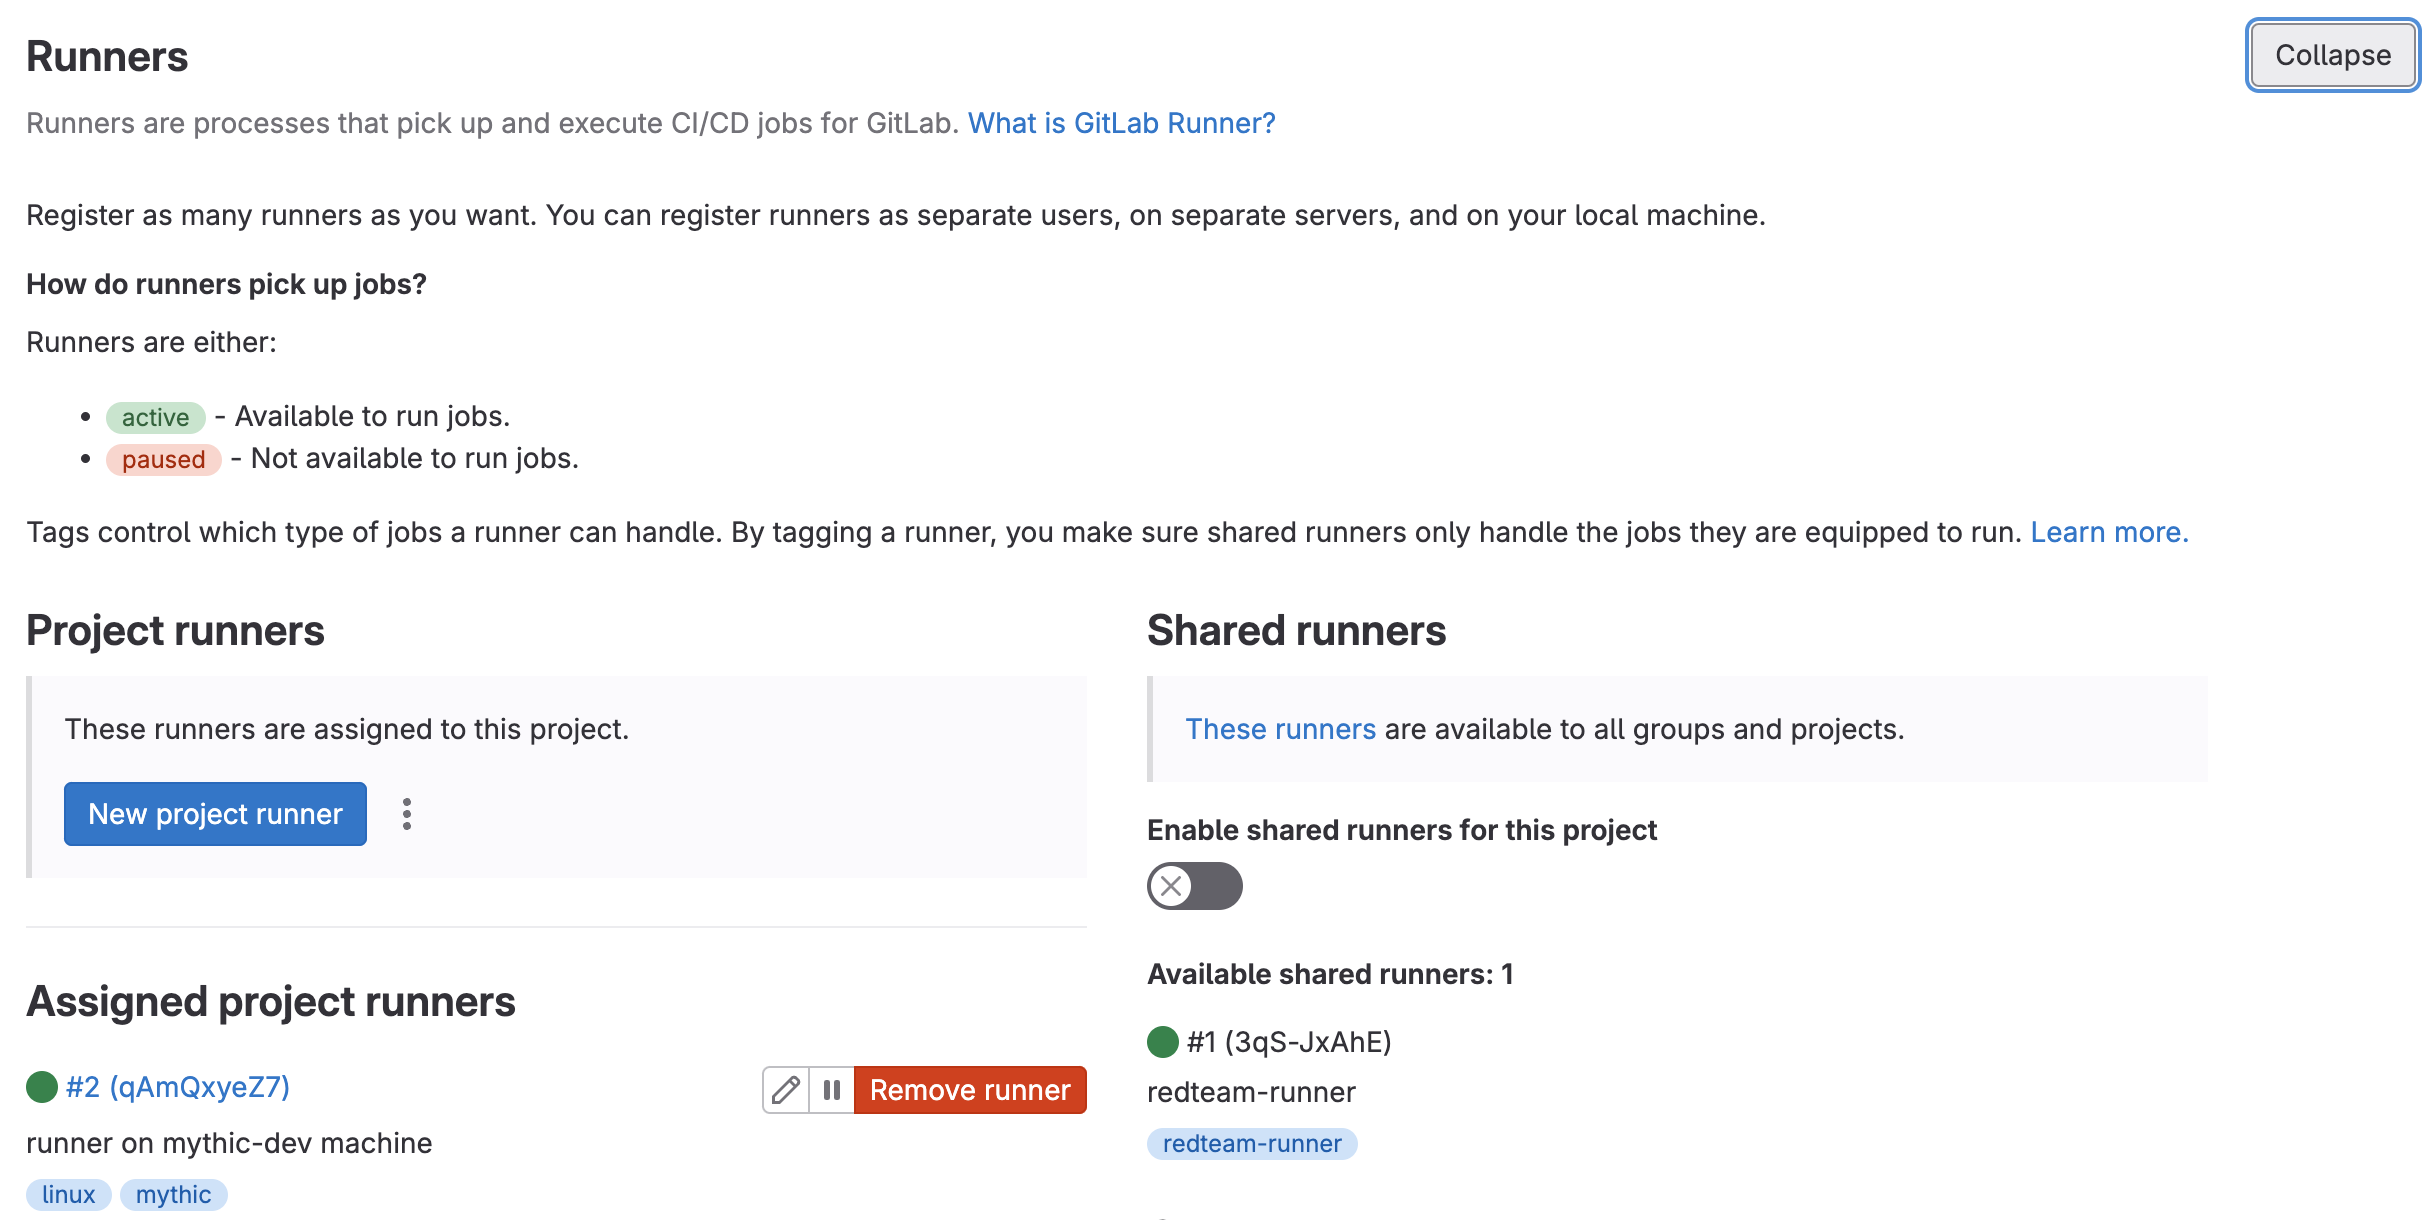
The first setting you'll want to set is your Runner. If you set up a runner as one of your prerequisite steps earlier, you can assign it here. If not, click New project runner and work through that process to create and set up your runner on your Mythic server. When you are prompted to choose a runner type on install, choose the shell executor. If your team uses shared runners for other CI/CD pipelines, you will want to make sure that shared runners are disabled for this project, given that your shared runners are unlikely to be able to talk to Mythic directly.
Next, you need to set your Variables. The GlMythic class uses the MYTHIC_ADMIN_PASSWORD environment variable to be able to actually sign into Mythic, so you need to make sure that the pipeline runner's environment is set up correctly.
To do this, click the Add variable button and add the MYTHIC_ADMIN_PASSWORD variable with the appropriate value. If you don't know your Mythic admin password, on the Mythic server in the directory where you installed Mythic, cat .env | grep MYTHIC_ADMIN_PASSWORD will give you the password.
Because GitLab handles merge requests in a detached state, you need to unclick the Protect Variable box, because that would prevent the pipeline from viewing the variable on a merge request otherwise. Because the variable is not protected, any branch committed back to your server can access your CI variables. This may pose a security risk if you allow remote access to your Mythic server (versus binding to localhost) and if you allow arbitrary users to access your repository. For this reason, our public repo does not have the environment variables. We use a private copy to perform testing, and suggest you do the same.
Additionally, set the AGENT_TYPE variable to the name of the agent you want to use. At time of release, valid agent types are poseidon or merlin. The section about adding more agents to the test suite will go into more detail.
You can also document commands to lint the code or run tests. These steps help to ensure high code quality and reduce the likelihood that the changes inadvertently break something. Having instructions for running tests is especially helpful if it requires external setup, such as starting a Selenium server for testing in a browser.
Now that the pipeline is configured to use the runner and pick up the environment variables that you need, the only thing left to do is to set up your pipeline. This step is quite simple: If you add the .gitlab-ci.yml file to the root of your repository, GitLab will pick that up as the pipeline config on your next commit. Here is our example pipeline, which we will explain momentarily.
install:
  stage: install
  script:
    - sudo /opt/Mythic/mythic-cli install folder "${CI_PROJECT_DIR}"/agents/"${AGENT_TYPE}" -f
  rules:
    - if: $CI_PIPELINE_SOURCE == 'merge_request_event'
    - if: $CI_COMMIT_TAG

test:
  stage: test
  script:
    - pytest "${CI_PROJECT_DIR}"/mythic-test
  rules:
    - if: $CI_PIPELINE_SOURCE == 'merge_request_event'
    - if: $CI_COMMIT_TAG
All of the variables set above are made available by GitLab as part of every pipeline. This pipeline has two stages, install and test. Both stages are set to only run on merge requests or if the commit being evaluated has a specific tag. The install stage will install your C2 agent into Mythic using its local folder install. This makes sure that the Mythic server has your latest C2 code changes installed. Next, the test stage runs the set of pytest tests that we created. The install stage will run very quickly, and the test stage will run a little more slowly, given that it's doing the work of creating and interacting with Mythic agents.
Pipeline in action
You can do a couple of things to validate that your pipeline is working. First, if you are performing a merge request, there will be a section at the beginning of the merge request that will link to the pipeline. The screenshot below shows that the pipeline has passed, but you can click into the pipeline by clicking on its number even when it's running.

You can then click into the stage that's running (or one that has already run) to view its output.
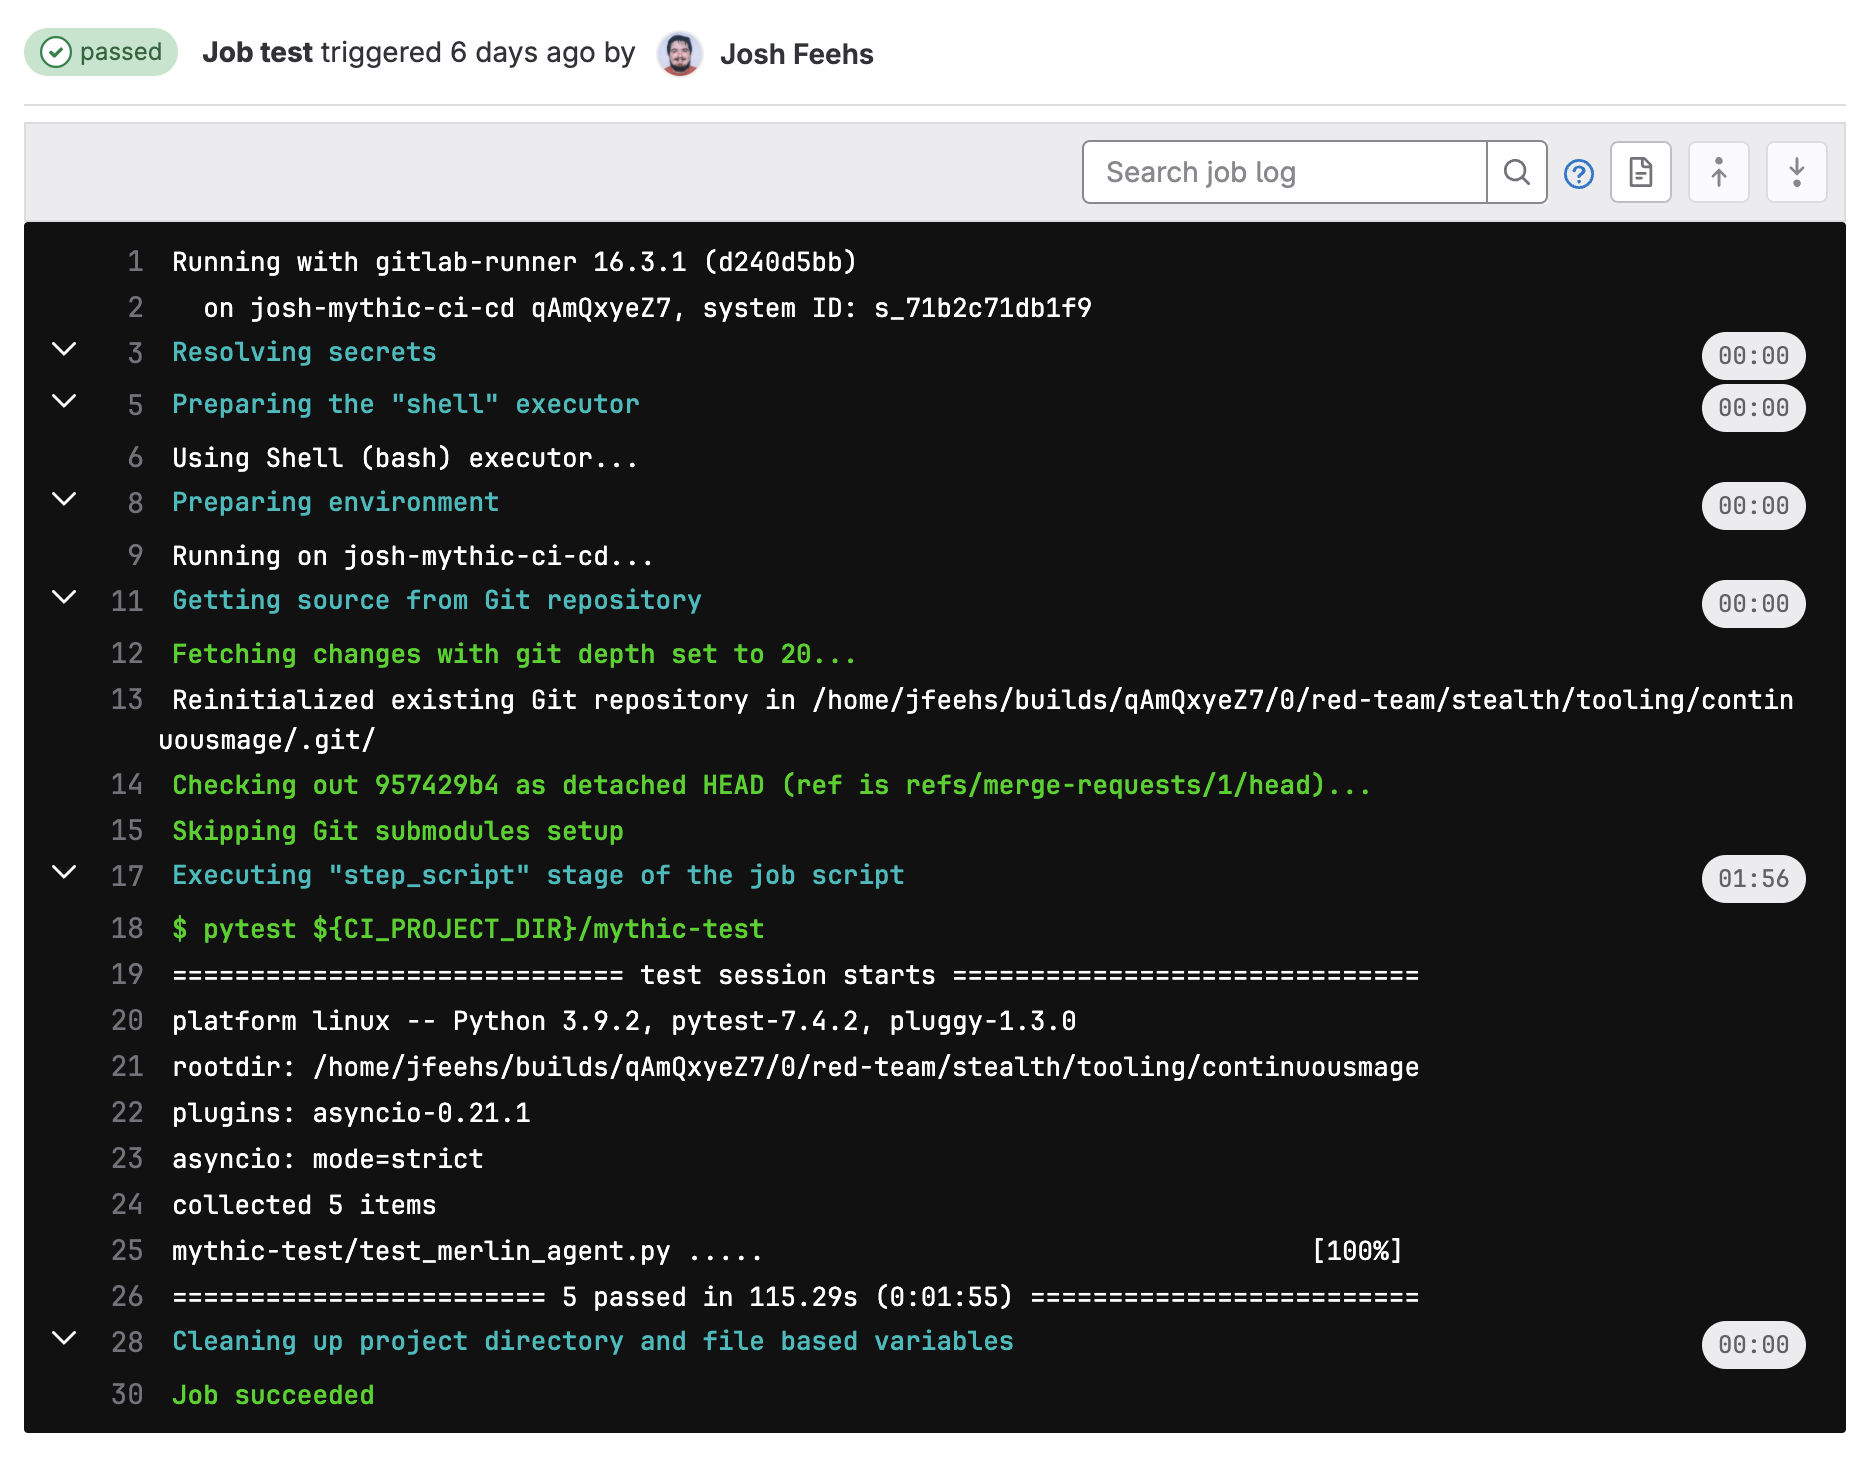
And there you are! You now have working pytest tests for a Mythic agent that run every time you make a merge request.
Adapting for other agents
We tested our test suite against Poseidon and Merlin. Although the initial tests (generate, download and exec, ls) work the same for both agents, Poseidon and Merlin require different parameters for their upload commands. Unfortunately, this means that not all tests will be agent agnostic.
As a result, each GlMythic object that is created is told what type of agent it is testing. The coroutine for creating an object allows you to pass in the agent type as a variable, and defaults to using the AGENT_TYPE environment variable to determine which agent is being tested.
async def create_glmythic(  username="mythic_admin",
                            password=os.getenv("MYTHIC_ADMIN_PASSWORD"),
                            server_ip="127.0.0.1",
                            server_port=7443,
                            agent_type=os.getenv("AGENT_TYPE")):
Agent source
To add more agents for testing, the first thing to do is to import your agent as a git submodule:
cd agents
git submodule add "${URL_TO_YOUR_AGENT}"
Commit your changes, and your agent is tracked as part of the repo.
Test compatibility
You'll need to validate that existing tests work with your agent. For tests to work, the parameters passed to the commands must match those in the test suite, with upload to be most likely to fail.
This is okay! Within the test_agent_upload test function, you'll see example code that specifies a different upload command for Merlin and Poseidon. Simply follow this structure for your own agent, passing your agent's parameters to the mythic.issue_task_and_waitfor_task_output function call.
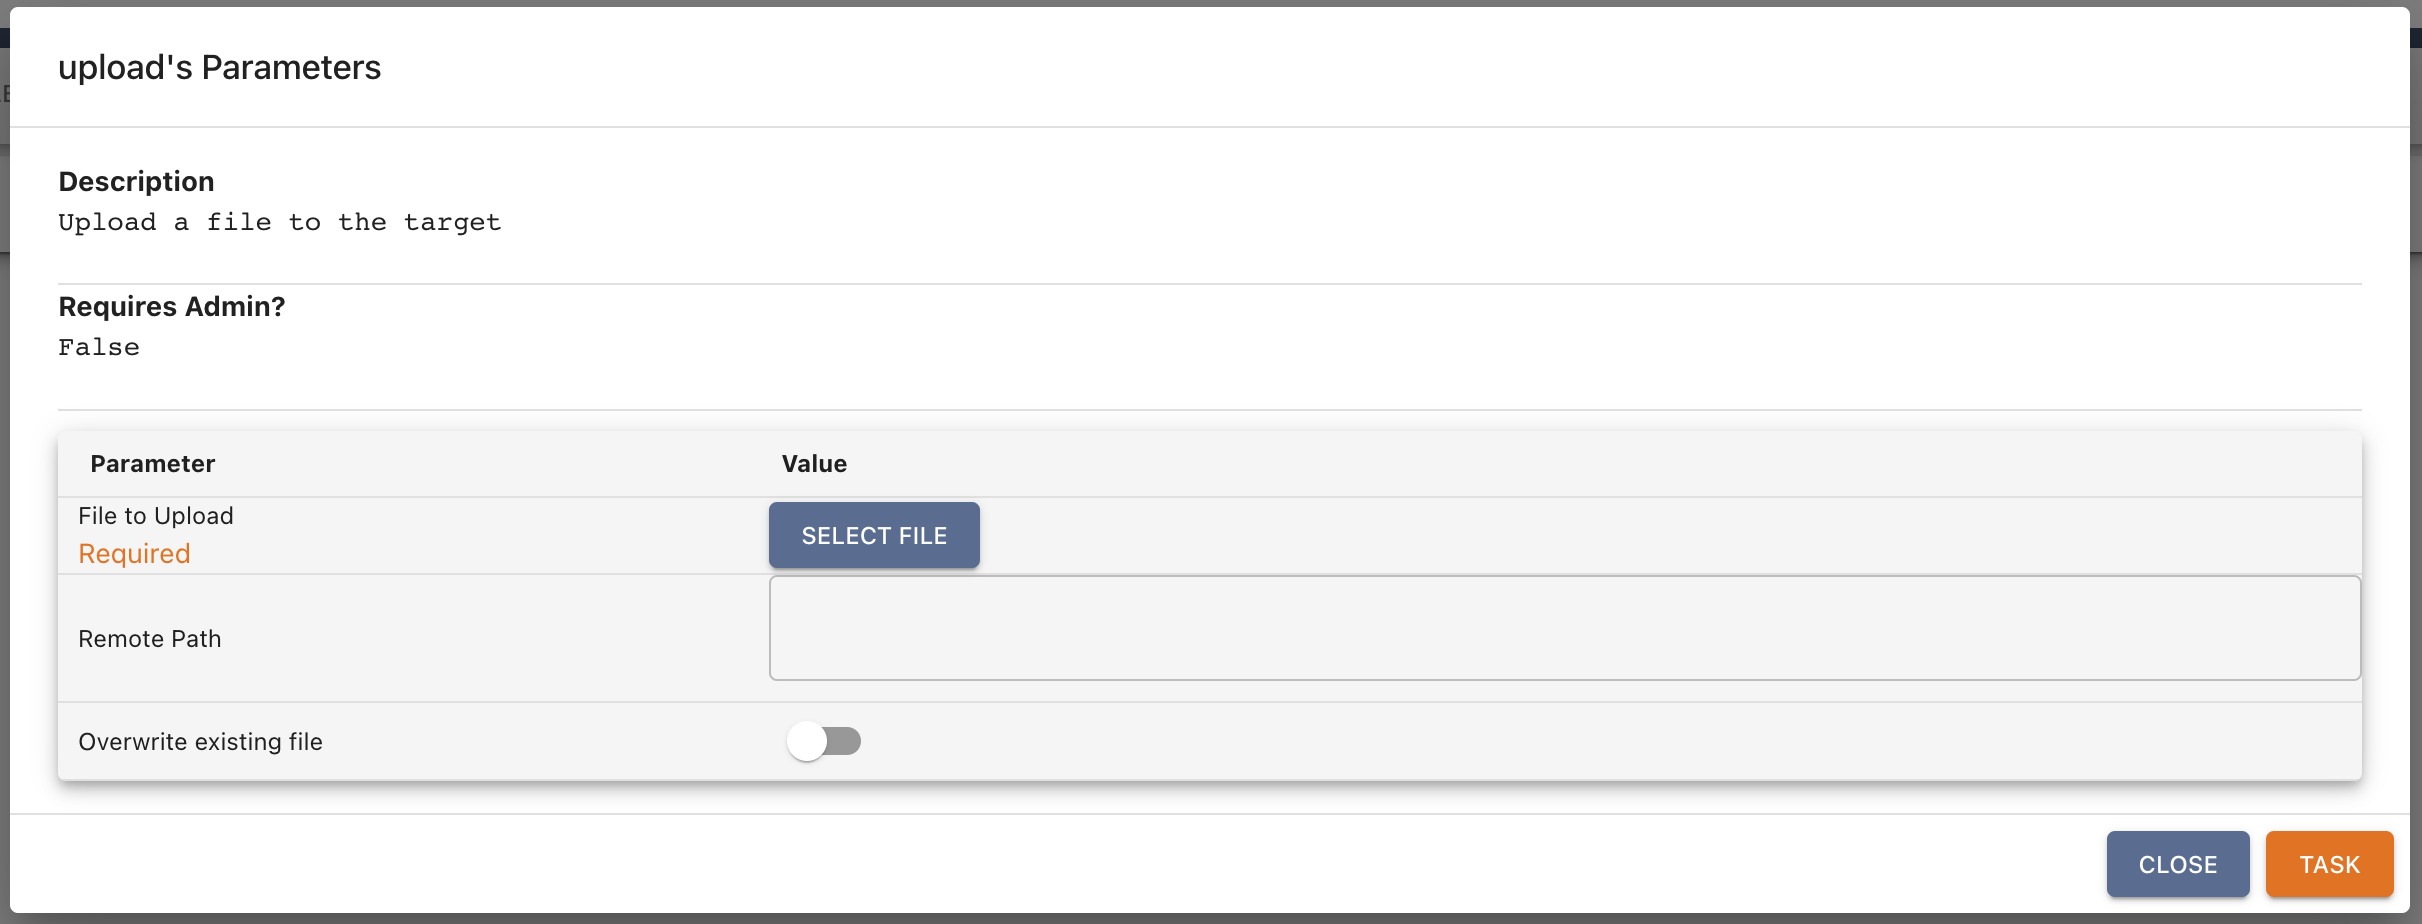
If you are using another open source C2 and are unsure of the correct parameters to pass, you can use the Mythic UI. Interact with one of your agents and run the upload command to see what params you need to pass. If you do this for Poseidon, it will look like the following:
Our test suite should be pretty easy to add to any Linux-based Mythic agent that supports the HTTP C2 profile. Because the GitLab Runner installs the agent into Mythic (and Mythic is made to run on Linux), the runner is expecting to be on a Linux machine. Additional effort and test modifications will be required to run the test suite against a Windows or MacOS agent.
A quick win
As we worked on this project, we were continuously running our test suite against both Poseidon and Merlin. Unexpectedly, in early October 2023, our test for Poseidon's upload function started to fail. After a quick investigation, we identified that a bug had been introduced, present in Poseidon 2.0.2, that caused file uploads to fail.
We took our information to one of the Poseidon developers, Cody Thomas (@its_a_feature_), and he quickly identified the underlying issue and fixed the problem.
This highlights the usefulness of continuous testing. Instead of running into a potential bug during a Red Team exercise, we identified the issue beforehand and were able to report the bug so the issue was fixed.
We sincerely thank the Mythic, Merlin, and Poseidon developers for open sourcing their hard work. Many Red Teams around the world are able to perform high-quality security assessments in part because of the hard work of C2 developers who open source their tools. We also want to specifically thank Cody Thomas for addressing this bug within 20 minutes of notification. His responsiveness and attention to detail are unmatched.
Share your feedback
This post has demonstrated both the value of continuous testing and shown how to implement continuous testing for your own use, using GitLab. If you have worked alongside these examples, you've implemented some continuous testing for the Mythic framework and have tests that you can use for Merlin, Poseidon, or your own Mythic agent(s).
At GitLab, we always seek feedback on our work. If you have any questions or comments, please open an issue on our project. You can also propose improvements via a merge request. We believe that everyone should be able to contribute, so we welcome any contributions, big or small.