CI/CD has changed our development processes, but it hasn’t simplified them in every aspect. The amount of knowledge necessary to implement and maintain your first CI/CD pipelines is huge, and the time you need to invest in it is consequential. Partnering with GitLab, R2Devops aims to simplify CI/CD onboarding by creating a hub of CI/CD jobs. In this blog post I'll show you how to use R2DevOps with GitLab to add jobs to an open source hub.
A collaborative hub of open source jobs
Collaboration is core to our development processes. On a daily basis, we use open source software and code and ask our teammates for review. Working together to achieve common goals helps us to develop better products and improve continuously. With R2Devops, you’ll find a collaborative library of open source CI/CD jobs.
You can save a lot of time by using jobs from an open source library. You won’t have to write your pipeline from scratch for every new project, and you can focus on what you like doing, which is coding.
And, of course, working together is working smarter. R2Devops empowers collaboration by allowing developers to add their own jobs into the library directly from their GitLab account.
How to add a job in R2Devops

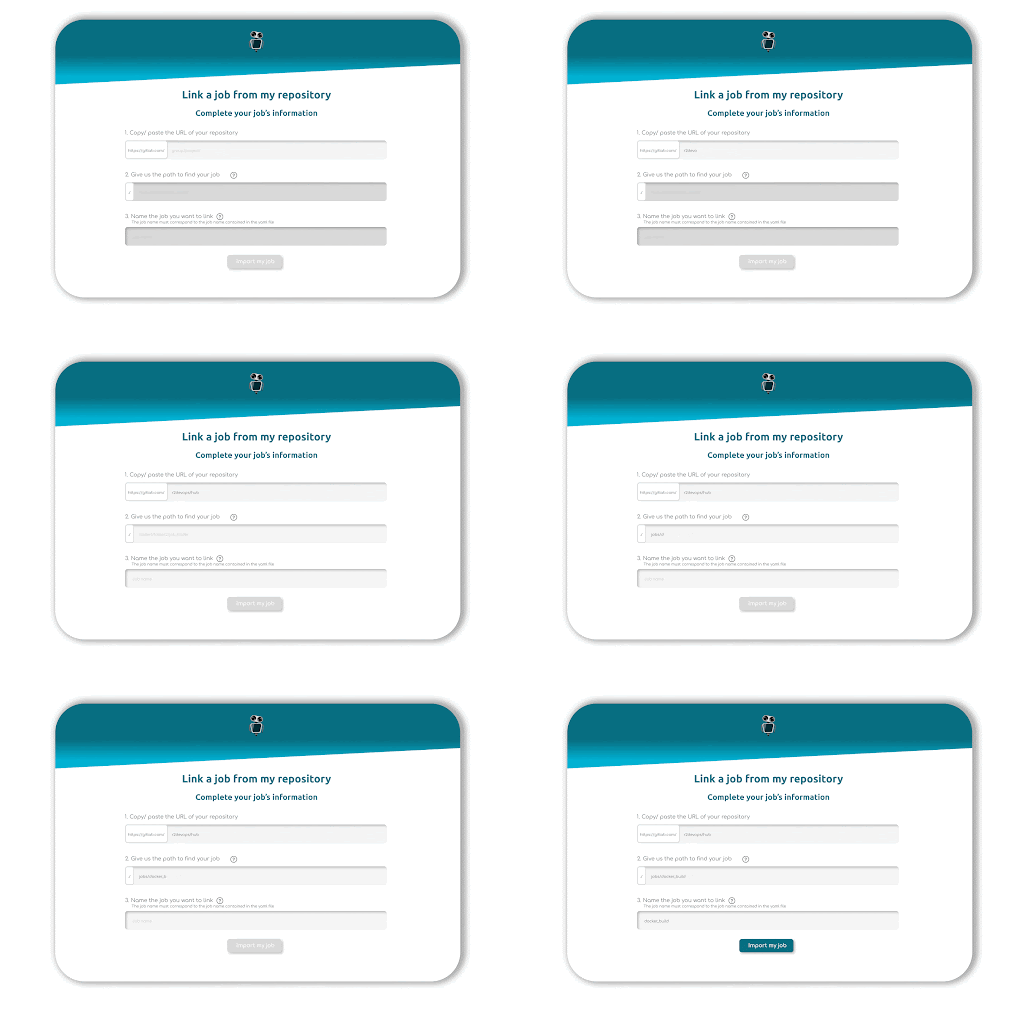
Link your GitLab account to R2Devops, fill in the URL of your repository, the path of your job, and give it a name. Once you click on import, our crawler will check three files:
1.) the jobname.yml/jobname.yaml
2.) the changelog.md
3.) the readme.md.
The crawler process is explained in detail in our documentation. In short, without a jobname.yml file, R2 won’t be able to import your job. The changelog.md allows R2 to check your job’s versions, and the readme.md is used to build the documentation for each version of your job.
Et voilà, anyone can see your job in R2Devops and easily use it in their pipeline.
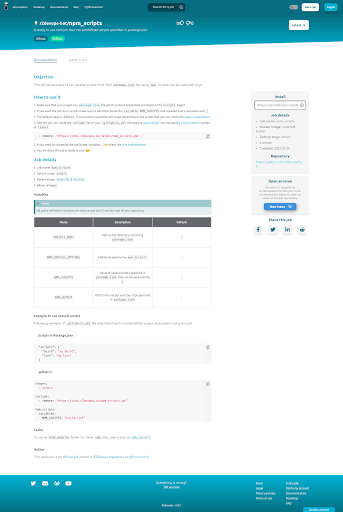
Once your job is in R2Devops, you can add information such as the license, description, and specify labels. This helps other users understand what your job can be used for. That data and the job’s code appears in the documentation. 👇

Include any jobs in one line with GitLab Include keyword feature
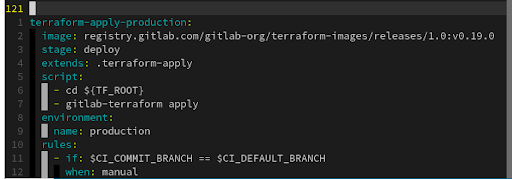
In January 2019, GitLab released a feature that simplifies the CI/CD keyword Include process. Rather than copying the code of a job every time you need to create a new pipeline, you can instead indicate to your pipeline where the source is located.
For example, this:

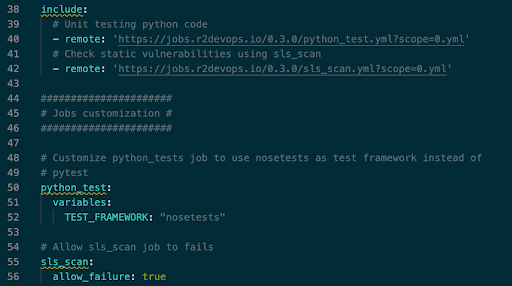
can become the below:

This feature is used in R2Devops. Every resource added in the library gets its own Include link, so anyone can implement it in one line in their CI/CD. It also means that the file you are using is located in a unique place. Once you update it, you only have to update the include link by modifying the version of the job you want to use. You don’t have to update the whole code in every pipeline you own.
Customize the job you need using GitLab variables
Most of R2Devops’ jobs are plug and play, meaning you can add the Include link of the job in your pipeline, launch it, and it will work. We understand every project is different and has its own requirements, which is why we defined variables for each job.
GitLab CI/CD variables and YAML overrides allow you to customize the jobs and make them fit your project easily.

We have included two jobs from the hub as examples: python_test code andsls-scan. Using the variables defined in the documentation for each job, you can personalize the behavior of these jobs to fit our project requirements.
Matching GitLab's values of open source and transparency
R2Devops joined the GitLab Alliance Partner Program in March. Both solutions share the same goal – to simplify developer lives by improving development processes. If you want to take part in the development of the open source CI/CD community of GitLab or give feedback on the solution, please [join the R2Devops community on Discord.](https://discord.r2devops.io?utm_medium=website&utm_source=r2devops&utm_campaign=button https://discord.r2devops.io?utm_medium=gitlab&utm_source=blog&utm_campaign=articleR2Devops)


