
Learning a new programming language can help broaden your software development expertise, open career opportunities, or create fun challenges. However, it can be difficult to decide on one specific approach to learning a new language. Artificial intelligence (AI) can help. In this tutorial, you'll learn how to leverage AI-powered GitLab Duo Code Suggestions for a guided experience in learning the Rust programming language.
- Preparations
- Learning a new programming language: Rust
- Cargo: Bringing structure into Rust
- Automation: Configure CI/CD pipeline for Rust
- Continue learning Rust
- What is next
Preparations
Choose your preferred and supported IDE, and follow the documentation to enable code suggestions for GitLab.com SaaS or GitLab self-managed instances.
Programming languages can require an install of the language interpreter command-line tools or compilers that generate binaries from source code to build and run the application.
Tip: You can also use GitLab Remote Development workspaces to create your own cloud development environments, instead of local development environments. This blog post focuses on using VS Code and the GitLab Web IDE.
VS Code
On macOS, you can install VS Code as a Homebrew cask or manually download and install it.
brew install --cask visual-studio-code
Navigate to the Extensions menu and search for gitlab workflow. Install the GitLab workflow extension for VS Code.
Tip: VS Code will also detect the programming languages, and offer to install additional plugins for syntax highlighting and development experience.
Code Suggestions
It can help to familiarize yourself with suggestions before actually verifying the suggestions. GitLab Code Suggestions are provided as you type, so you do not need use specific keyboard shortcuts. To accept a code suggestion, press the tab key. Also note that writing new code works more reliably than refactoring existing code. AI is non-deterministic, which means that the same suggestion may not be repeated after deleting the code suggestion. While Code Suggestions is in Beta, we are working on improving the accuracy of generated content overall. Please review the known limitations, as this could affect your learning experience.
Learning a new programming language: Rust
Now, let's dig into learning Rust, which is one of the supported languages in Code Suggestions.
Rust by Example provides a great tutorial for beginners, together with the official Rust book. The Hands-on Rust book shows how to build a 2D game as a more practical approach. More examples are shared in this Rust book list.
Before diving into the source code, make sure to set up your development environment.
Development environment for Rust
- Create a new project
learn-rust-aiin GitLab, and clone the project into your development environment. All code snippets are available in this "Learn Rust with AI" project.
git clone https://gitlab.com/NAMESPACE/learn-rust-ai.git

cd learn-rust-ai

git status
- Install Rust and the build toolchain. Fortunately, this is straightforward following the Rust install documentation.
Tip for using the generic installer: Download the script and run it after review.
# Download and print the script before running it
curl -Lvs https://sh.rustup.rs -o rustup-init.sh

# Run the Rust installer script
sh rustup-init.sh
Example on macOS using Homebrew:
brew install rust
-
Optional: Install the rust-analyzer VS Code extension.
-
Each exercise will invite you to compile the code with the
rustccommand, and later usingcargoas build tool and package manager.
You are all set to learn Rust!
Hello, World
We will start with Rust by Example, and follow the Hello, World exercise.
Create a new file hello.rs in the root directory of the project and start with a comment saying // Hello world. Next, start writing the main function, and verify the code suggestion.

Accept the suggestion by pressing the tab key and save the file (keyboard shortcut: cmd s).
// Hello world

fn main() {
    println!("Hello, world!");
}

Commit the change to the Git repository. In VS Code, use the keyboard shortcut ctrl shift G, add a commit message, and hit cmd enter to submit.
Use the command palette (cmd shift p) and search for create terminal to open a new terminal.
Build and run the code.
rustc hello.rs

./hello

Tip: Adding code comments in Rust (//) before you start writing a function or algorithm will help Code Suggestions with more context to provide better suggestions. In the example above, we did that with // Hello world, and will continue doing so in the next exercises.
Cargo: Bringing structure into Rust
Cargo is the official Rust package management tool. It is more than that - you can run build and test commands because Cargo understands them as well.
You can initialize a new Cargo configuration in the current directory tree with the following command:
cargo init
The directory tree invites you to add the source code into the src/ directory, while Cargo.toml manages the dependencies and used compiler versions. The .gitignore file is also added including best practices.
tree
.
├── Cargo.toml
├── README.md
├── hello
├── hello.rs
└── src
    └── main.rs
Try building the code and running it using cargo.
cargo build

cargo run
Commit all changes and push them to your GitLab project.
git commit -avm "Initialize Cargo"

git push
After exploring Cargo, let's make sure that our code is continuously tested while learning Rust. The next section explains how to set up GitLab CI/CD for Rust.
Automation: Configure CI/CD pipeline for Rust
The CI/CD pipeline should run two jobs in two stages: Build and test the code. The default container image, rust:latest, works in the first iteration. In order to save resources, the CI/CD configuration also supports caching for downloaded dependencies and build objects. The CARGO_HOME variable is set to the CI/CD job home directory to ensure everything gets appropriately cached.
stages:
  - build
  - test

default:
  image: rust:latest
  cache:
    key: ${CI_COMMIT_REF_SLUG}
    paths:
      - .cargo/bin
      - .cargo/registry/index
      - .cargo/registry/cache
      - target/debug/deps
      - target/debug/build
    policy: pull-push

# Cargo data needs to be in the project directory to be cached.
variables:
  CARGO_HOME: ${CI_PROJECT_DIR}/.cargo
The CI/CD jobs inherit the default values, and specify the cargo commands in the script section.
build-latest:
  stage: build
  script:
    - cargo build --verbose

test-latest:
  stage: build
  script:
    - cargo test --verbose
You can see an example in this MR.
Continue learning Rust
Make sure to add new source code into the src/ directory.
Define variables and print them
Practice adding a few more print statements into src/main.rs, and then build and run the code again.
-
Define a variable called
nameand assign your name as string value. -
Print the name, including a string prefix saying
Hello,.


-
Open a new terminal in VS Code using the command palette (keyboard shortcut
cmd + shift + p) and search forterminal. -
Build and run the code with the
cargo buildandcargo runcommands.

An example solution can be found here.
Explore variable types
Define different variable value types (primitives) and embed them into the print statements. Maybe they feel familiar with other programming languages?
Tip: Use code comments to see which code suggestions can be useful to learn. Start with typing // Integer addition and see what code suggestions you can add.
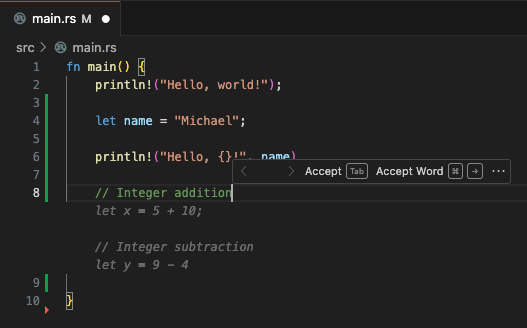
Experiment with GitLab Duo Code Suggestions. The shown examples are non-deterministic, but you may be able to add additions, subscriptions, multiplications, etc., and the corresponding println statements just by accepting code suggestions and continuing the flow with enter or completing the code statements. This workflow can create a chain of code suggestions that can help you learn the Rust language.


An example solution can be found here.
The code suggestions are not perfect. Sometimes there are errors that require you to fix the problems. When writing this blog post, I had to fix two missing semicolons at the end of the code lines. The great thing about the Rust compiler is that the error messages tell you exactly where the problem happens with suggestions to fix them. Code Suggestions and the Rust-provided build chain make writing Rust code more efficient.
println!("Hello, {}!", name)

// Integer subtraction
let y = 9 - 4

You can try to provoke the same error by removing a semicolon at the end of a statement and then running cargo build in the terminal again. The Rust compiler will also warn you about unused variables to help with better code quality. The screenshot shows warnings for variable definitions, and also a CLI command to fix them.

Flow control: Conditions and loops
Next, let's focus on flow control with conditions, loops, etc., and how to implement them.
-
Start typing
// Flow controland see which suggestions are provided. -
Experiment with the code, and continue defining a boolean variable
vwhich is set to true.
  // Flow control
  let v = true;


- Start typing
// Loopsand experiment with the code suggestions.
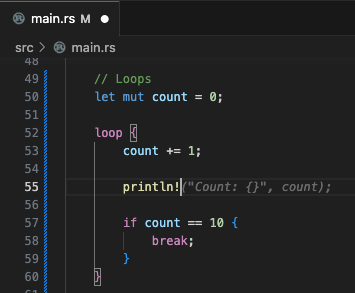
Let's assume the loop looks the like following snippet. It does not have a loop counter which gets printed on every loop execution.
// Loops
let mut count = 0;

loop {
    count += 1;

    if count == 10 {
        break;
    }
}
- Start typing
println!and see which code suggestions are provided, for exampleprintln!("Count: {}", count);.
- Apply the suggestions, and execute
cargo build && cargo runon the terminal again.
Let's learn more: Rust supports different loop types, for example while loops, for loops, etc.
- Type
// While loopand verify the code suggestions. Repeat the same for// For loop.
// While loops
let mut count = 0;

while count < 10 {
    count += 1;
    println!("Count: {}", count);
}

// For loops
let a = [10, 2, 3, 4, 5];

for element in a {
    println!("Element: {}", element);
}
There is more to learn with loops and conditions: Iterate over arrays, lists, maps, slices. Practice with writing comments for // Maps and sets and // Vectors and strings.

  // Maps and sets
  let mut scores = HashMap::new();

  scores.insert(String::from("Blue"), 10);
  scores.insert(String::from("Yellow"), 50);

  for (key, value ) in &scores {
      println!("{}: {}", key, value);
  }

  // Vectors and strings
  let mut v = Vec::new();

  v.push(1);
  v.push(2);

  for element in &v {
      println!("Element: {}", element);
  }
This snippet will fail because the HashMap type needs to be imported from std::collections::HashMap. Add the following line on top before the main function definition:
use std::collections::HashMap;
- Build and run the code with
cargo build && cargo run.
An example solution is provided here.
Async exercise:
-
Modify the input values for the different data types, and build and run the code again.
-
Add a condition into the loops that print the items only when a specific condition is met (for example, the number is odd or even).
Functions
Functions help increase code readability and testability with unit tests. Practice creating functions with the following steps:
- Two functions
isEvenandisOddto evaluate whether a number is even or odd.
fn isEven(x: i32) -> bool {
    x % 2 == 0
}

fn isOdd(x: i32) -> bool {
    x % 2 != 0
}
isPrimefunction to check whether a given integer value is a prime number.
fn isPrime(x: i32) -> bool {
    let mut i = 2;

    while i * i <= x {
        if x % i == 0 {
            return false;
        } else {
            i += 1;
        }
    }

    return true
}
- Create an array of integer values, loop over it, and call the functions. Let GitLab Code Suggestions guide you with the implementation by starting to type the if conditions followed by the function name.
  // Functions
  let mut integers = vec![1, 2, 3, 4, 5];

  for i in integers.iter() {

      if (isEven(i)) {
          println!("{} is even", i);
      }

      if (isOdd(i)) {
          println!("{} is odd", i);
      }

      if (isPrime(i)) {
          println!("{} is prime", i);
      }

      println!("{}", i);
  }
Note that passing a reference value to a function may result in an error from the Rust compiler. Follow the suggestions and build the code again.
$ cargo build && cargo run

error[E0308]: mismatched types
   --> src/main.rs:112:21
    |
112 |         if (isPrime(i)) {
    |             ------- ^ expected `i32`, found `&{integer}`
    |             |
    |             arguments to this function are incorrect
    |
note: function defined here
   --> src/main.rs:136:4
    |
136 | fn isPrime(x: i32) -> bool {
    |    ^^^^^^^ ------
help: consider dereferencing the borrow
    |
112 |         if (isPrime(*i)) {
    |                     +
An example solution is provided here.
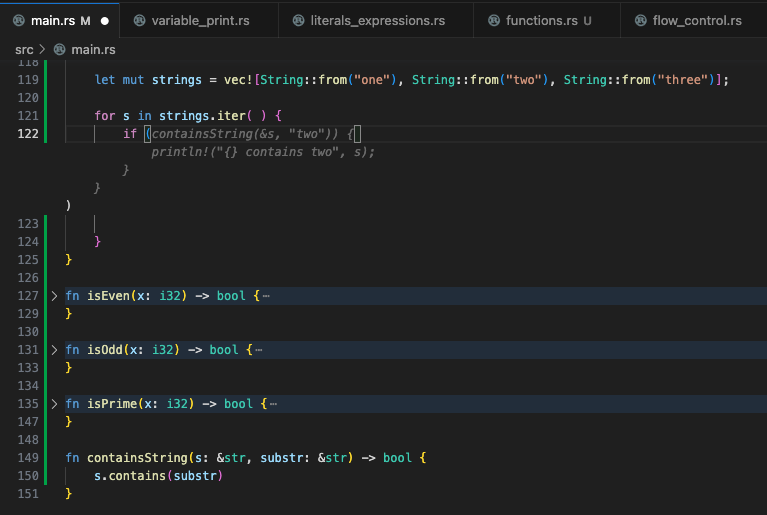
Async exercise: Create a function containsString and test it with an array of string values, and a string to search for, in a loop. The screenshot shows a potential implementation.
Testing
While learning programming, adopt testing into your process. This can be unit tests for functions, documentation testing, and integration testing. Practice with testing the previously created functions isEven, isOdd, and isPrime. Starty by typing mod tests { followed by a new line with use super::* to implement the example from the Rust documentation for unit tests.
mod tests {
    use super::*;

    #[test]
    fn test_is_even() {
        assert!(isEven(2));
        assert!(!isEven(3));
    }

    #[test]
    fn test_is_odd() {
        assert!(!isOdd(2));
        assert!(isOdd(3));
    }

    #[test]
    fn test_is_prime() {
        assert!(isPrime(2));
        assert!(!isPrime(3));
    }
}
Run cargo test to run the unit tests. Modify the test values to experiment with the results.
cargo test

Create unit tests that fail, and commit and push the changes to GitLab. The CI/CD pipelines will fail in this simulated breakage. The example above needs a fix for the test_is_prime test. Commit and push the change to verify that the pipeline passes again.
-        assert!(!isPrime(3));
+        assert!(!isPrime(4));
What is next
In an upcoming blog, we will look into advanced learning examples with asynchronous operations, services and external API communication in future blog posts. Until then, here are a few recommendations for practicing async.
Async learning exercises
std miscprovides asynchronous operations with threads, channels and file I/O- Book: Hands-on Rust: Effective Learning through 2D Game Development and Play
- Tutorial: Are we game yet?
- Use case: Web server with rocket.rs
Here are a few more exercises and ideas for additional learning:
- The Rust compiler might have created warnings that need to be addressed. Follow the instructions from the
cargo buildcommands and check the Git diff.
cargo fix --bin "learn-rust-ai"

git diff
-
Error handling is required when failure is detected, and the caller should know. Some errors can be recovered from within the application, others require program termination.
-
The
stdlibrary extends primitive types and makes programming more efficient.
Share your feedback
Which programming language are you learning or considering learning? Start a new topic on our community forum or Discord and share your experience.
If you are using Code Suggestions Beta with GitLab Duo already, please share your thoughts and feedback in this issue.