Developers typically use advanced techniques like canary, blue/green, and incremental deployments to reduce risk when practicing progressive delivery, a facet of continuous delivery (CD). In this tutorial, we will show you how to use feature flags, another progressive delivery option developers can use to test while in production.
What is progressive delivery?
Progressive delivery is the ability to test in production while controlling your audience of who can exercise or see updates to an application with a high level of granularity. This approach can also be thought of as developer experimentation.
What are feature flags
Feature flags enable you to choose what to deploy and who to deploy to in production. They allow you to define the audience for your application updates as well as the fashion in which they will be served.
Feature flags help stakeholders reduce risk, allowing them to do controlled testing of features and separate feature delivery from customer launch.
Benefits of feature flags
The following are benefits of GitLab's feature flags.
- Lower risk. Feature flags prevent unscheduled outages, control your audience in a fine-grained fashion, and can be optionally used in conjunction with canary deployments.
- Ease of use. Feature flags have simple configurability and instrumentation, support user lists, and offer built-in service.
- Language agnostic. Our feature flag implementation supports all of the main programming languages.
- Better compliance and audit capabilities. The GitLab platform automatically records all feature flags actions.
Tutorial requirements
This is what you need for this tutorial:
- A GitLab account on gitlab.com SaaS
- Flux CLI installed on your local desktop (on my Mac, I installed it by executing
brew install fluxcd/tap/flux) - A running Kubernetes cluster, i.e. a GKE cluster with 3 e2-medium nodes
kubectlconnectivity to your Kubernetes cluster from a local Terminal window on your desktop
About this feature flag tutorial
This tutorial is based on a fictitious application, which is a simplified inventory system. The goal of this tutorial is to show you how to create, configure, and implement a feature flag using GitLab.
Note: This tutorial is for learning purposes and not meant to deploy a production-ready architecture. Also, to keep the number of steps low, masked variables and sealed secrets are not being used throughout this tutorial.
Flux and the GitLab agent for Kubernetes
Here is how to install Flux and GitLab agent for Kubernetes.
- Log on to your GitLab workspace.
- Create a personal access token (PAT) from your GitLab account by navigating to User settings > Preferences > Access tokens. In the Personal Access Tokens section, click on the Add new token button on the righthand side of the section. For Token name, enter
pat-for-flux. Leave the expiration date with its default (it should be 30 days from its creation) and select the API scope for your PAT. Click on the Create personal access token button to create your PAT. Copy and save the value of your PAT; you will need it at a later step.
 Creating a personal access token
- Head back to your GitLab workspace main page.
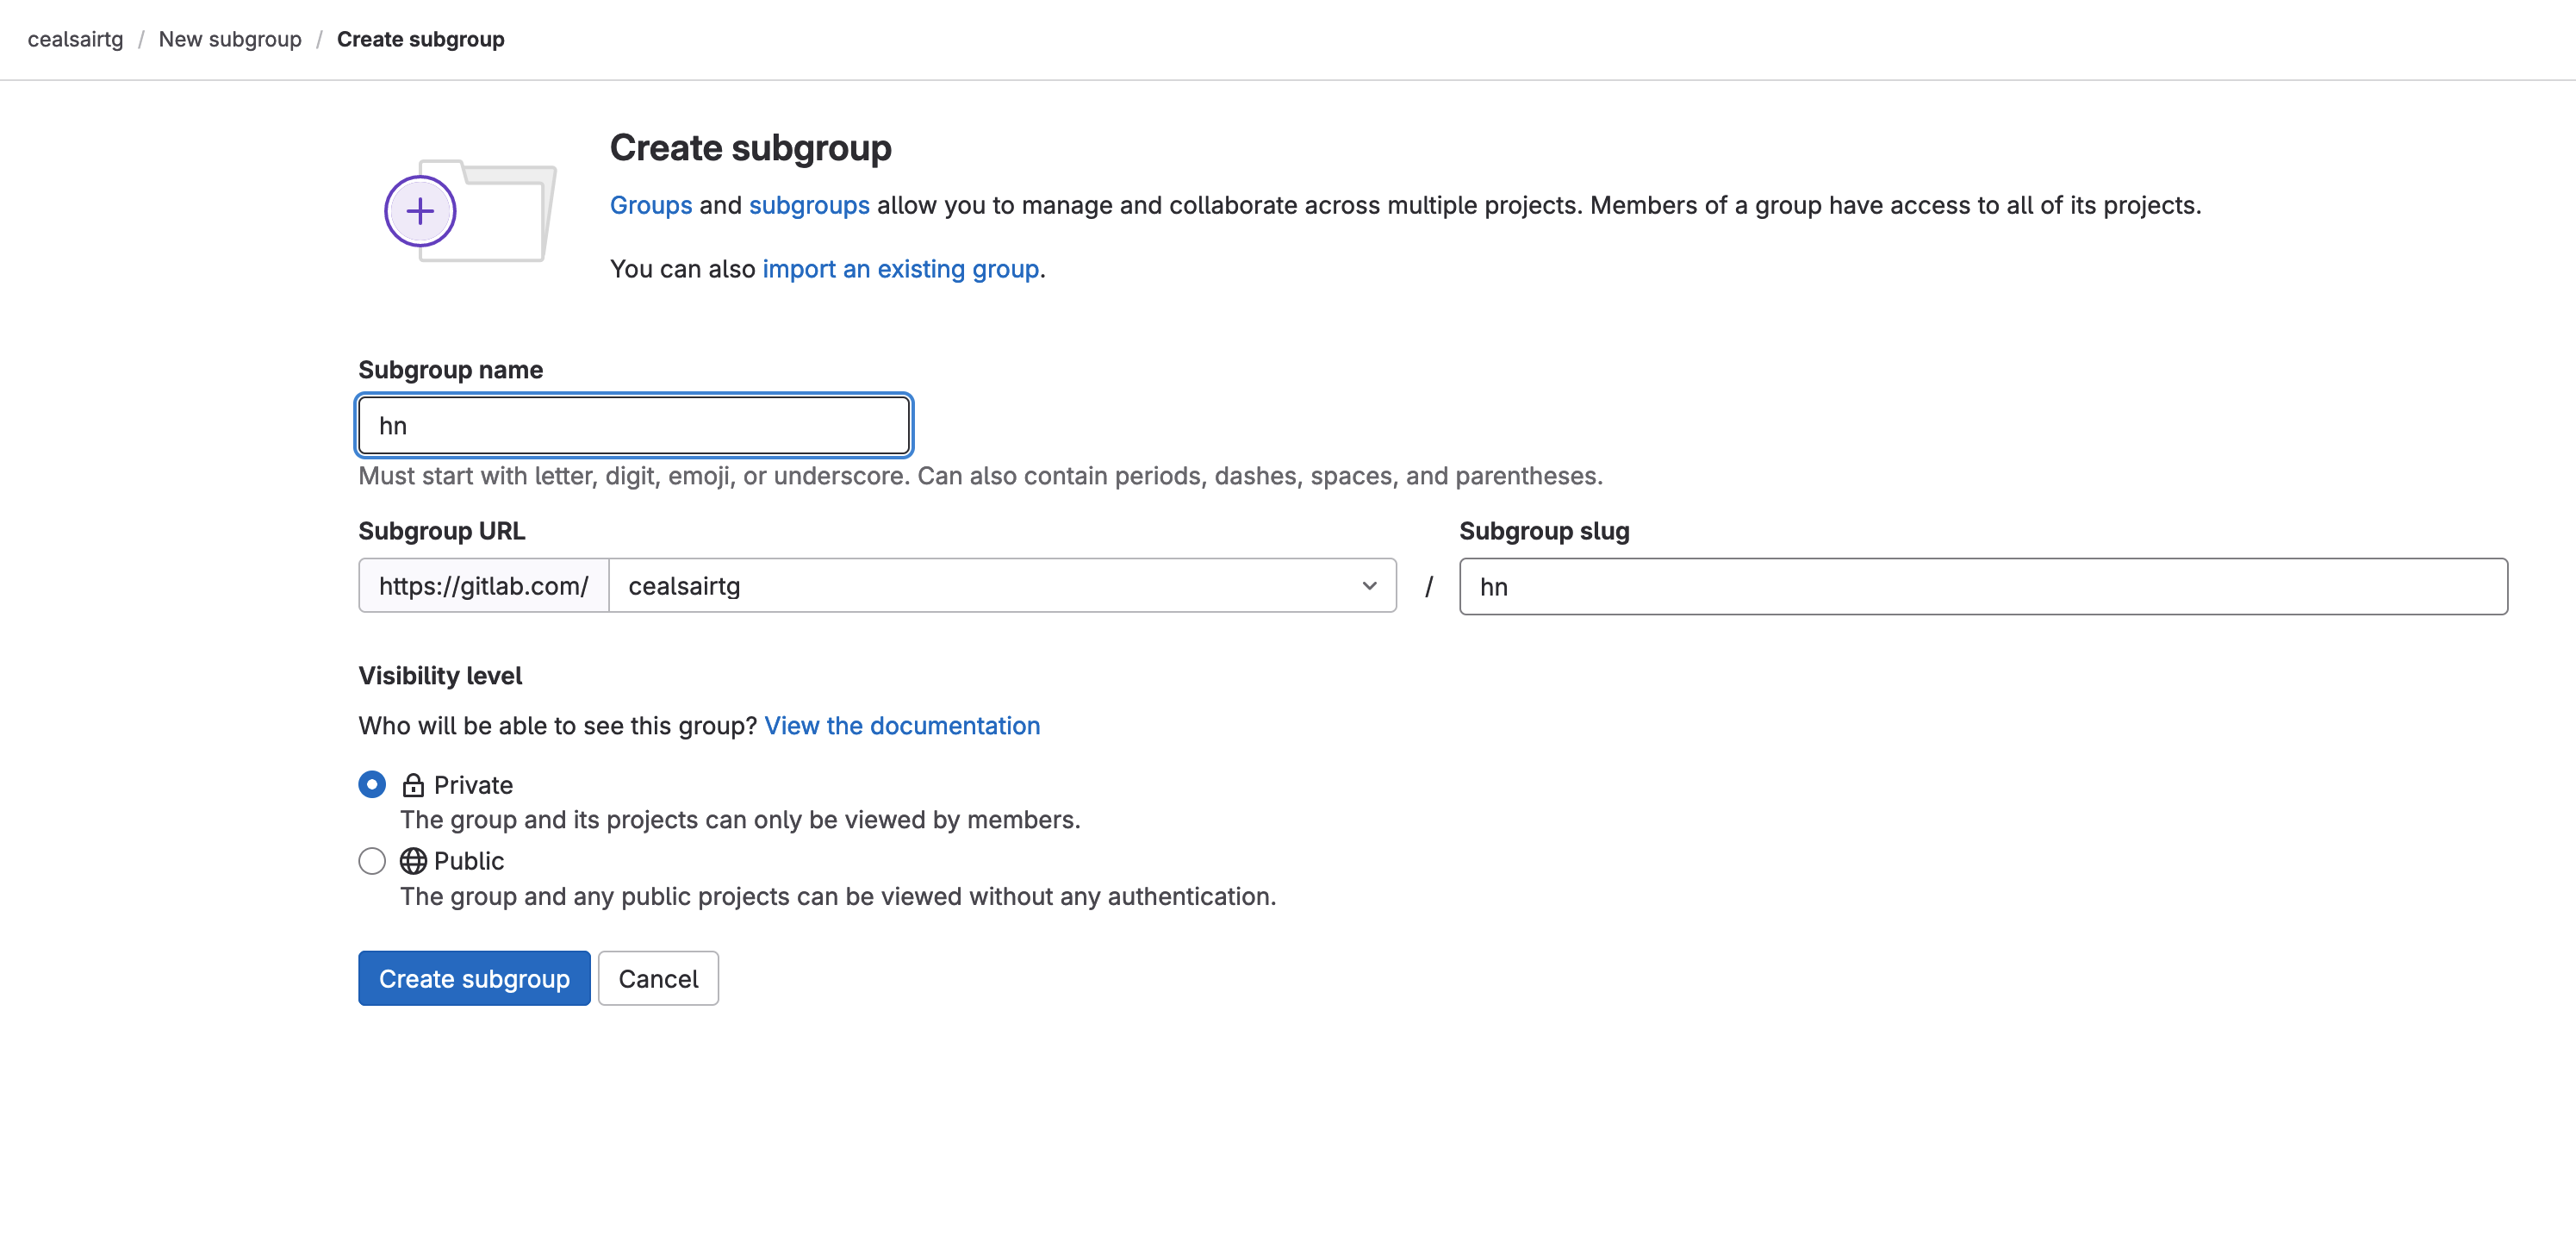
- Create a group named “hn” by clicking the button New group (or New subgroup if you are creating this group inside an existing group) on the top right hand side of your screen, and then clicking on the Create group tile. Enter "hn" for your Group name and click on the Create group button to create it. Leave the rest of the fields with their defaults.
 Creating group "hn"
- Inside group “hn”, create project “flux-config” by clicking the New project on the top righthand side of your screen and then clicking on the Create blank project tile.
 Creating project "flux-config"
- From the Terminal window with
kubectlaccess to your Kubernetes cluster, export your PAT by entering the following command:
export GITLAB_TOKEN=
<replace with your PAT value>
- From the Terminal window with
kubectlaccess to your Kubernetes cluster, bootstrap Flux by executing the following command:
Note: Make sure to replace <your path> with whatever precedes your group “hn”. For example, it could be --owner=tech-marketing/sandbox/hn, or if your group “hn” is at the very top level of your GitLab workspace, it would be --owner=hn.
flux bootstrap gitlab \
  --owner=<your path>/hn \
  --repository=flux-config \
  --branch=main \
  --path=clusters/my-cluster \
  --deploy-token-auth
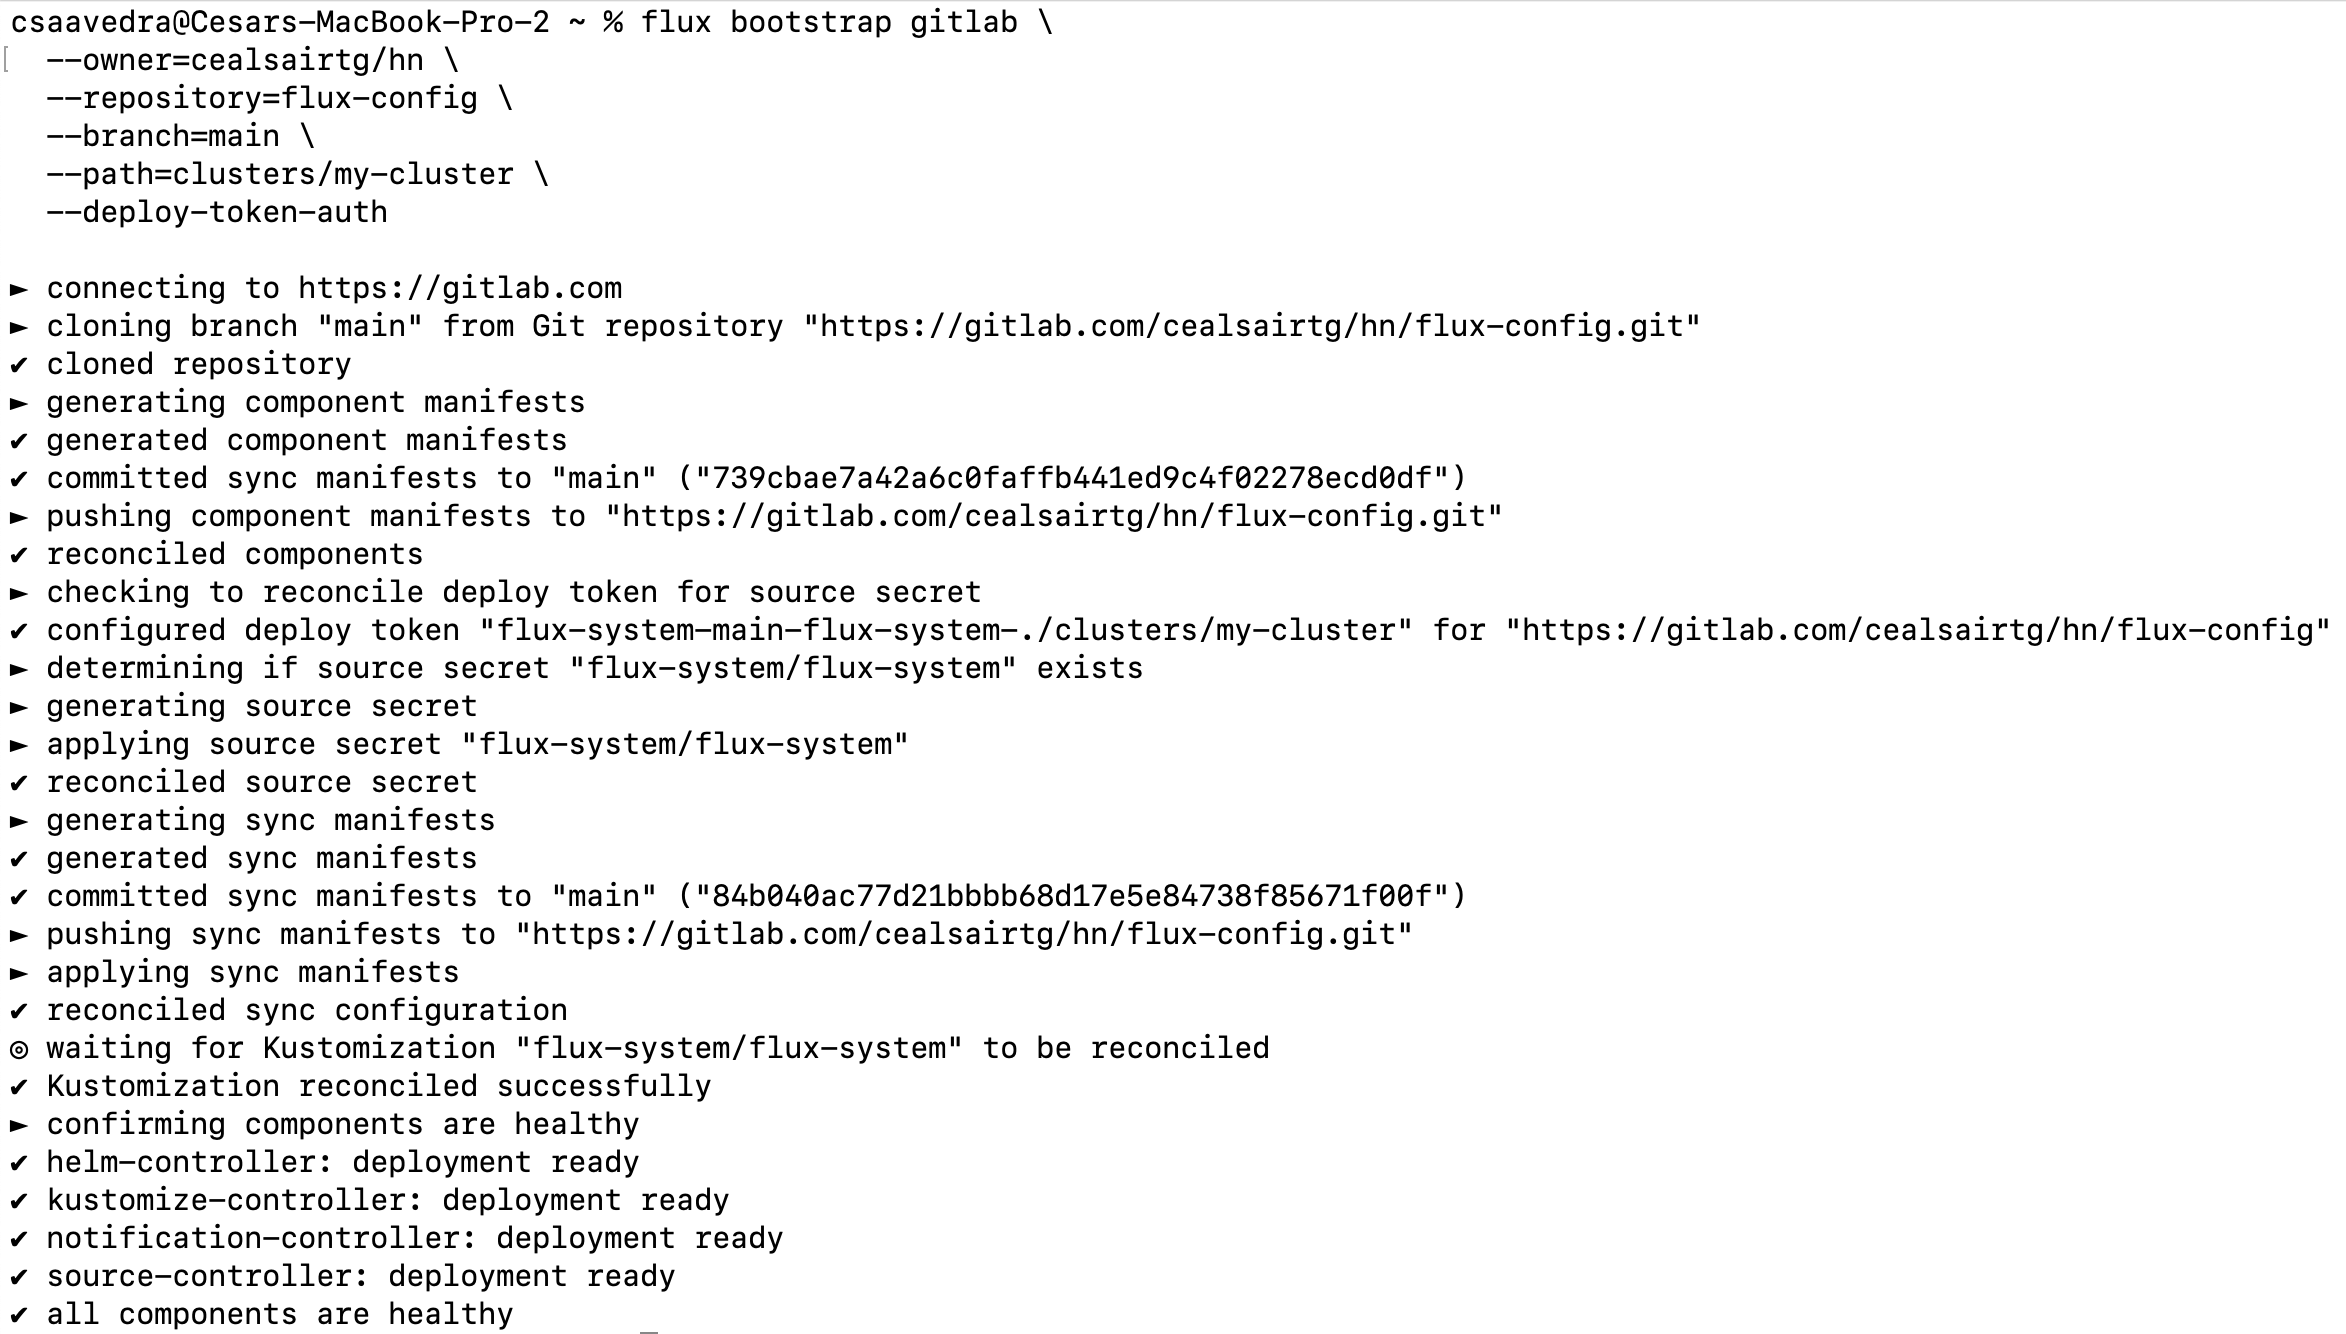 Flux bootstrap output
The “flux-config” project should now contain new directories and files as shown below:
 Project flux-config post flux bootstrap process
- Head over to project hn/flux-config and create file “.gitlab/agents/k8s-agent/config.yaml” by clicking on the + sign next to the “flux-config” and selecting New file. Paste the following into it the new file:
Note: Make sure to replace <your path> with whatever precedes your group “hn”. For example, it could be - id: tech-marketing/sandbox/hn or if your group “hn” is at the very top level of your GitLab workspace, it would be - id: hn.
ci_access:
  groups:
    - id: <your path>/hn
Commit this file to main by clicking on the Commit changes button and ensuring that the target branch is “main”.
 Creating the GitLab agent for Kubernetes configuration manifest
- Head to Operate > Kubernetes clusters and register the agent by clicking the Connect a cluster button.
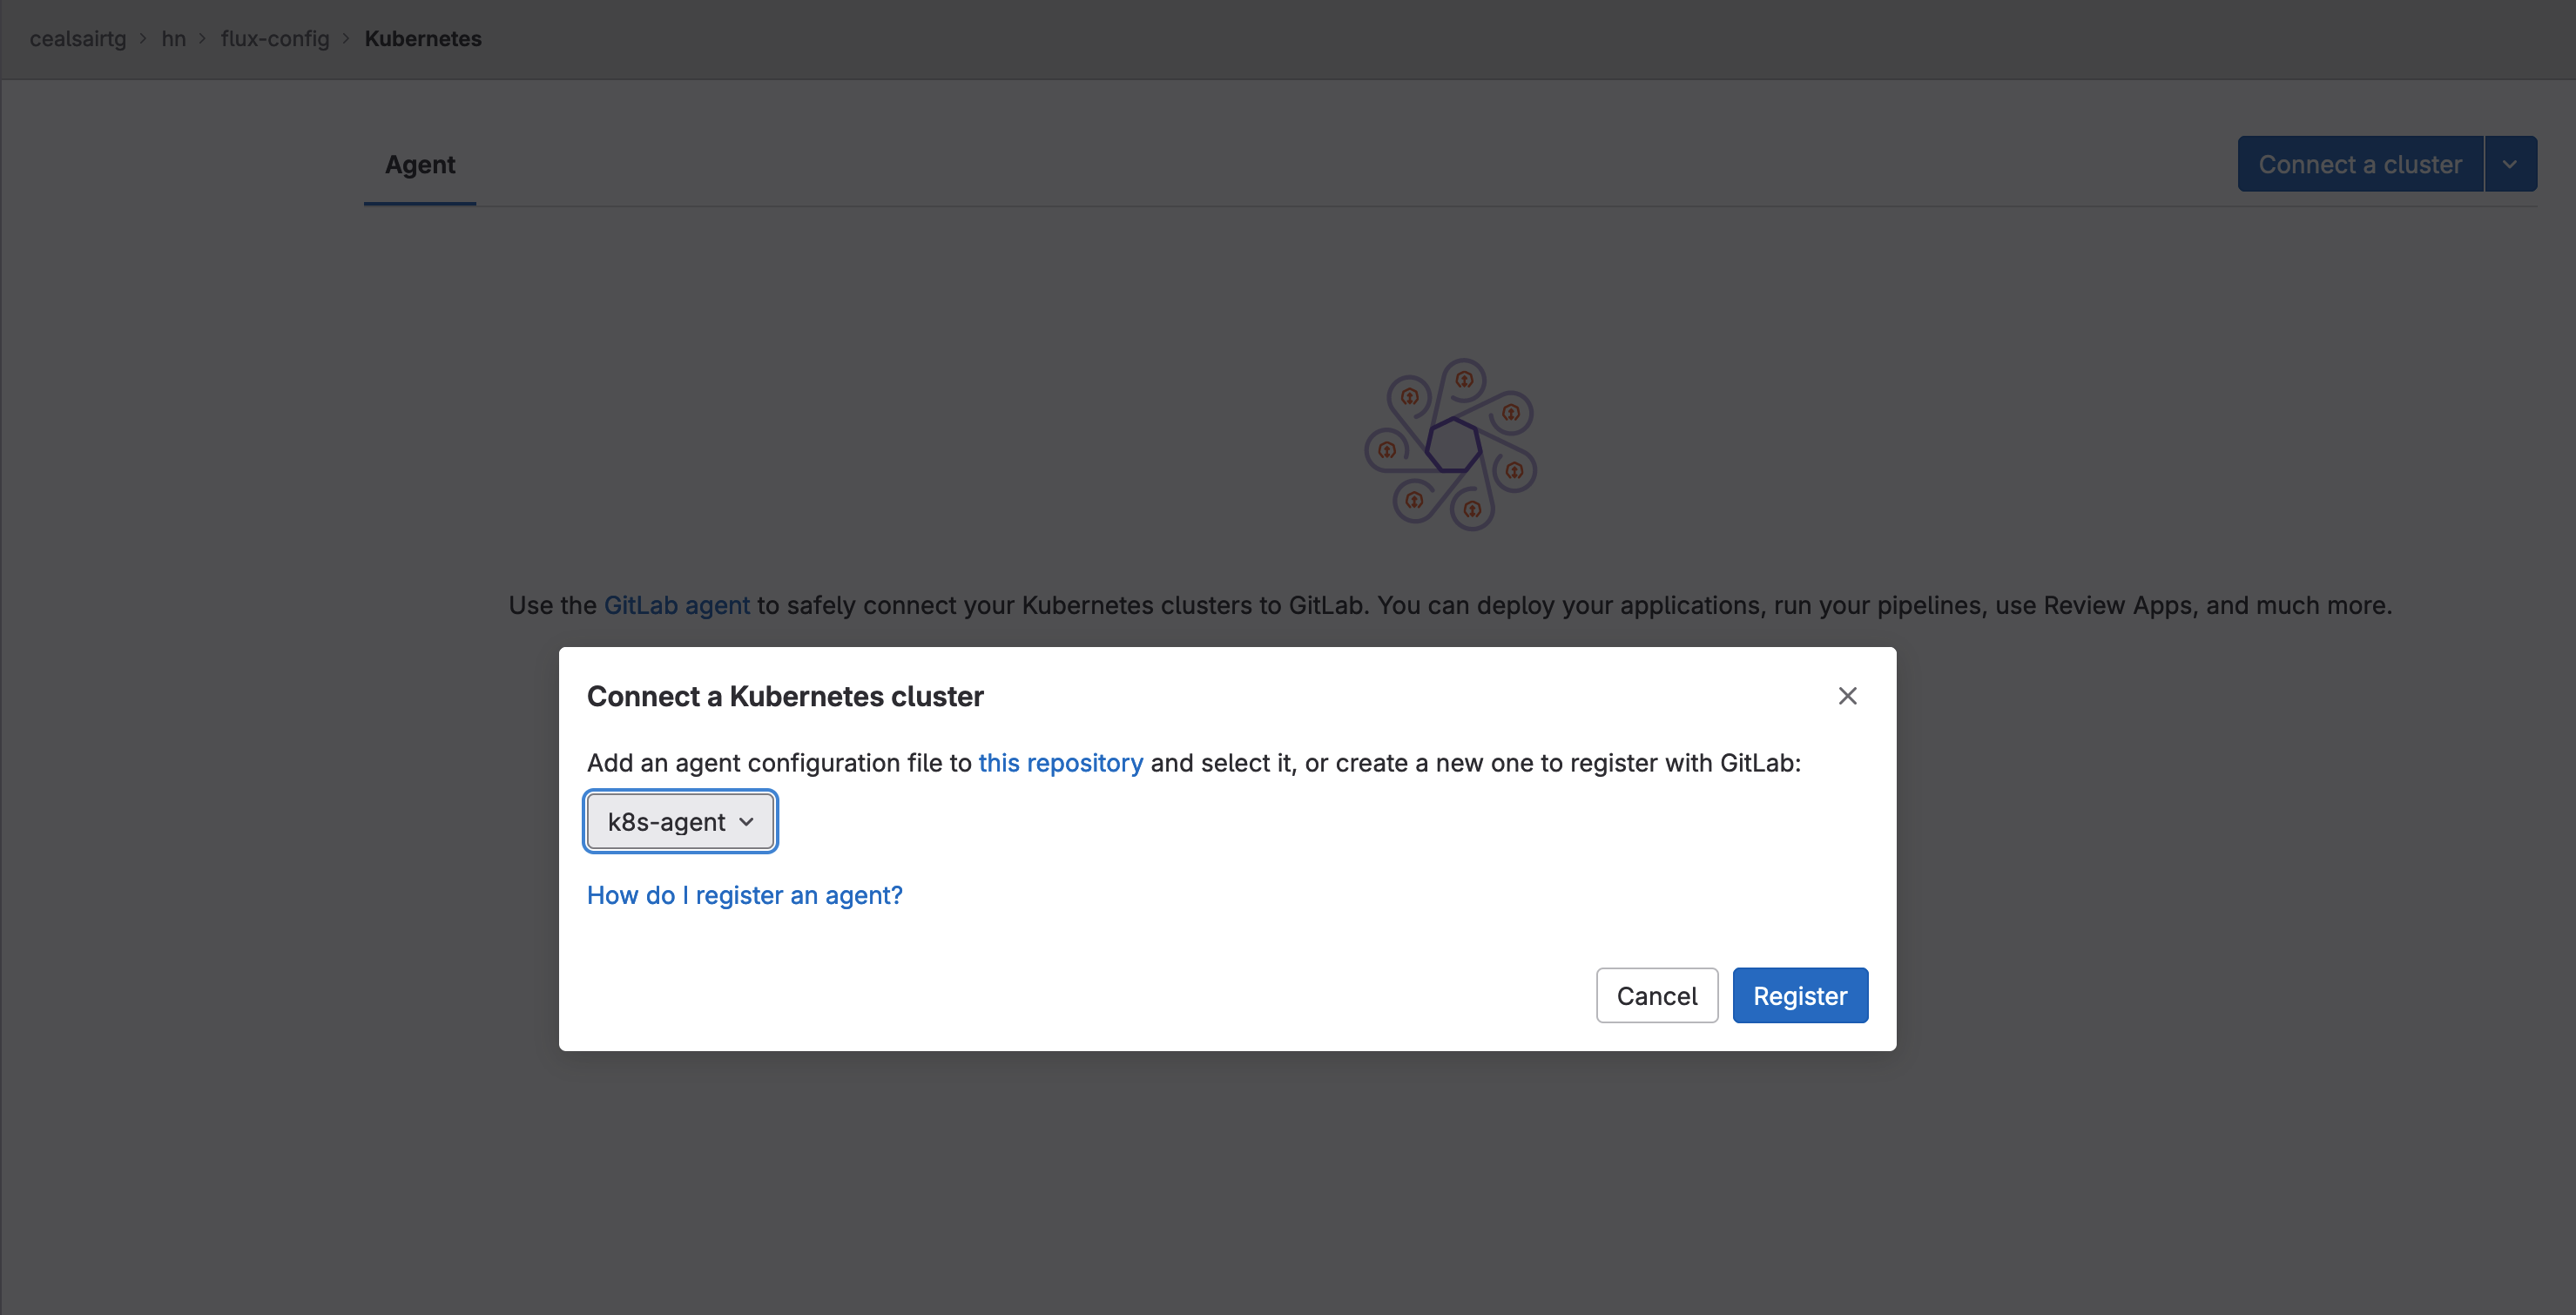 Registering the GitLab agent for Kubernetes
- On the “Connect a Kubernetes cluster” dialog, click on the popdown list and select agent “k8s-agent”. Click on the Register button. The dialog will refresh and show the Agent access token. Copy and save the Agent access token; you will need it at a later step. Close the dialog by clicking on the Close button.
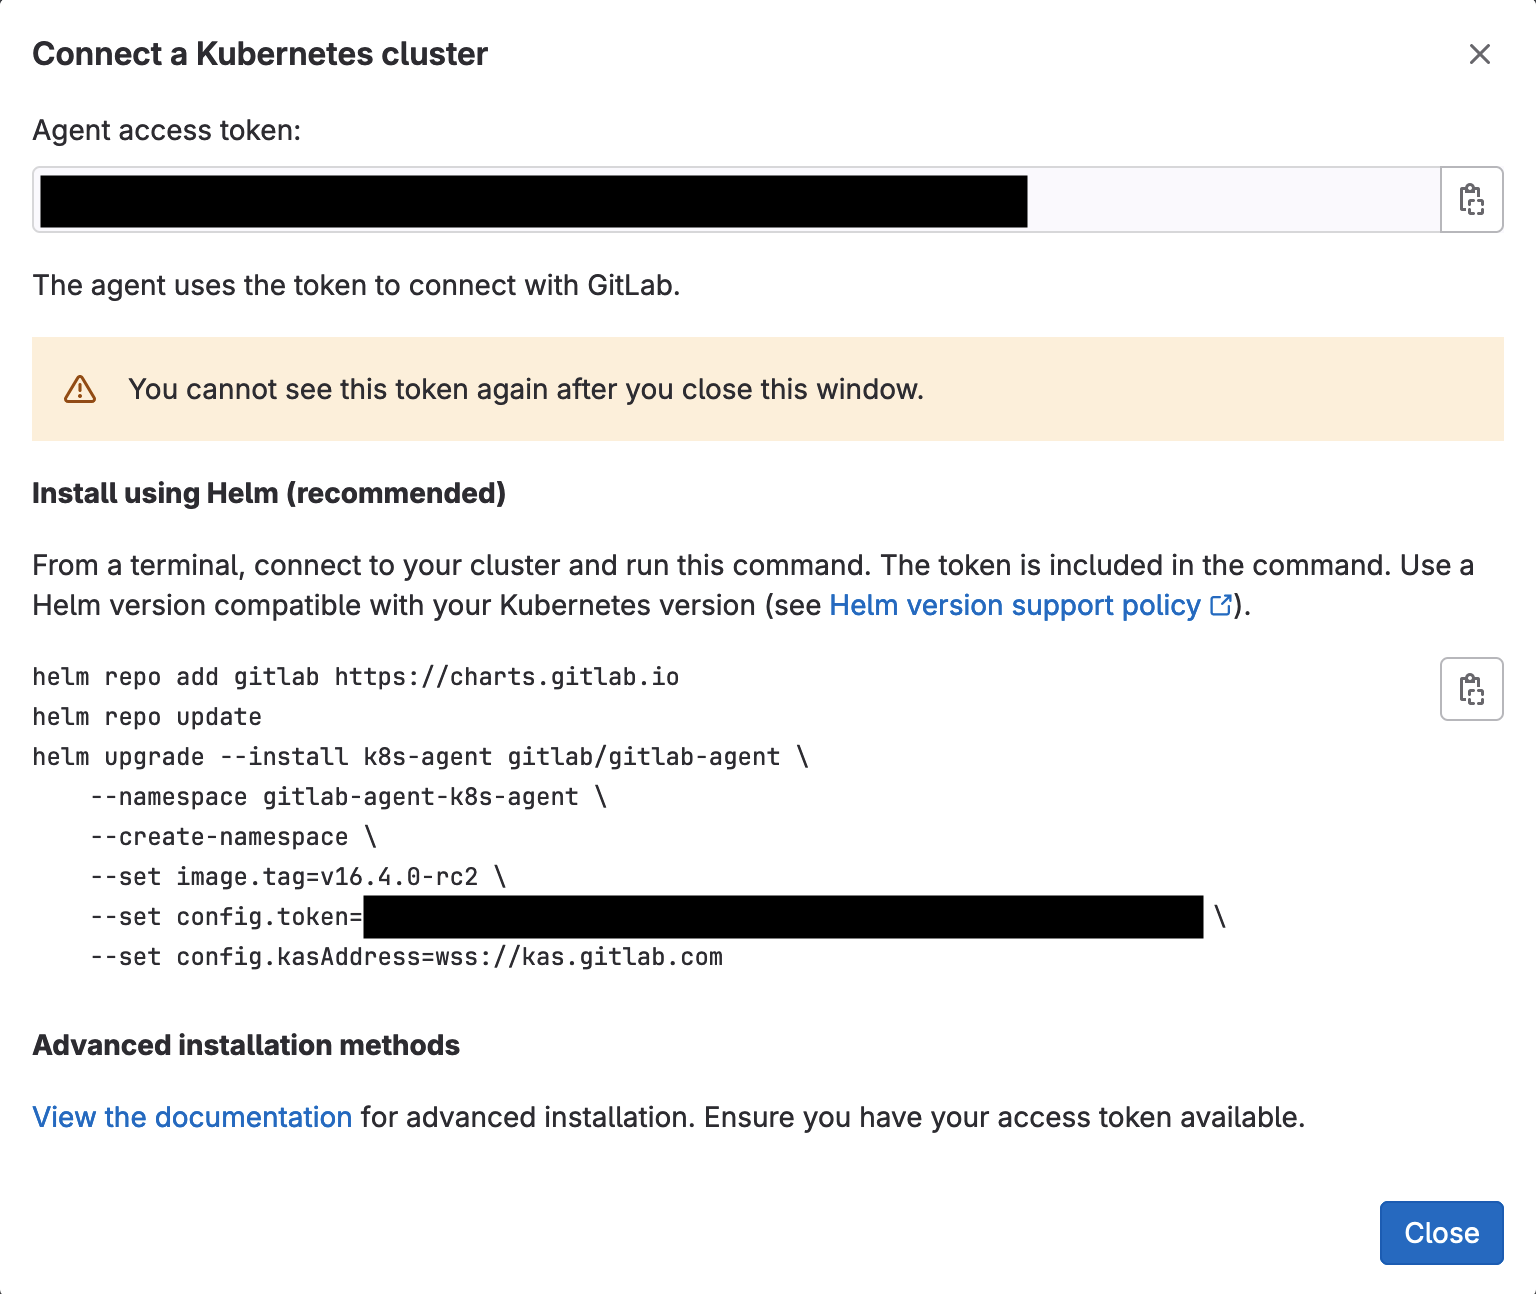 The agent access token to save
At this moment, you will see the agent listed and its Connection status will be “Never connected”.
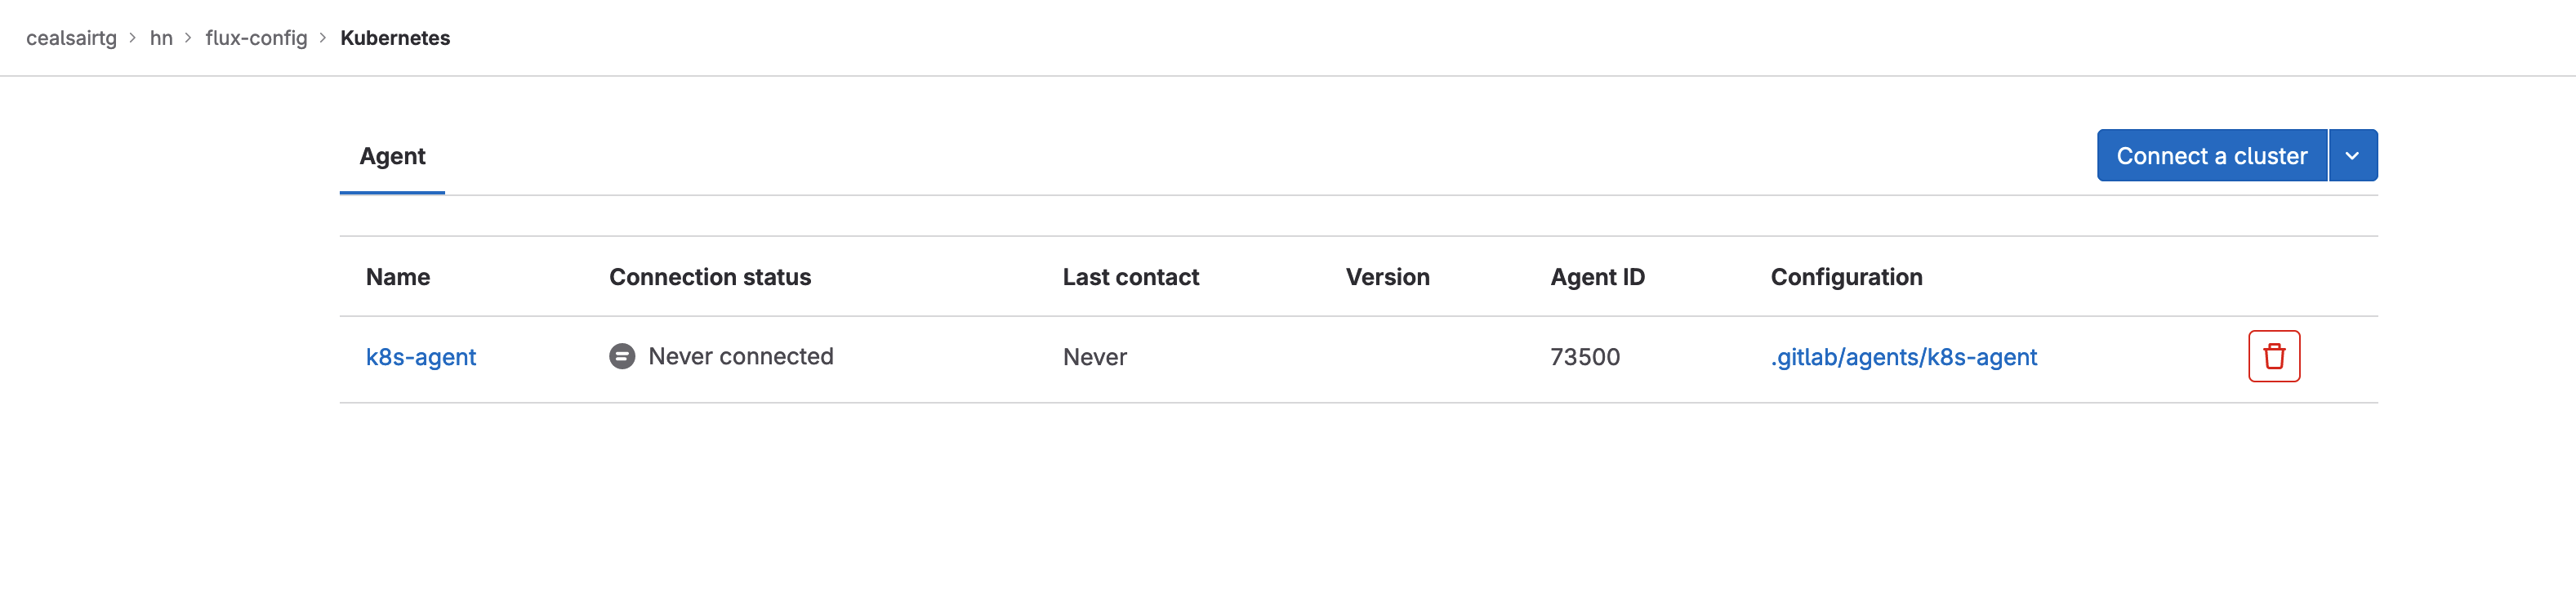 Agent registered but not connected yet
- Head to flux-config/clusters/my-cluster directory and create a file named “namespace-gitlab.yaml” and paste the following into it:
apiVersion: v1
kind: Namespace
metadata:
  name: gitlab
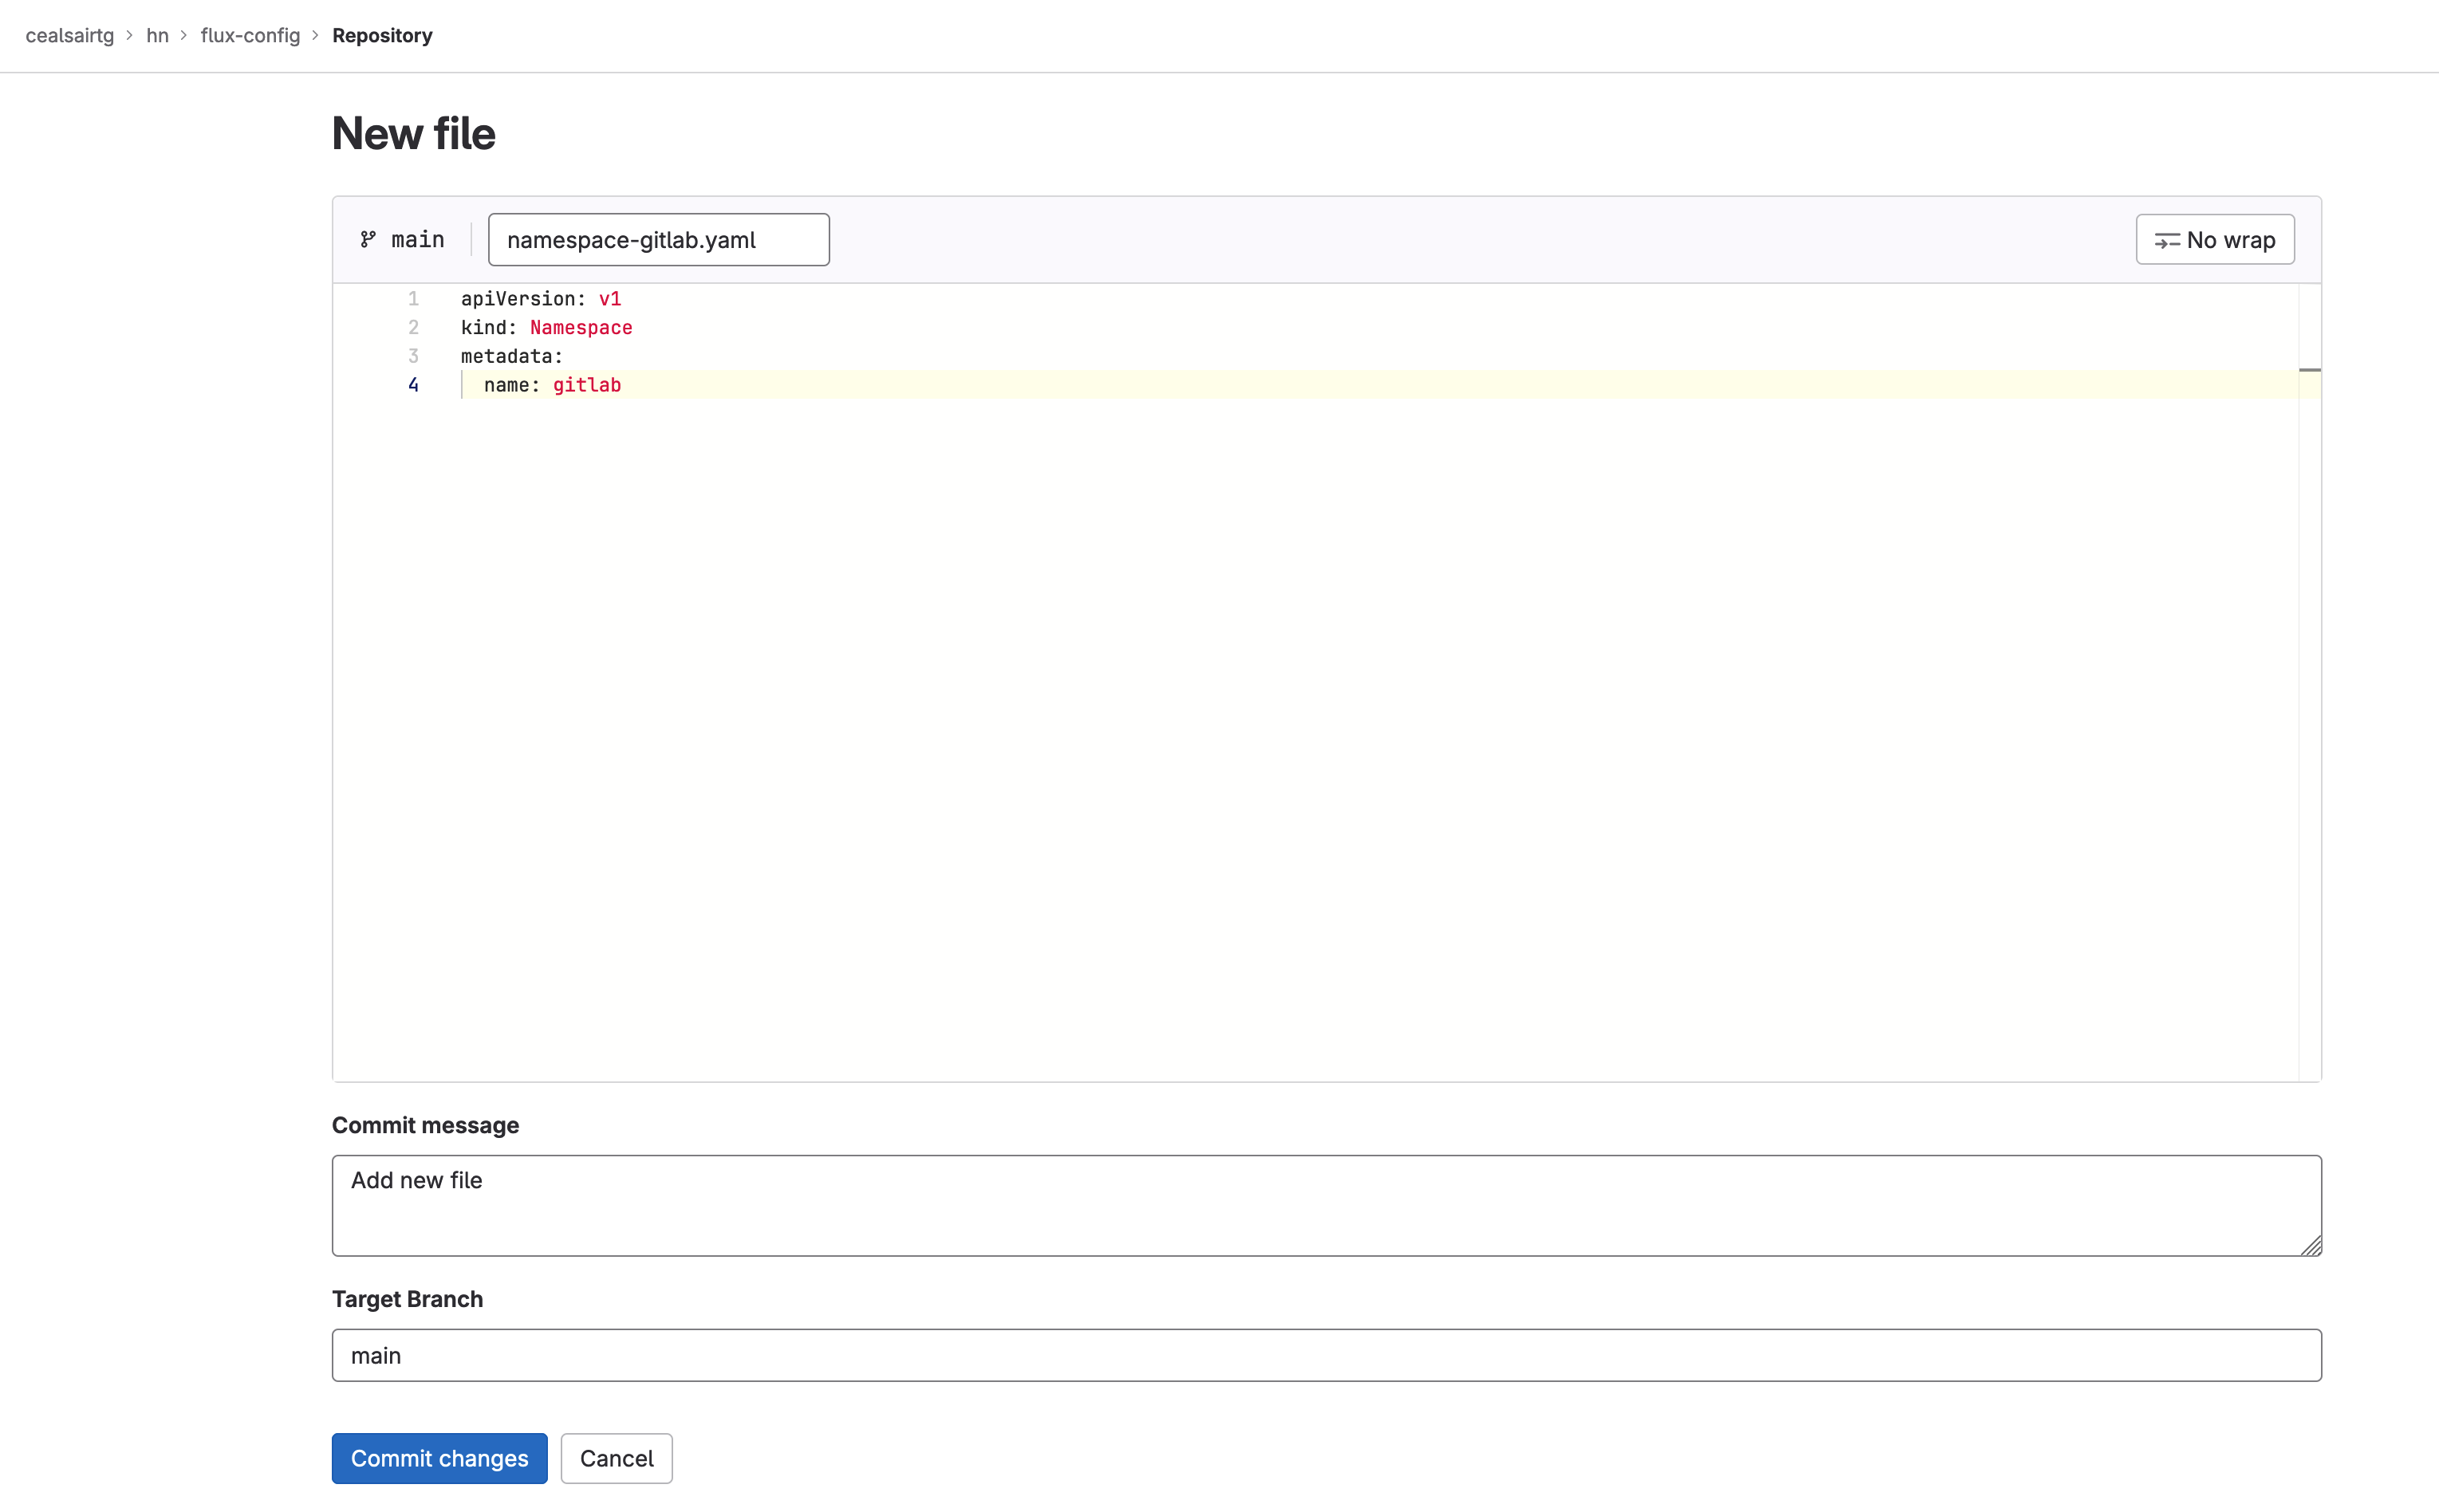 Manifest for the gitlab namespace
Commit this file to main by clicking on the Commit changes button and ensuring that the target branch is “main”.
Note: You can check that the namespace was created in your cluster by executing this command from a Terminal:

kubectl get ns
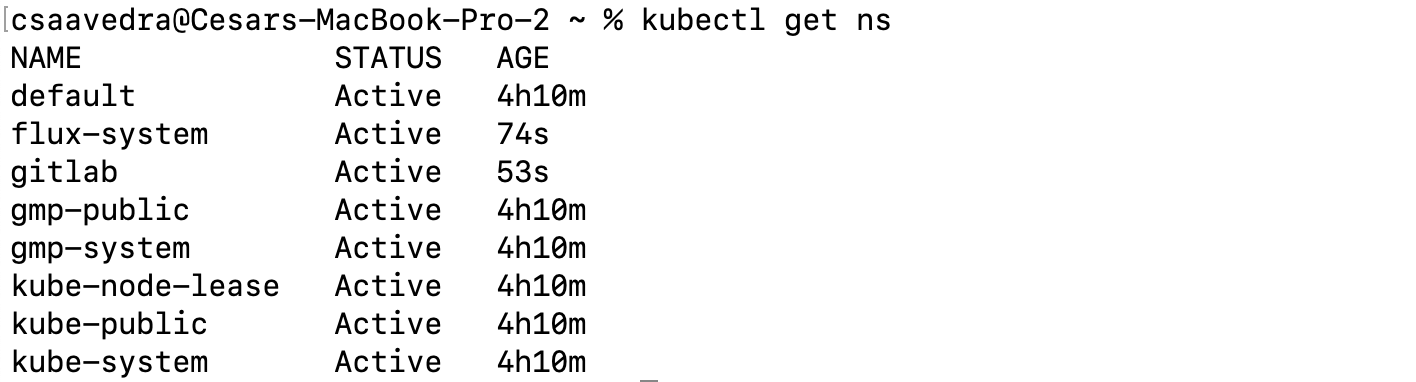 Flux created gitlab namespace
- Before we have Flux deploy the GitLab agent for Kubernetes to your cluster, we need to create a secret, containing the Agent access token you saved earlier, in your cluster. Create a file named “secret.yaml” in your local desktop, paste the following into it and then save it:
Note: Make sure to replace <your-agent-access-token-here> with your Agent access token you saved earlier.
apiVersion: v1
kind: Secret
metadata:
  name: gitlab-agent-token-initial
type: Opaque
stringData:
  values.yaml: |-
    config:
      token: "<your-agent-access-token-here>"
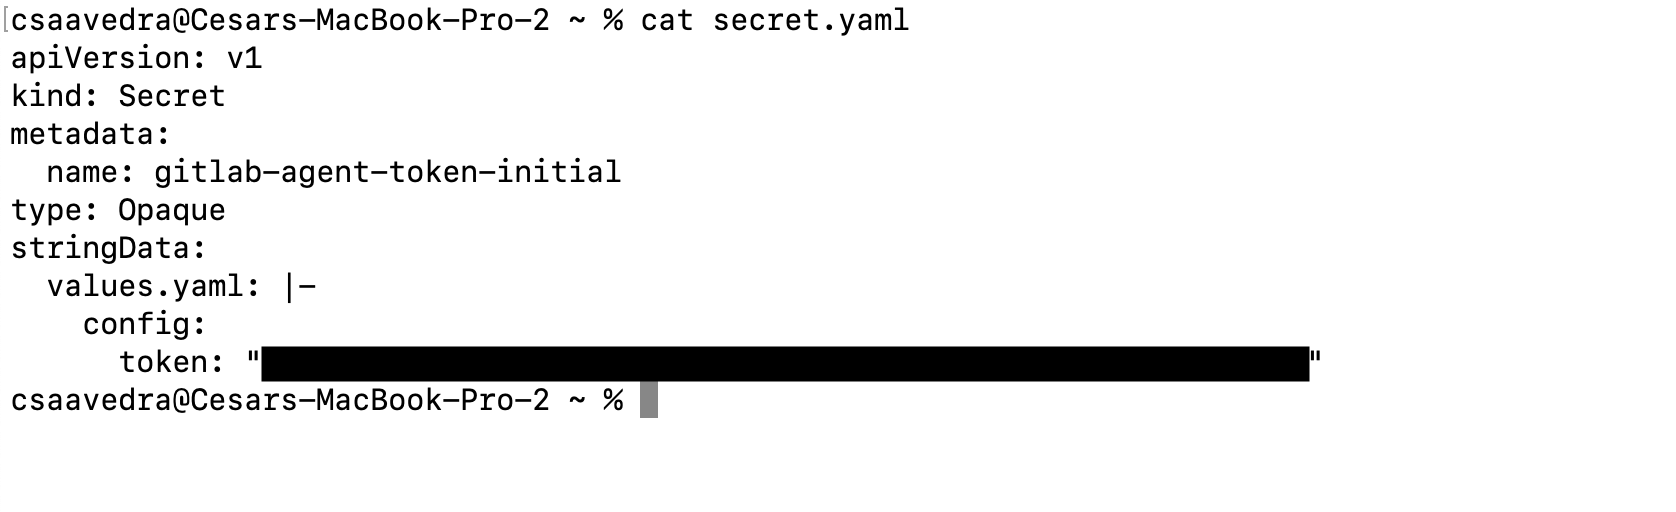 Manifest for agent token secret created on local desktop
- Create the secret in your cluster by executing the following command from a Terminal:
kubectl apply -f secret.yaml -n gitlab
Note: You can check that the secret was created in your cluster by executing this command from a Terminal:

kubectl get secrets -n gitlab
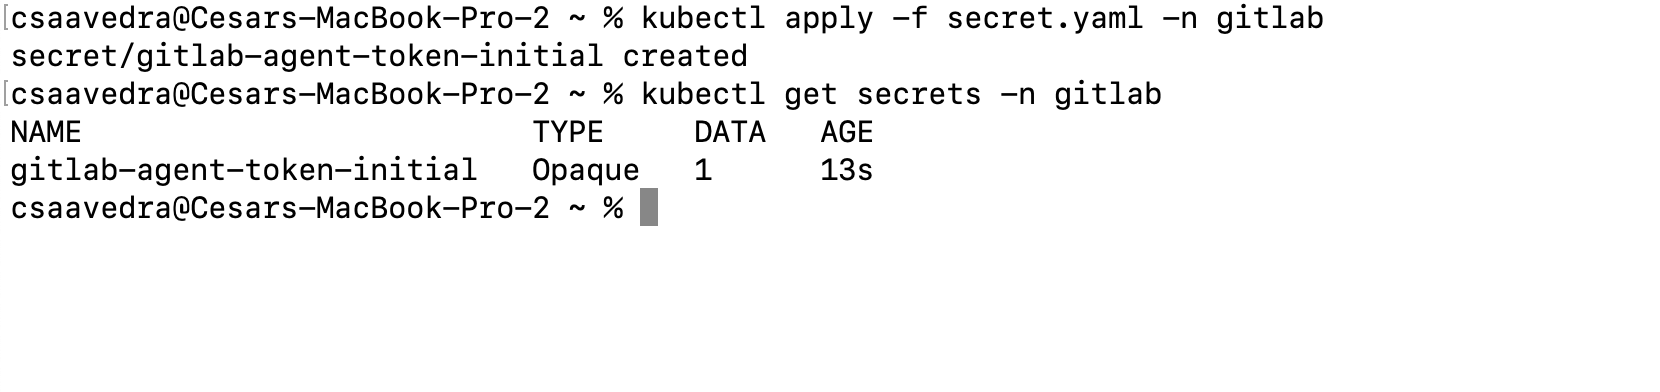 Applying the agent token secret to the Kubernetes cluster
- Now let’s use the Flux Helm Controller to deploy the GitLab agent for Kubernetes to your cluster. Head to flux-config/clusters/my-cluster directory and create a file named “agentk.yaml” and paste the following into it:
---
apiVersion: source.toolkit.fluxcd.io/v1beta2
kind: HelmRepository
metadata:
  labels:
    app.kubernetes.io/component: agentk
    app.kubernetes.io/created-by: gitlab
    app.kubernetes.io/name: agentk
    app.kubernetes.io/part-of: gitlab
  name: gitlab-agent
  namespace: gitlab
spec:
  interval: 1h0m0s
  url: https://charts.gitlab.io
---
apiVersion: helm.toolkit.fluxcd.io/v2beta1
kind: HelmRelease
metadata:
  name: gitlab-agent
  namespace: gitlab
spec:
  chart:
    spec:
      chart: gitlab-agent
      sourceRef:
        kind: HelmRepository
        name: gitlab-agent
        namespace: gitlab
  interval: 1h0m0s
  values:
    replicas: 1
    config:
      kasAddress: "wss://kas.gitlab.com"
  valuesFrom:
    - kind: Secret
      name: gitlab-agent-token-initial
      valuesKey: values.yaml
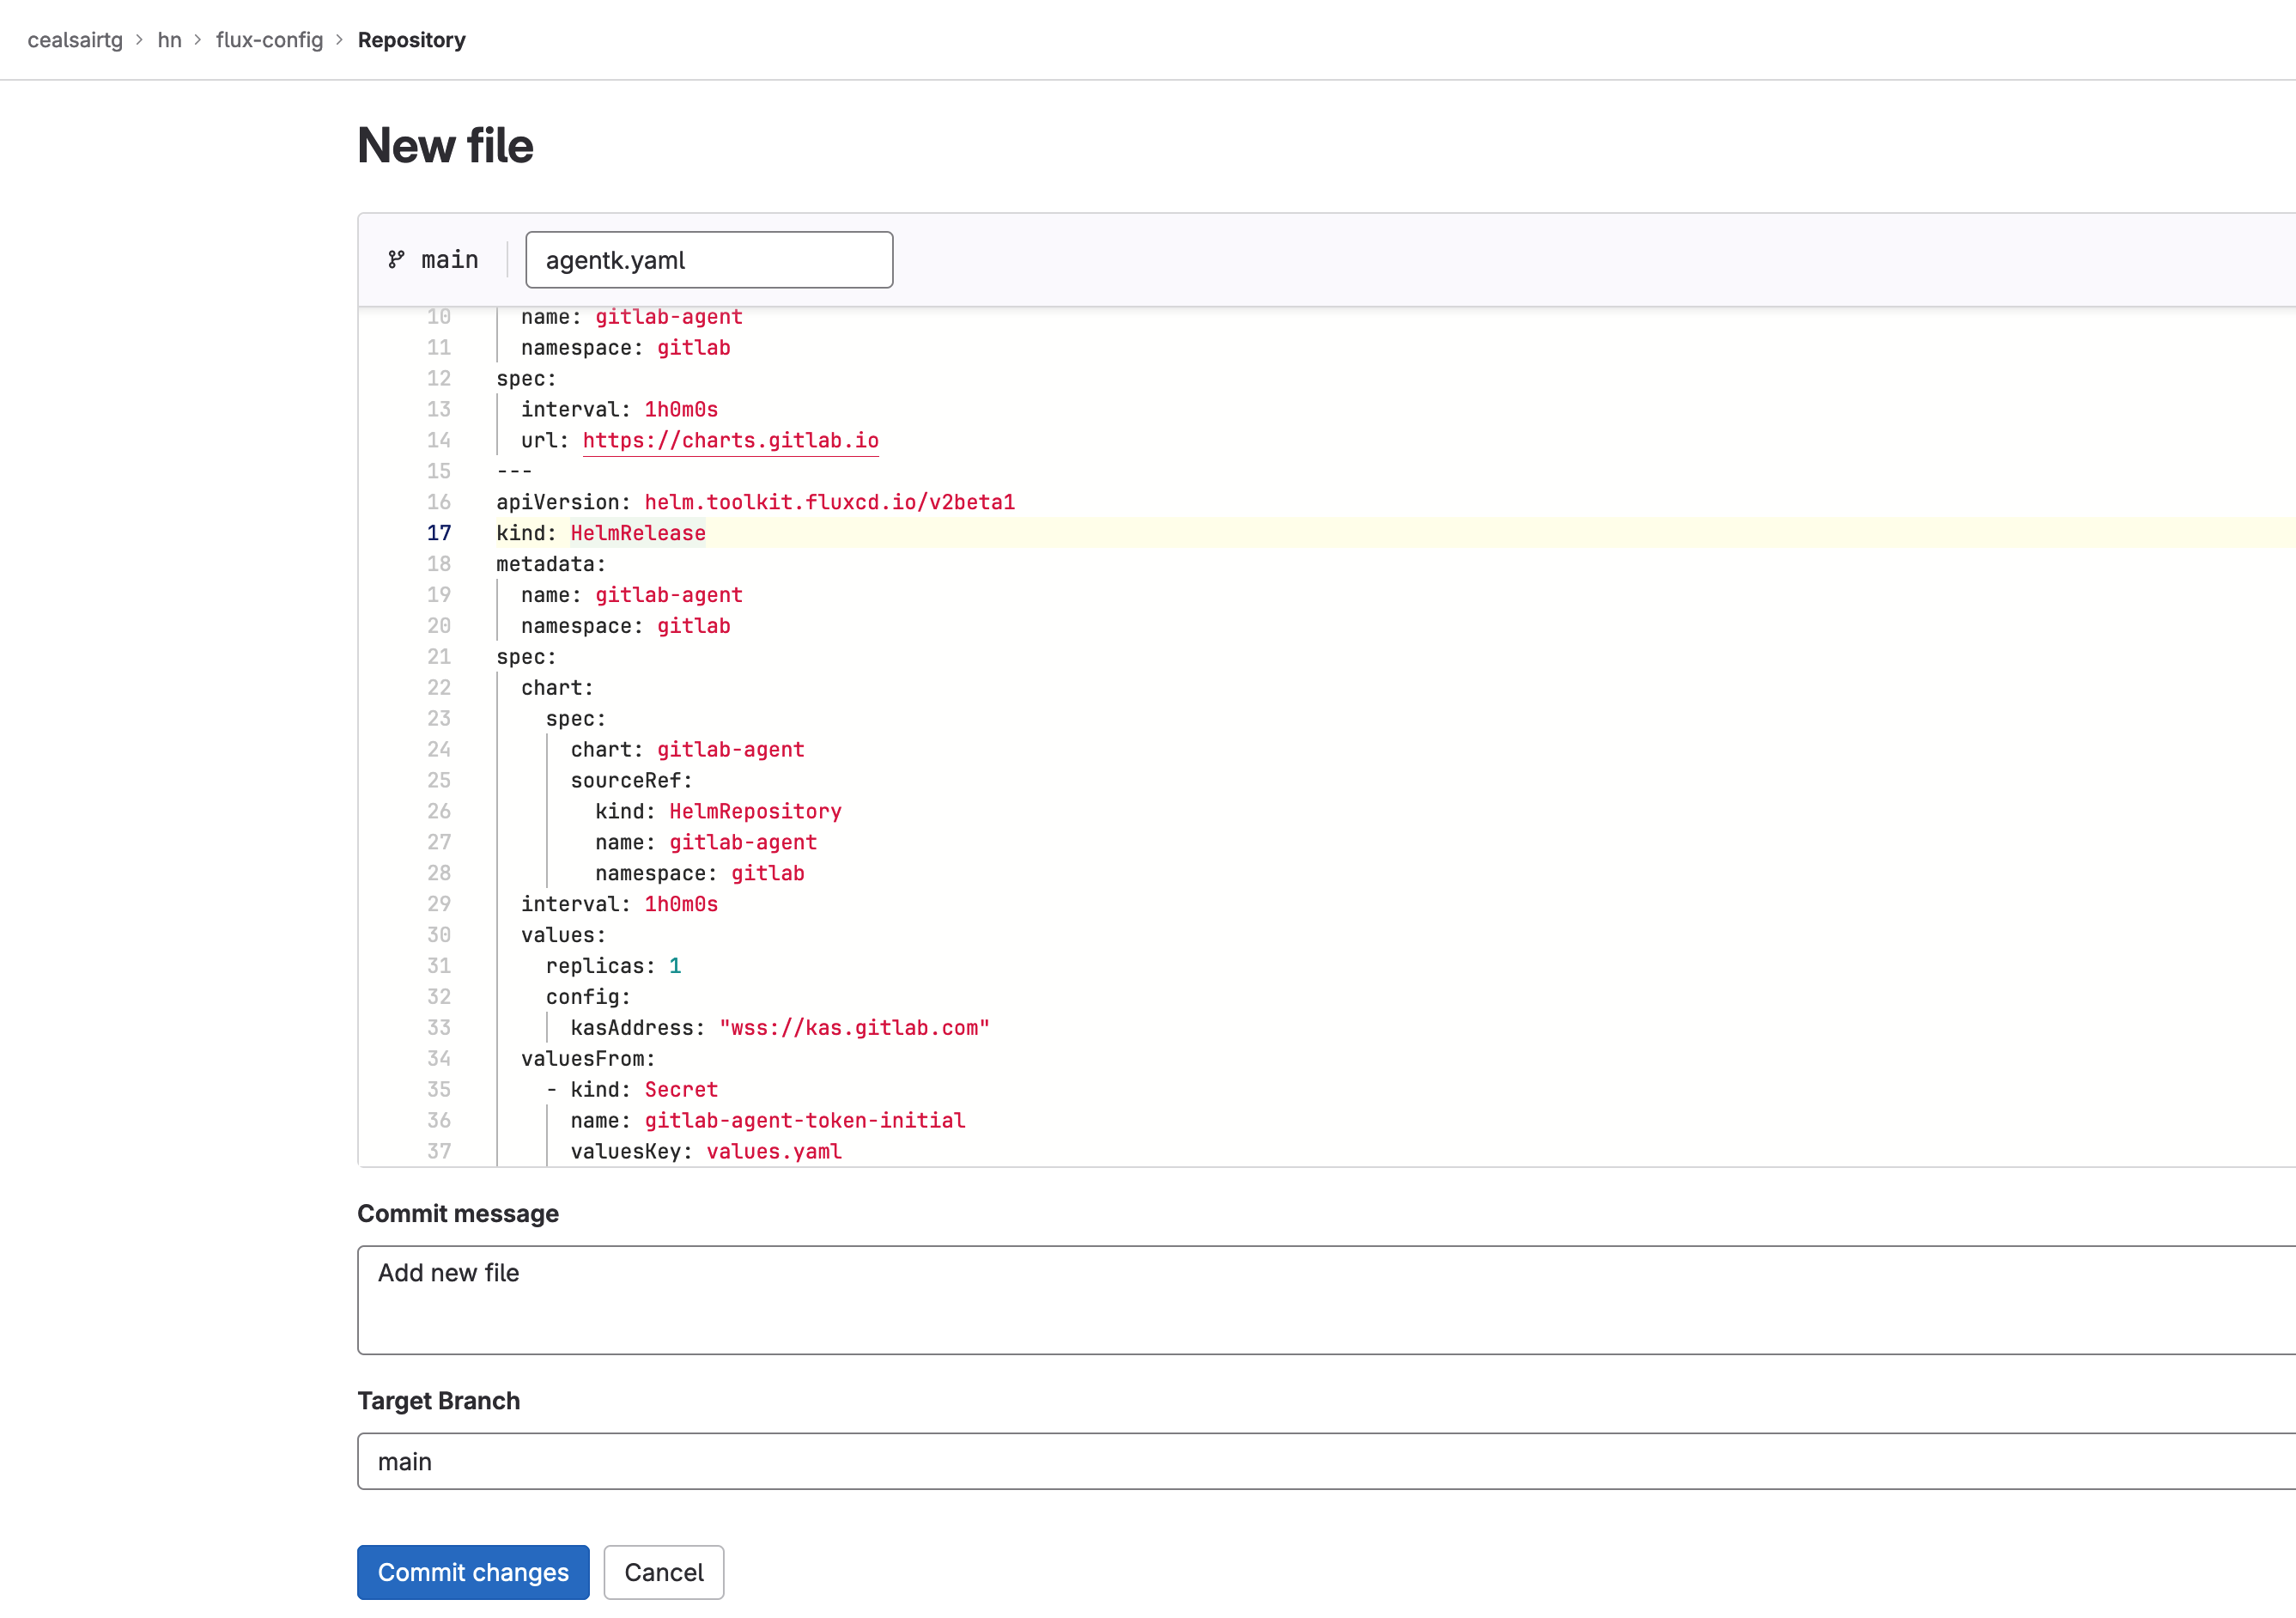 Creating the manifest for the GitLab agent for Kubernetes
Commit this file to main by clicking on the Commit changes button and ensuring that the target branch is “main”.
Note: In a few seconds, you can check that the GitLab agent for Kubernetes was created in your cluster by executing this command from a Terminal (the pod name should start with “gitlab-agent”):

kubectl get pods -n gitlab
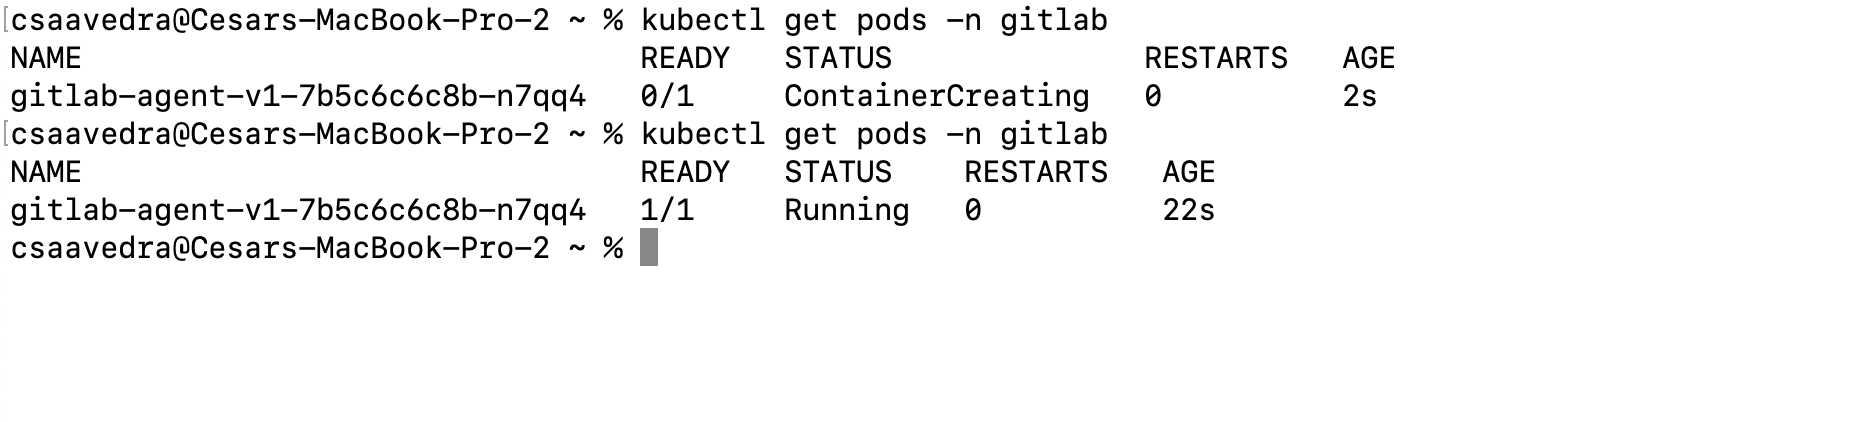 Agentk running in the Kubernetes cluster
Creating an instance of MySQL database in your cluster via Flux
- Using the breadcrumb at the top of your window, head to group “hn” and create a new project by clicking on the New project button. On the Create new project window, click on the Import project tile.
- At the Import project window, click on the Repository by URL button. The window will display fields to enter the URL of the repository you would like to import. In the text field Git repository URL, enter the following:
Leave the rest of the fields with their defaults.
 Importing mysql project into group "hn"
- Click on the Create project button at the bottom of the screen. You will see an "Importing in progress" message temporarily on your screen.
- Now we need to create a deploy token for this project so that Flux can interact with it. While in project “mysql”, select Settings > Repository and scroll down to the Deploy tokens section. Click on the Expand button to the right of the Deploy tokens section. Then click on the Add token button, which will expand the section to include fields to start entering information for the deploy token to be created.
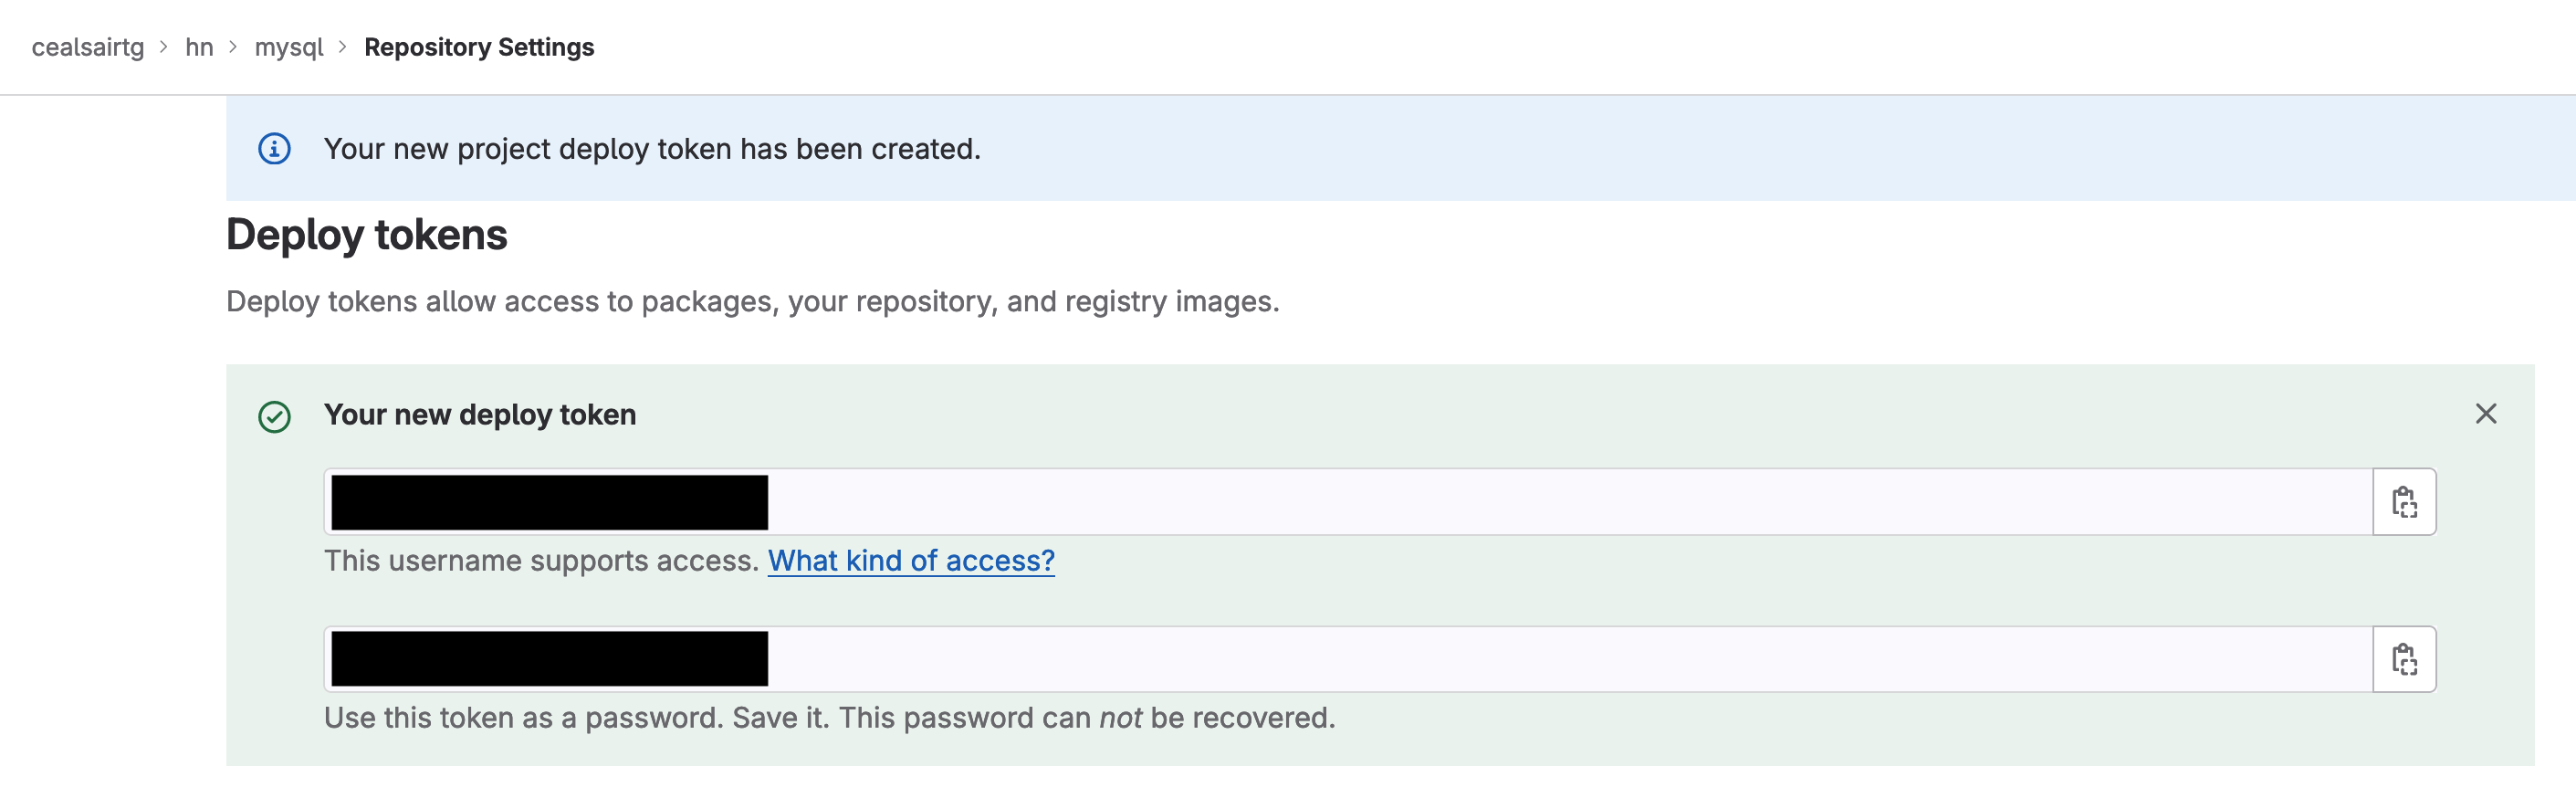
- Give the deploy token the name “mysql-flux-deploy-token” and check the checkbox read_repository for it. Then click on the button Create deploy token to create the token.
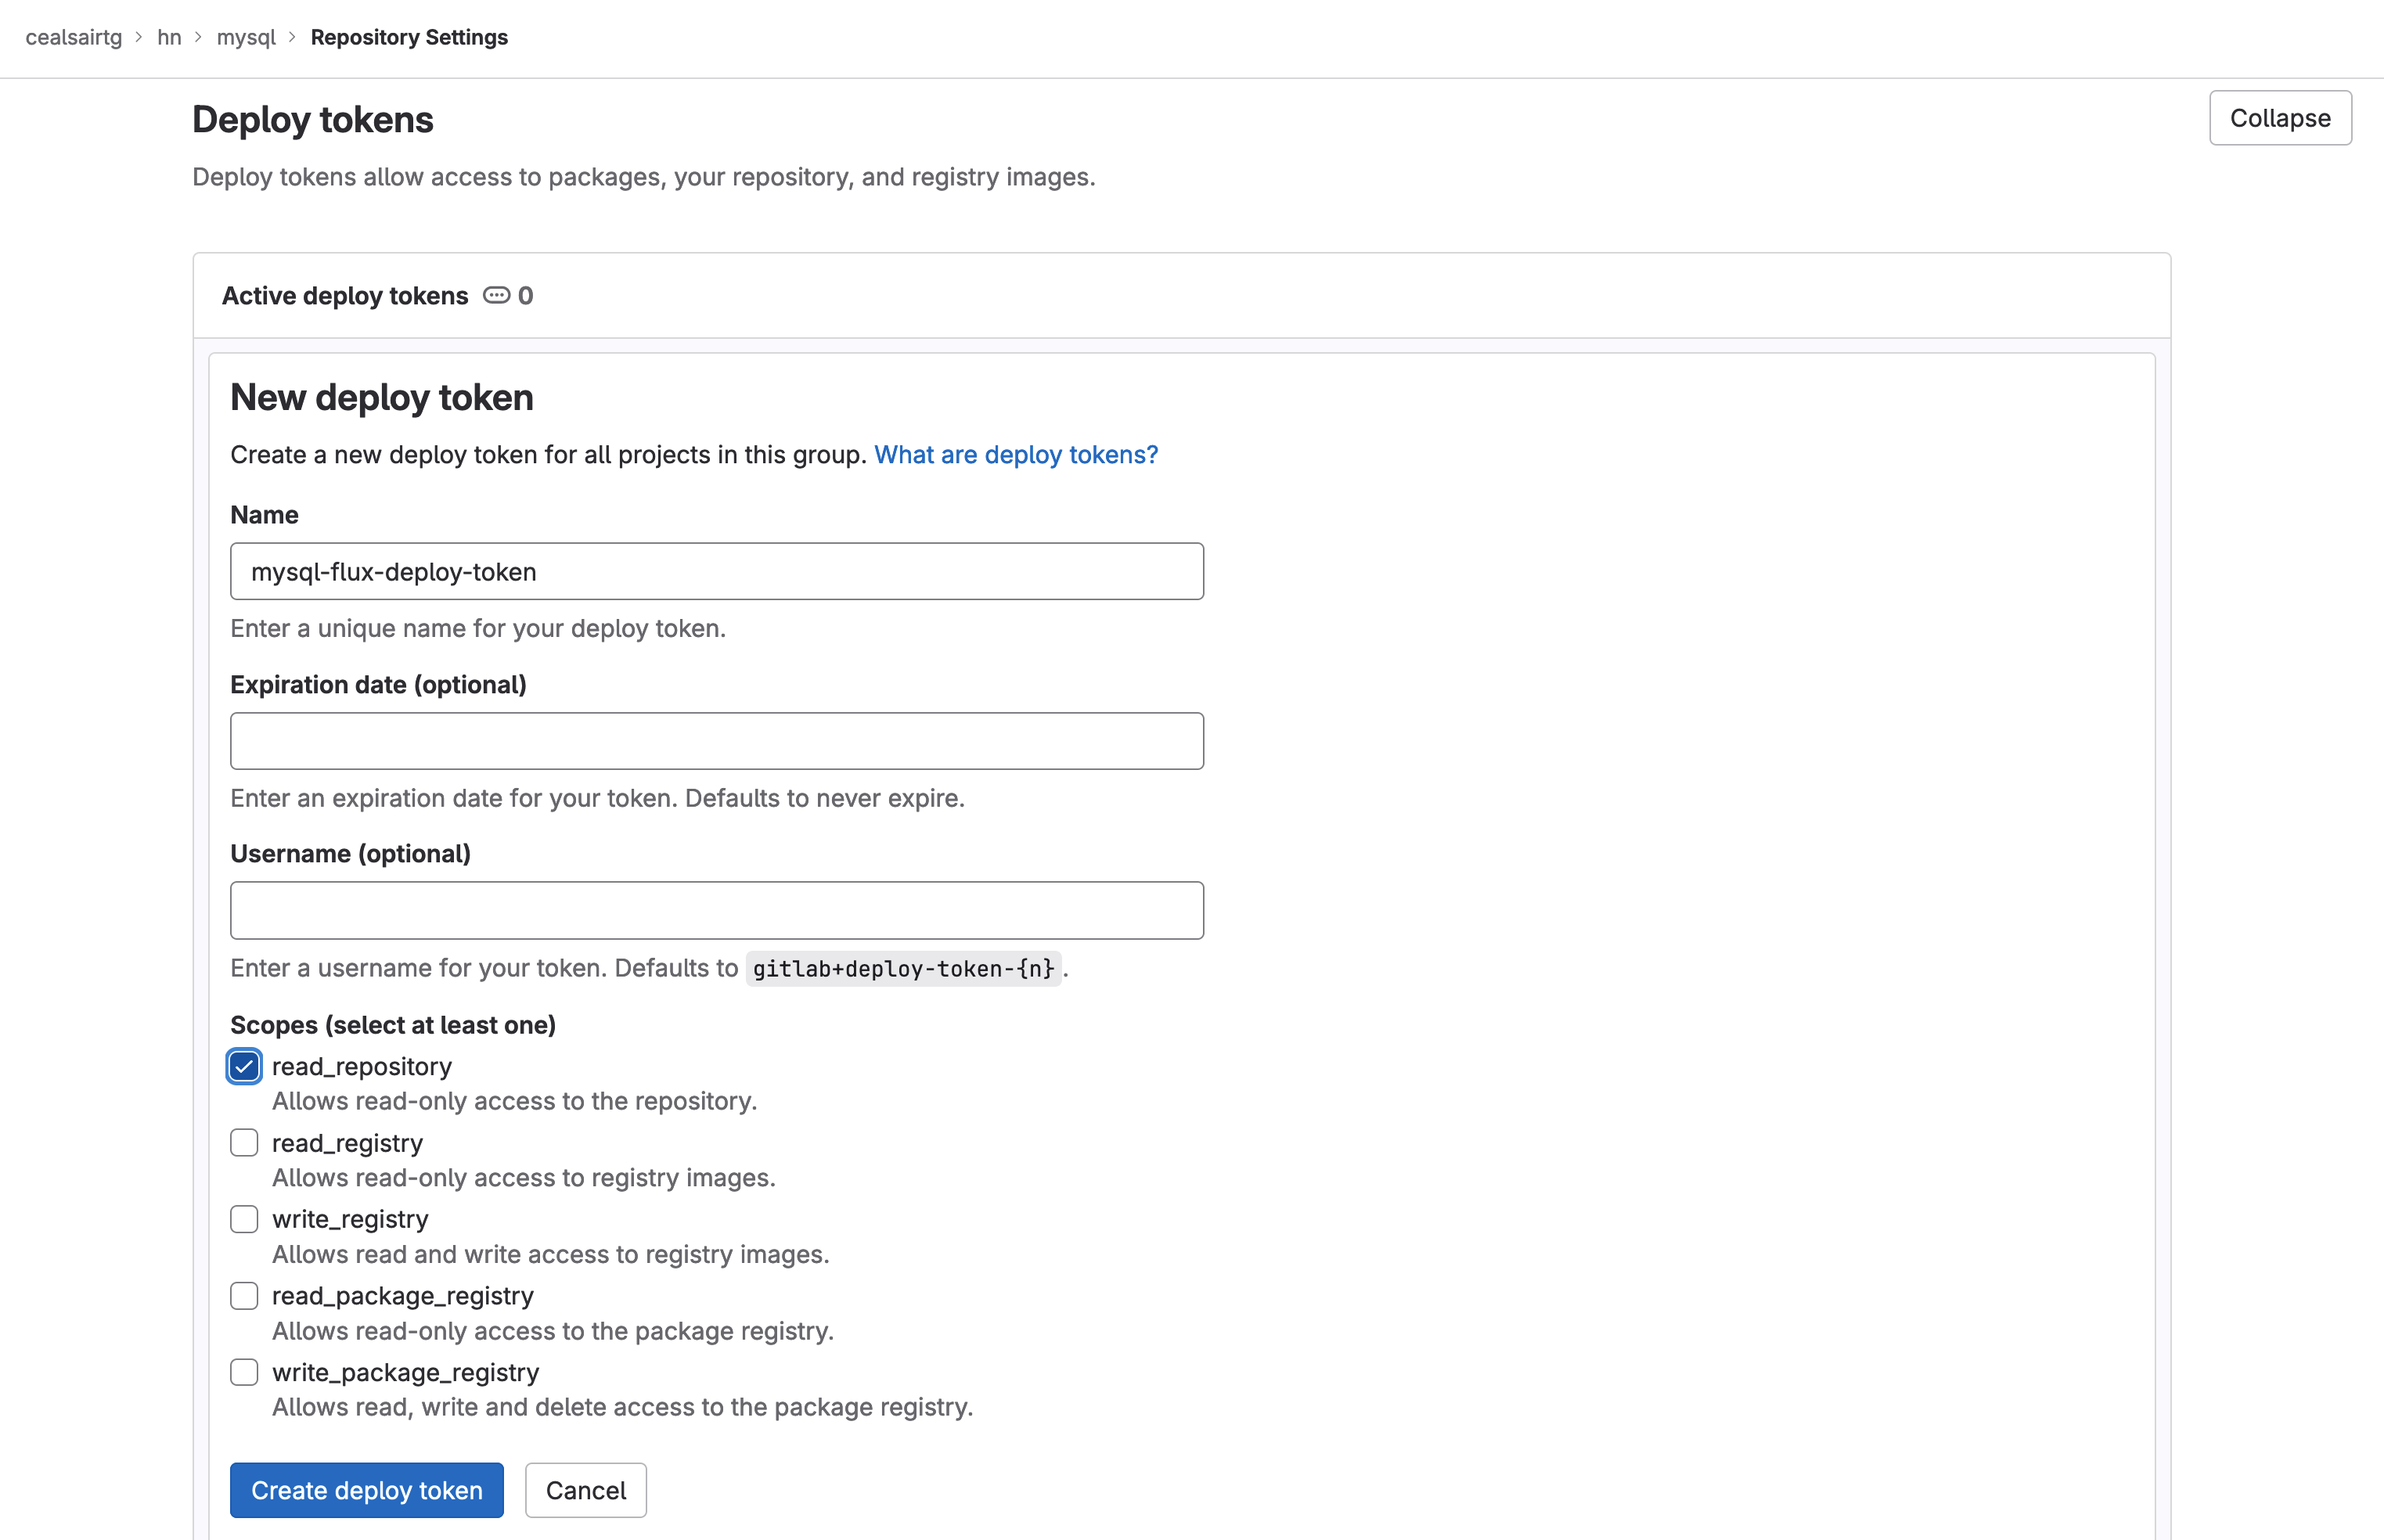 Creating the deploy token for "mysql" project for Flux to interact with it
Copy and save the username and password for the newly created deploy token; you will need them at a later step.
 Creating the deploy token for "mysql" project for Flux to interact with it
- From a Terminal, execute the following command to create a secret in your cluster for the deploy token you just created:
Note: Make sure to replace <your path> with the missing partial path to the project “mysql”,
flux create secret git mysql-flux-deploy-authentication \
         --url=https://gitlab.com/<your path>/hn/mysql \
         --namespace=default \
         --username=<your-deploy-token-username> \
         --password=<your-deploy-token-password>
Note: You can check that the secret was created in your cluster by executing this command from a Terminal:

kubectl -n default get secrets mysql-flux-deploy-authentication
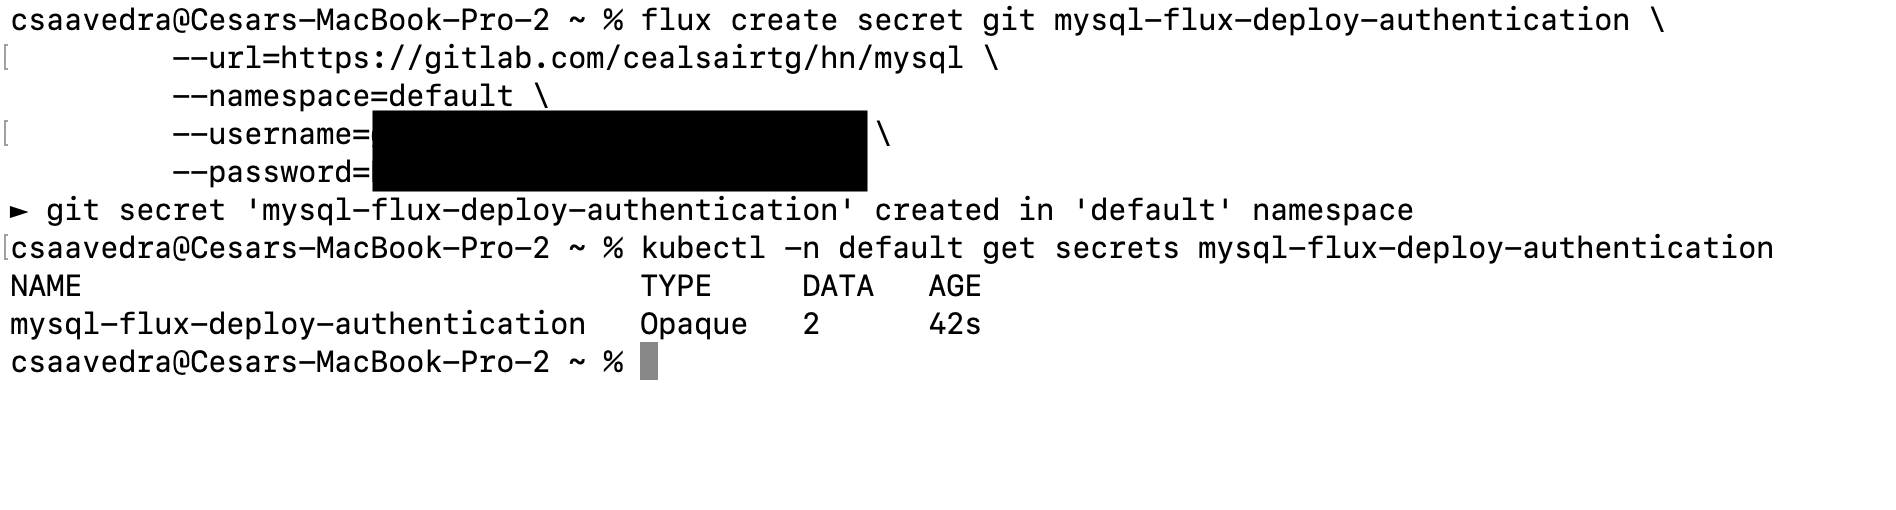 Creating secret for the deploy token for "mysql" project in the Kubernetes cluster
- Head back to project “hn/flux-config” and open the Web IDE from it.
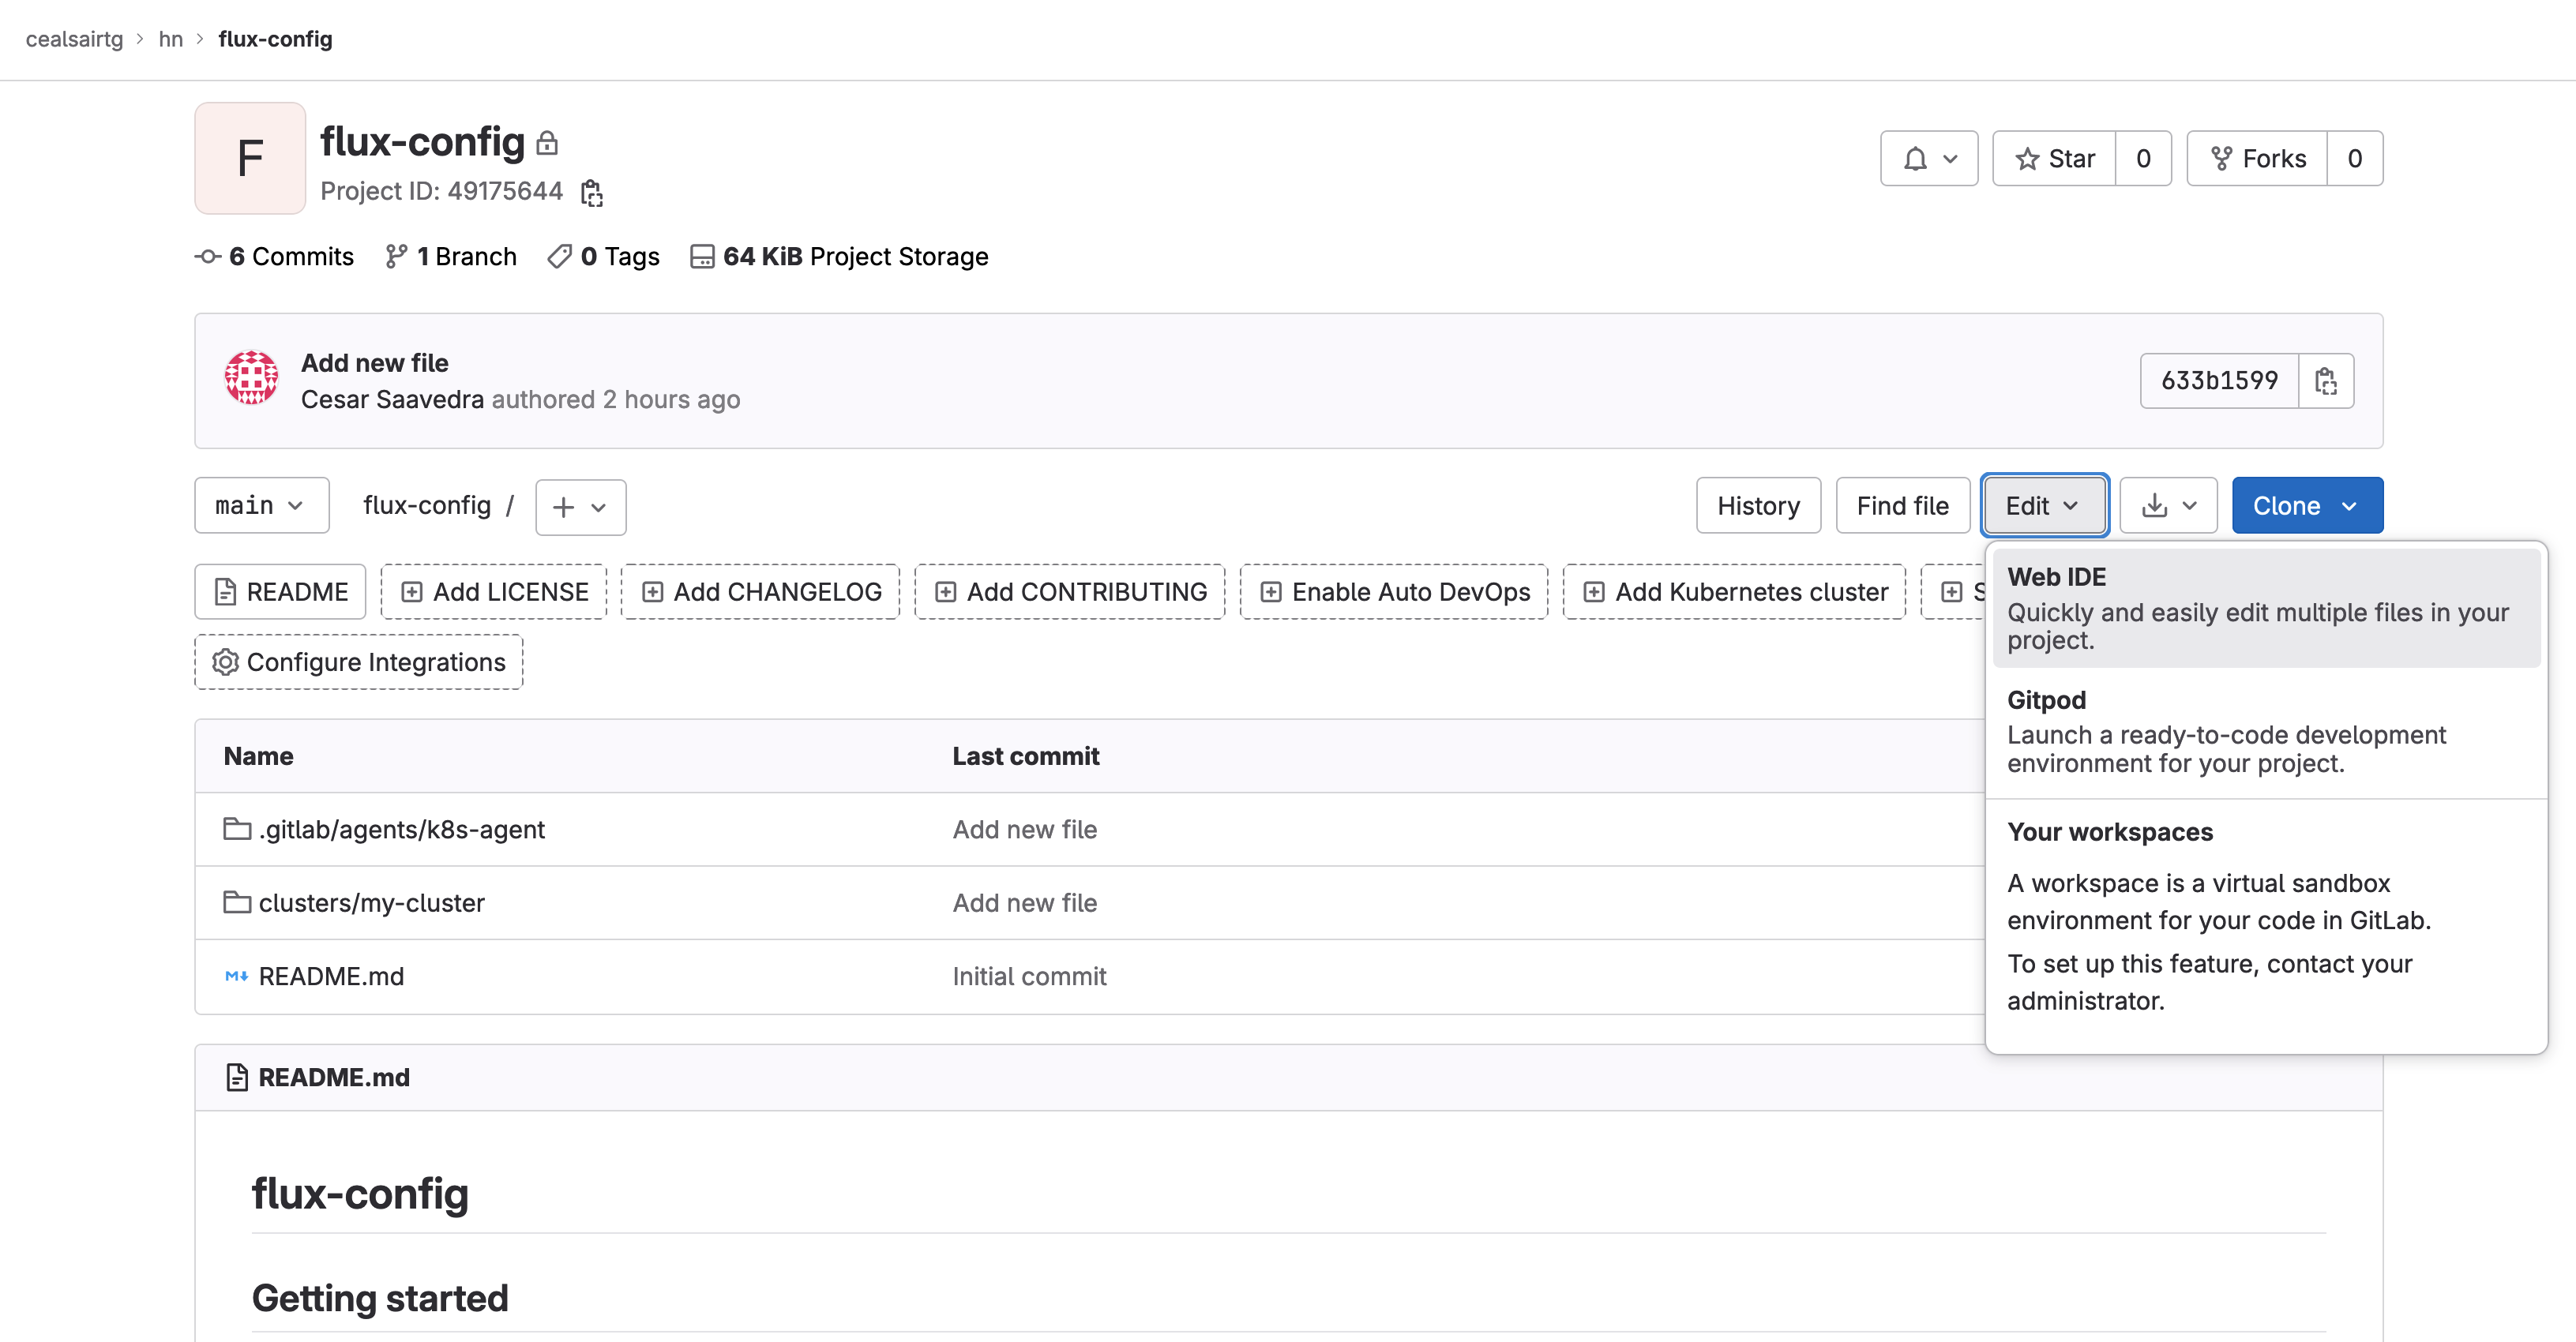 Selecting Web IDE from the dropdown menu
- From inside the Web IDE, navigate to directory "clusters/my-cluster".
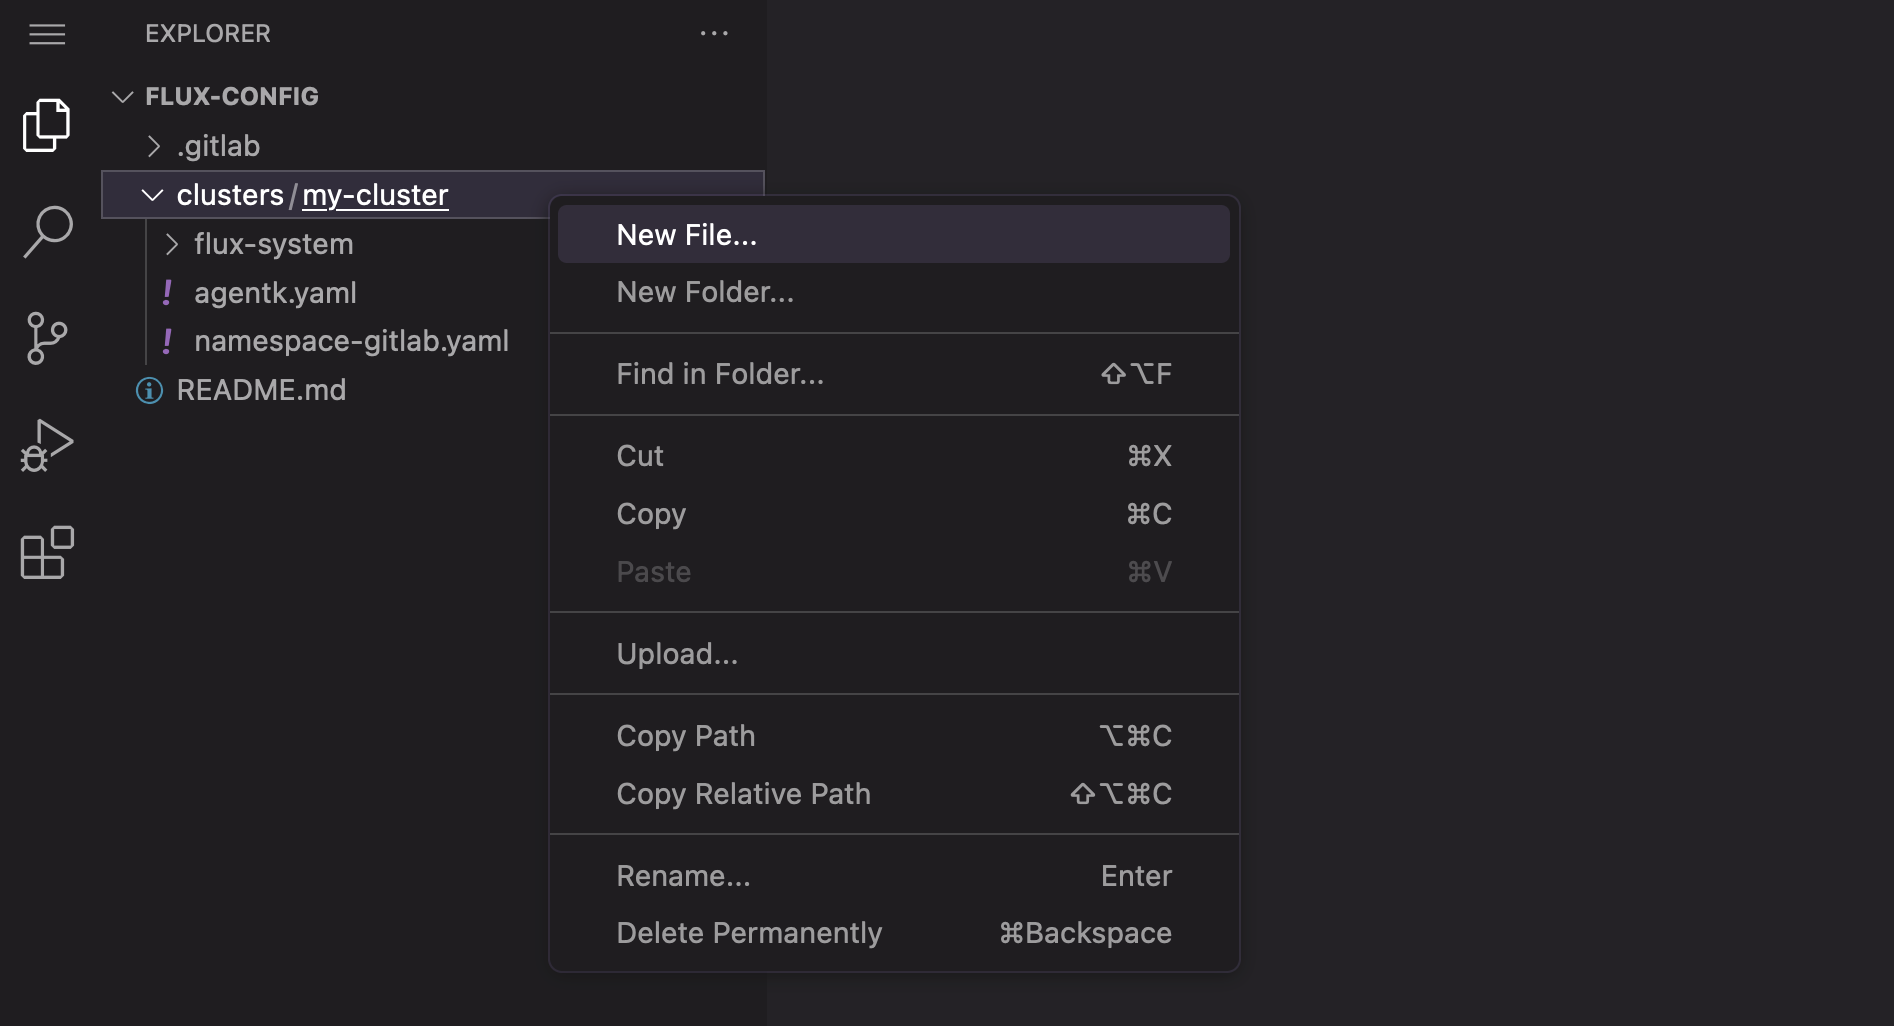 Navigate to directory "clusters/my-cluster" in the Web IDE
- Inside “clusters/my-cluster” directory, create file “mysql-manifests-source.yaml” and paste the following text into it:
Note: Replace <your path> with the missing partial path to the project “mysql”
apiVersion: source.toolkit.fluxcd.io/v1beta2
kind: GitRepository
metadata:
  name: mysql
  namespace: default
spec:
  interval: 1m0s
  ref:
    branch: main
  secretRef:
    name: mysql-flux-deploy-authentication
  url: https://gitlab.com/<your path>/hn/mysql
 Creating mysql-manifests-source.yaml file in the Web IDE
- Still in the Web IDE, inside “clusters/my-cluster” directory, create file “mysql-manifests-kustomization.yaml” and paste the following text into it:
apiVersion: kustomize.toolkit.fluxcd.io/v1beta2
kind: Kustomization
metadata:
  name: mysql-source-kustomization
  namespace: default
spec:
  interval: 1m0s
  path: ./
  prune: true
  sourceRef:
    kind: GitRepository
    name: mysql
    namespace: default
  targetNamespace: default
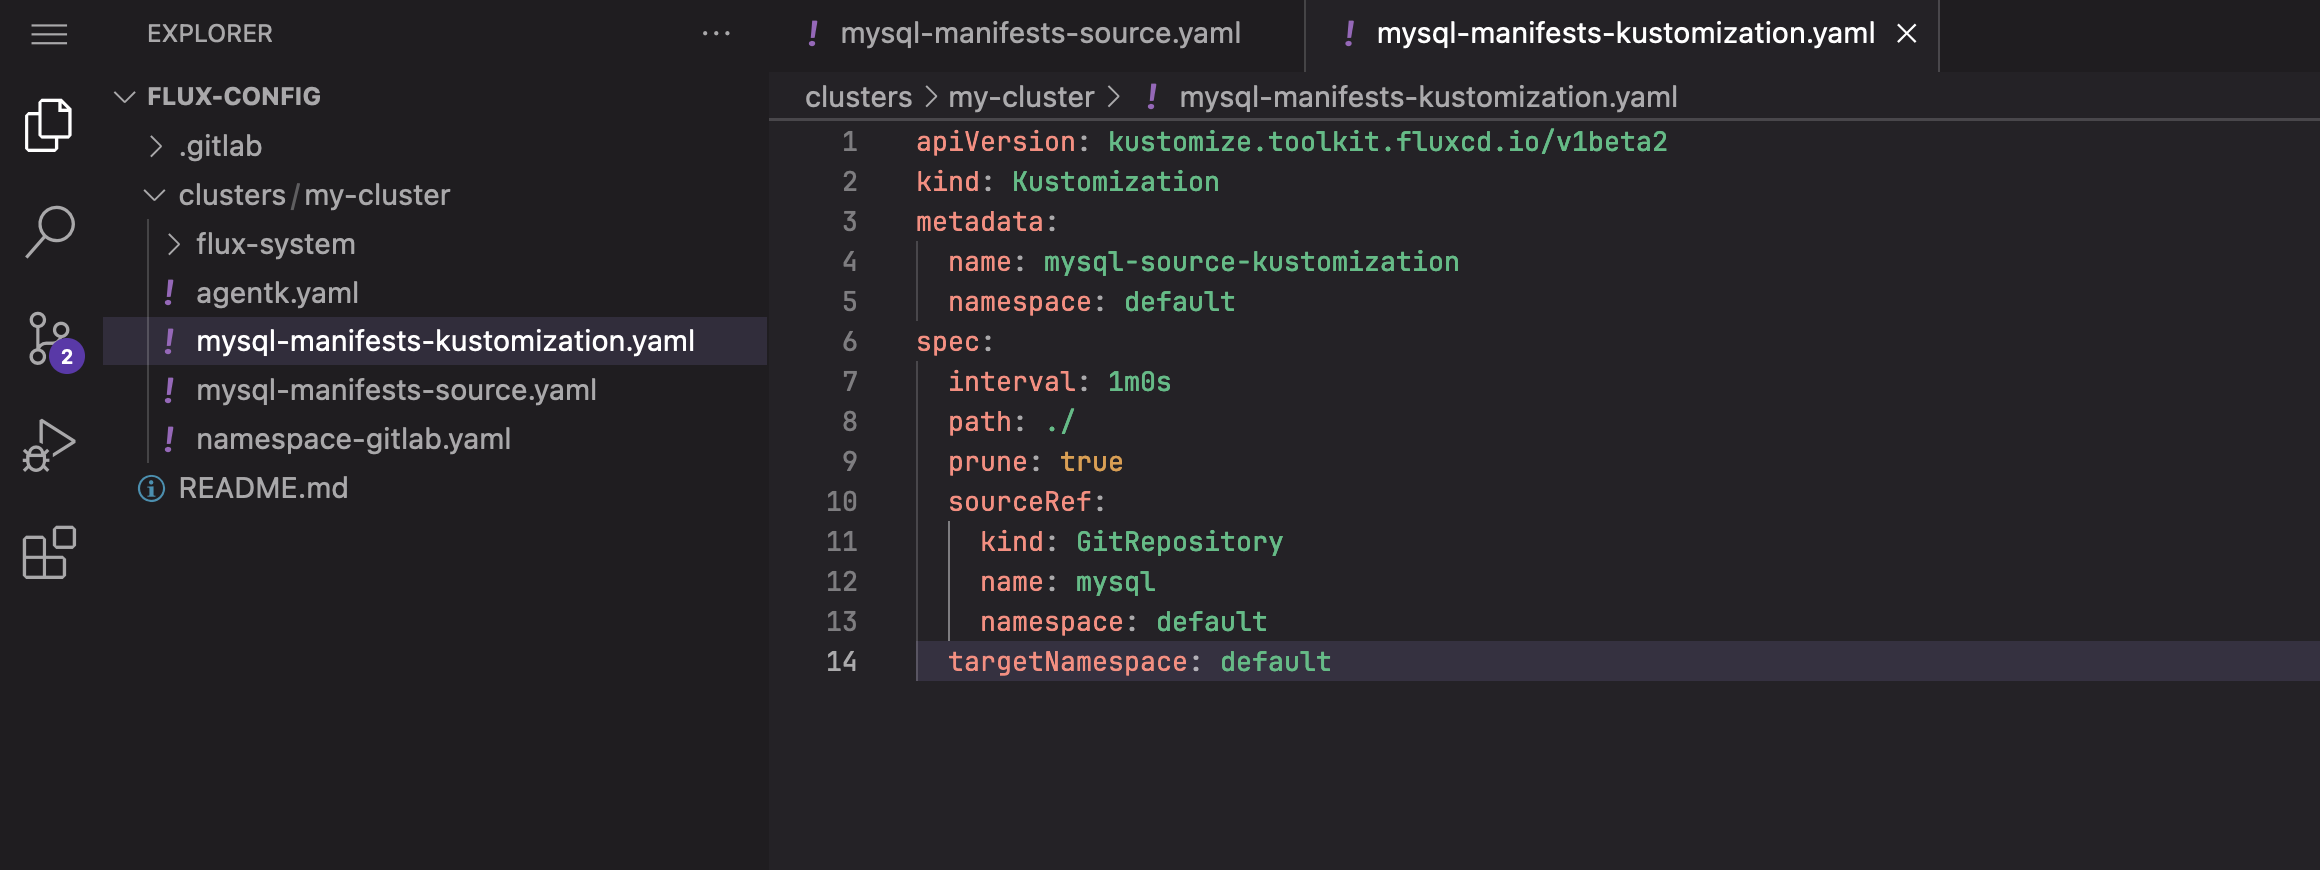 Creating mysql-manifests-kustomization.yaml file in the Web IDE
- From the Web IDE, commit both files to the main branch by clicking on the Source Control icon on the left vertical menu, pressing the Commit to main button.
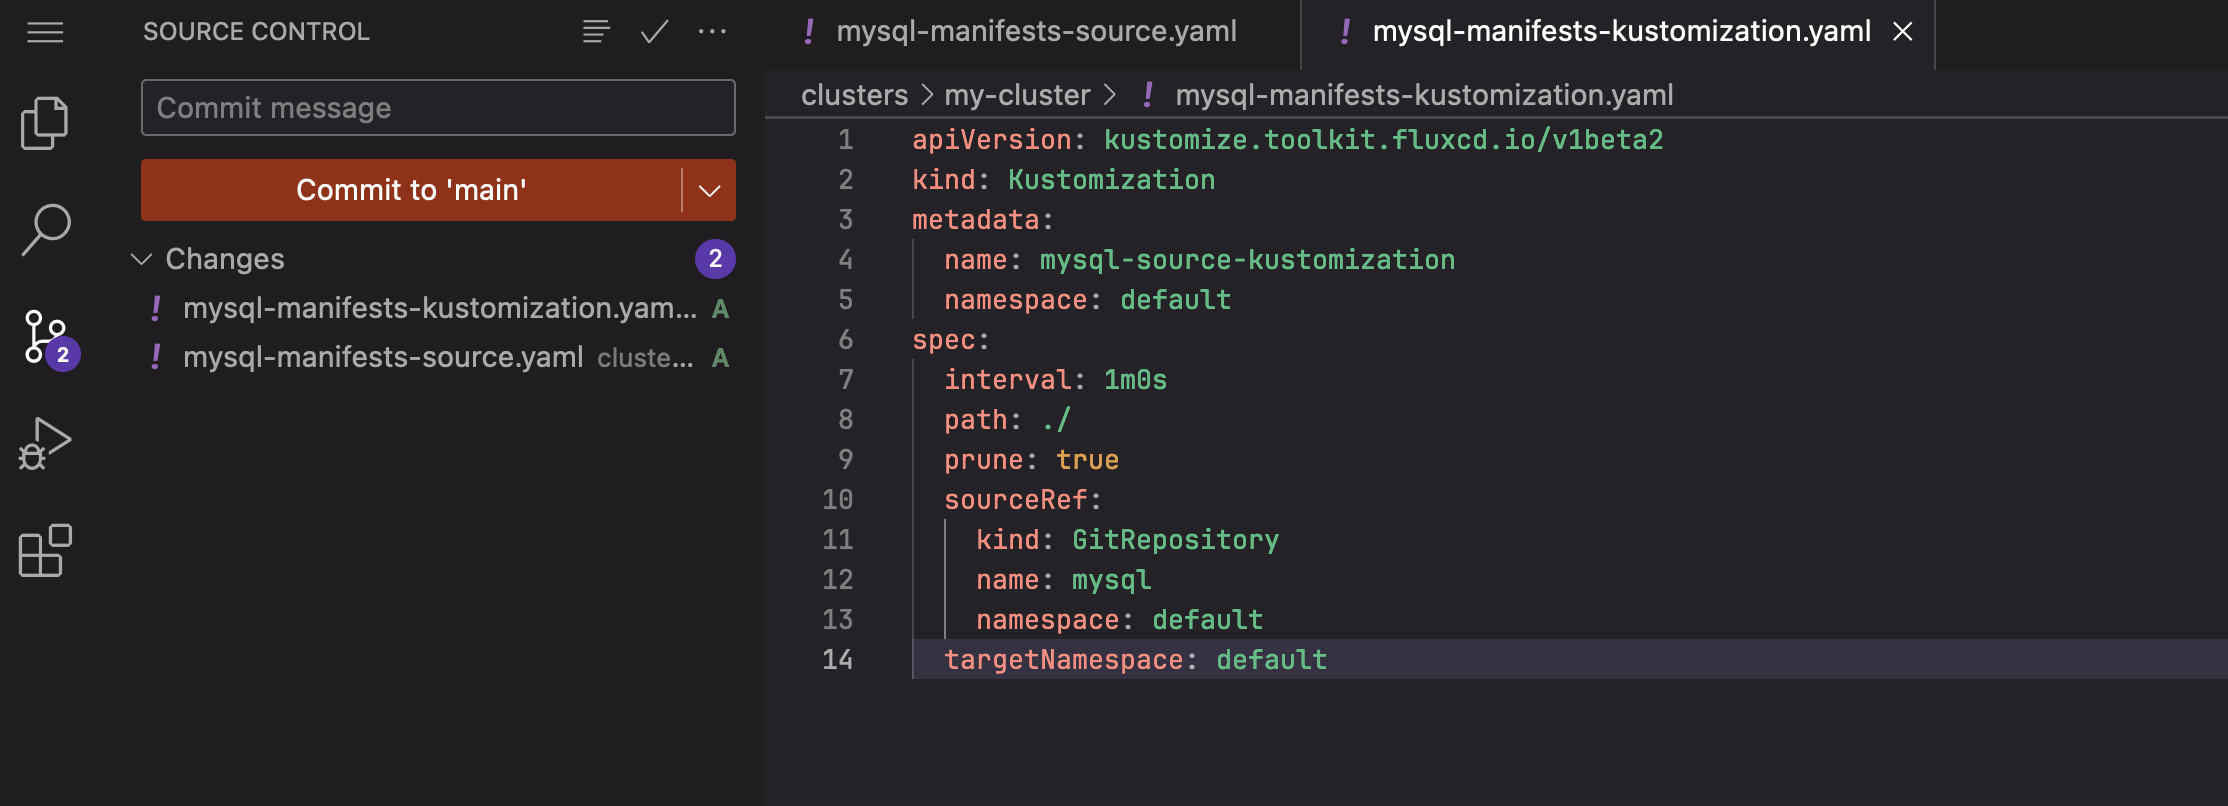 Clicking on the Source Control icon and committing to main in the Web IDE
Then press the Continue button to confirm that you want to commit your changes to the default branch:
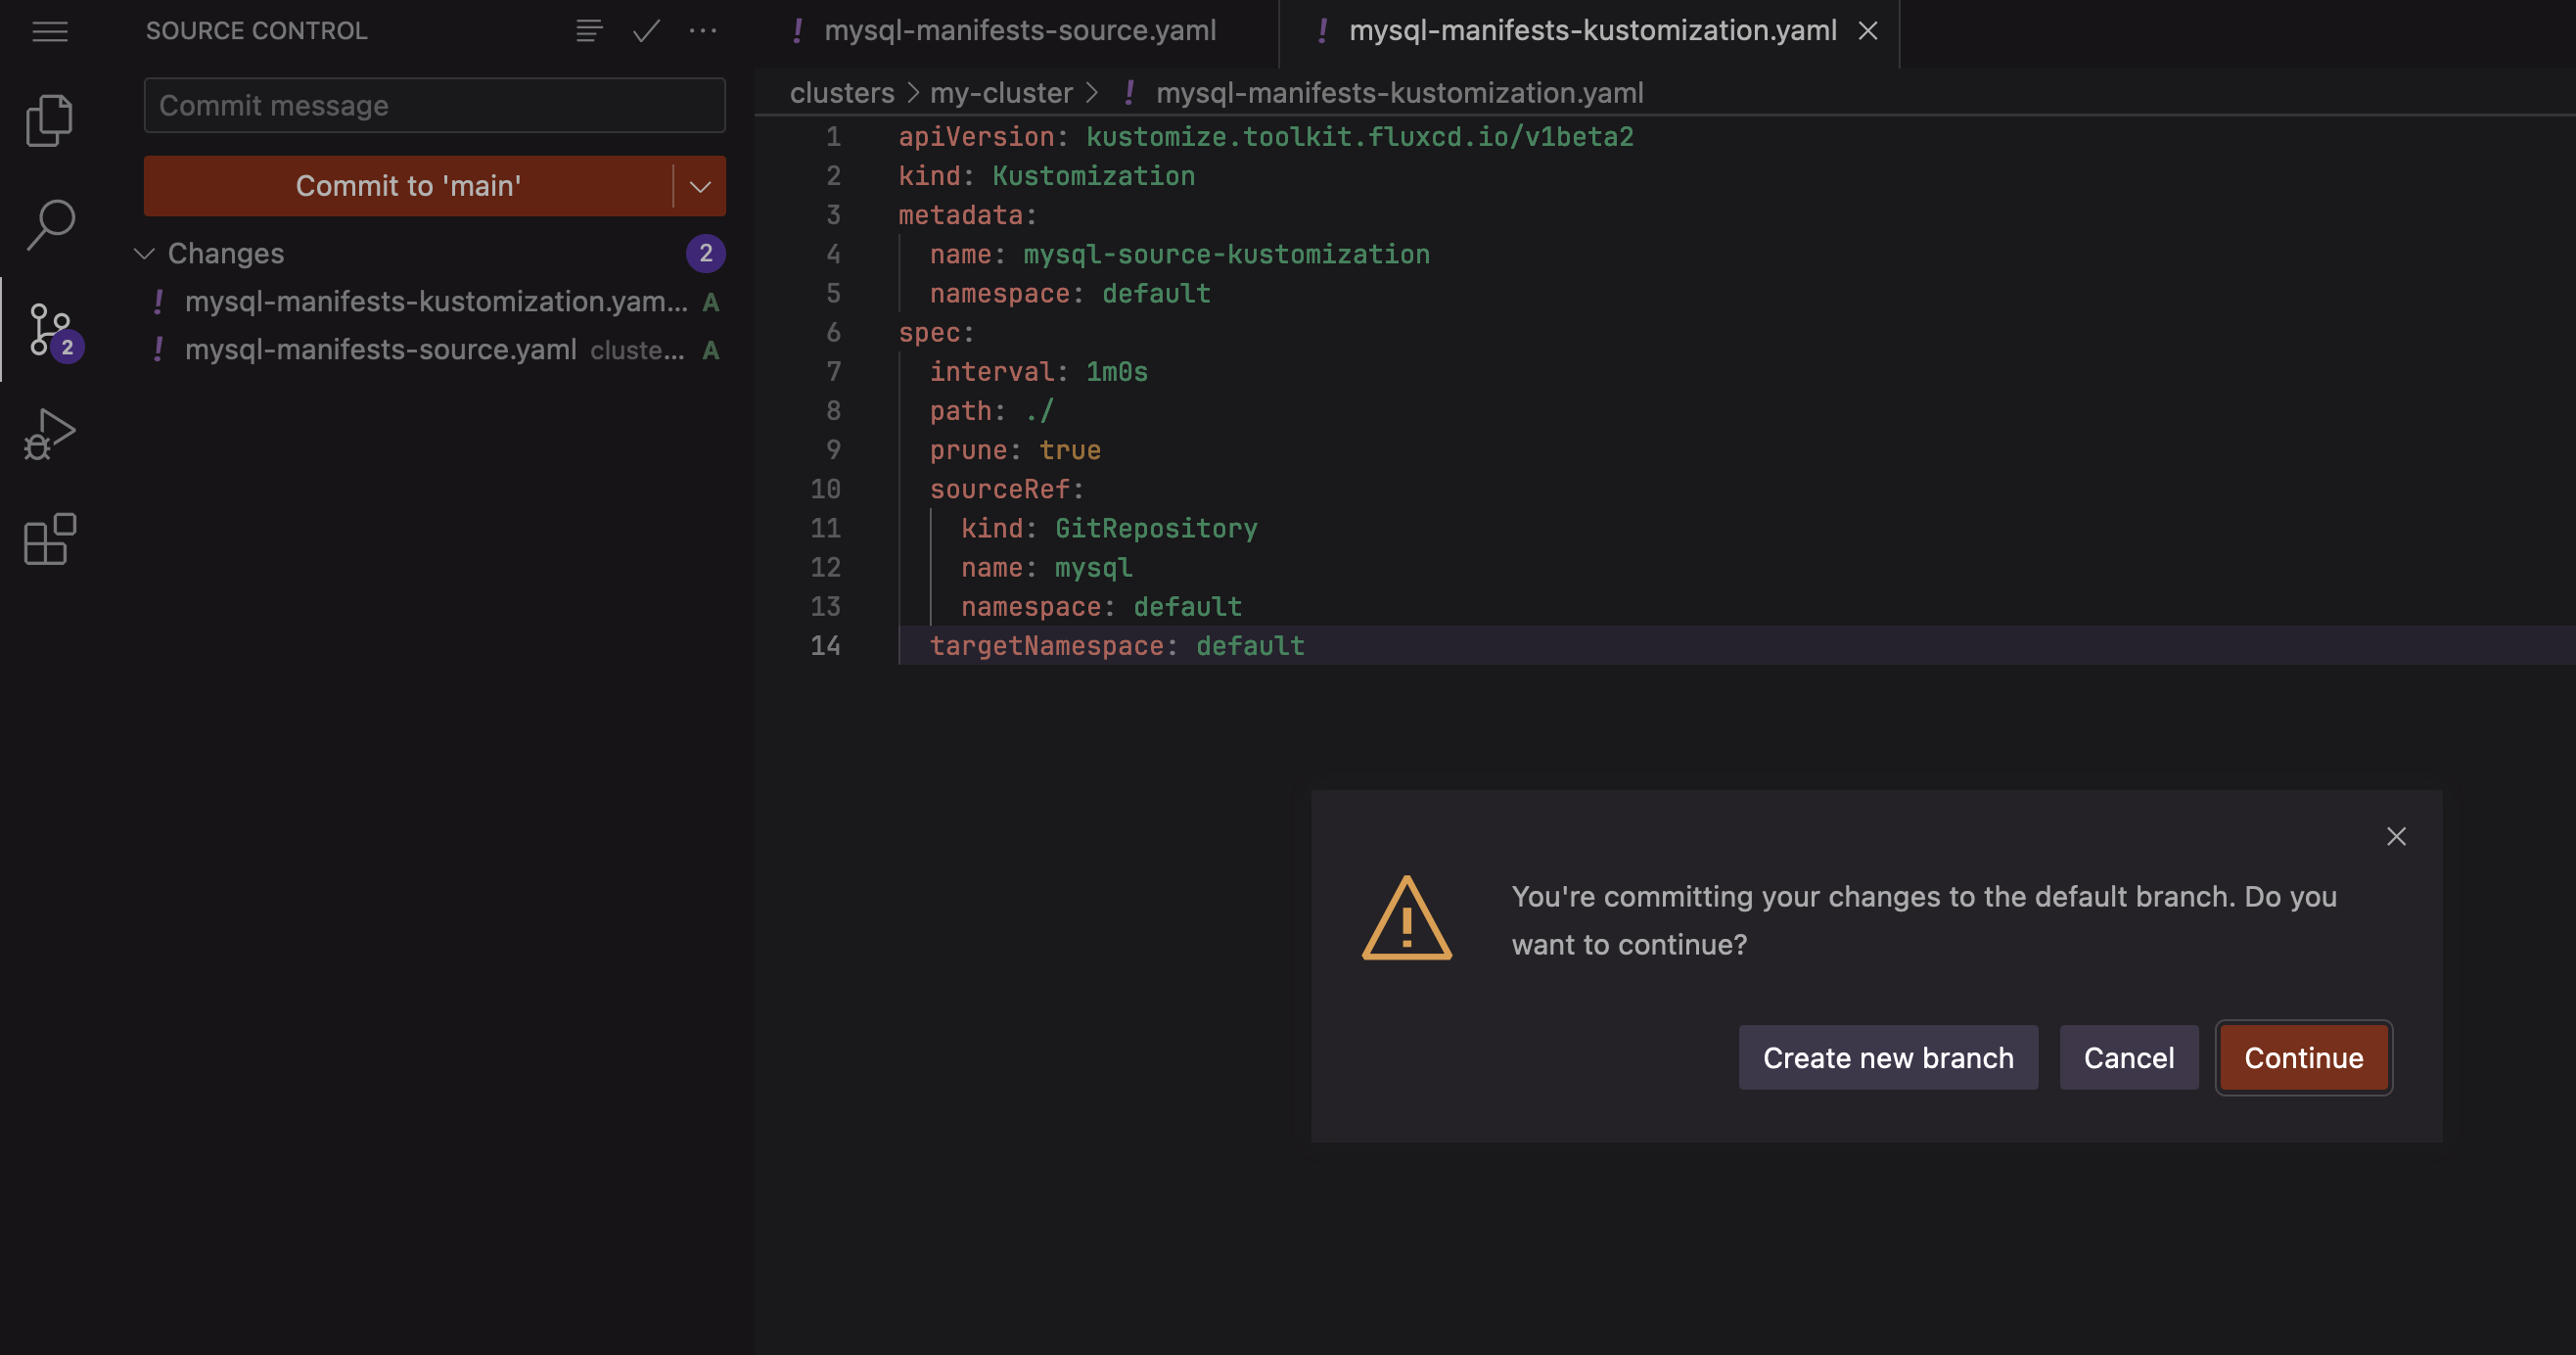 Clicking on the Source Control icon and committing to main in the Web IDE
- Flux will deploy MySQL to your Kubernetes cluster. You can close the Web IDE browser tab at this point.
Note: You can check that the GitLab agent for Kubernetes was created in your cluster by executing this command from a Terminal:

kubectl get pods -l app=mysql

You can check the persistent volume by executing this command from a Terminal:

kubectl describe pvc mysql-pv-claim
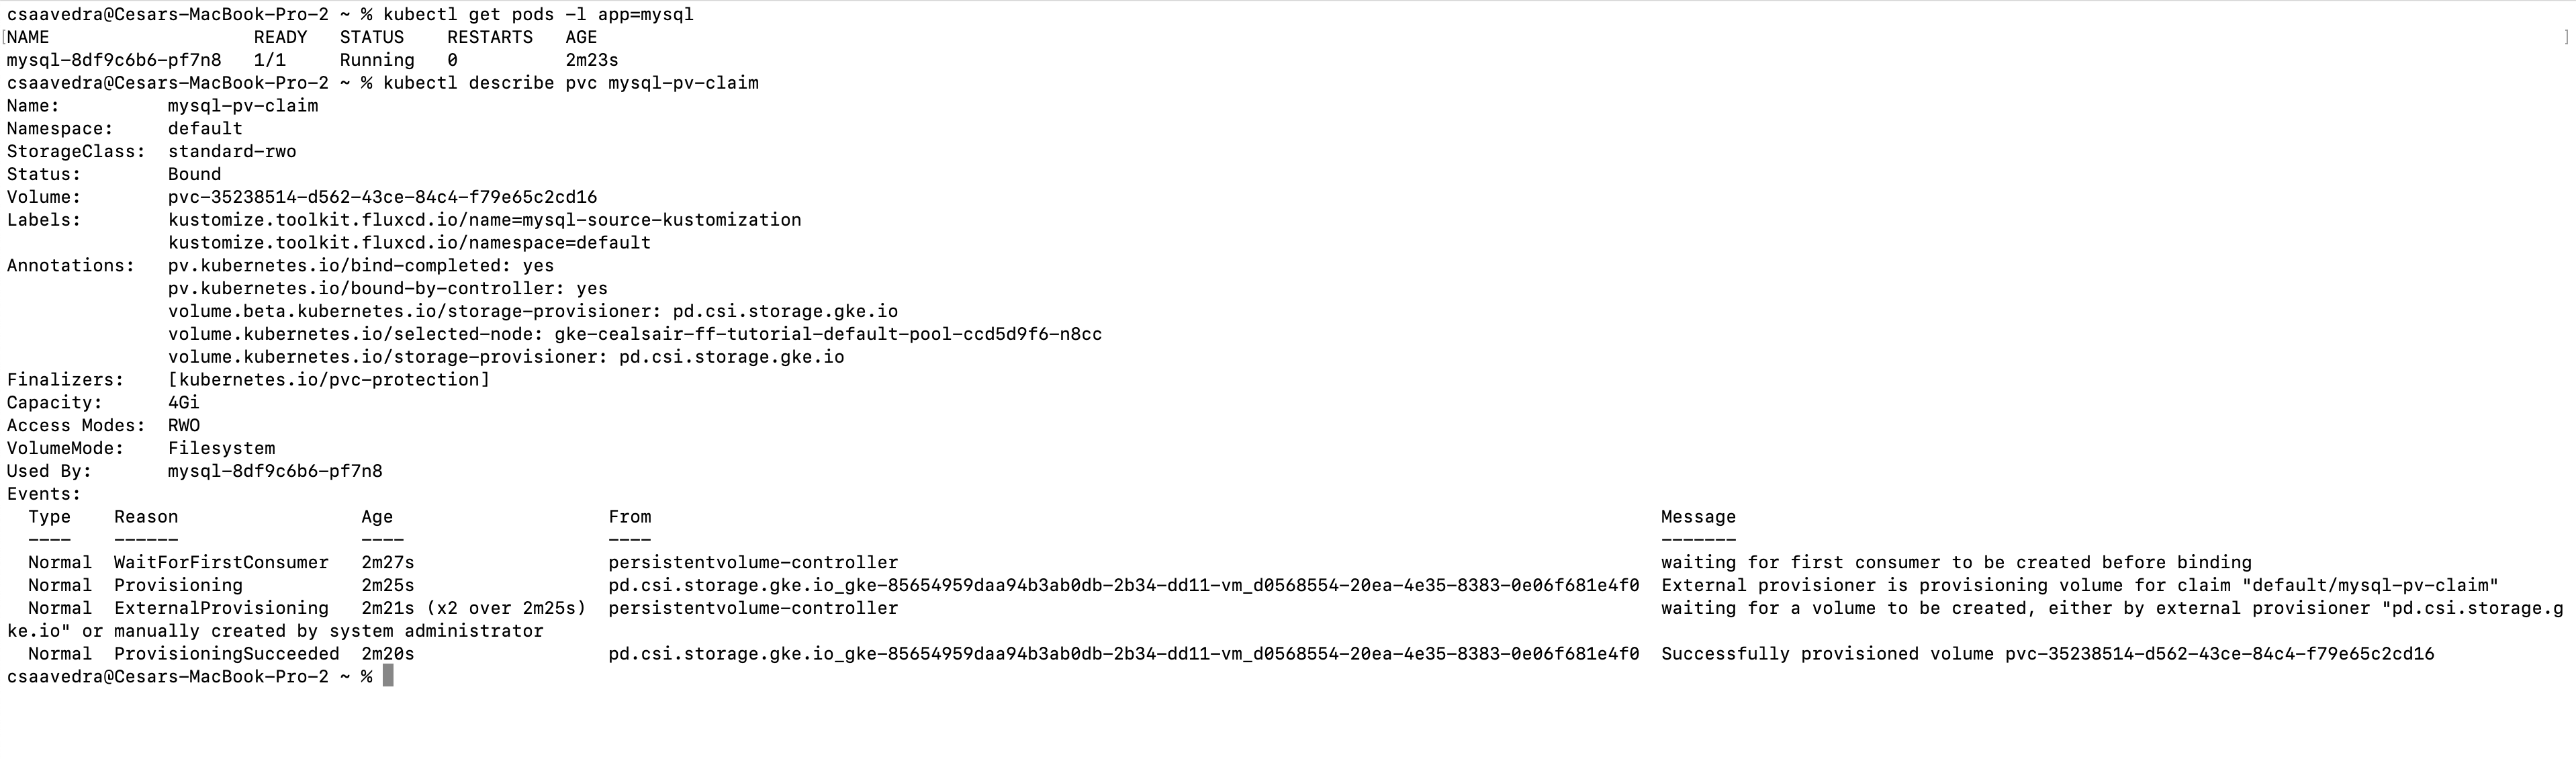 Verifying that mysql pod and its associated persitent volume claim are up and ready
- Now that the MySQL pod is up and running, we need to create a database, tables, and indexes in it and also populate some of the tables with dummy data for the inventory system. Using the breadcrumb at the top of your window, head over to the “mysql” project and select Build > Pipelines from the left vertical navigation menu.
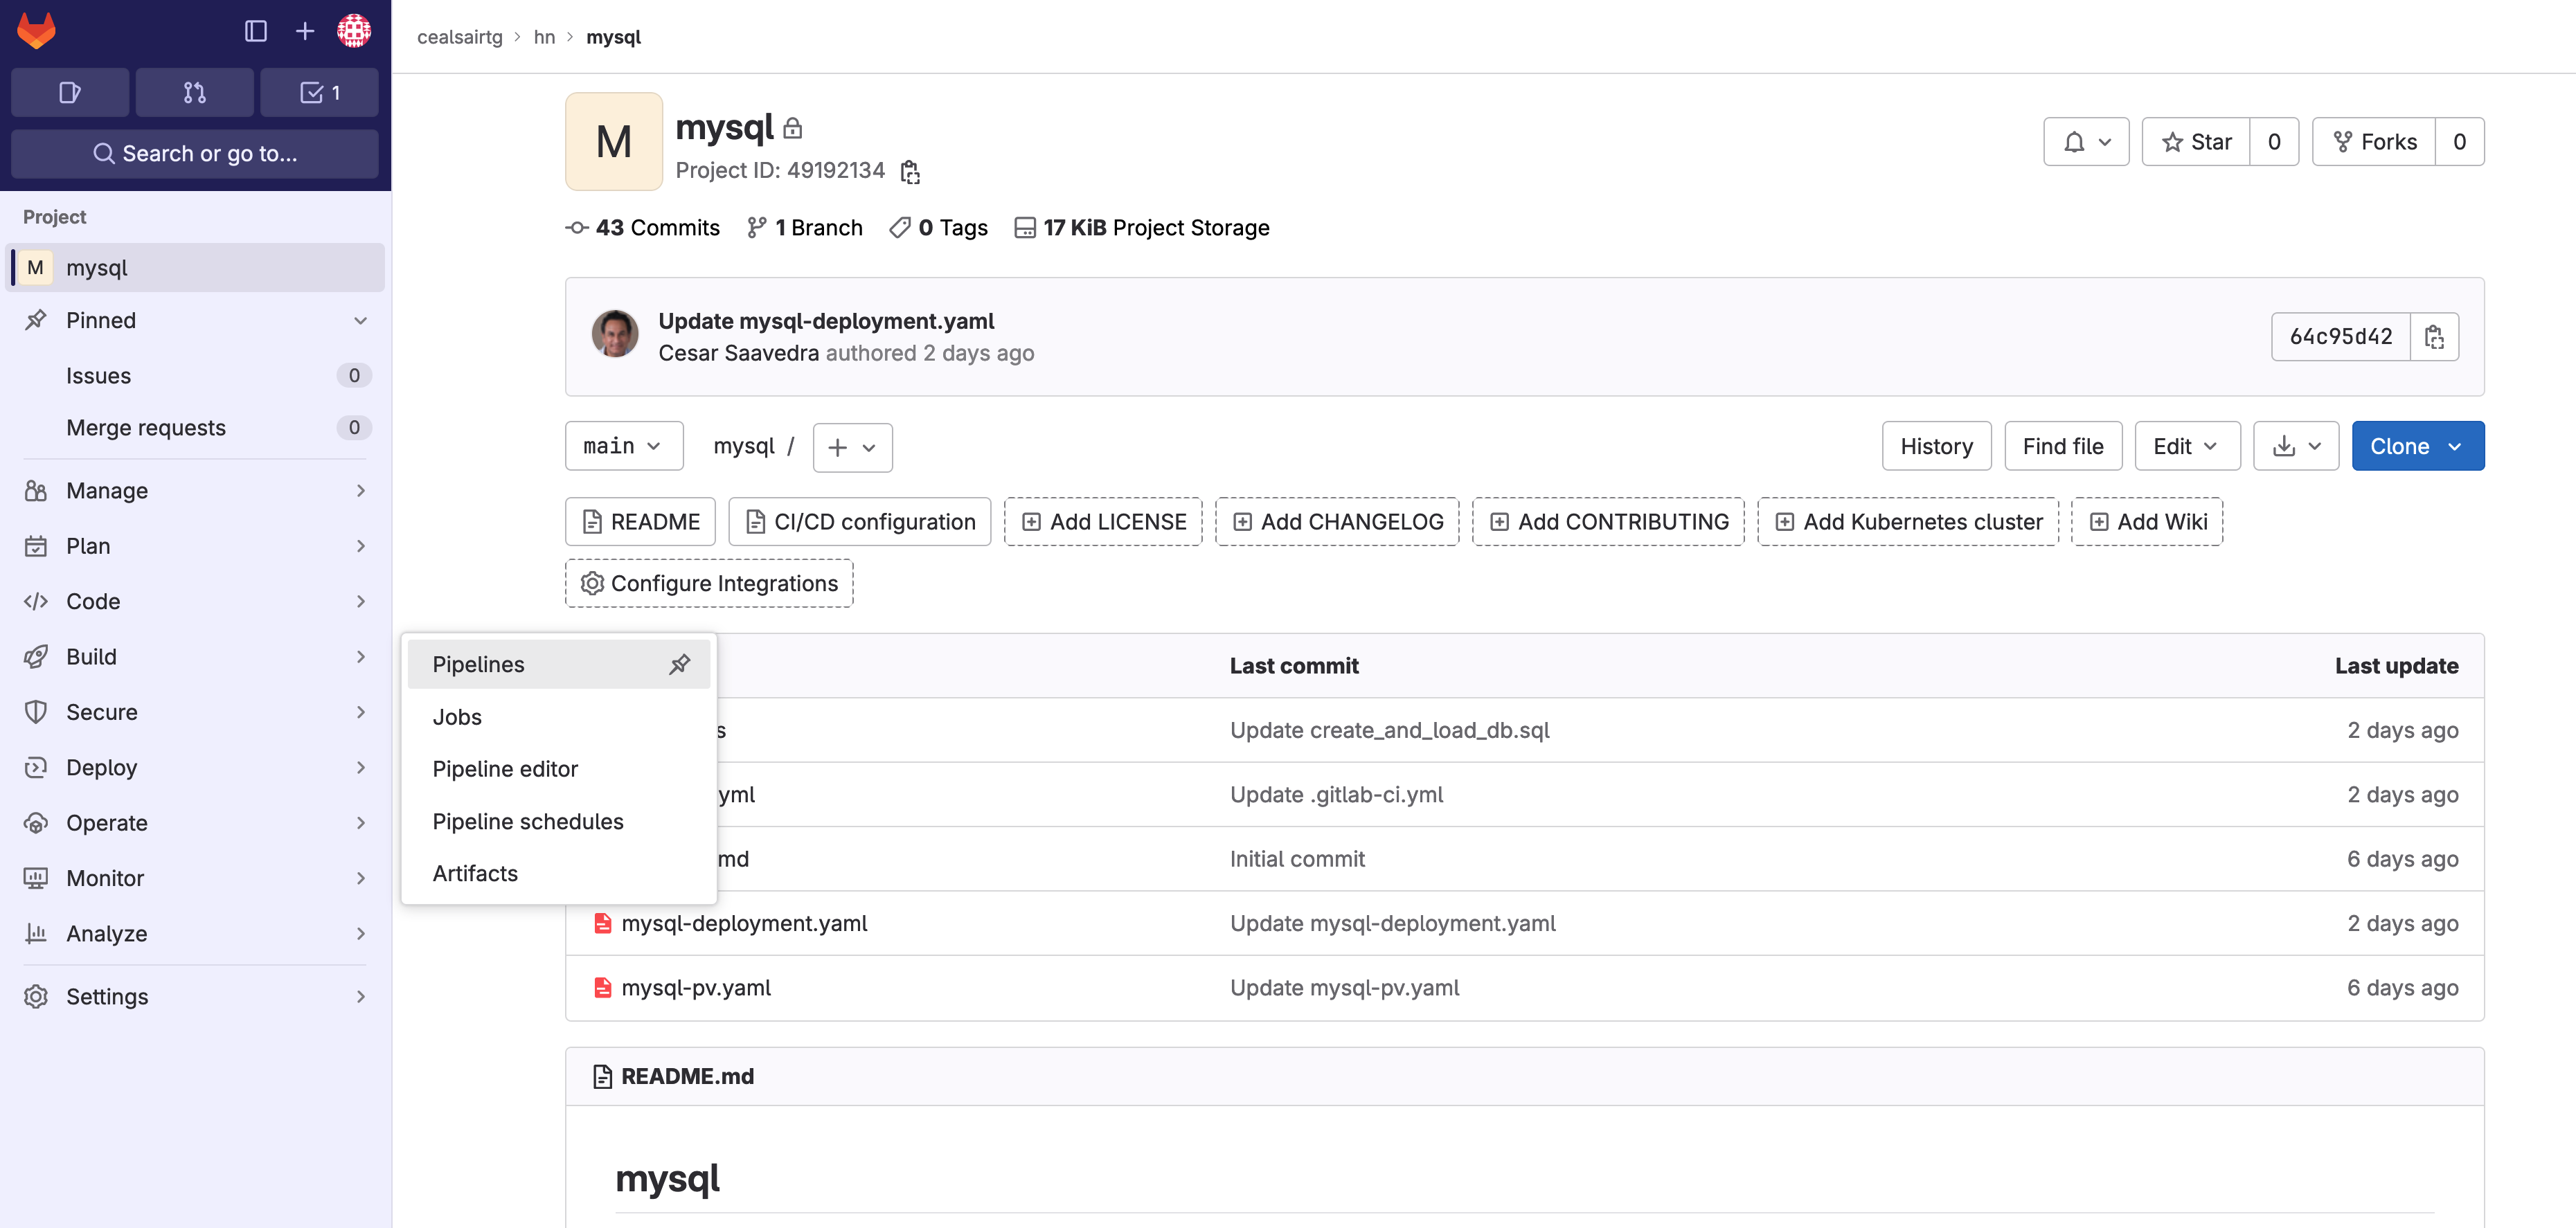 Head to "mysql" project and select Build > Pipelines from the left vertical navigation menu
- Click on the Run pipeline button on the top right side of the Pipelines window. This will put you on the Run pipeline window. Click on the Run pipeline button on the bottom left of the Run pipeline window leaving the rest of the fields with its defaults.
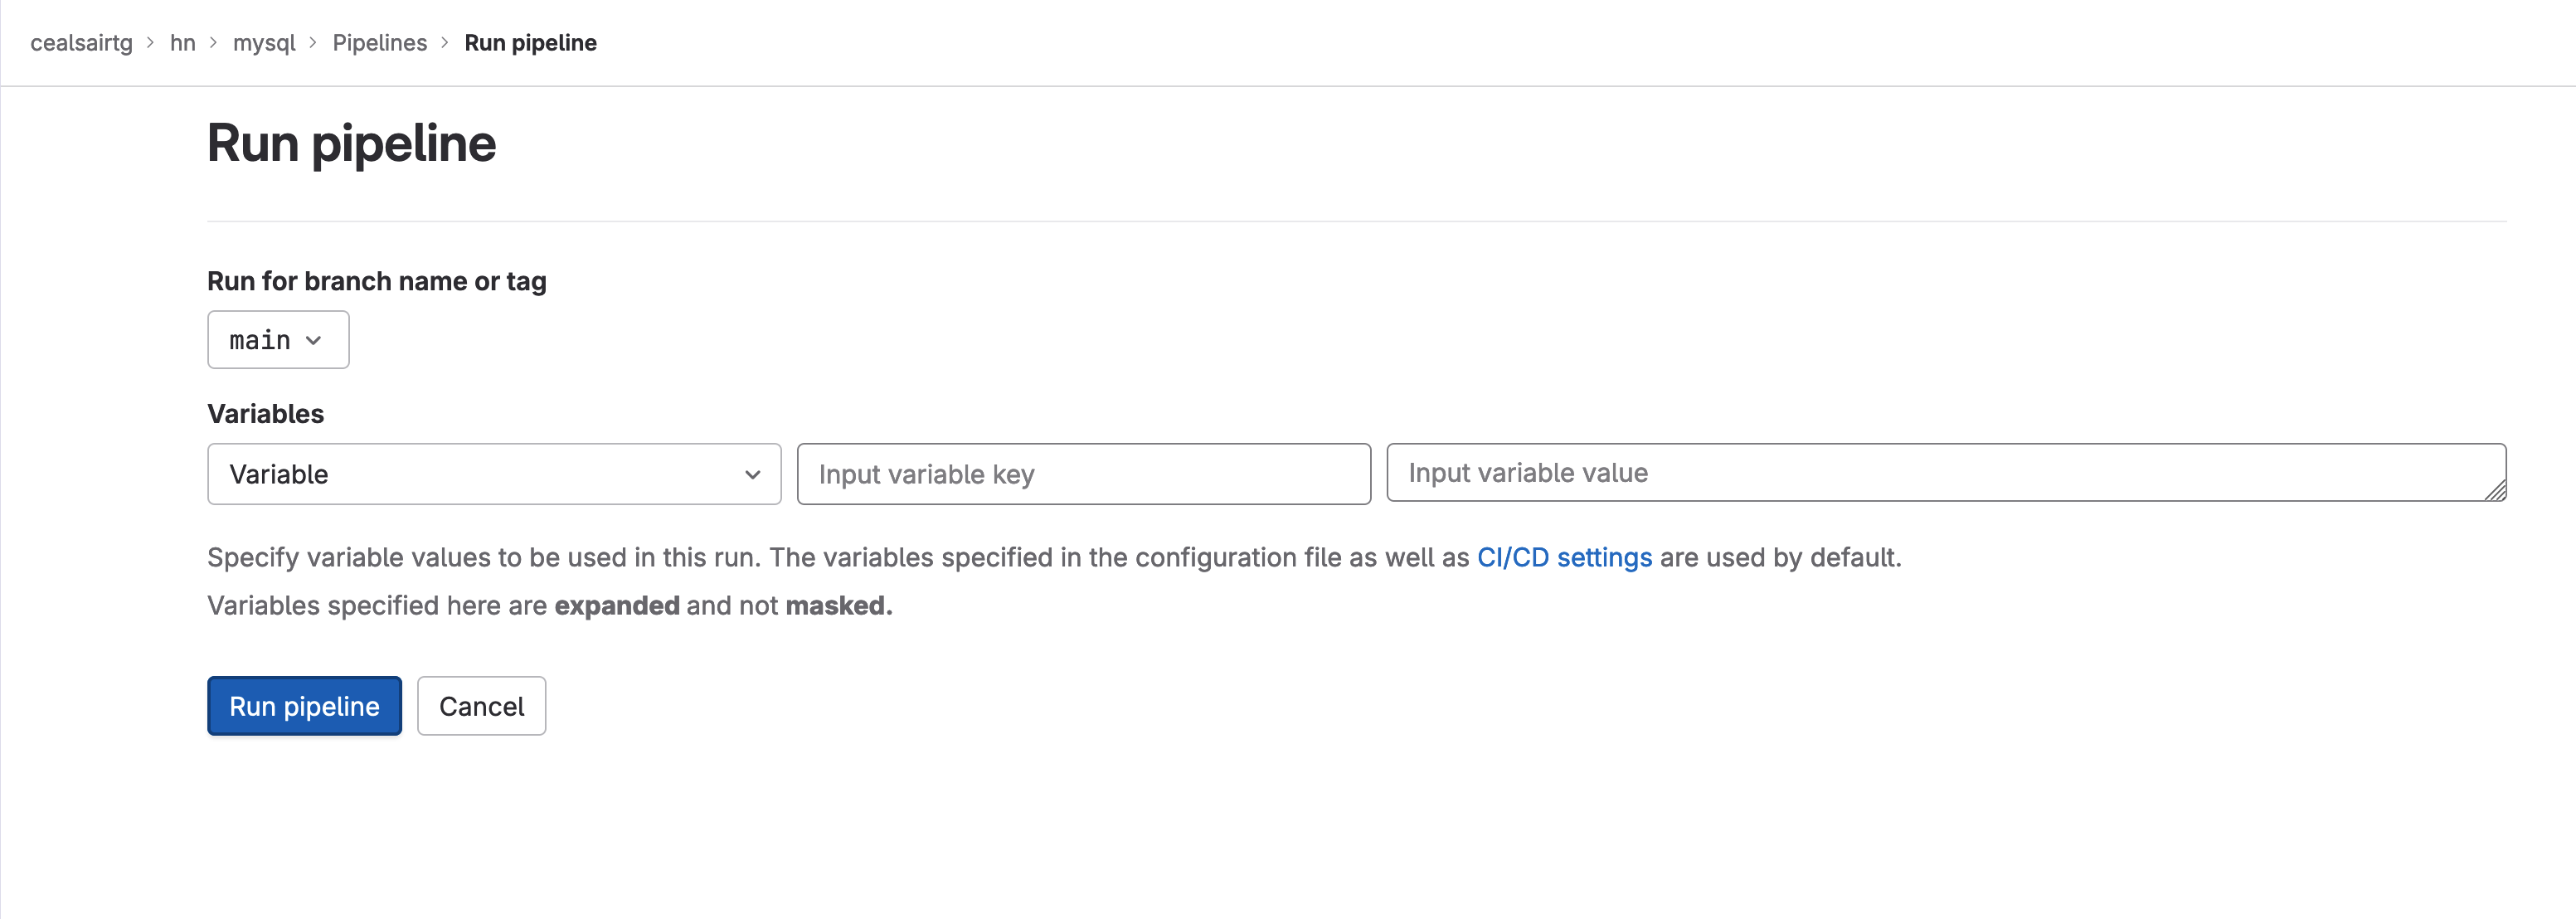 Clicking on the Run pipeline button to run the project "mysql" pipeline
- At this point you will see the pipeline stage and jobs. There are two jobs under the Build stage: create_and_load_db and clear_db.
 The "mysql" pipeline and its two manual jobs
- Click on the Play button (the right solid arrow) next to the create_and_load_db job name. This job will create a product table and a users table and populate them with dummy data. It will also create tables and indexes needed for storing all the session-related information as users log in and log out from the inventory system.
Note: The clear_db job should only be used if you’d like to erase all of the database resources created by the create_and_load_db job. The clear_db should only be used AFTER a failed run of the create_and_load_db job.
Now that we have the database ready to go, let’s set up the project that we will use for the creation of the feature flags.
Creating and importing projects
- Head back to group “hn” and inside of it, create a cluster management project (you can call it “cluster-management”) at the same level as the project you imported above. You can view this instructional video (up to minute 6:09) to see how to do this. While applying the steps in the video for this tutorial, adjust the variables values from the video to this post as described in the following notes:
Note 1: Make sure to create and set the KUBE_CONTEXT and KUBE_NAMESPACE variable in group “hn” and to these values:
| variable | value |
|---|---|
| KUBE_CONTEXT | <your path>/hn/flux-config:k8s-agent |
| KUBE_NAMESPACE | my-apps |
For example, in my case <your path> was “tech-marketing/sandbox/hn/flux-config:k8s-agent”. In your case, it will be different. If <your path> is at the root of your GitLab workspace, then it would be empty so the value of KUBE_CONTEXT would be “hn/flux-config:k8s-agent”.
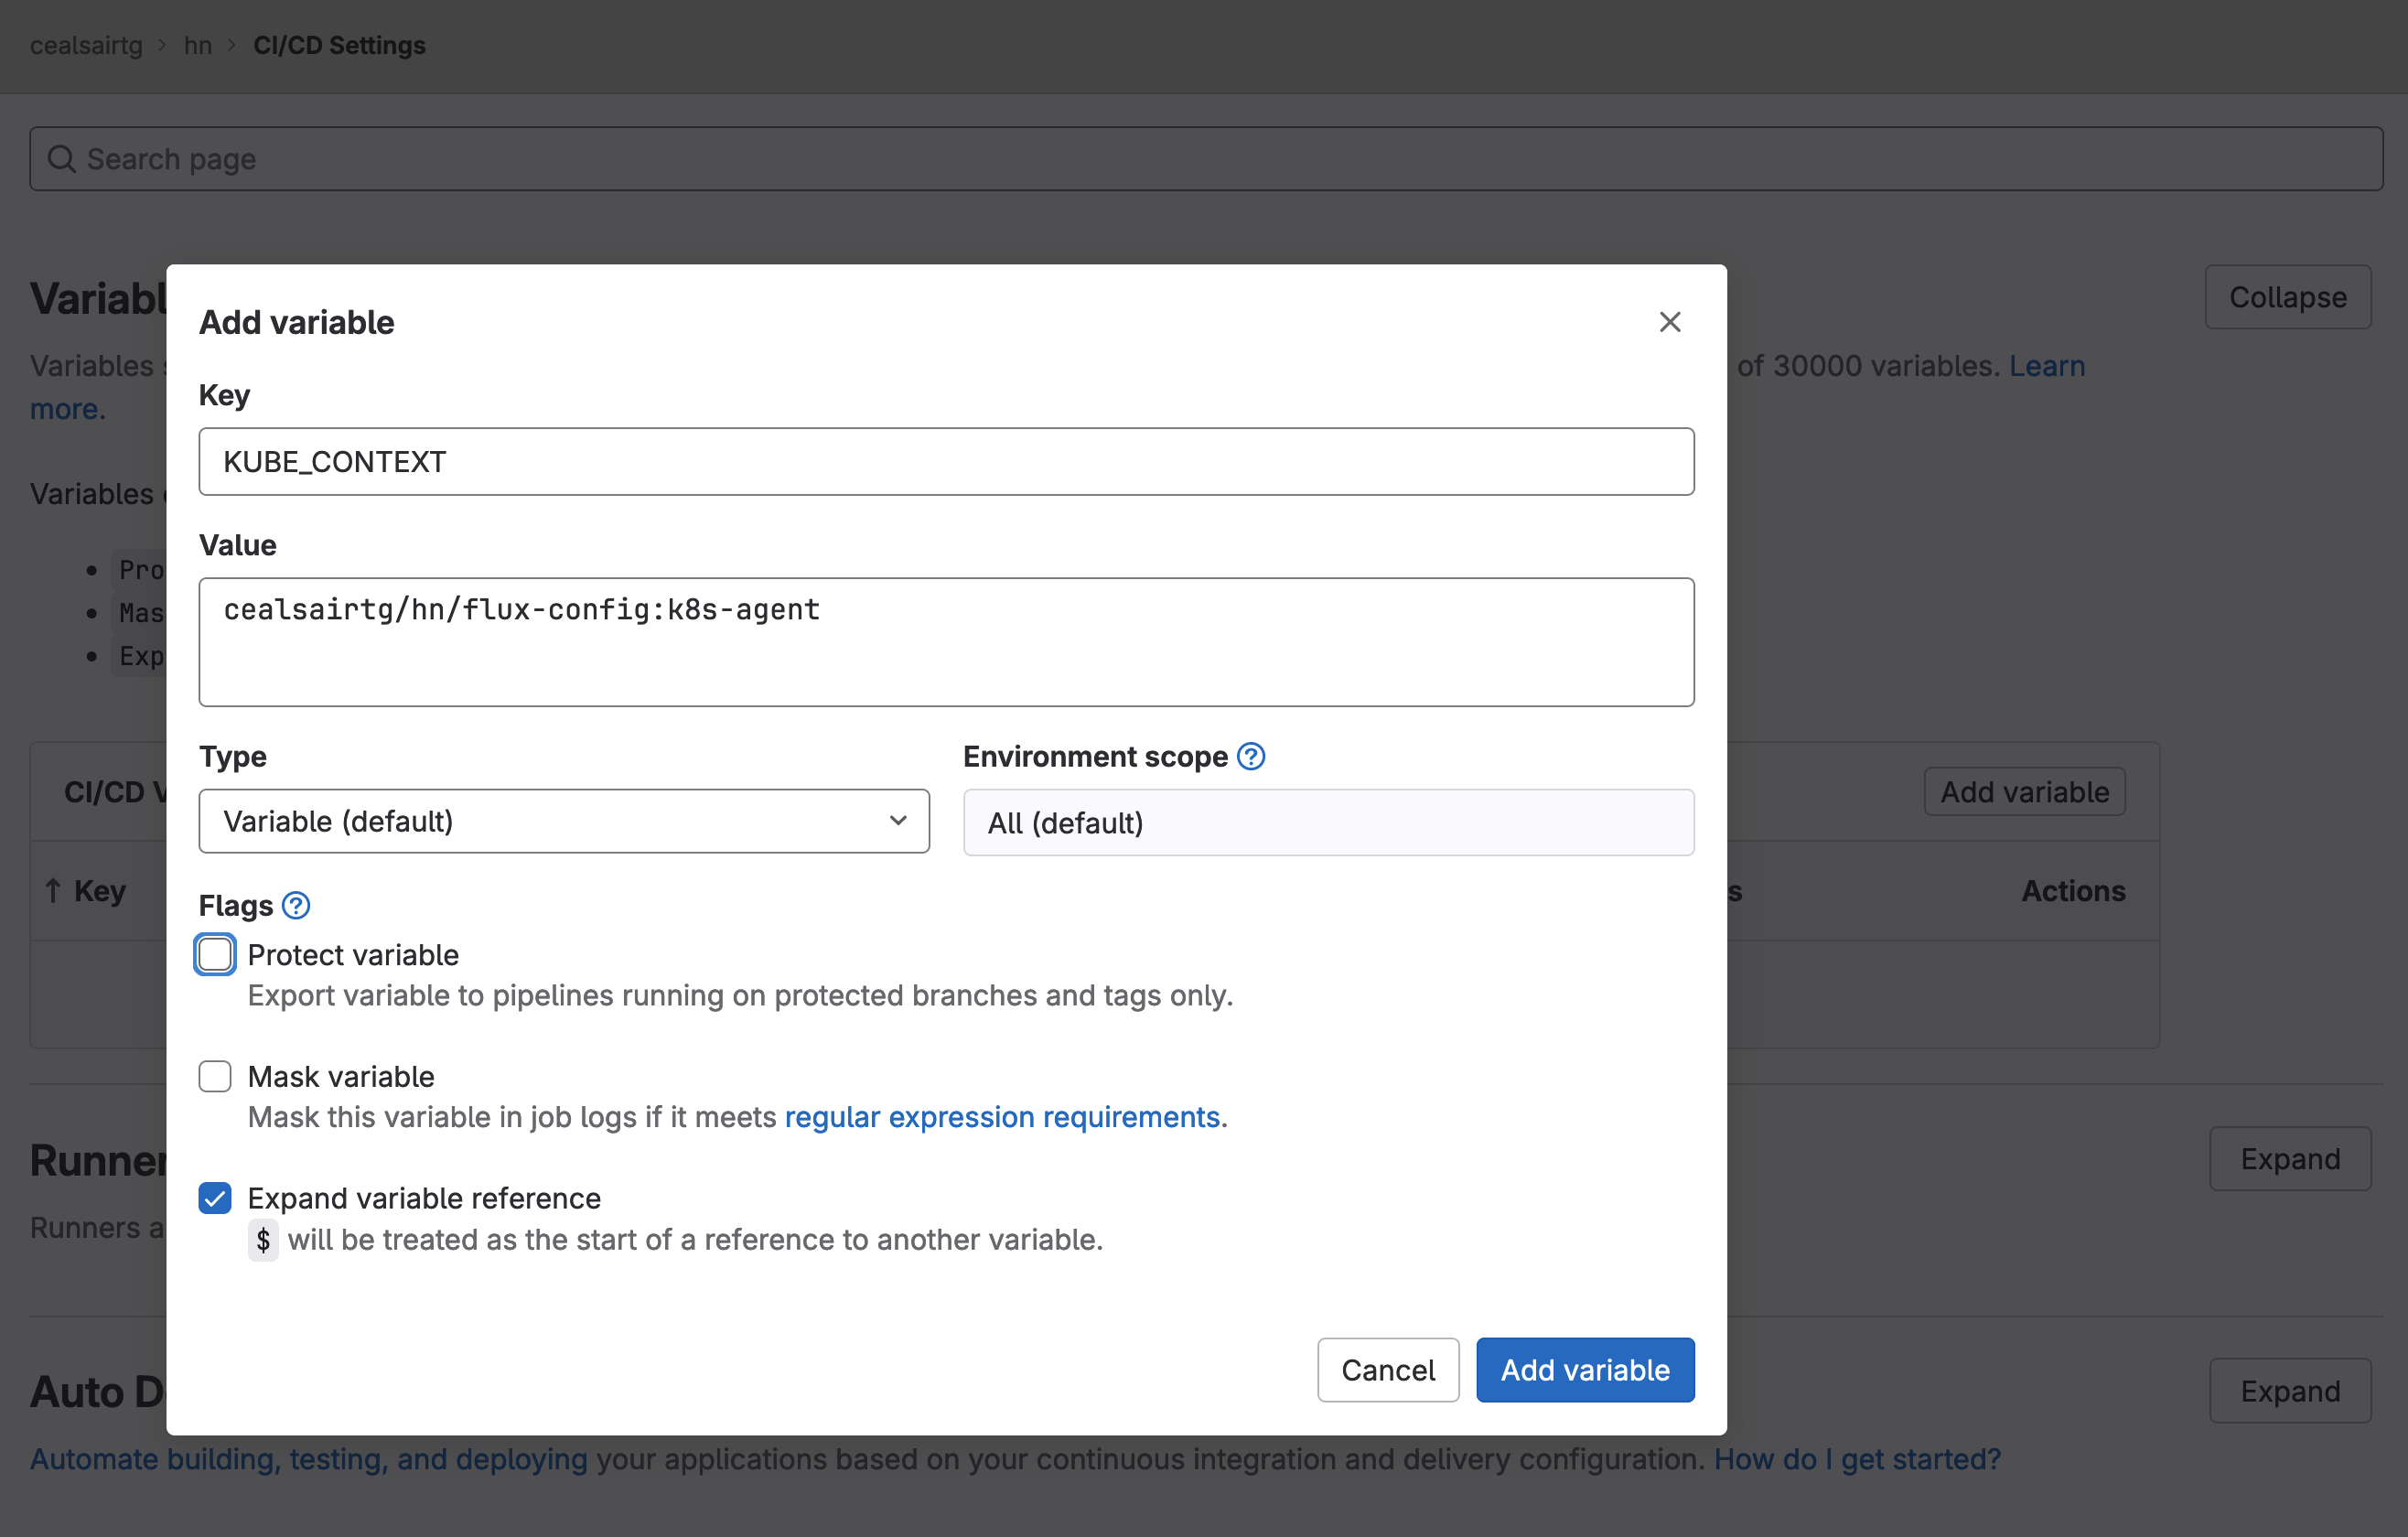 Adding variable KUBE_CONTEXT in group "hn"
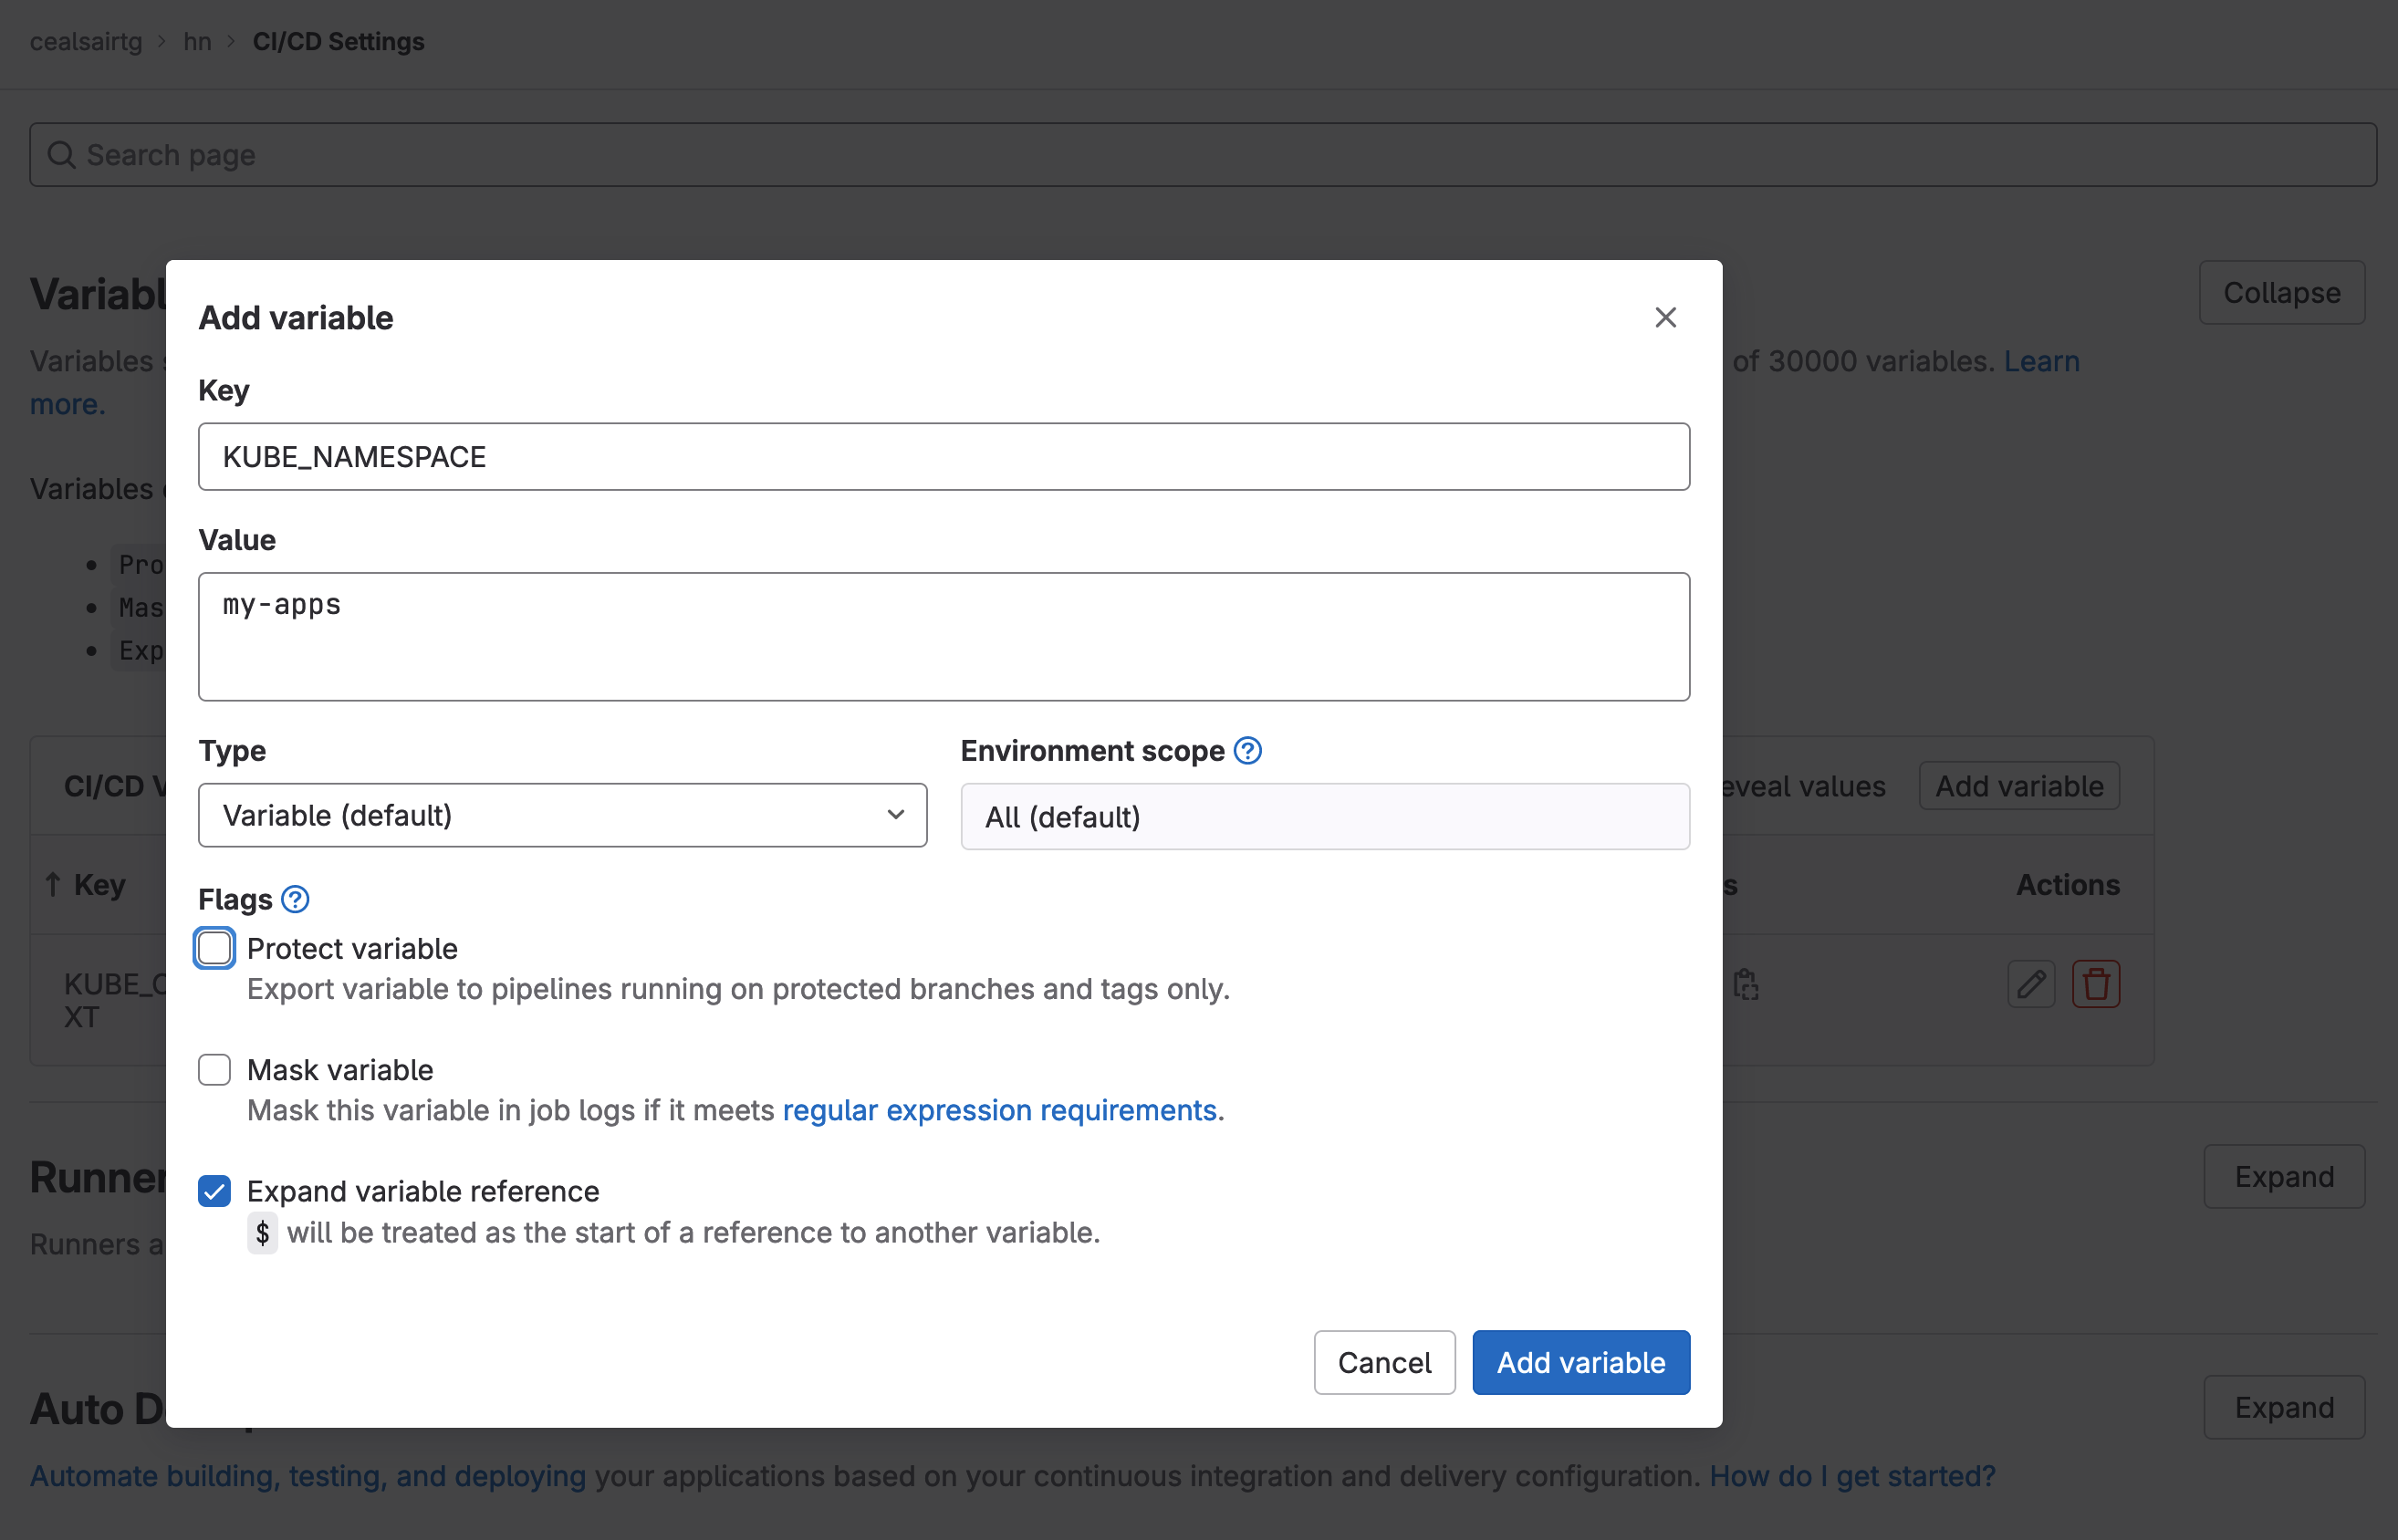 Adding variable KUBE_NAMESPACE in group "hn"
Note 2: As an FYI, when uncommenting the GitLab managed apps in the “helmfile.yaml” file, there will not be one for Prometheus. So, you will only uncomment the lines for ingress and cert-manager.
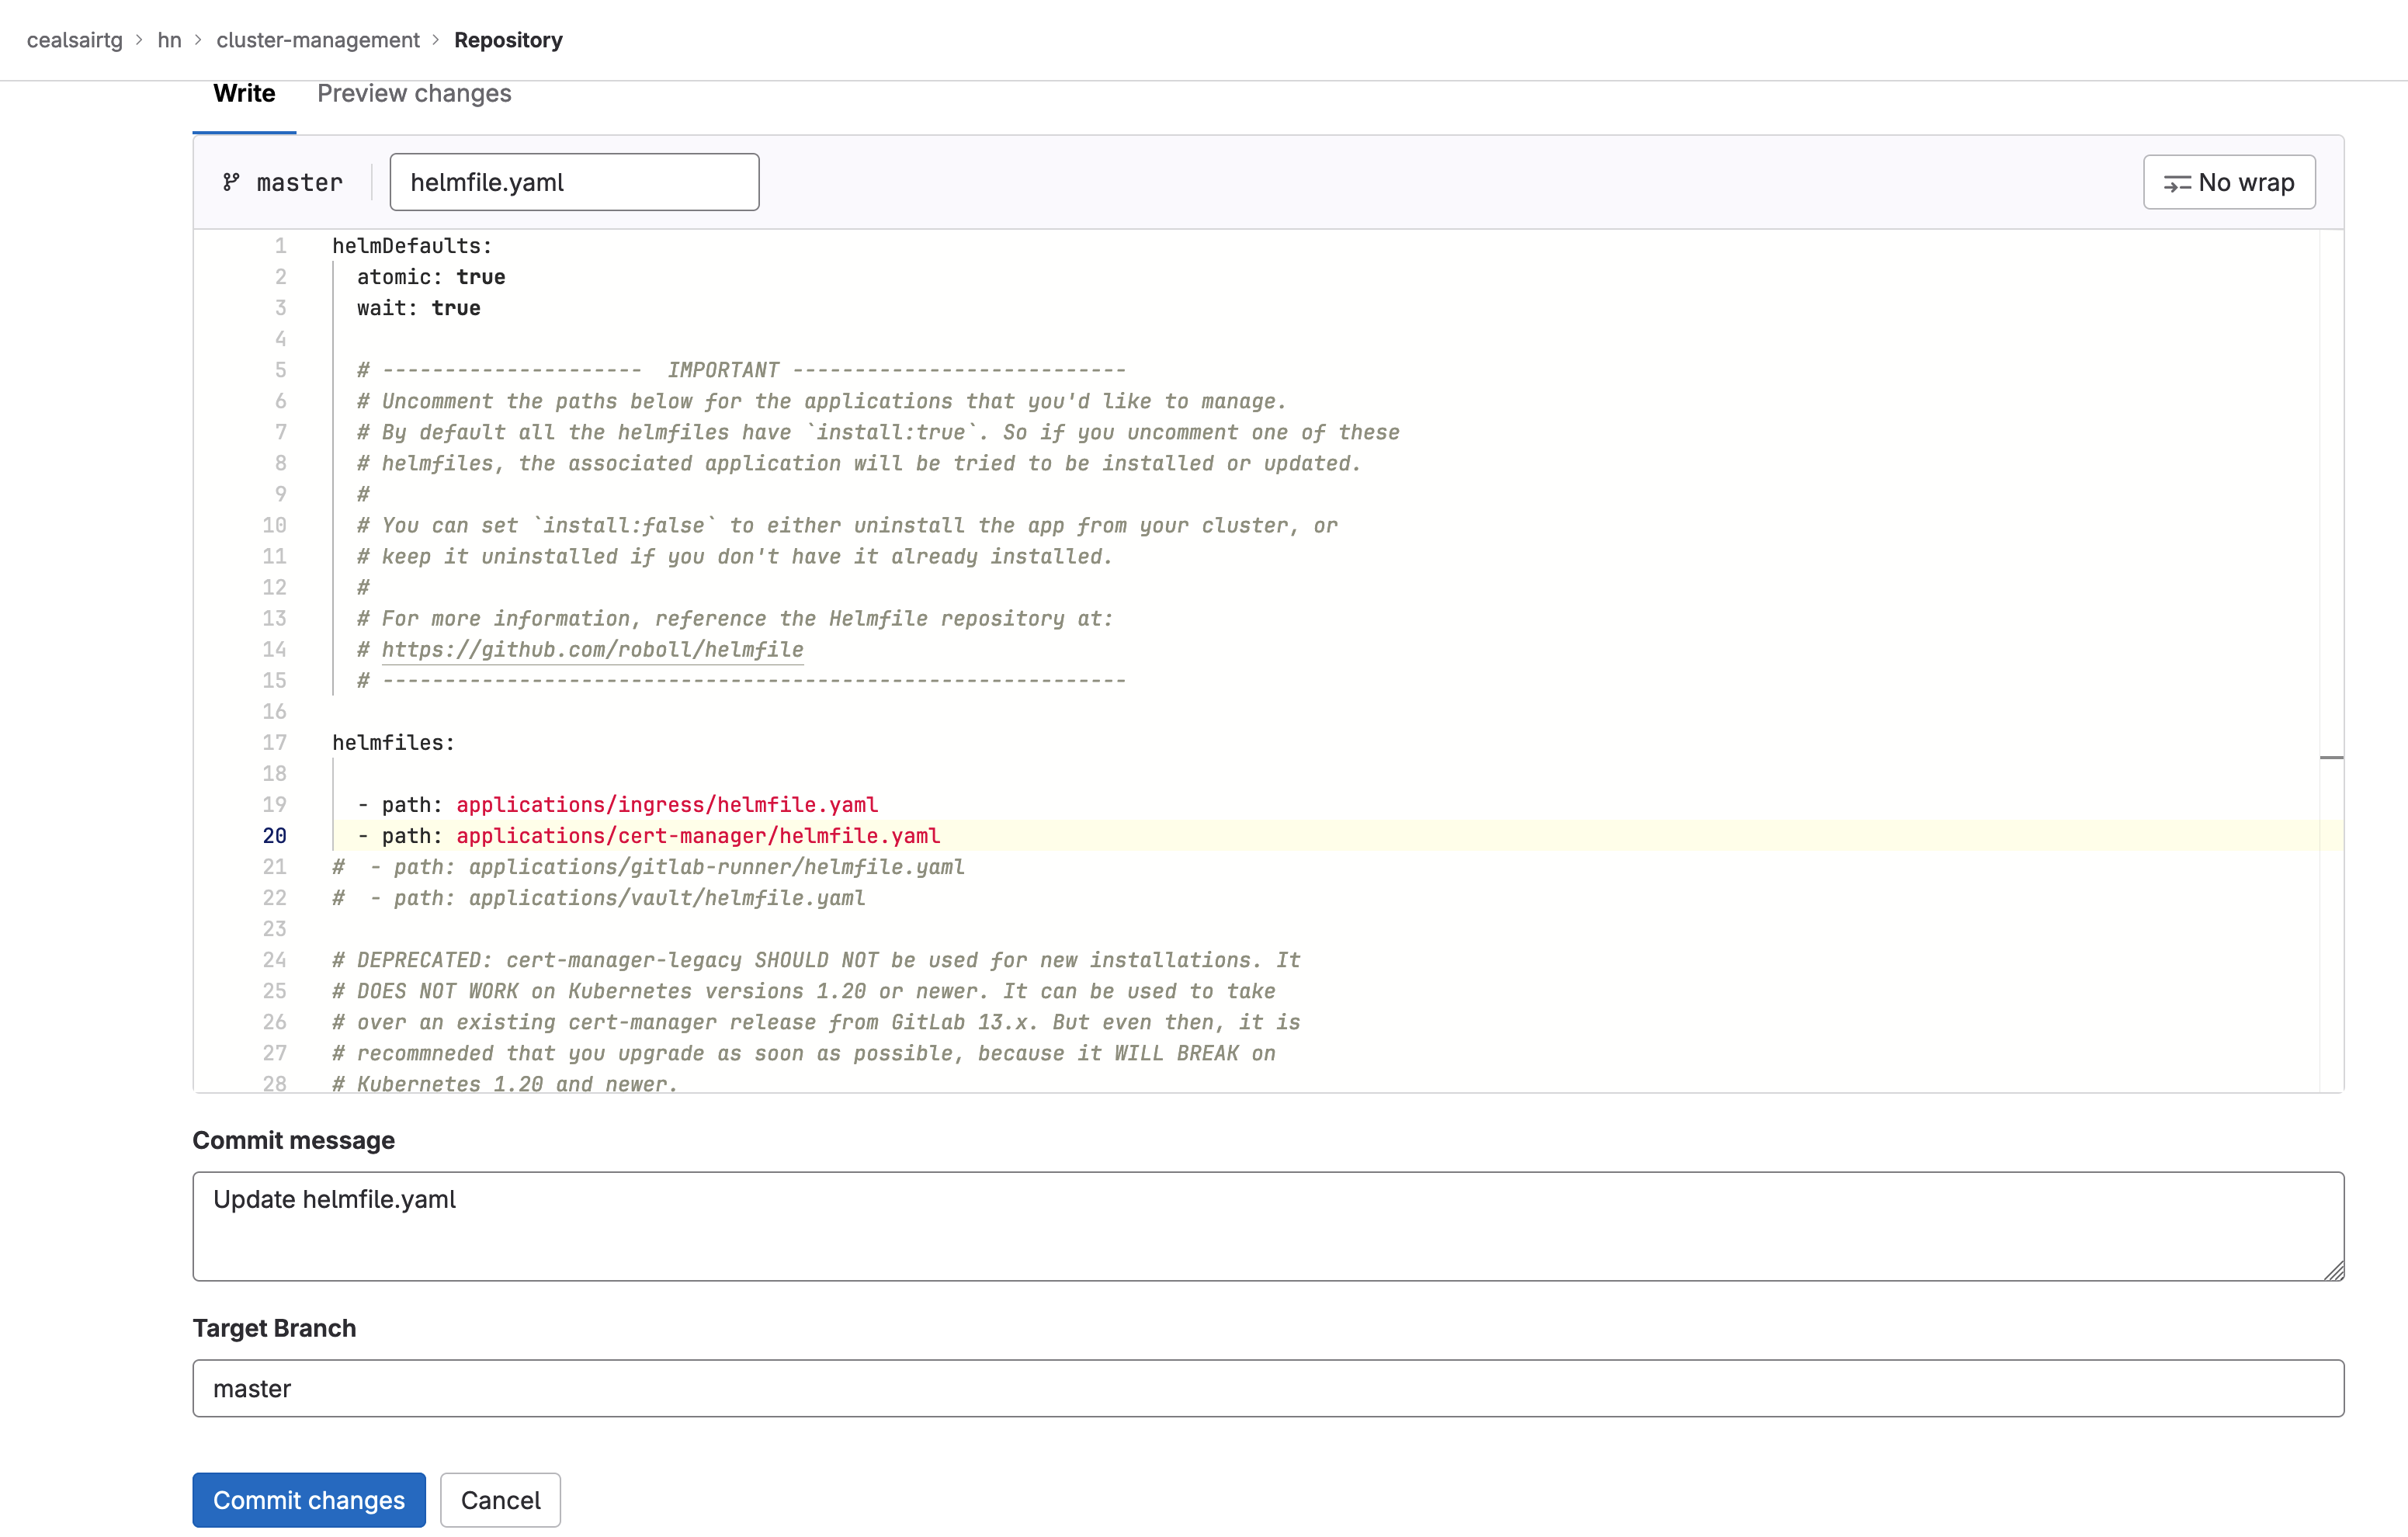 Uncommenting lines for ingress and cert-manager in file "helmfile.yaml"
Note 3: When the pipeline for project “cluster-management” runs, you will notice that the job “sync” is a manual job. You will need to click on its Play (right arrow next to its name) button to run it. Wait until the “sync” job completes successfully before continuing.
 Job "sync" is manual so you need to press on the Play button next to its name
Note 4: Once the pipeline finishes, for your convenience, here is the command you need to run from a Terminal window to get the external IP address of your cluster:
kubectl --namespace gitlab-managed-apps get services -o wide -w ingress-ingress-nginx-controller
 Running
 kubectl command to get the ingress IP address to the cluster
Create and set a variable KUBE_INGRESS_BASE_DOMAIN in group “hn” and set it to the external IP address of your cluster and append the suffix “.nip.io” to it.
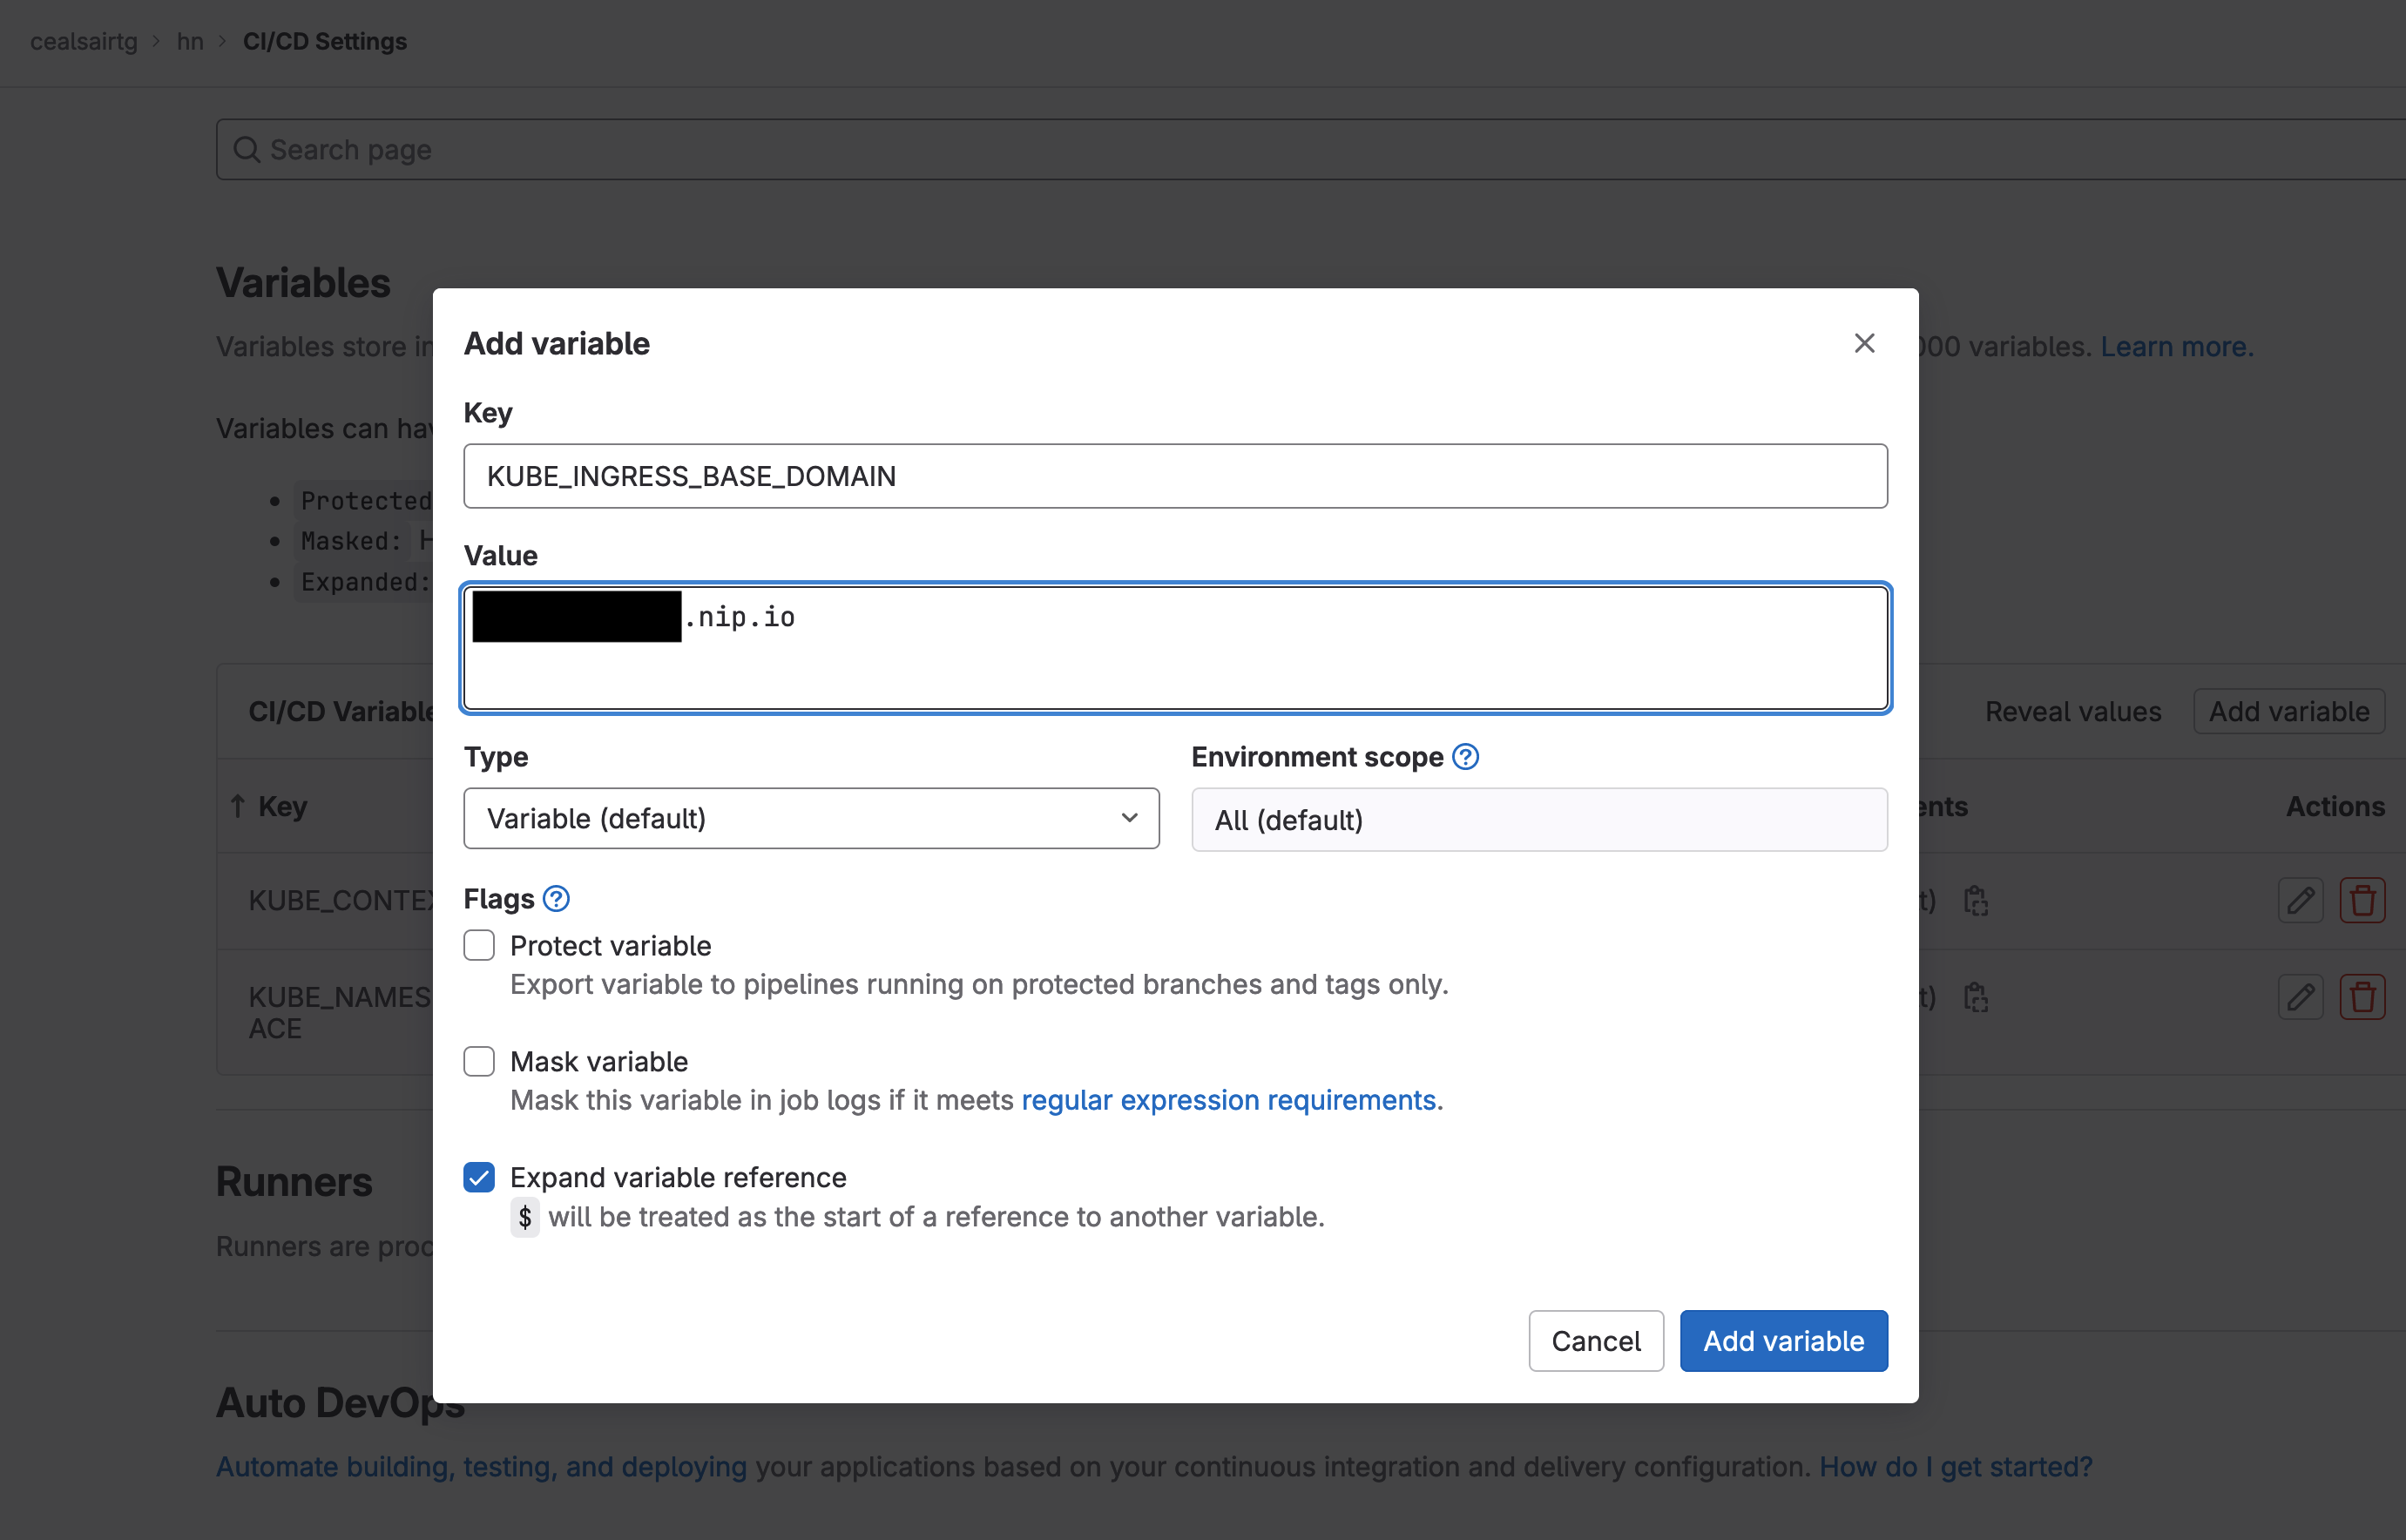 Addding variable KUBE_INGRESS_BASE_DOMAIN in group "hn"
- Inside group “hn”, create a new project. Click on the New project button. On the Create new project window, click on the Import project tile and then click on the Repository by URL button.
- This will expand the window and show fields to enter the URL of the repository you would like to import. In the field Git repository URL, enter the following:
Leave the rest of the fields with their defaults.
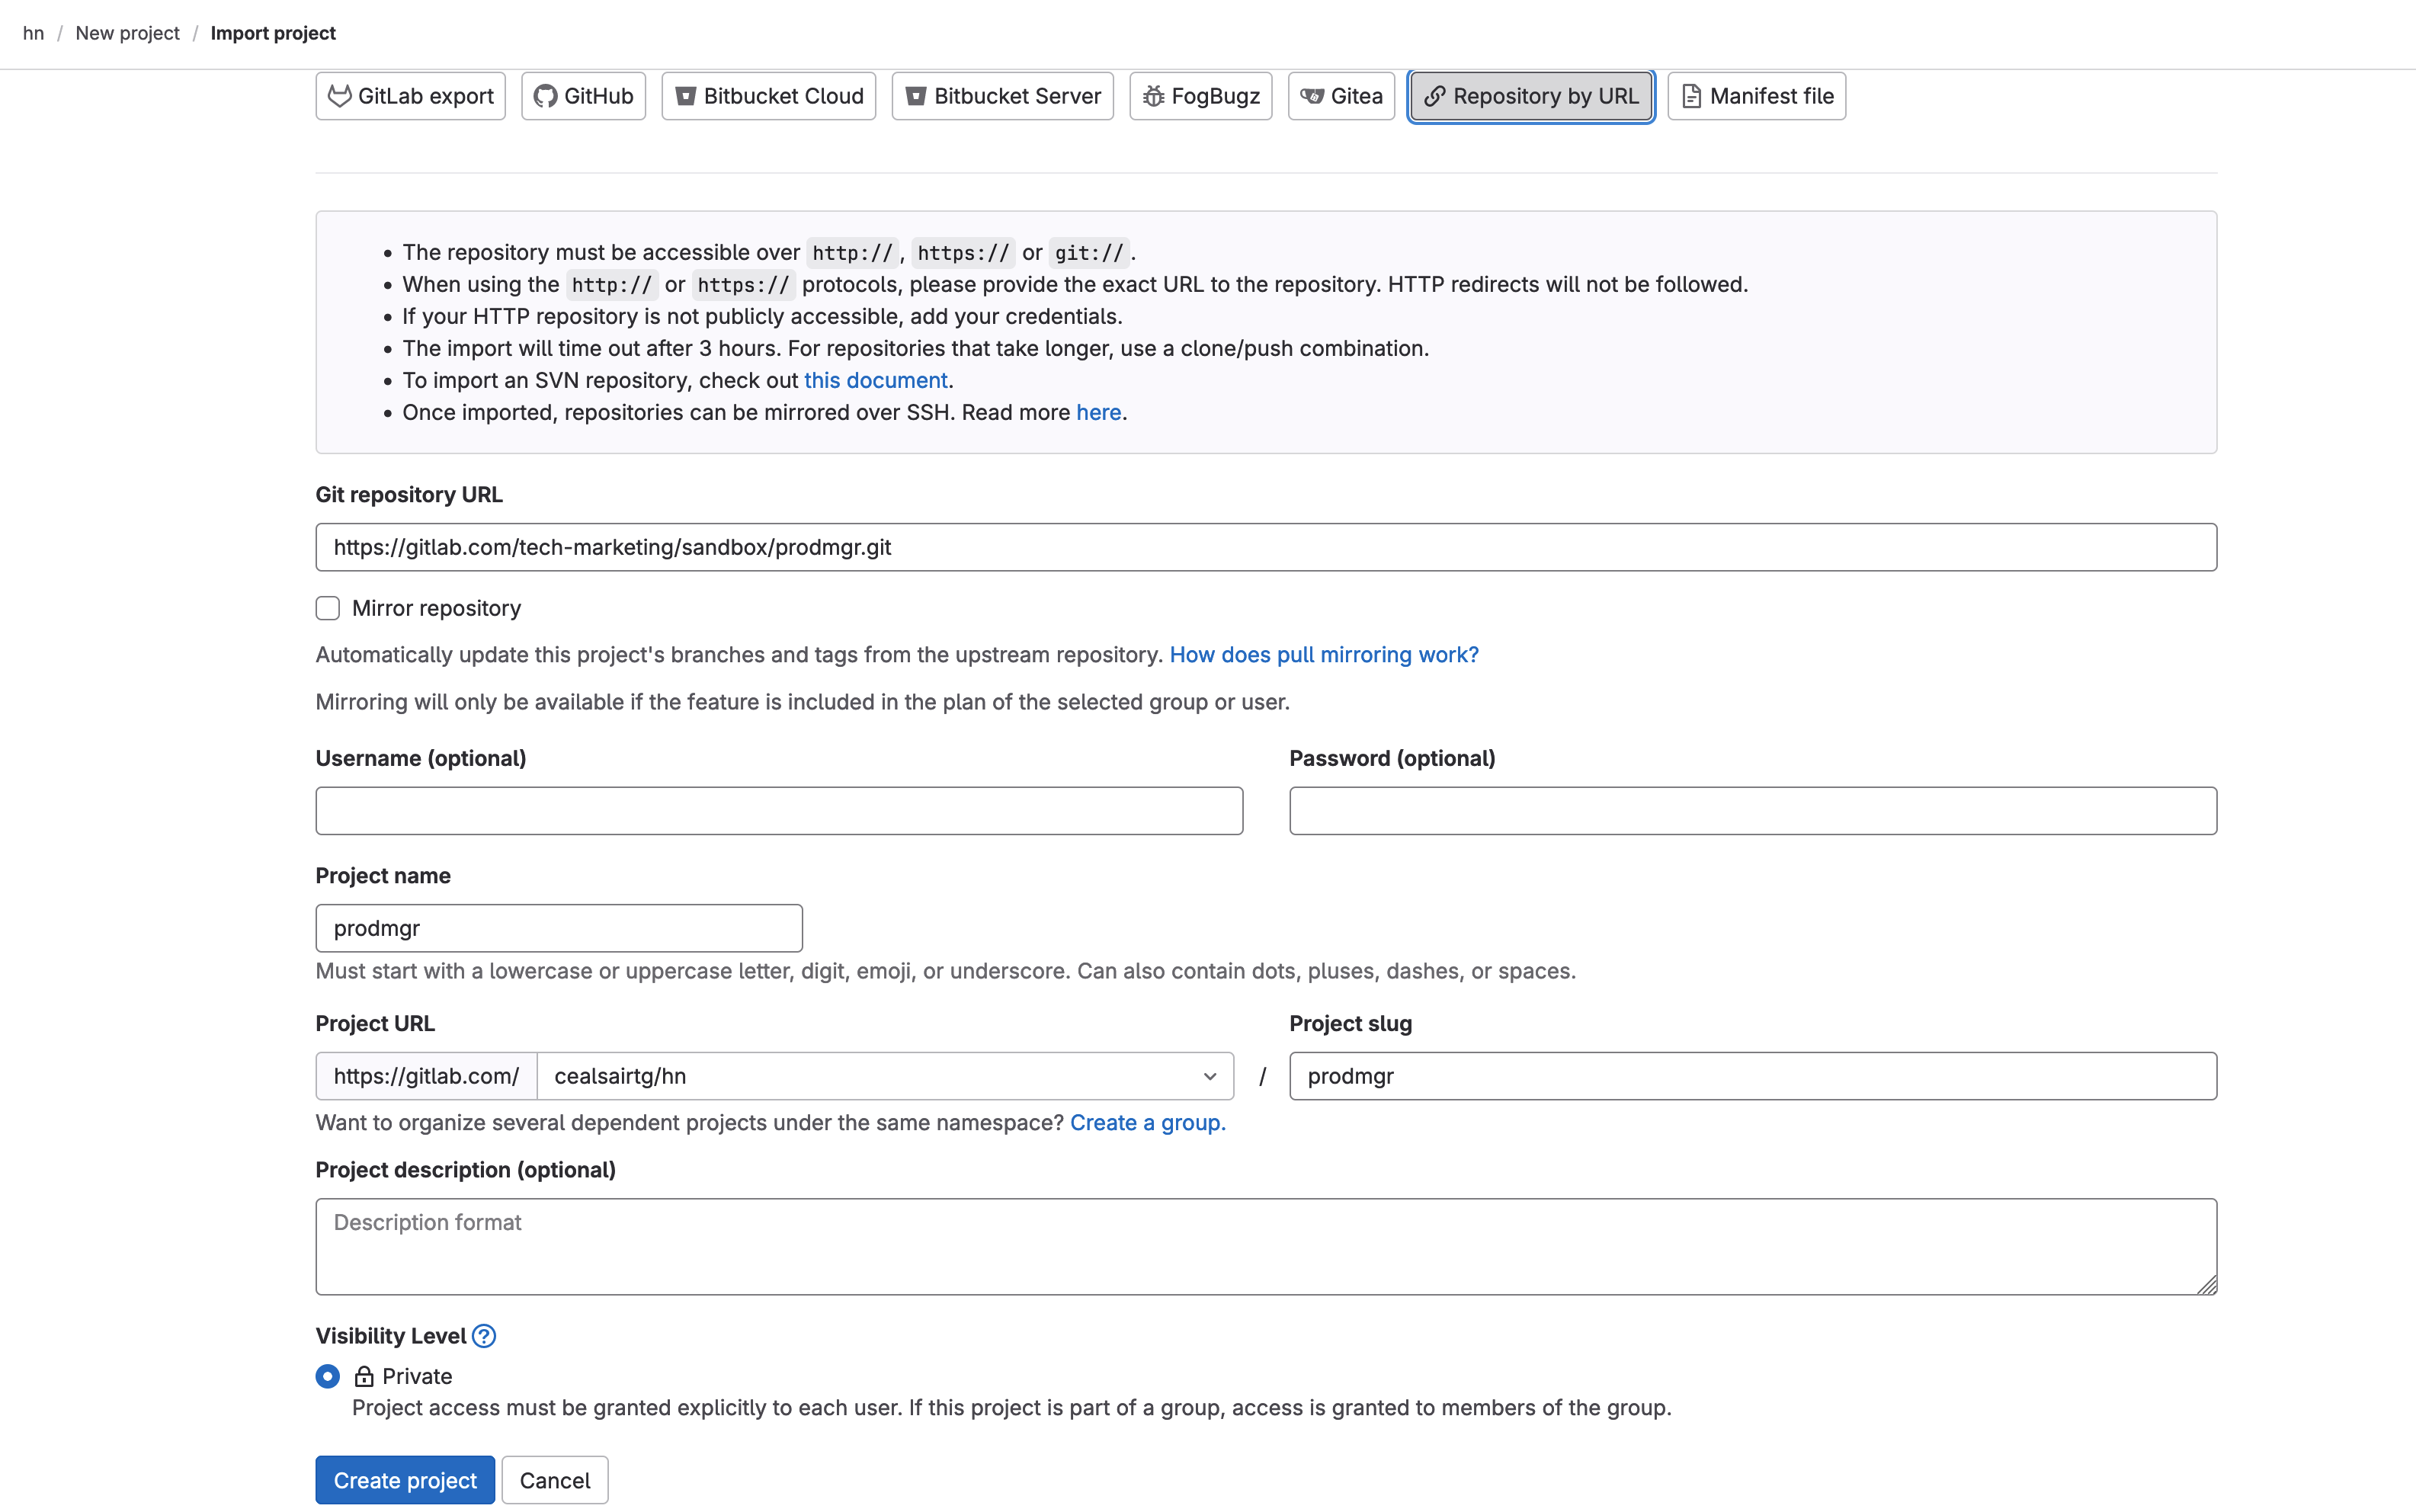 Importing project "prodmgr" into group "hn"
- Click on the Create project button at the bottom of the screen. You will see an Importing in progress message temporarily on your screen.
- In project “prodmgr”, create a pipeline file and make sure to name it “.gitlab-ci.yml”. Paste the following code block into the empty file:
include:
  template: Auto-DevOps.gitlab-ci.yml

variables:
  K8S_SECRET_TF_VAR_dbusername: "sasha"
  K8S_SECRET_TF_VAR_dbpassword: "password"
  TEST_DISABLED: "true"
  CODE_QUALITY_DISABLED: "true"
  LICENSE_MANAGEMENT_DISABLED: "true"
  BROWSER_PERFORMANCE_DISABLED: "true"
  LOAD_PERFORMANCE_DISABLED: "true"
  SAST_DISABLED: "true"
  SECRET_DETECTION_DISABLED: "true"
  DEPENDENCY_SCANNING_DISABLED: "true"
  CONTAINER_SCANNING_DISABLED: "true"
  DAST_DISABLED: "true"
  REVIEW_DISABLED: "true"
  CODE_INTELLIGENCE_DISABLED: "true"
  CLUSTER_IMAGE_SCANNING_DISABLED: "true"
  POSTGRES_ENABLED: "false"
  STAGING_ENABLED: "true"
  INCREMENTAL_ROLLOUT_MODE: "manual"
Click on the Commit changes button ensuring that the Target branch is main.
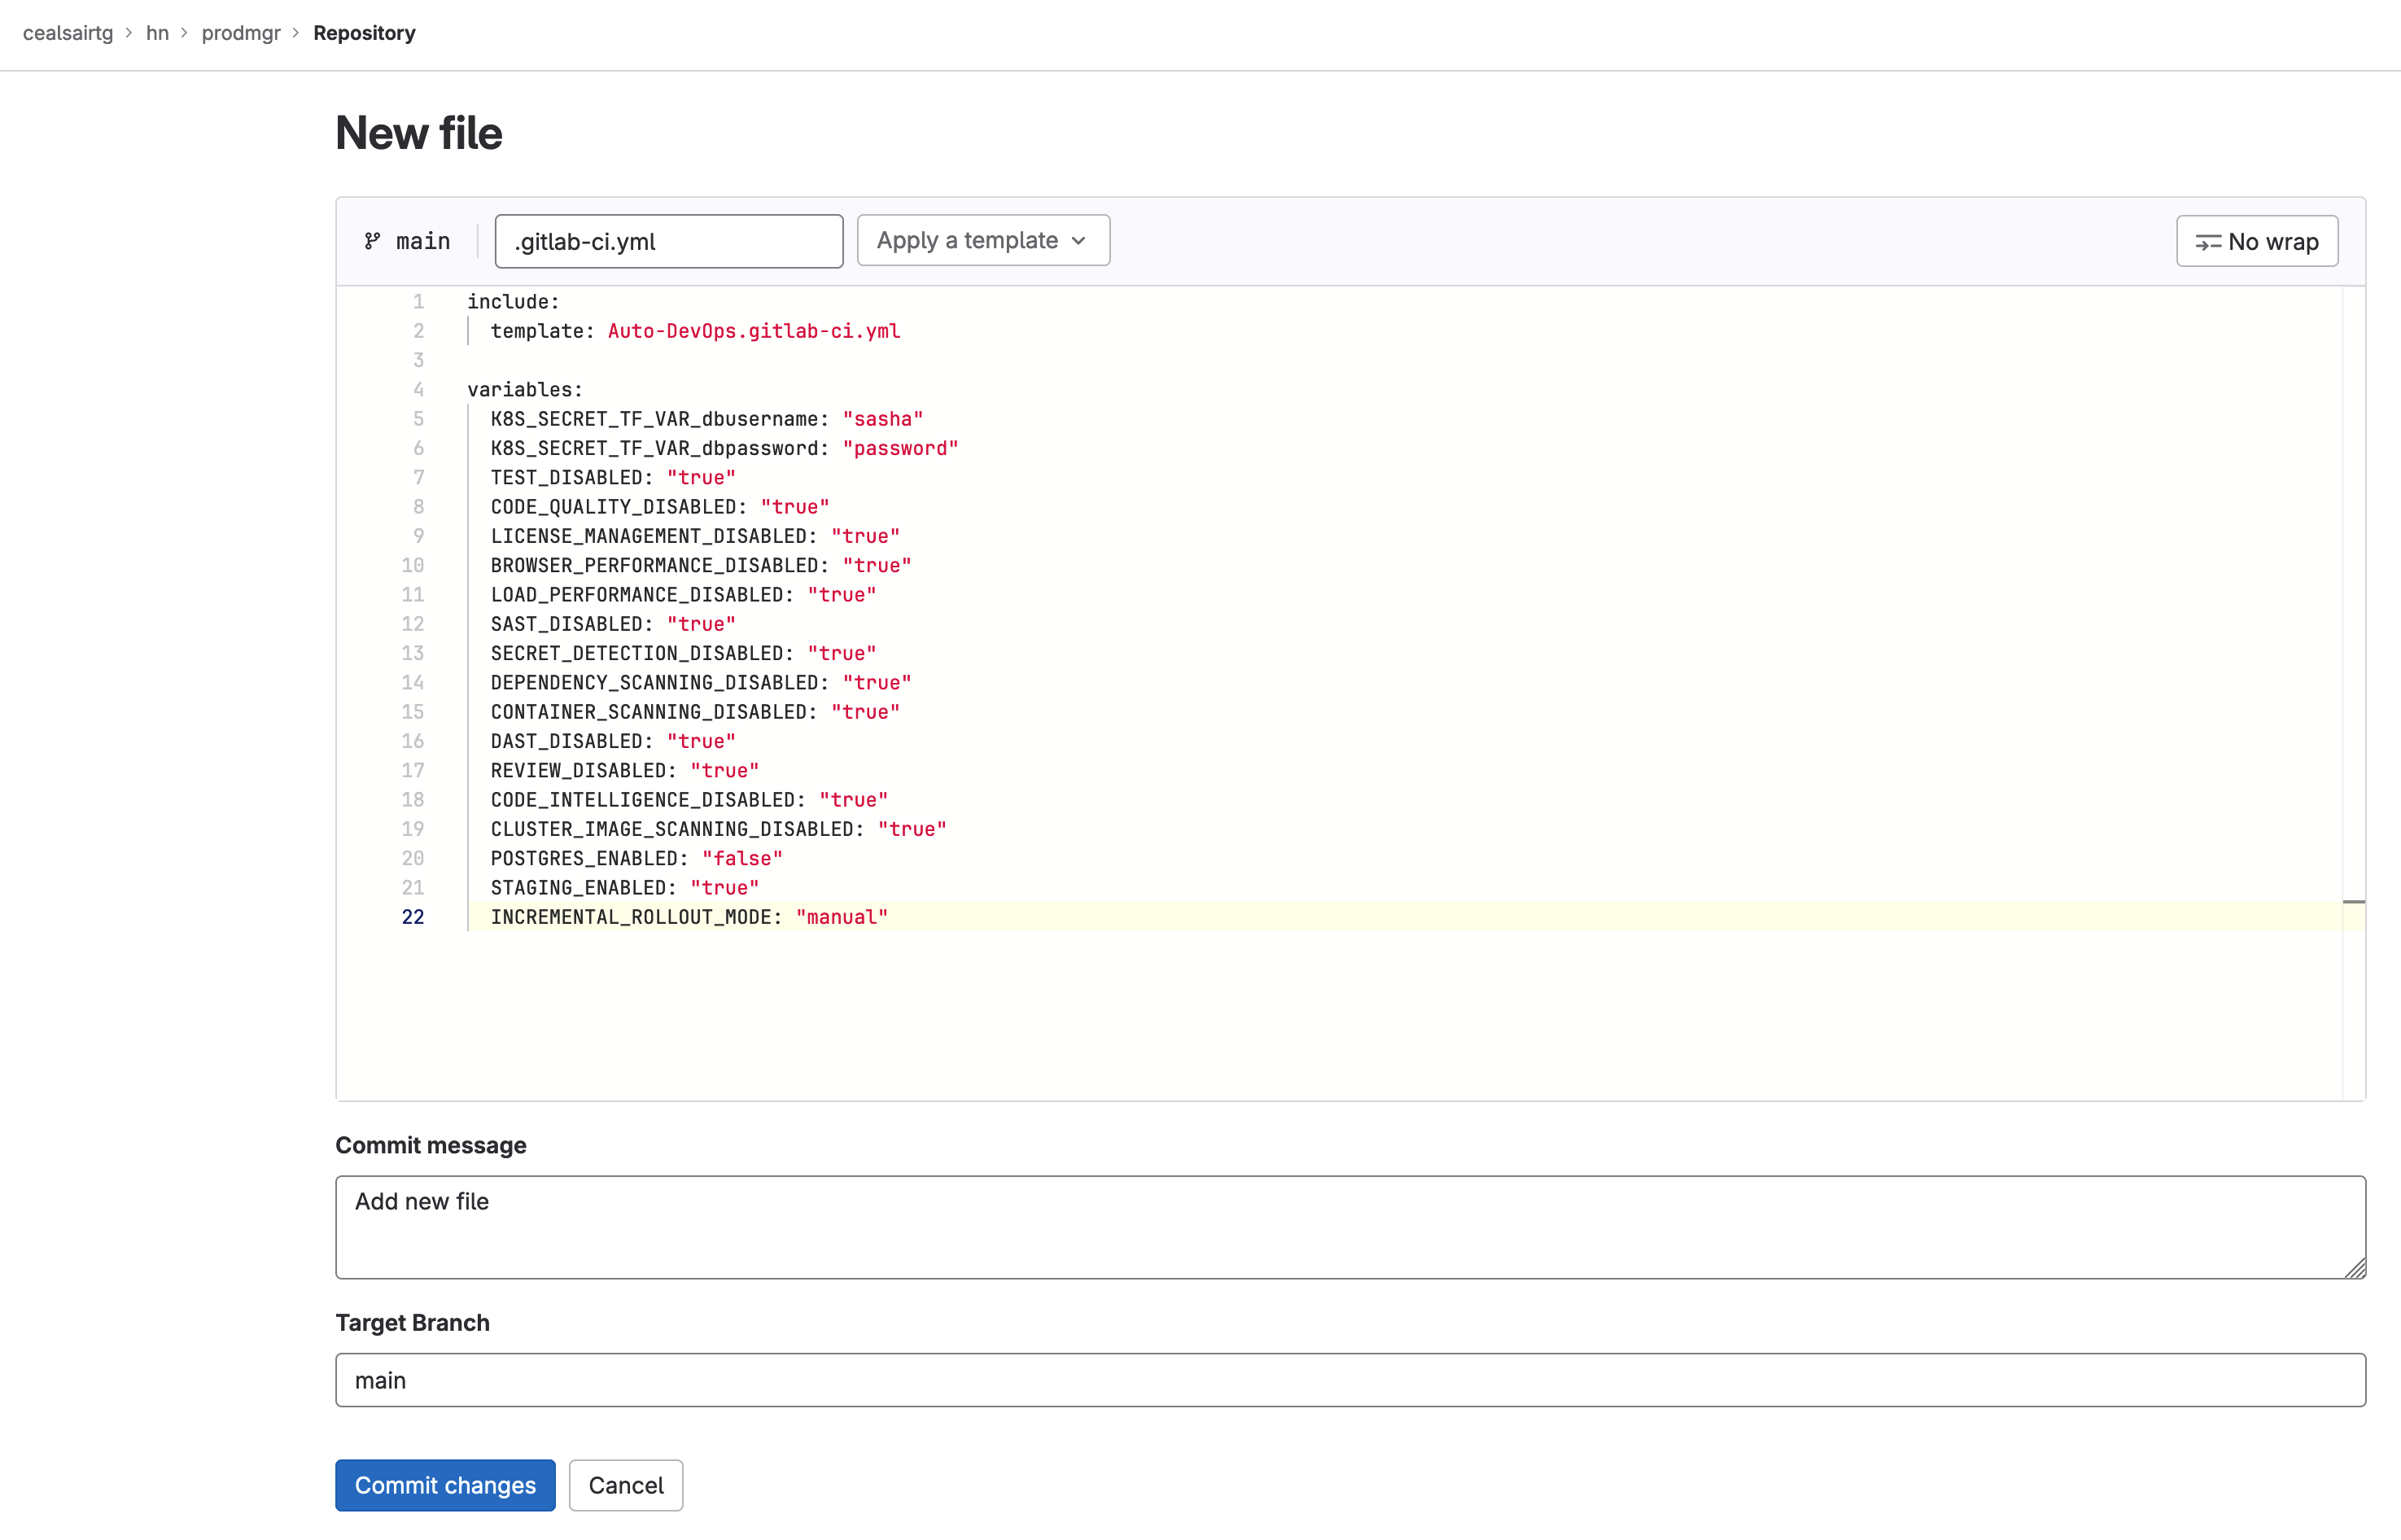 Creating an Auto-DevOps-based pipeline for project "prodmgr"
- The previous step builds the application and deploys it to the staging environment. Once deployed to staging, head to Build > Pipelines and click on the most recently executed pipeline (should be the first one in the list). Click on the pipeline to display it and then deploy the application to production by clicking on “rollout 100%” job.
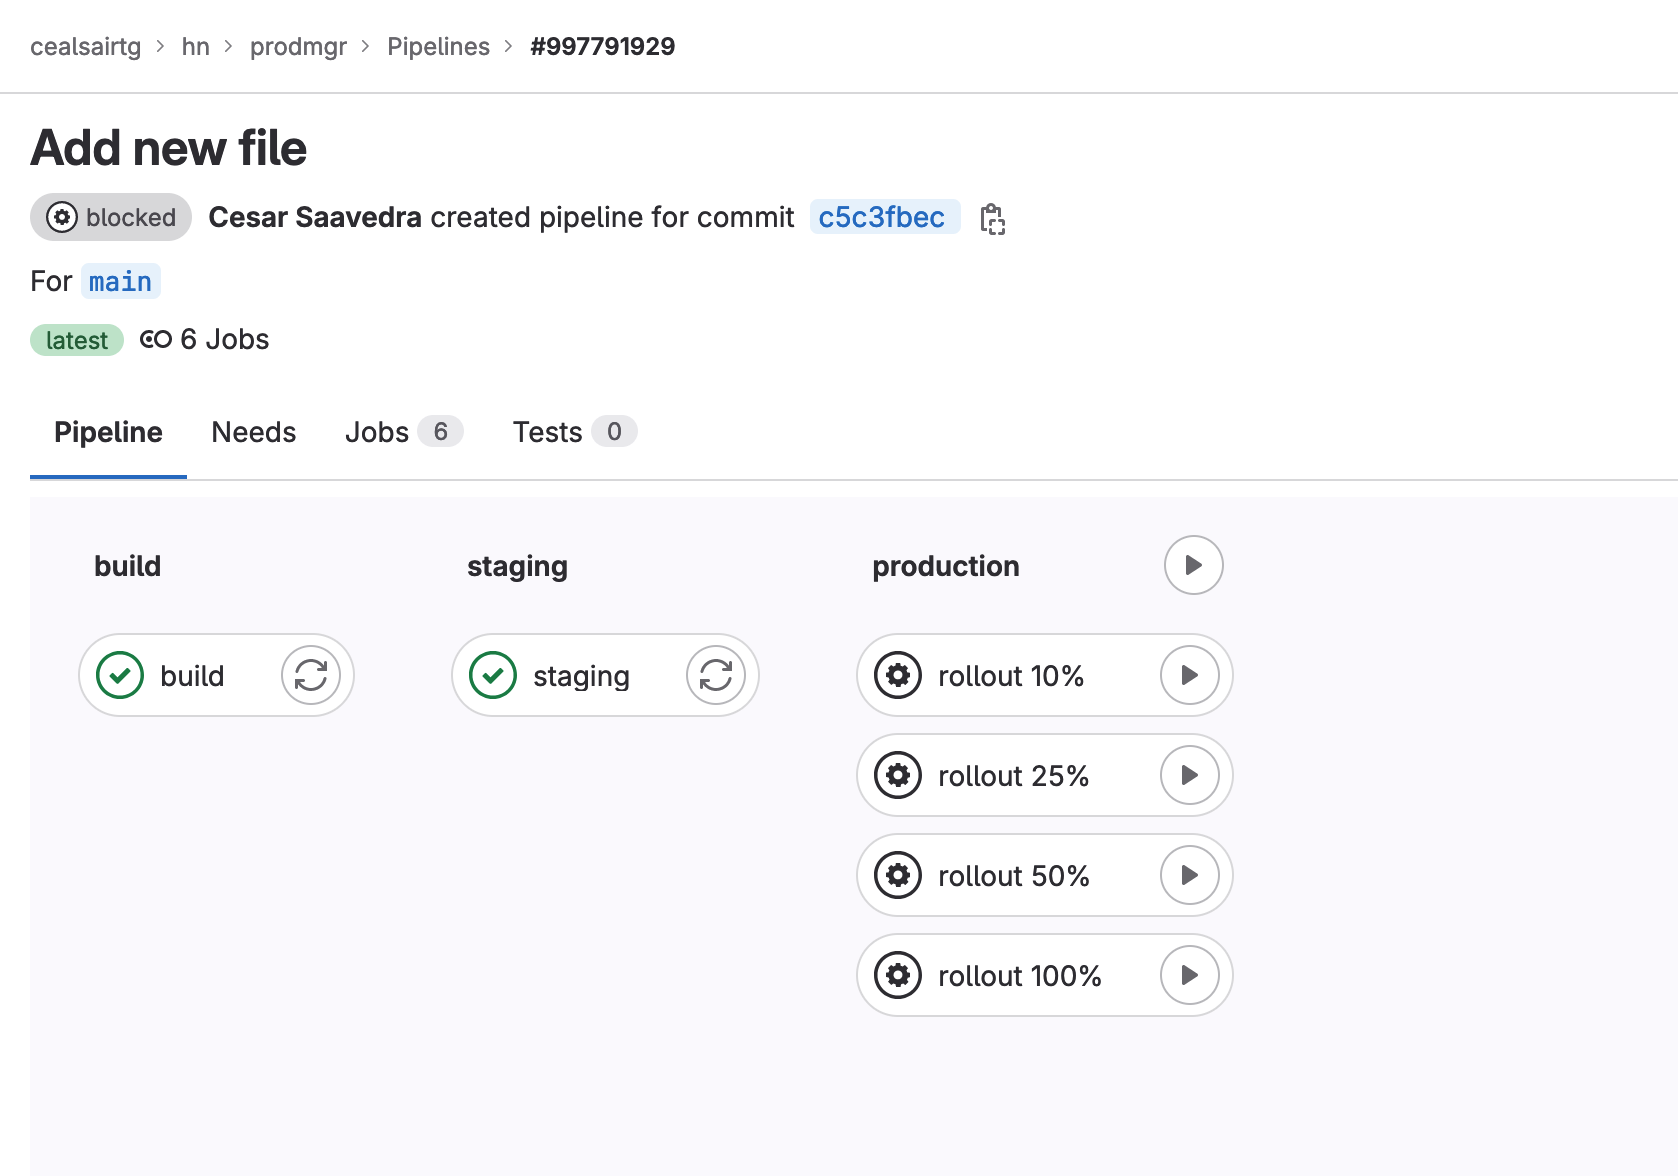 To deploy the application to production, click on the rollout 100% Play button
At this point, you have a running application in the staging and production environments in your Kubernetes cluster. Let’s start creating a feature flag.
Creating a new feature flag
- In project “prodmgr”, select Deploy > Feature flags from your left vertical navigation menu.
Creating a user list
- Click on the link View user lists on the top right hand side of your screen.
- Click on the New user list button on the top right hand side of your screen.
- In the Name field of the user list, enter “prods-in-alphabetical-order-userlist” and then click on the Create button.
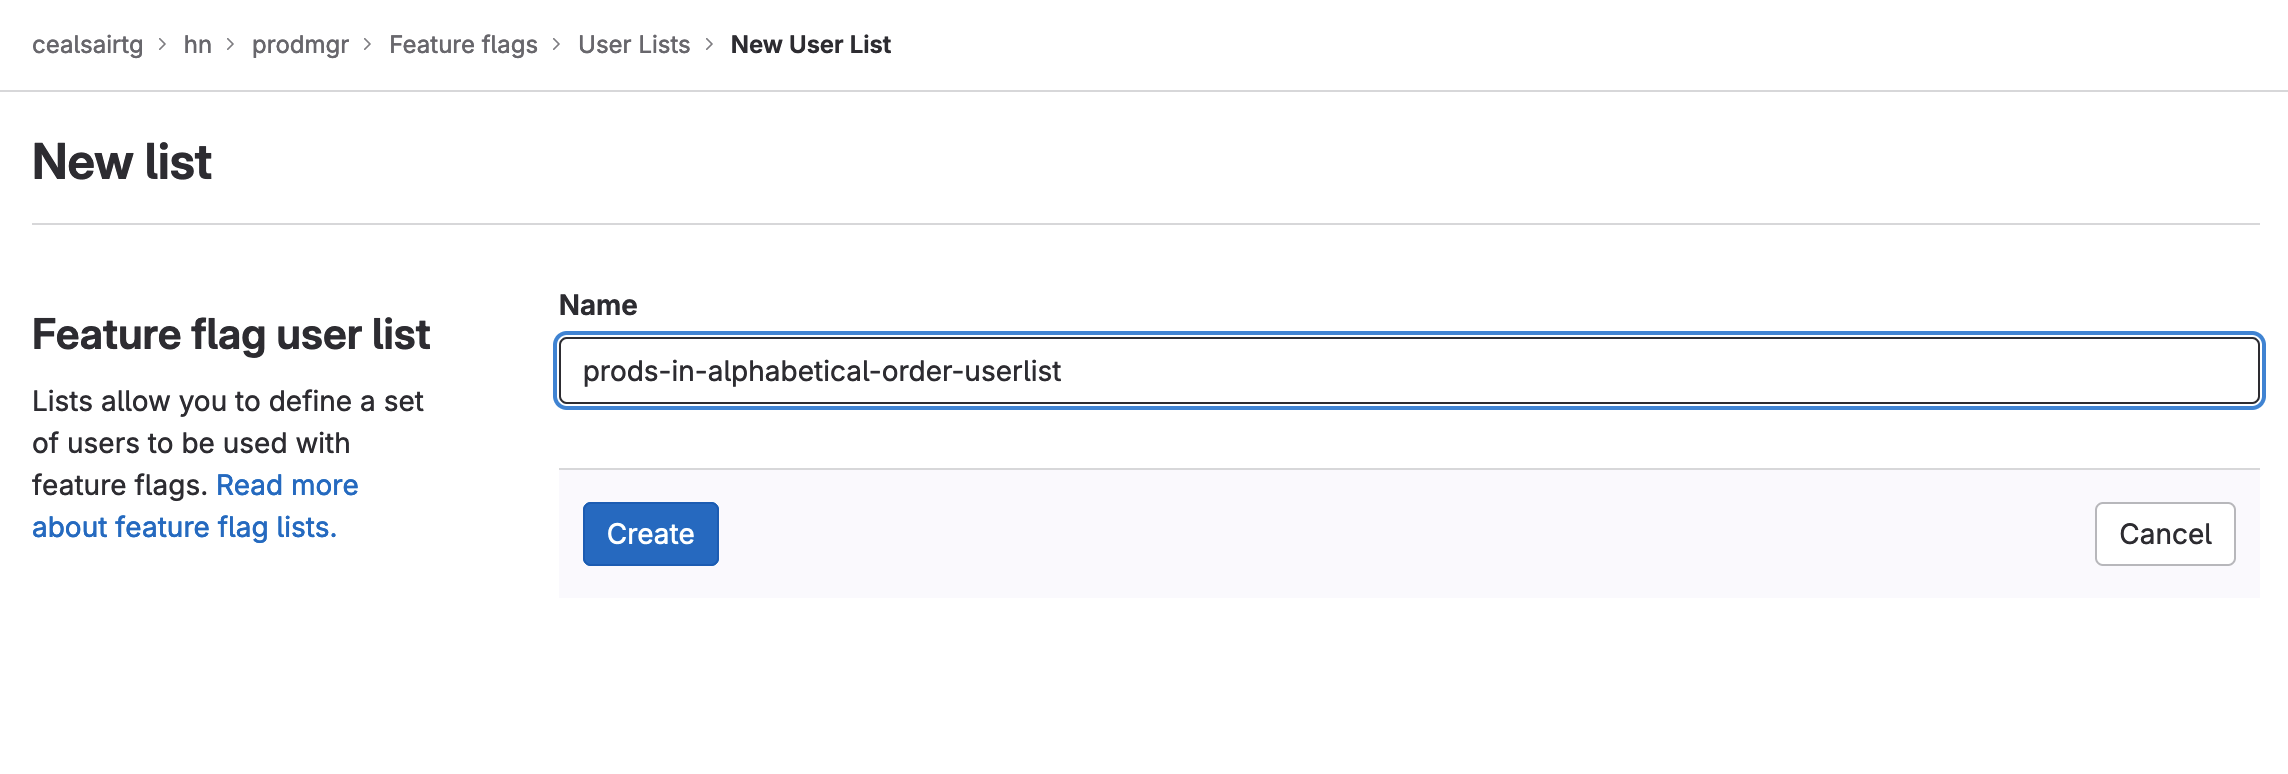 Creating user list named "prods-in-alphabetical-order-userlist”
- On the next screen, click on the Add Users button on the top right hand side of your screen.
- In the User IDs text field, enter the following two email addresses and then click on the Add button:
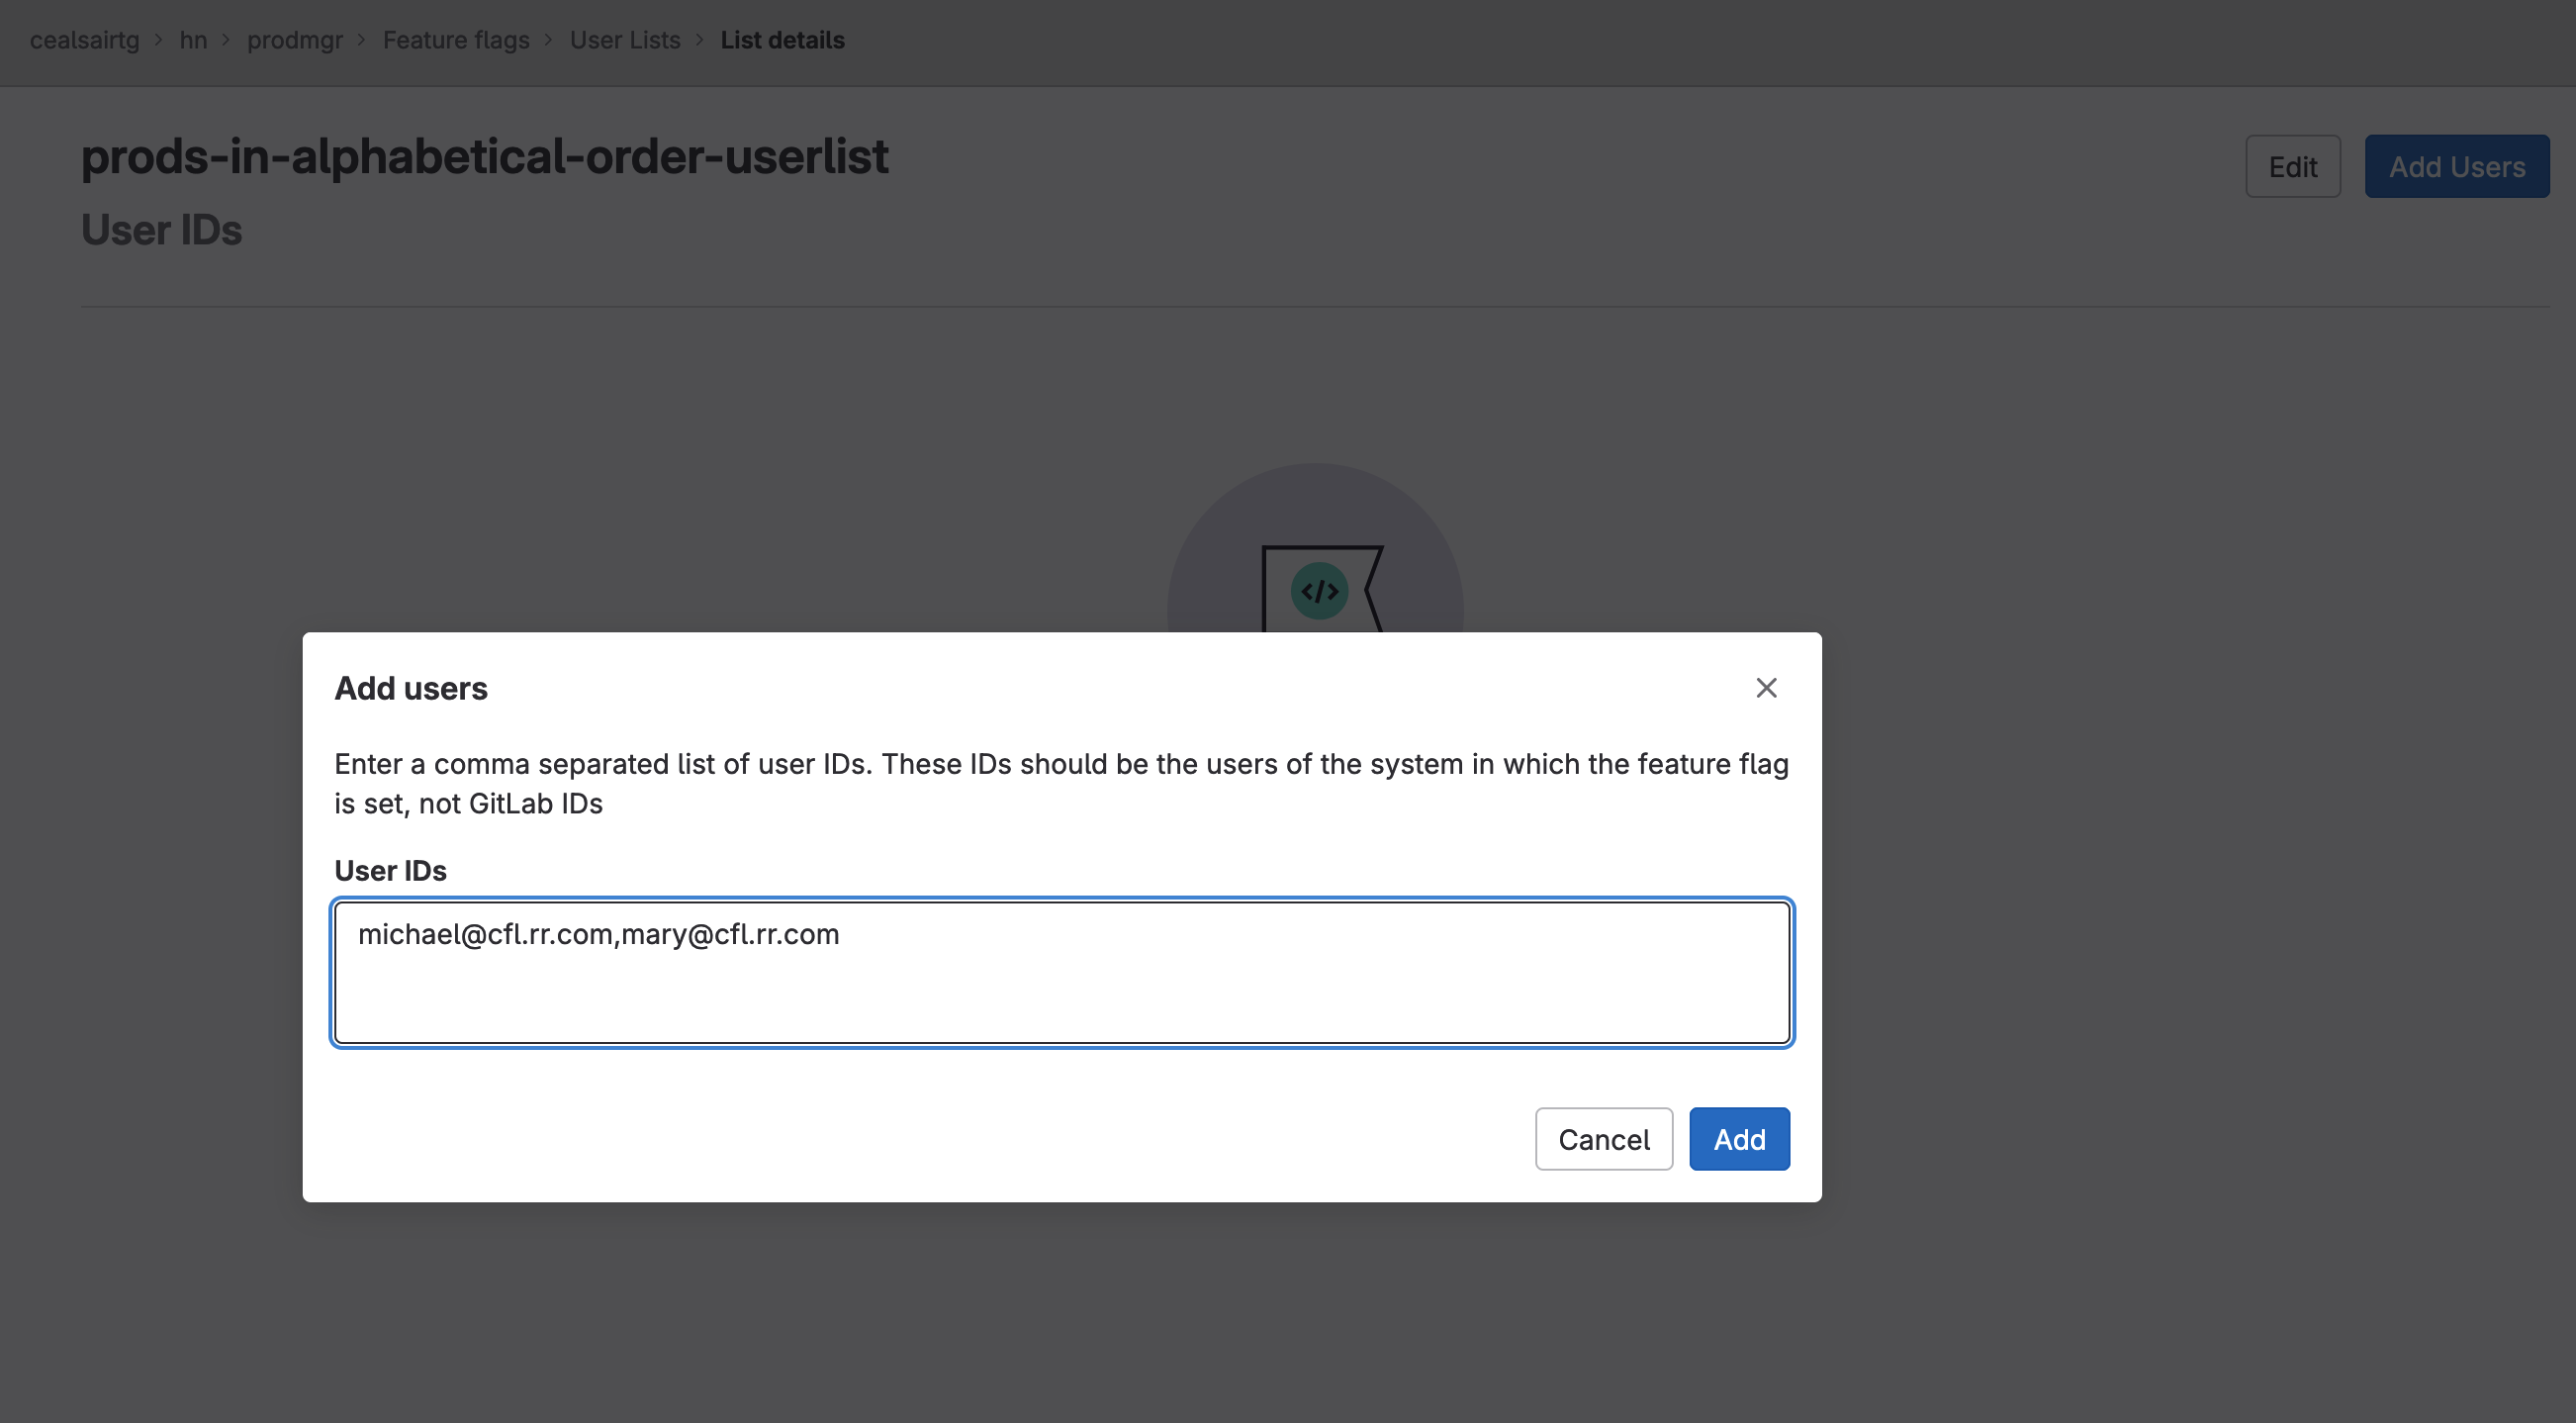 Adding users to user list "prods-in-alphabetical-order-userlist”
- Head back to the Feature flags window by selecting Deploy > Feature flags from your left vertical navigation menu.
Creating the flag
- Click on the New feature flag button on the top right hand side of your screen.
- In the New feature flag window, enter “prods-in-alphabetical-order-ff”.
Specifying the strategy for the production environment
In the Strategies section of the New feature flag window, there should already be sub-sections for Type and Environments.
- For Type, select Percent rollout from the dropdown menu.
- For Percentage, enter 50 in the field.
- For Based on, ensure that Available ID is selected from the popdown menu.
- For Environments, click on the + sign and select the production environment.
Specifying the strategy for the staging environment
- Click on the Add strategy button on the right hand side of the Strategies section. A new sub-section for another strategy will appear.
- For Type, select User List from the dropdown menu.
- For User List, select the user list prods-in-alphabetical-order-userlist.
- For Environments, click on the + sign and select the staging environment.
- Click on Create feature flag button at the bottom of your screen to complete the creation of the feature flag.
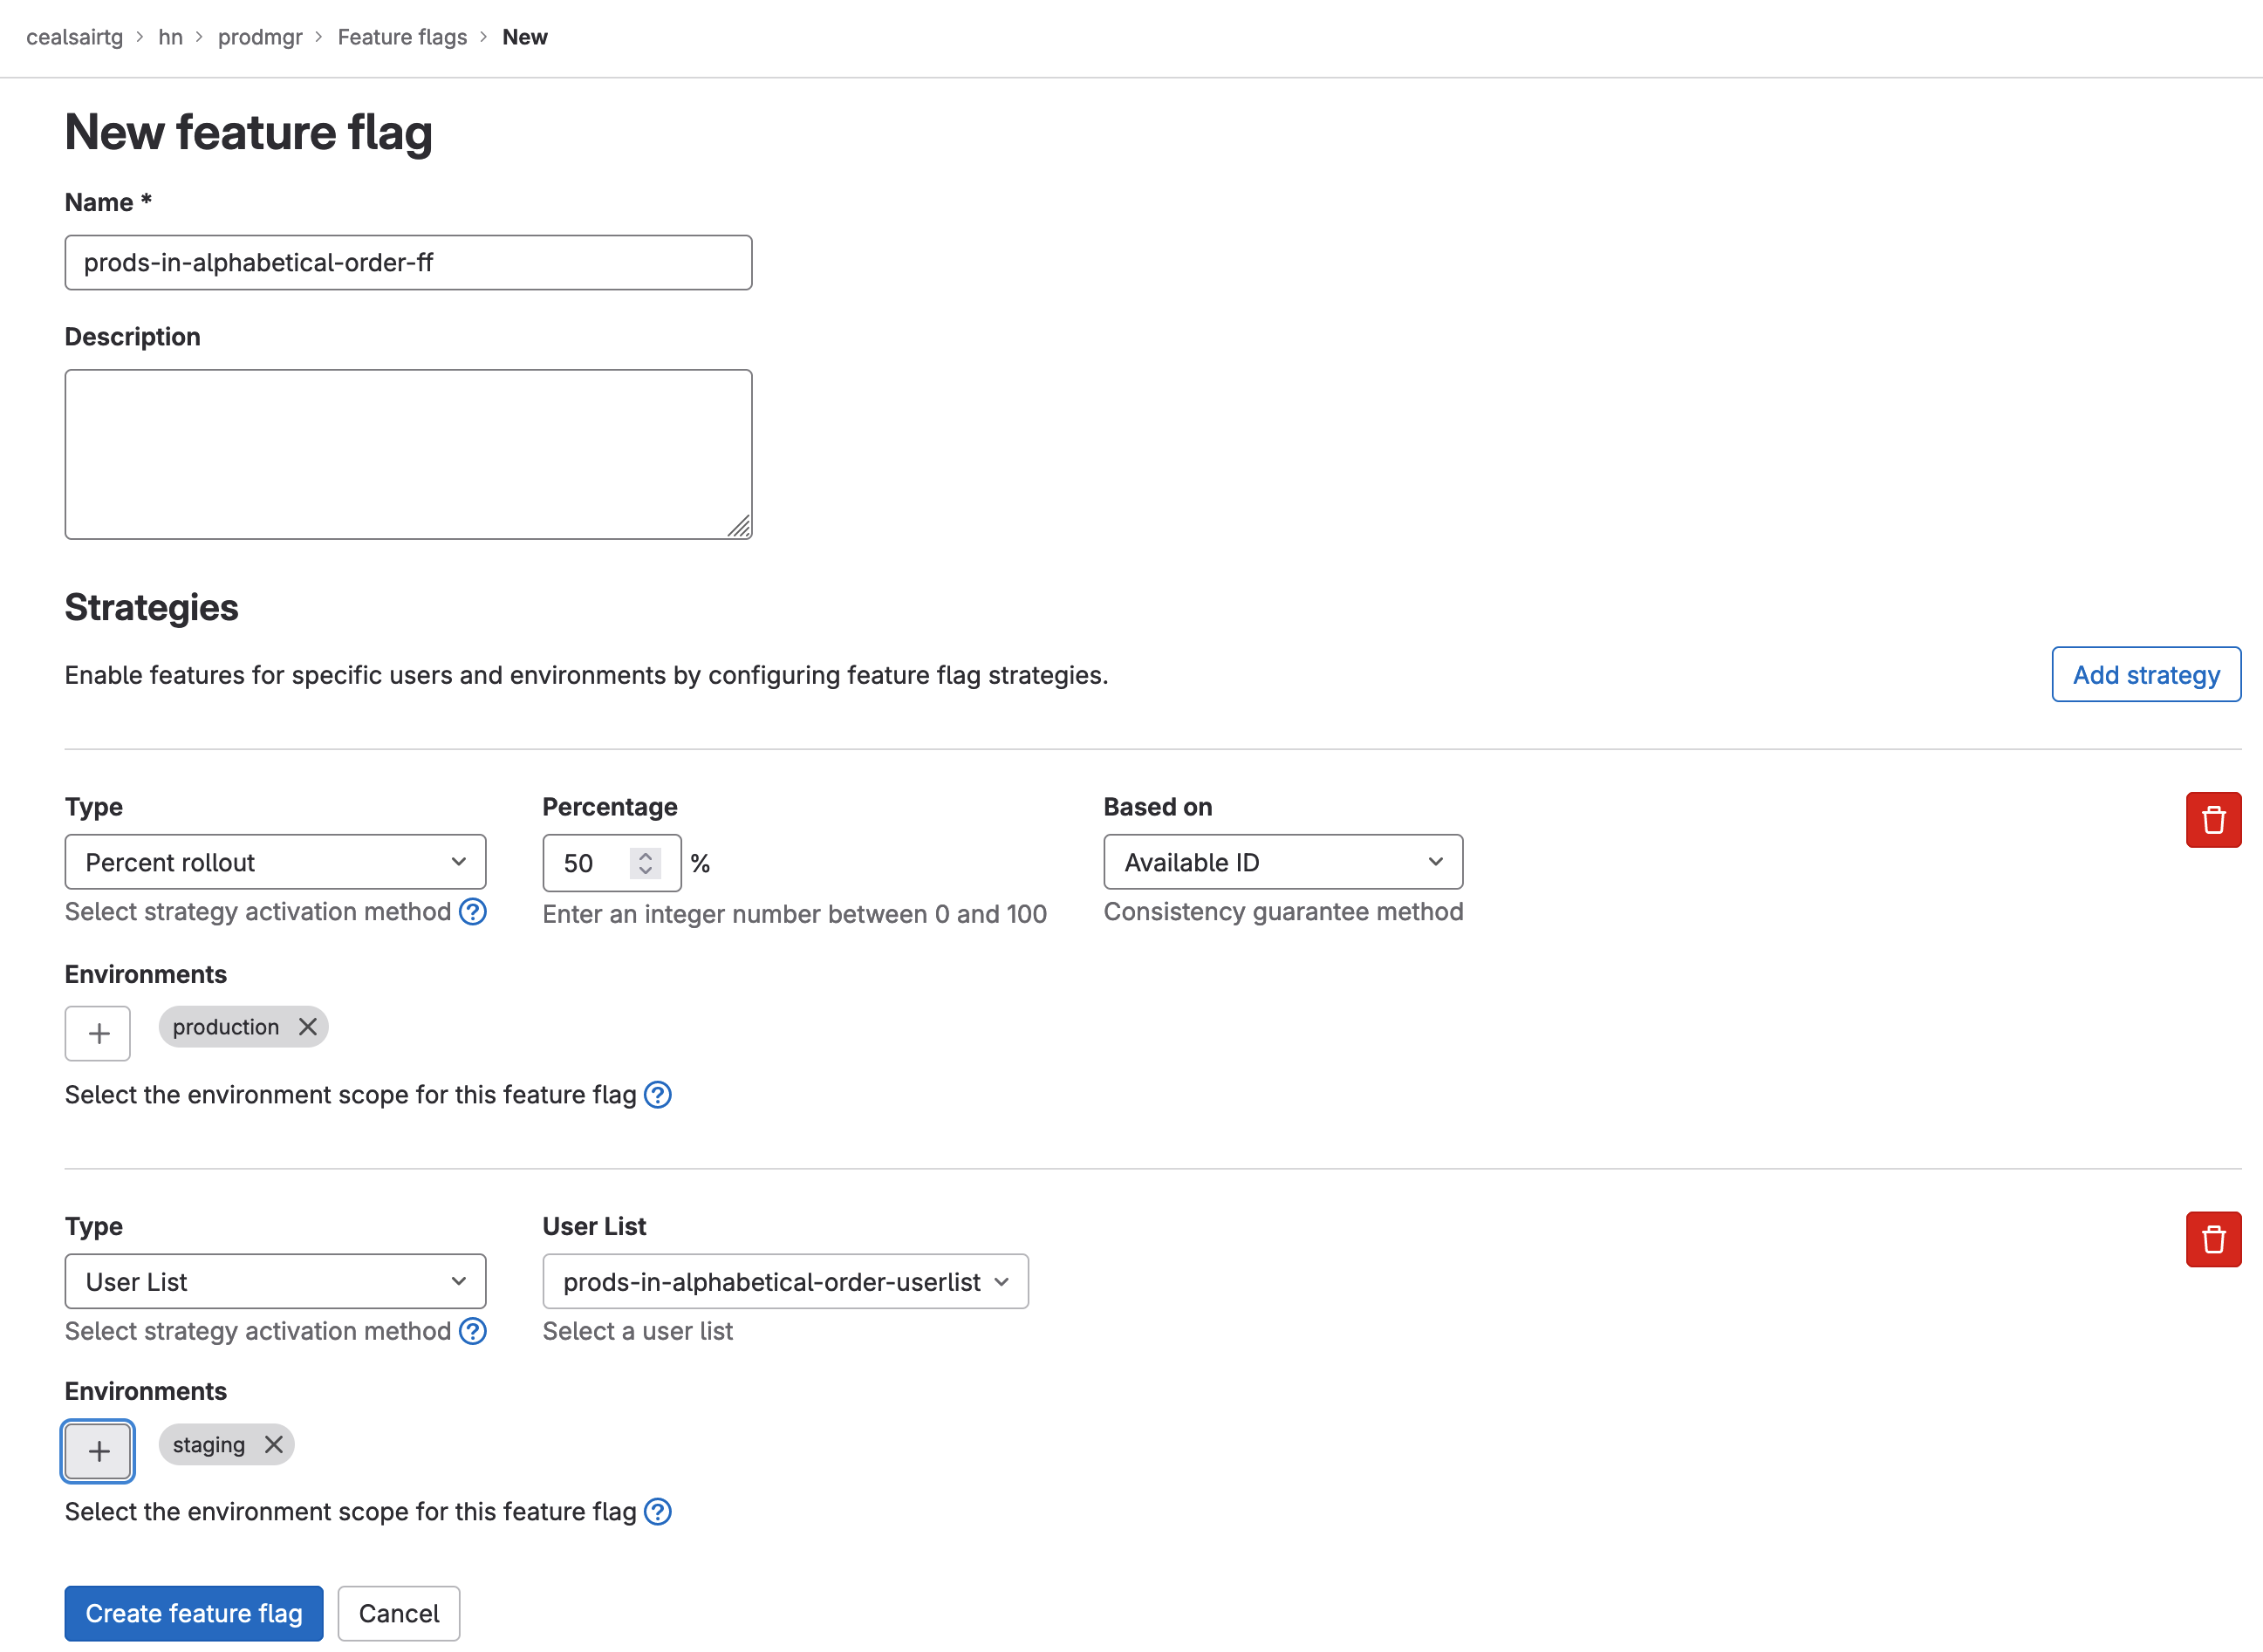 Defining the feature flag with its strategies for strating and production environments
Sharing feature flag configuration information with developers
In order for developers to instrument their code for this feature flag, you need to share with them the following information:
- On the Feature flags window, click on the Configure button on the top right hand side of your screen.
- Copy and save the values of API URL (URL where the client application connects to get a list of feature flags) and Instance ID (unique token that authorizes the retrieval of the feature flags). These are the two values that you will need for feature flag instrumentation.
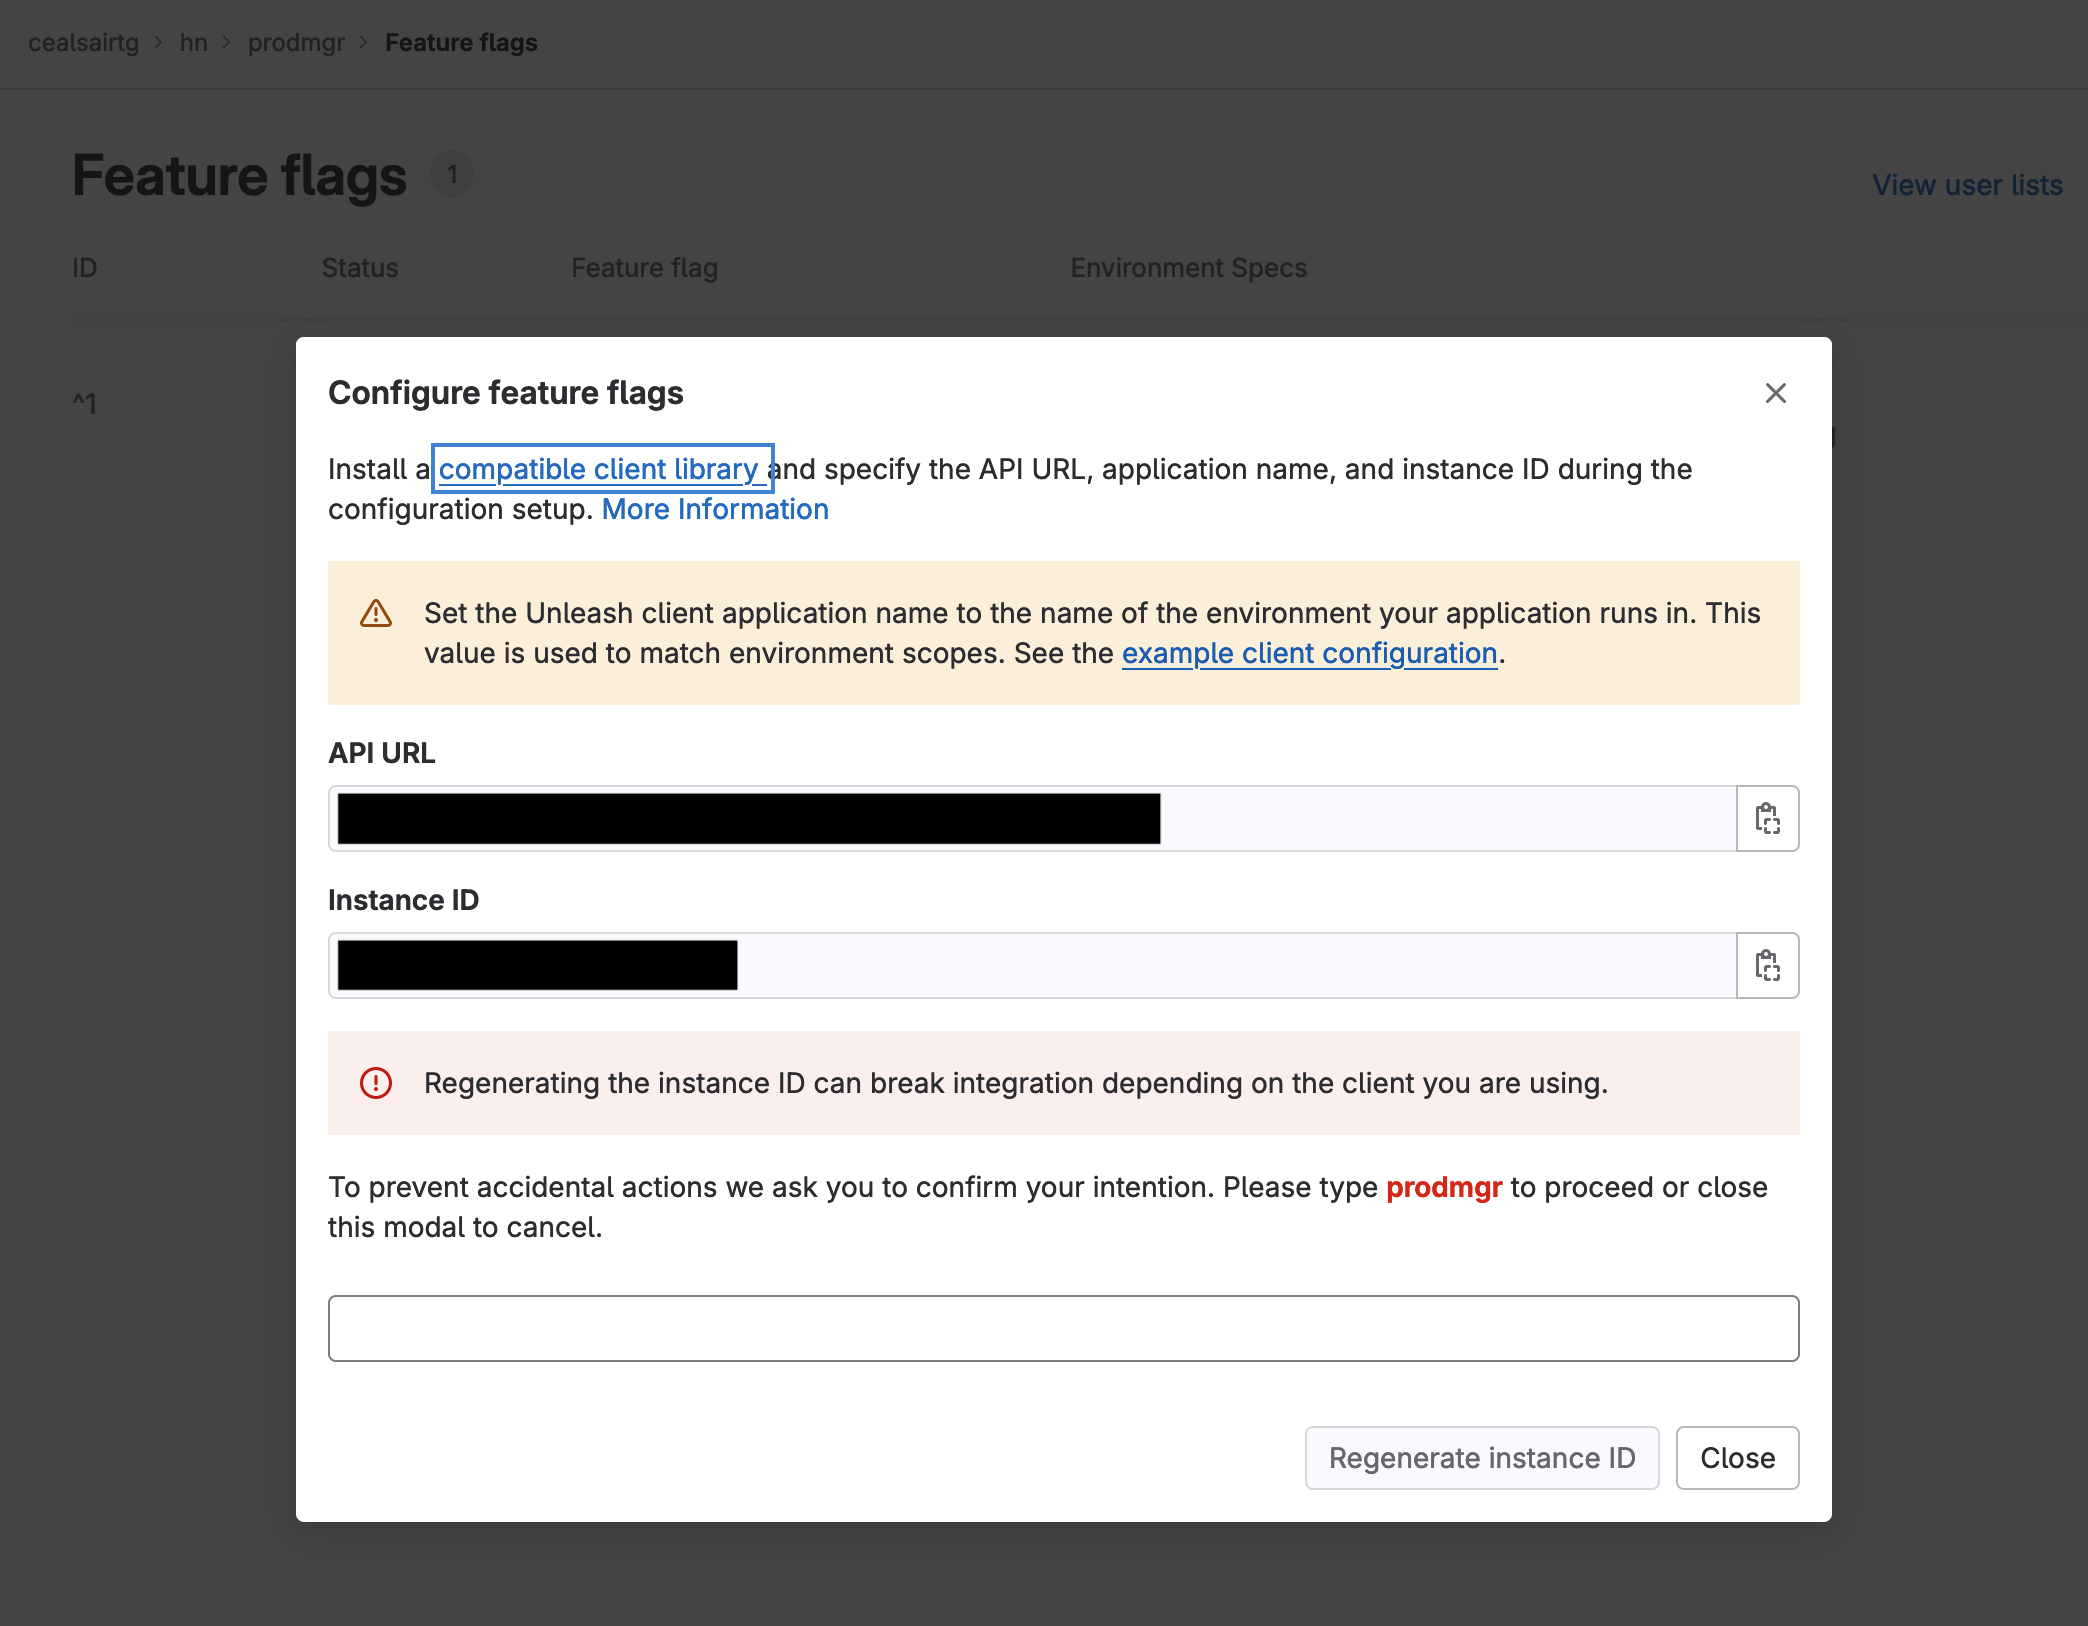 Copy and save the values for the feature flag API URL and Instance ID
- Head over to Settings > CI/CD and scroll down to the Variables section and click on its Expand button. Add the following two variables to your project:
| Variable Key | Variable Value | Variable Type | Environment Scope | Flag - Protect variable | Flag - Mask variable |
|---|---|---|---|---|---|
| K8S_SECRET_UNLEASH_URL | <saved API URL value> | Variable | All (default) | unchecked | unchecked |
| K8S_SECRET_UNLEASH_INSTANCE_ID | <saved Instance ID value> | Variable | All (default) | unchecked | unchecked |
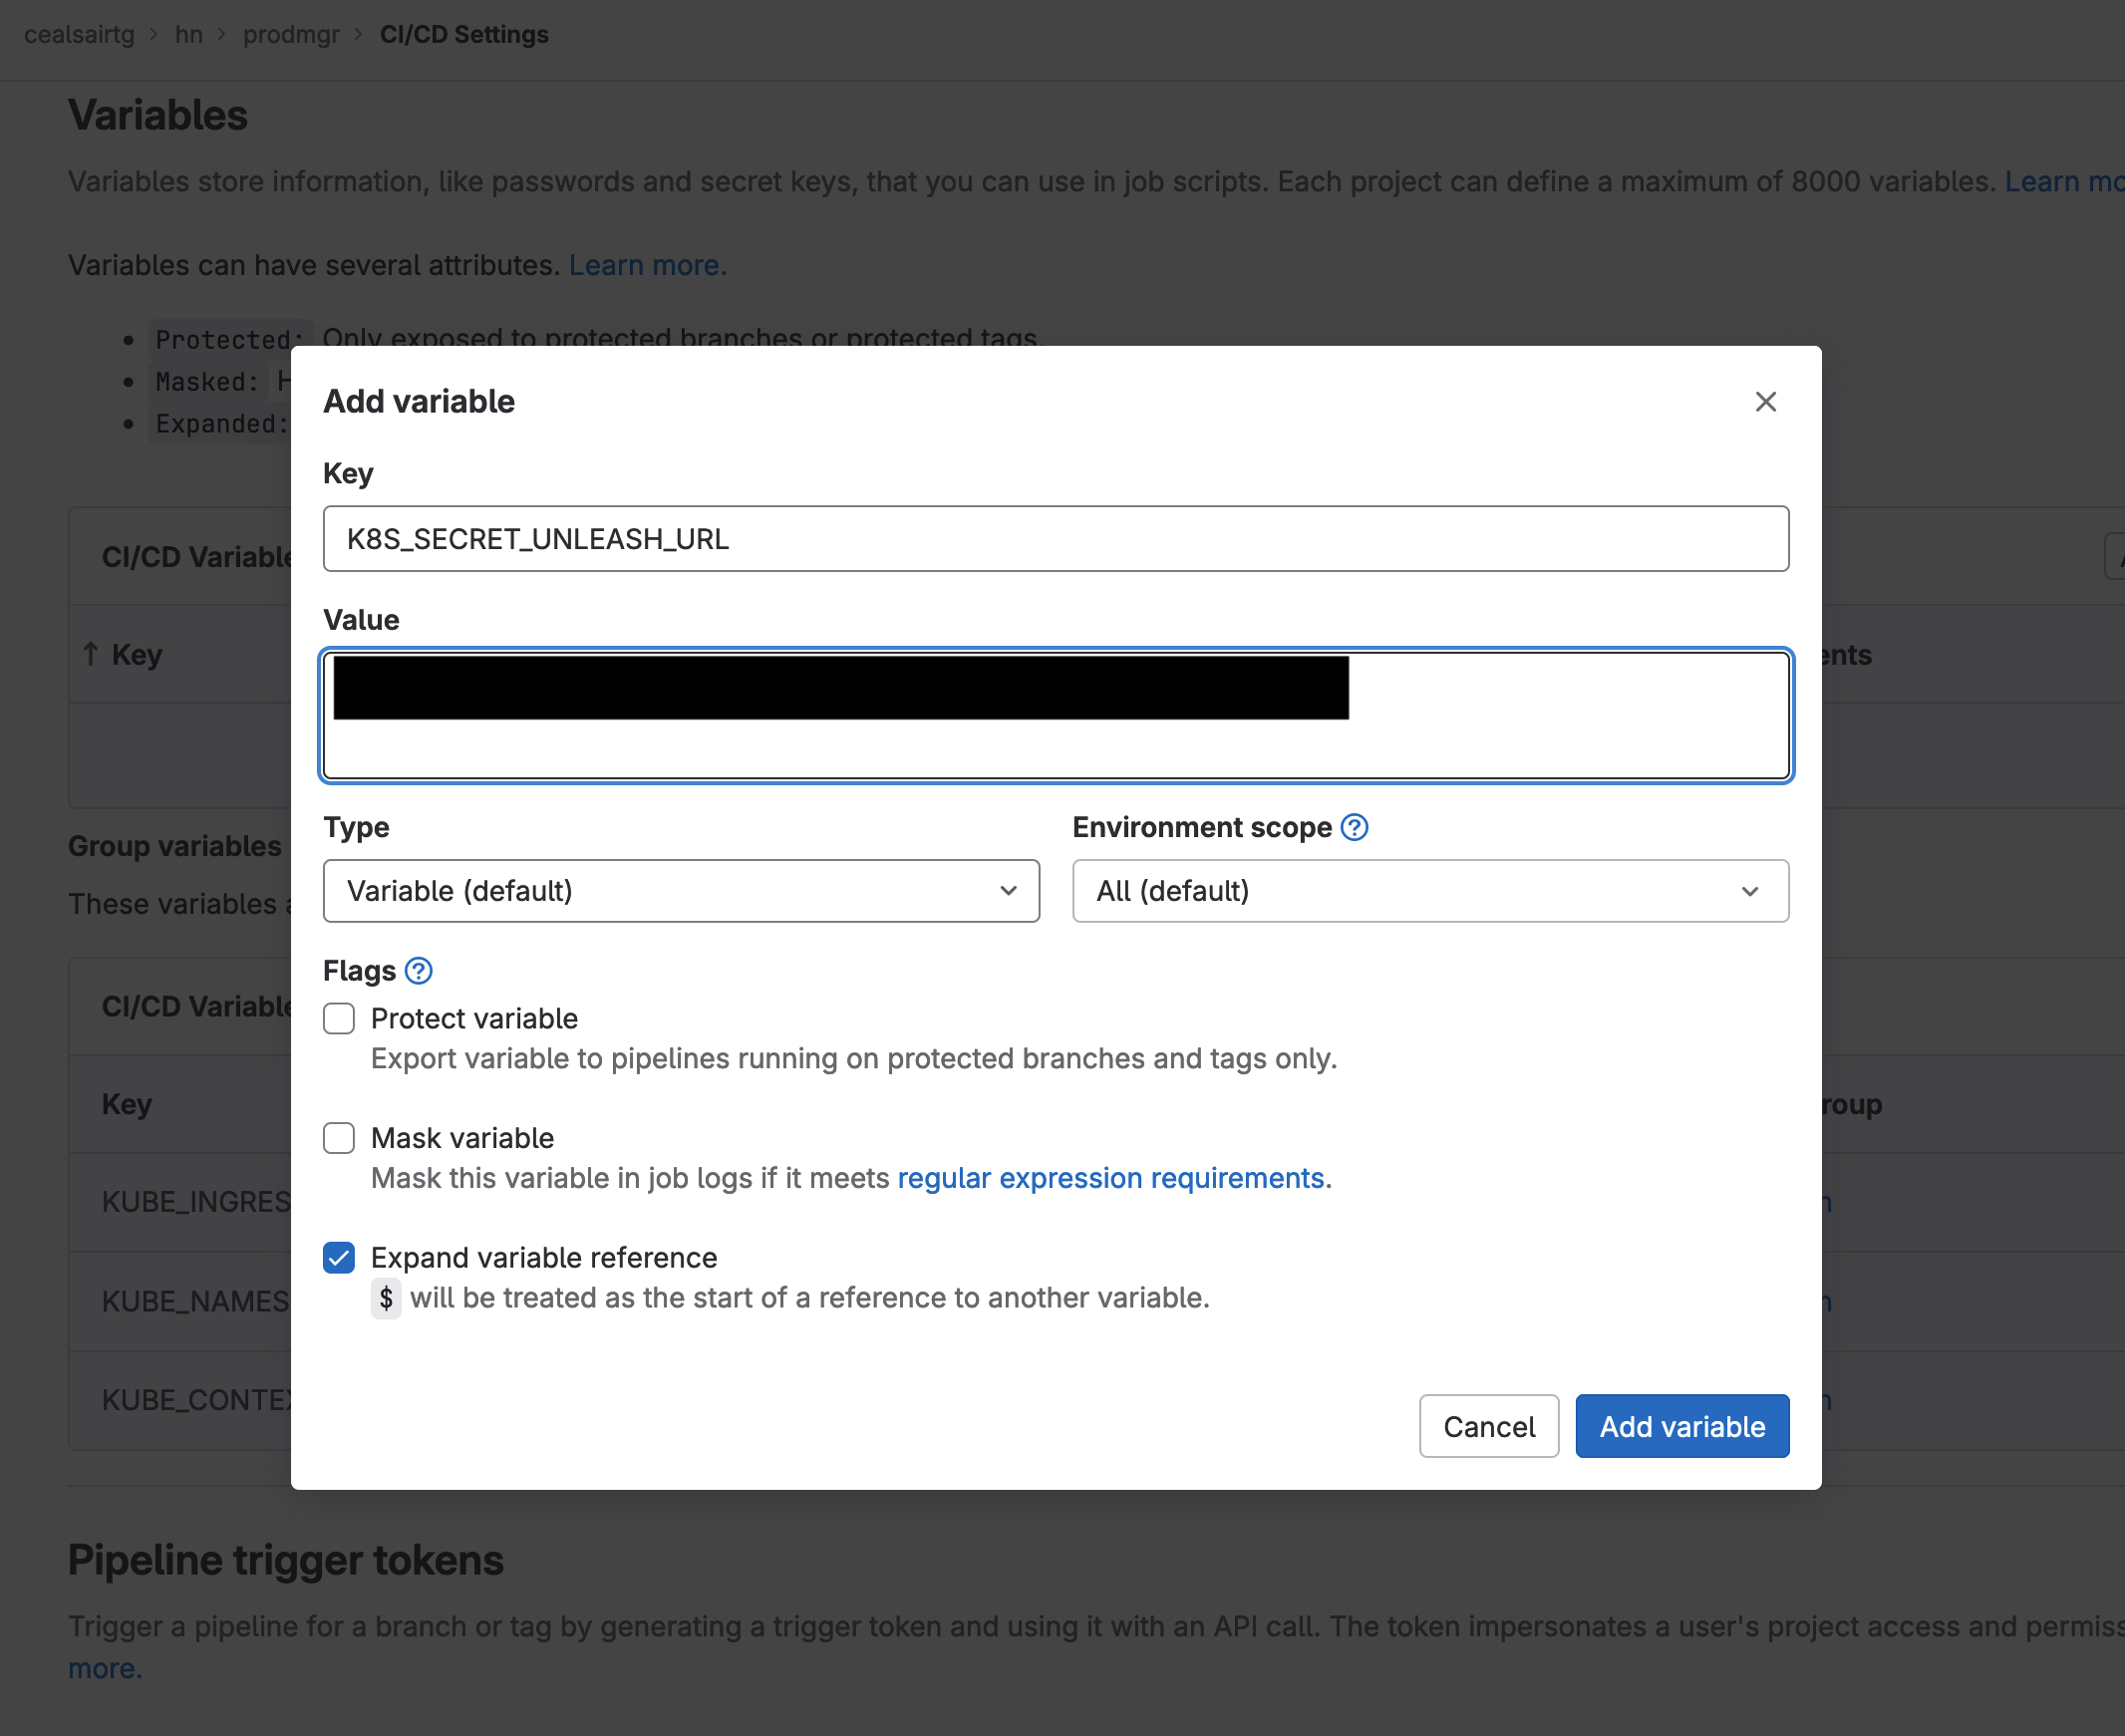 Adding variable K8S_SECRET_UNLEASH_URL to project "prodmgr"
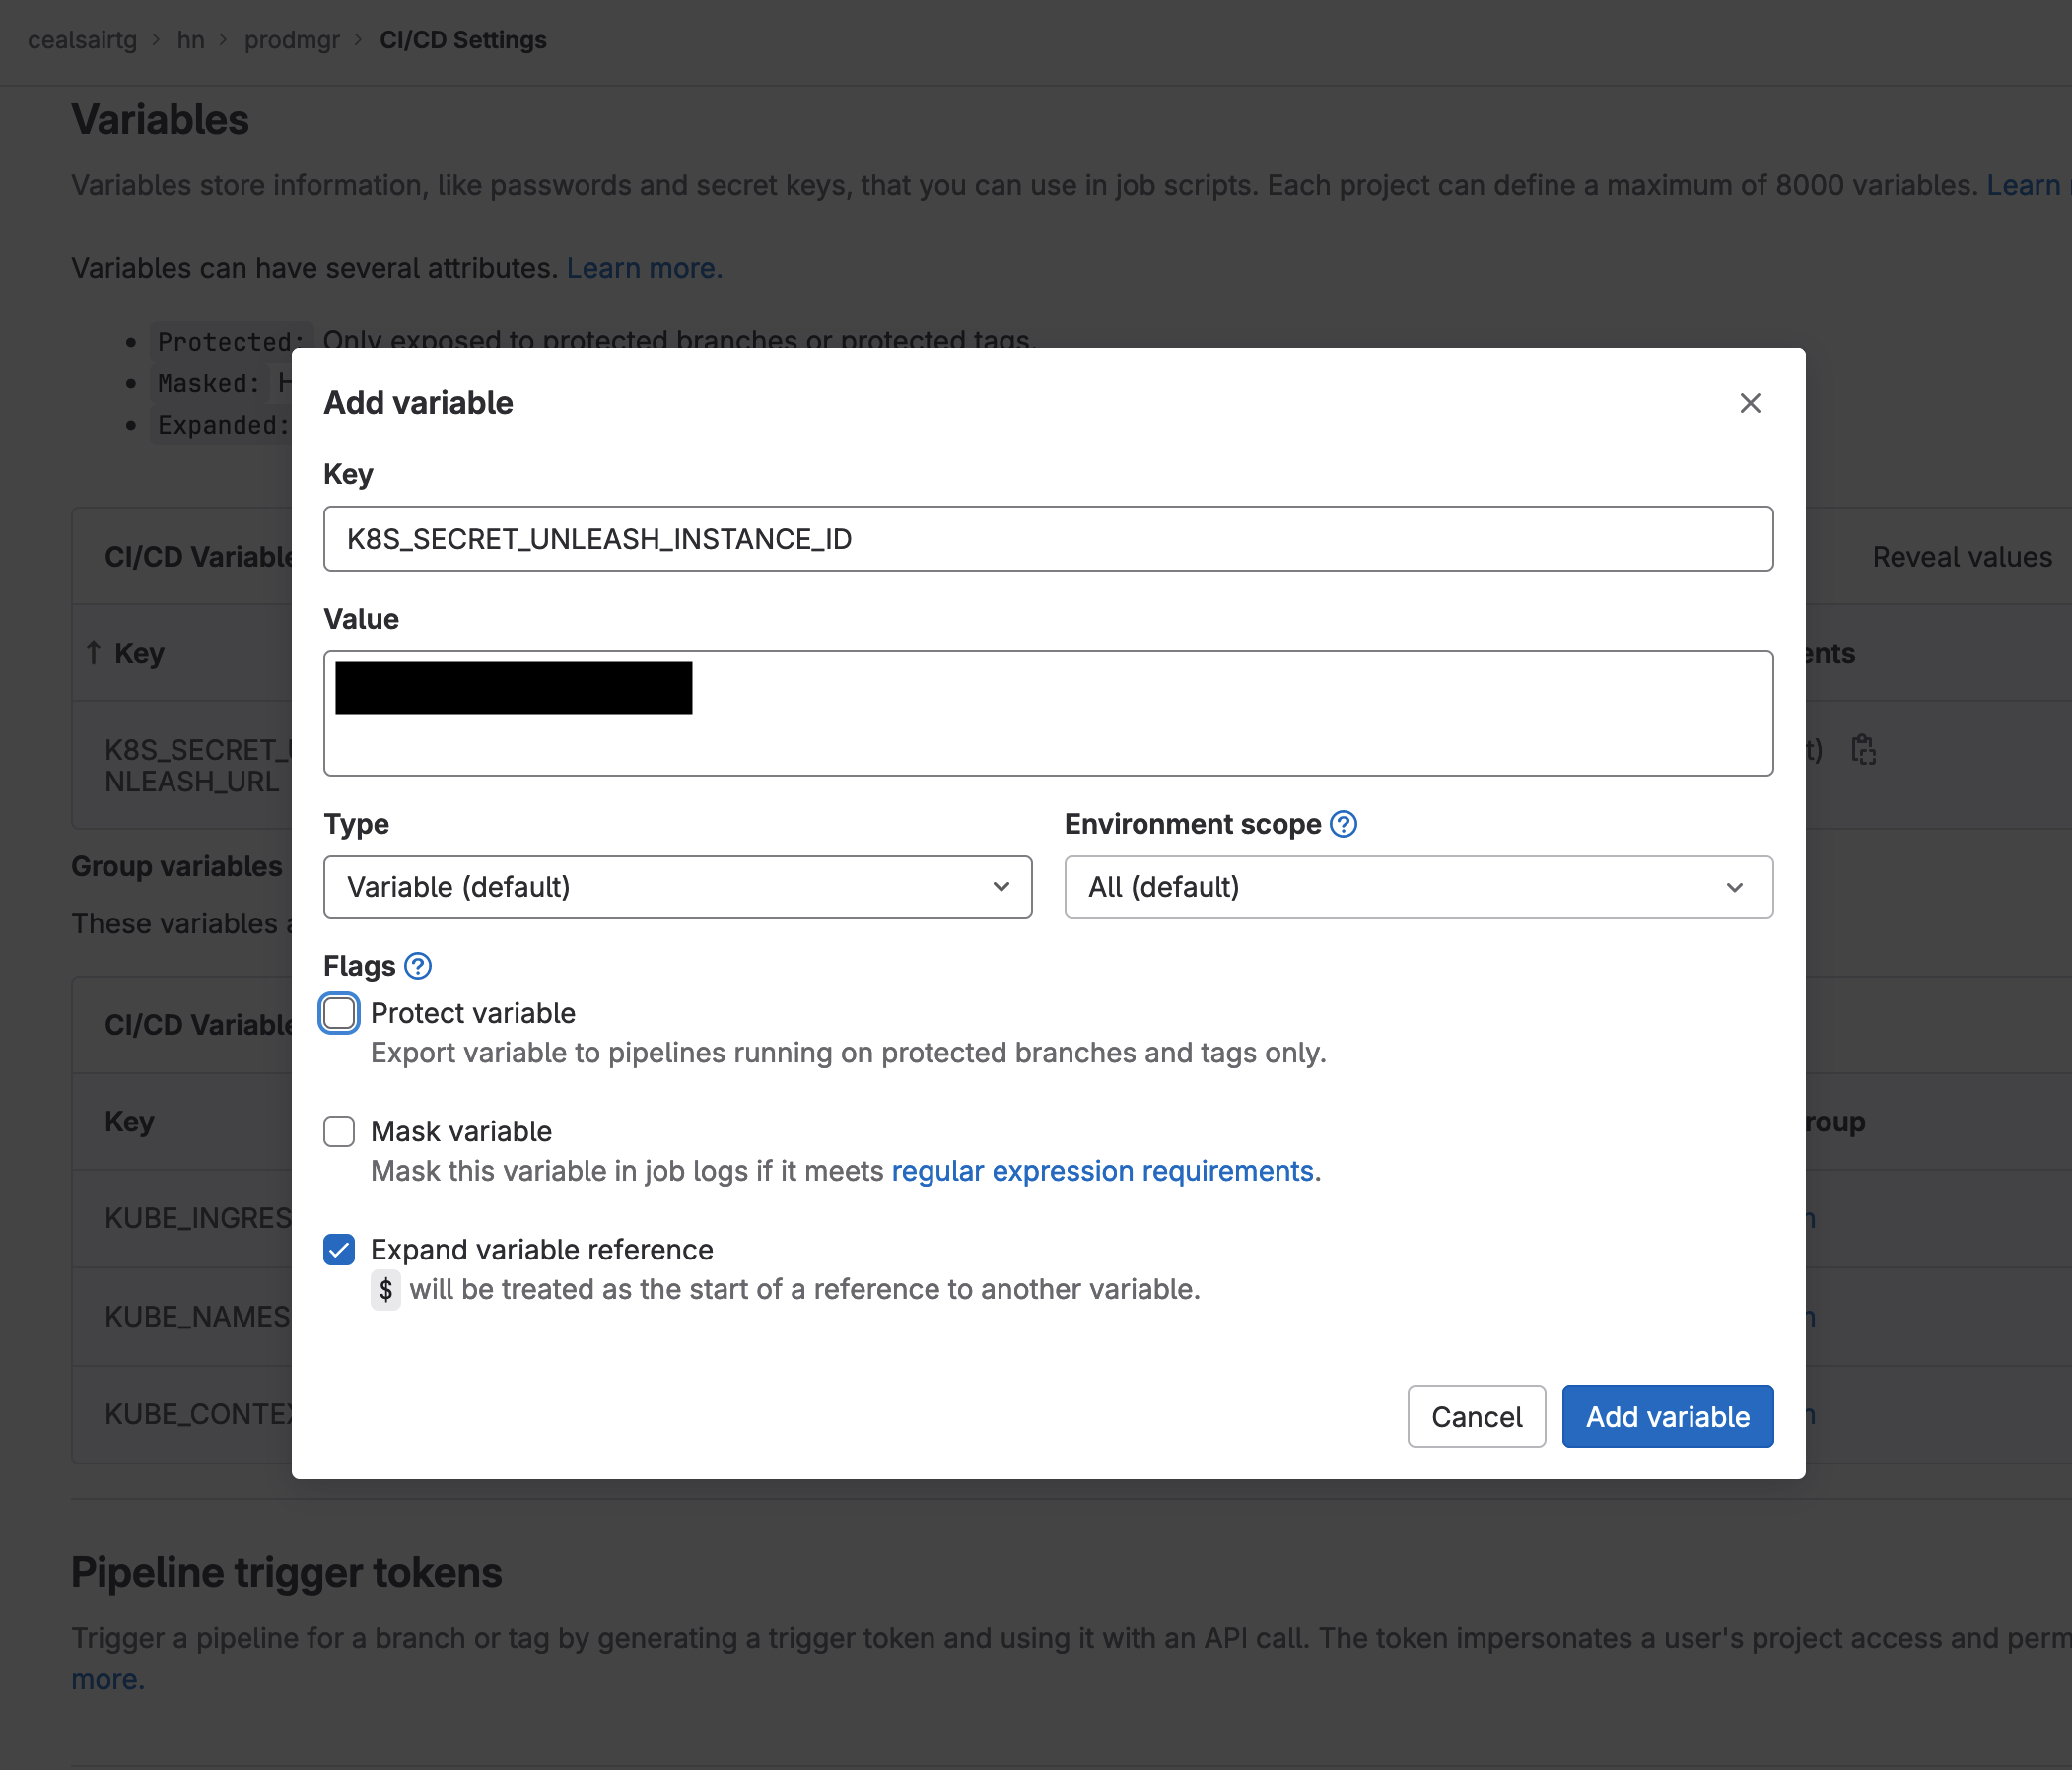 Adding variable K8S_SECRET_UNLEASH_INSTANCE_ID to project "prodmgr"
These two variables contain values that will be passed to your application (via the K8S_SECRET_ keyword) so that it can make use of the feature flags defined and managed by GitLab.
In order for your application to be able to use feature flags, you need to instrument your application with our Feature Flags framework. Let's see how you do this in the sample Java application.
Instrumenting the code
In this example, we are using the Java client for Unleash but if you’re using a different programming language then you need to use the client library for your language. To get all the supported languages, refer to the Unleash documentation or Unleash open source project.
Instrumenting Java class files
- In project “prodmgr”, navigate to the directory
src/main/java/csaa/jspring/ProductManager. - Click on the file name “AppController.java” to view its contents and then click on the Edit button to enter edit mode.
- You will see a few code blocks that have been commented out and are preceded by the line:
// Uncomment block below to instrument Feature Flag
Uncomment all the code blocks under each of the lines indicated above.
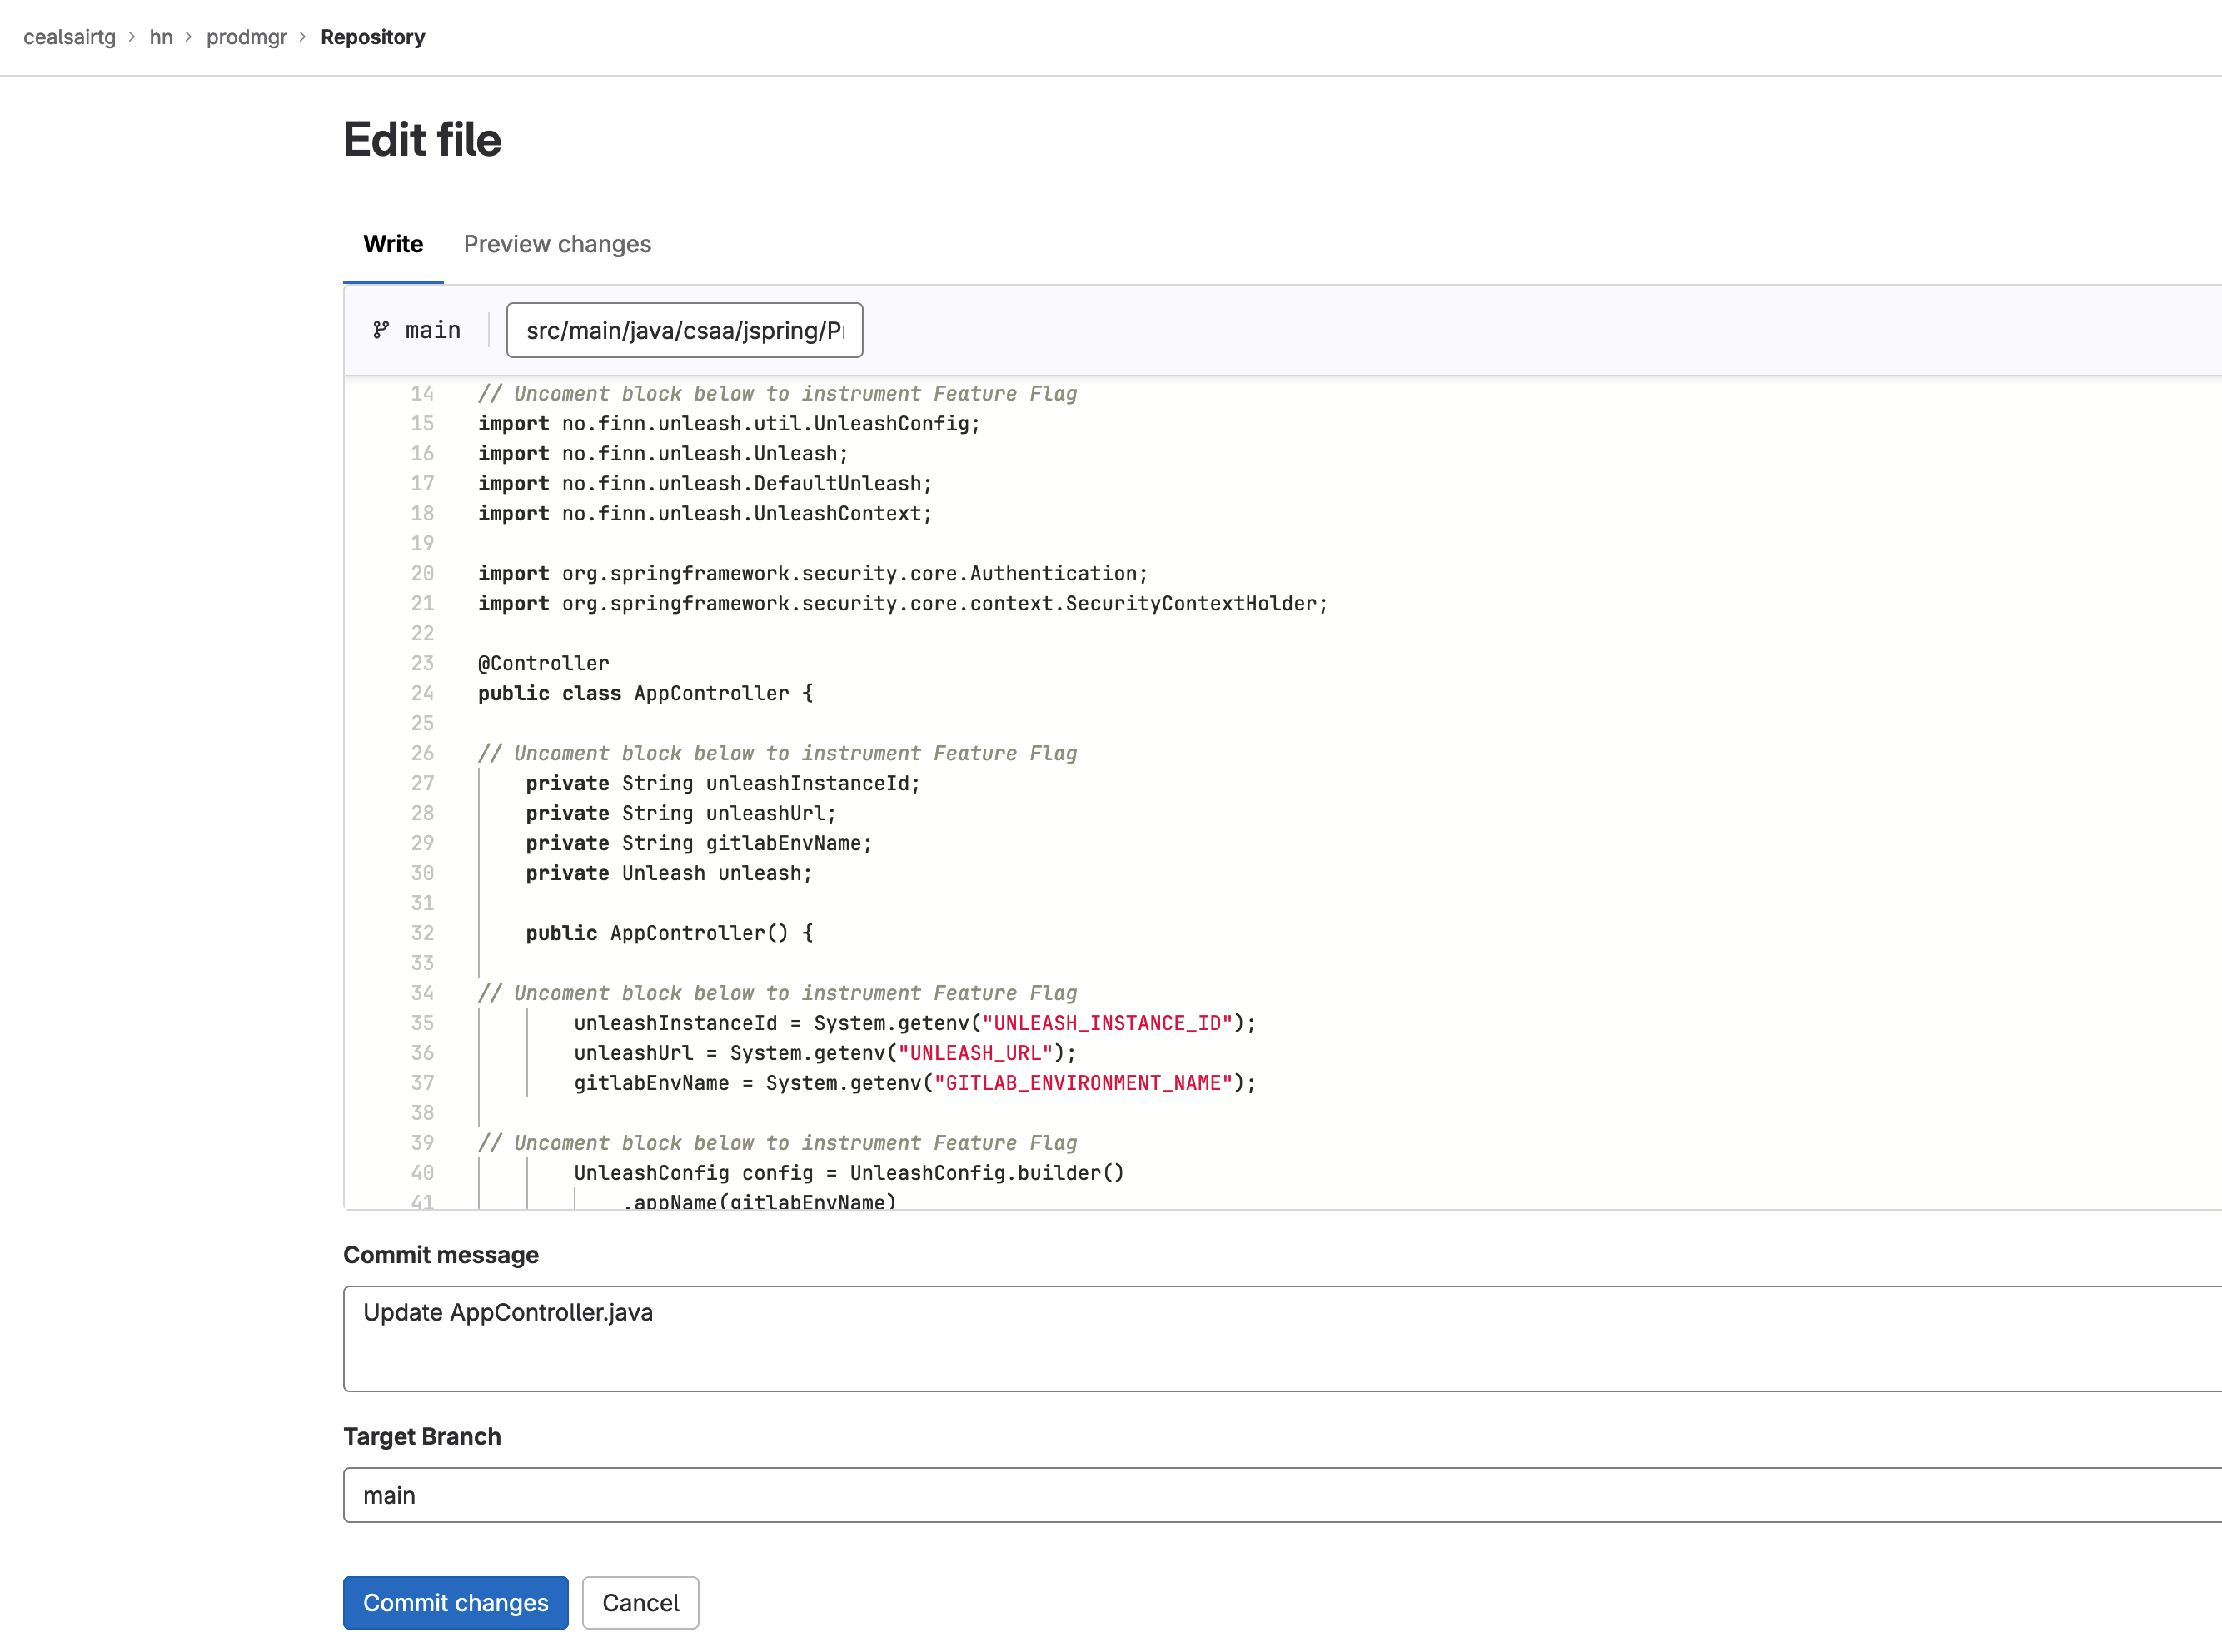 Partial view of AppController.java file with uncommented code blocks
- Commit the changes to the main branch.
- The commit starts a pipeline that deploys the application to the staging environment. Head to Build > Pipelines and click on the most recently executed pipeline (should be the first one in the list). Click on the pipeline to display it and wait until the staging job finishes. Then deploy the application to production by clicking on “rollout 100%” job.
Now that the application is running in the staging and production environments, let’s see the feature flag in action.
Feature flag in action
Now let's check how the feature flag is working.
Checking the feature flag in the staging environment
- In project “prodmgr”, click on Operate > Environments to see the list of all environments. Then click on the "Open live environment" button for the staging environment.
- A new browser tab will appear and will display a login screen. If your browser complains about the connection being insecure, accept the risk and open the browser tab.
- Remember that the feature flag strategy for staging is based on the user list containing michael and mary in it. Let’s try logging in as each of them.
- Enter credentials [email protected] with password p33sw0rd. Verify that Michael gets a product list sorted in alphabetical order. Log out and close the browser tab to ensure that his session closes.
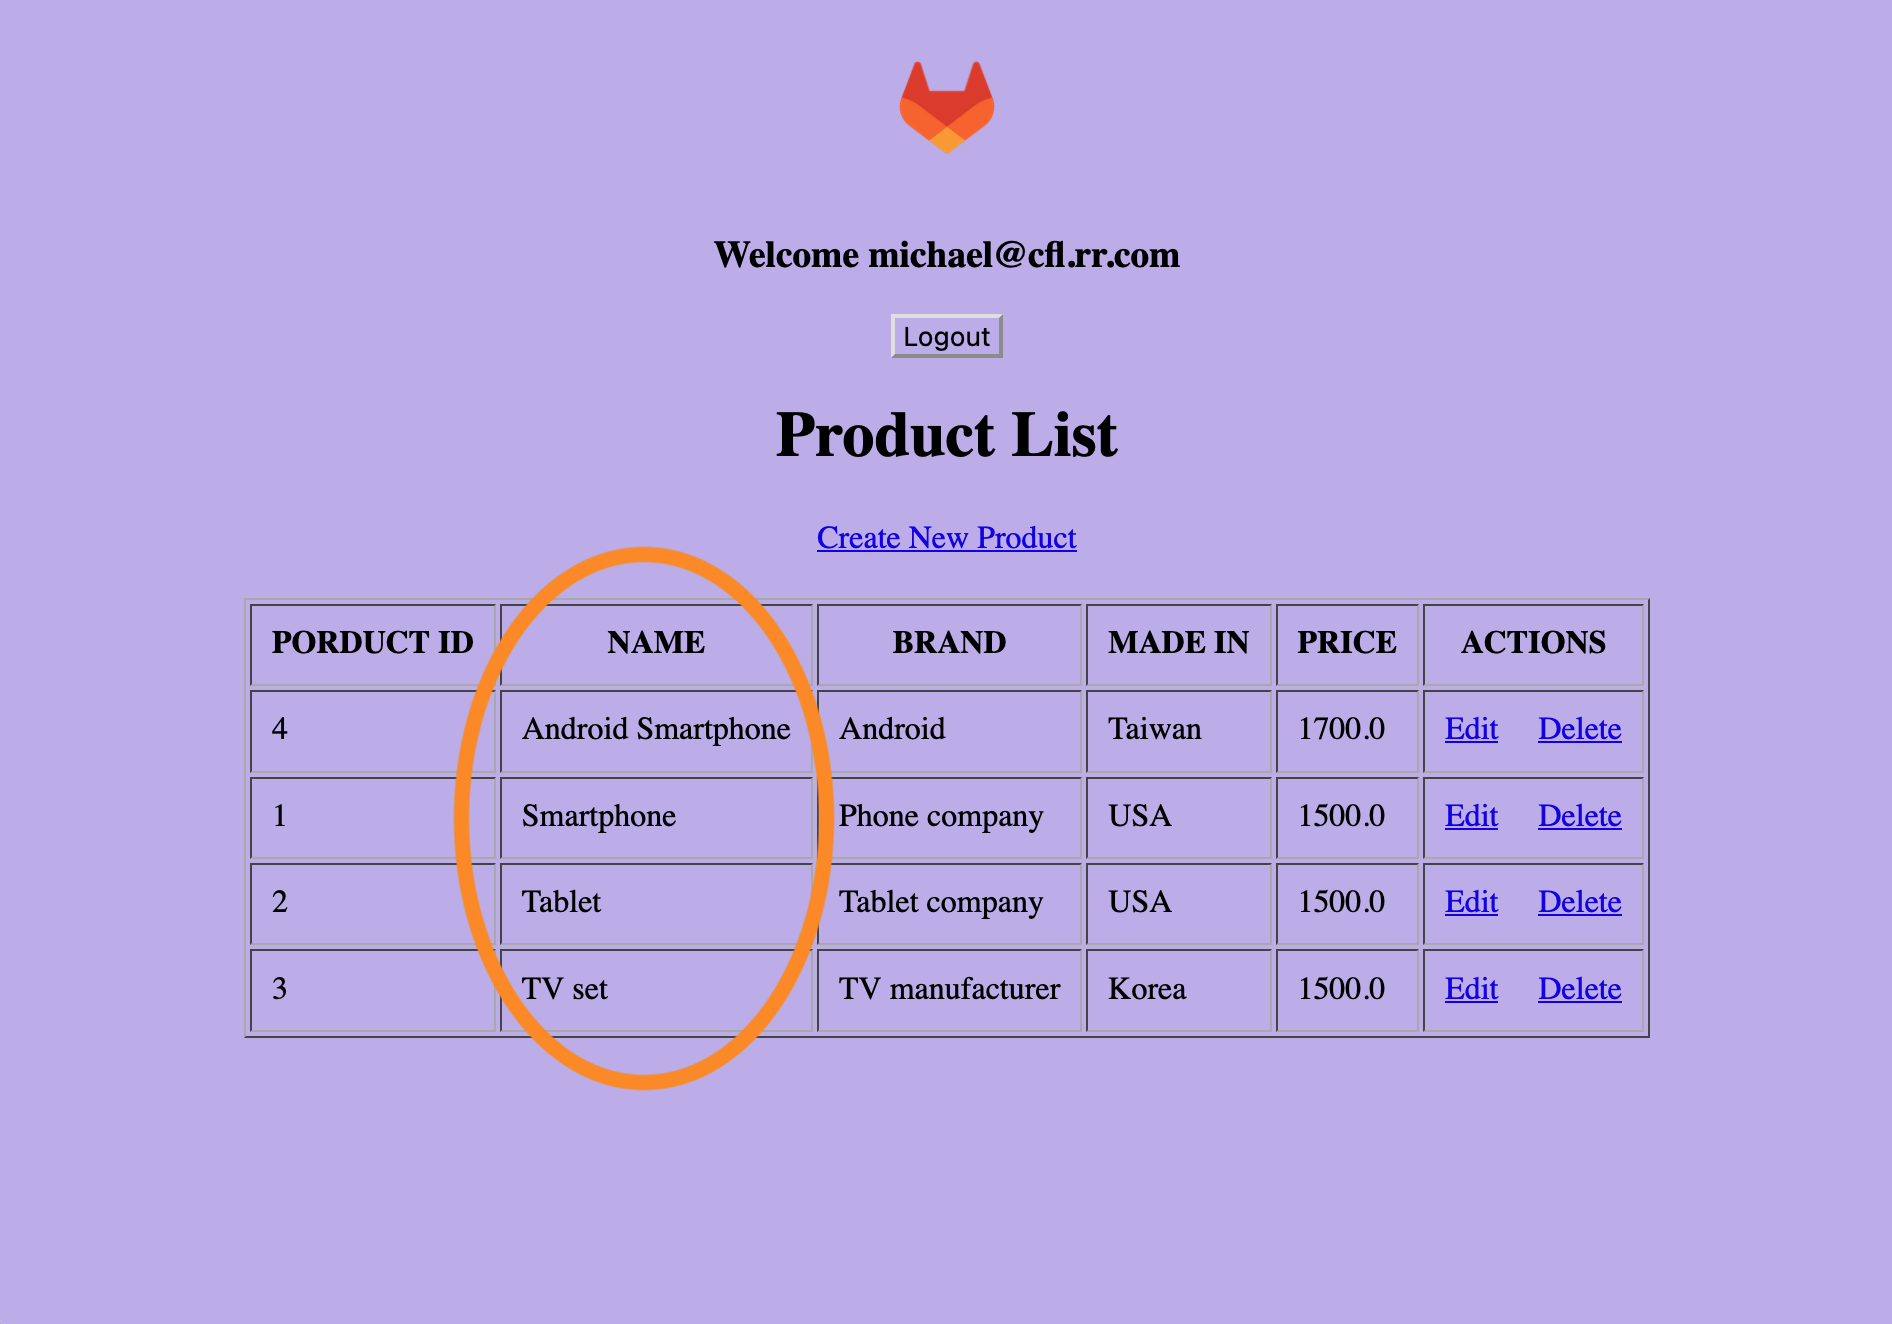 Michael gets the feature flag that orders the list of product names in alphabetical order
- From the Environments window, click on the "Open live environment" button for the staging environment. Enter credentials "[email protected]" with password "p33sw0rd". Verify that mary gets a product list sorted in alphabetical order. Log out and close the browser tab to ensure that her session closes.
- From the Environments window, click on the "Open live environment" button for the staging environment. This time, enter credentials for "[email protected]" with password "p33sw0rd". Verify that thomas does not get a product list sorted in alphabetical order. Log out and close the browser tab to ensure that his session closes.
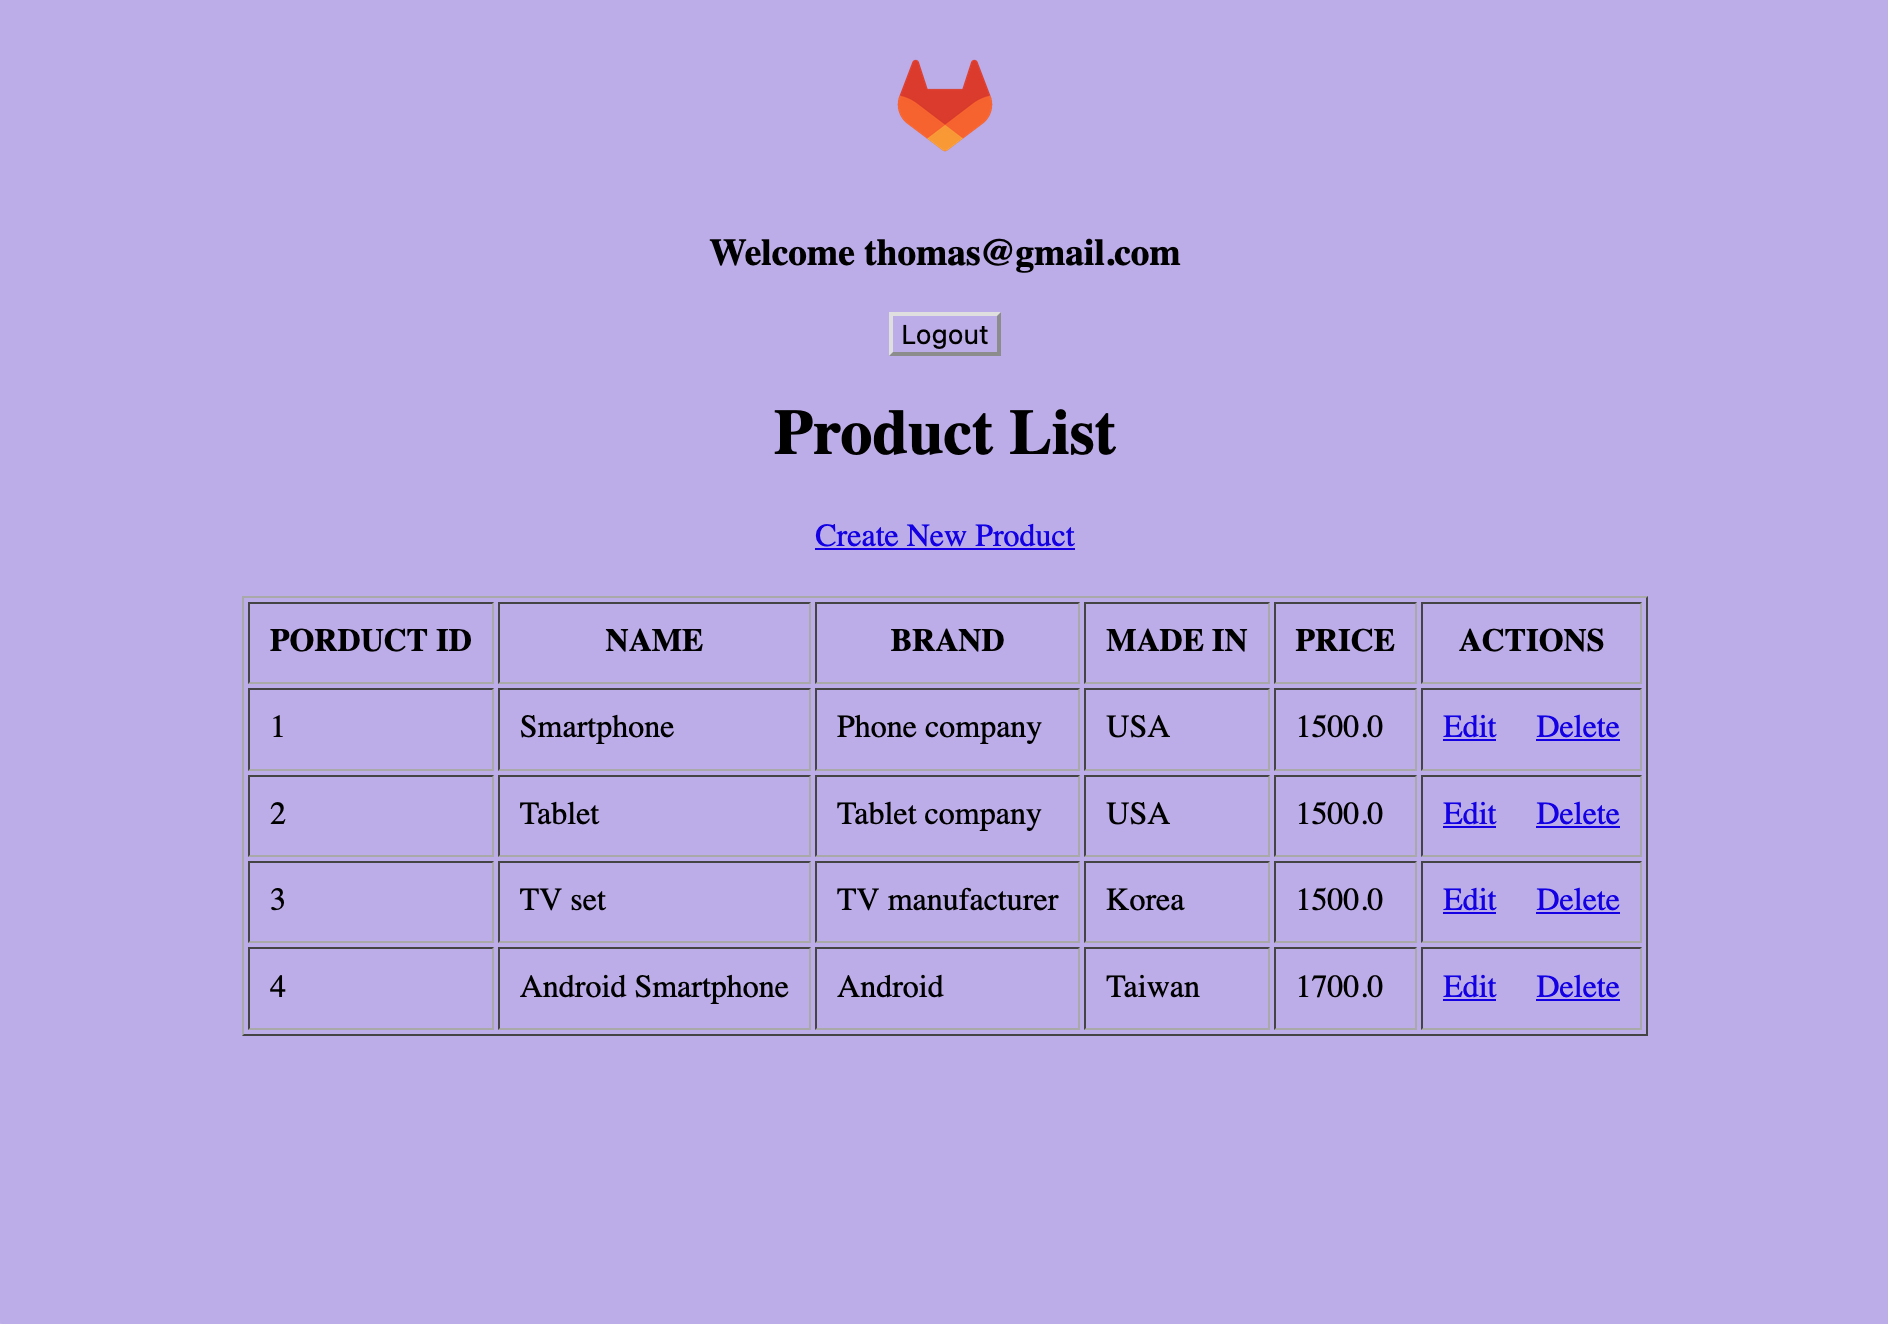 Thomas does not get the feature flag because the product names are not ordered in alphabetical order
The steps above demonstrate that the feature flag strategy for staging successfully worked.
Checking the feature flag in the production environment
- Click on Operate > Environments to see the list of all environments. Then click on the "Open live environment" button for the production environment.
- A new browser tab will appear and will display a login screen. If your browser complains about the connection being insecure, accept the risk and open the browser tab.
- Remember that the strategy in production is that the feature will be served to 50% of the users. Try logging into the web application as each of the following users keeping track of who gets the list of products sorted in alphabetical order by name and who does not:
Note: Remember to click on the "Open live environment" button for the production environment. Once you log out from each user, remember to close the browser tab to ensure that the session closes.
| Username | Password |
|---|---|
| [email protected] | pa33w0rd |
| [email protected] | pa33w0rd |
| [email protected] | pa33w0rd |
| [email protected] | pa33w0rd |
| [email protected] | pa33w0rd |
| [email protected] | pa33w0rd |
Your final count should consist of three users being served the feature and three not, matching the strategy that was set for the production environment.
As changes are made to feature flags, you can track them from the audit events window.
Auditing feature flag changes
Note: A Premium GitLab subscription is needed for viewing Audit events.
- In project “prodmgr”, select Secure > Audit events from the left vertical navigation menu.
- This displays all the events that have occurred in GitLab for the last thirty days. You will see that events related to updates to feature flags are listed.
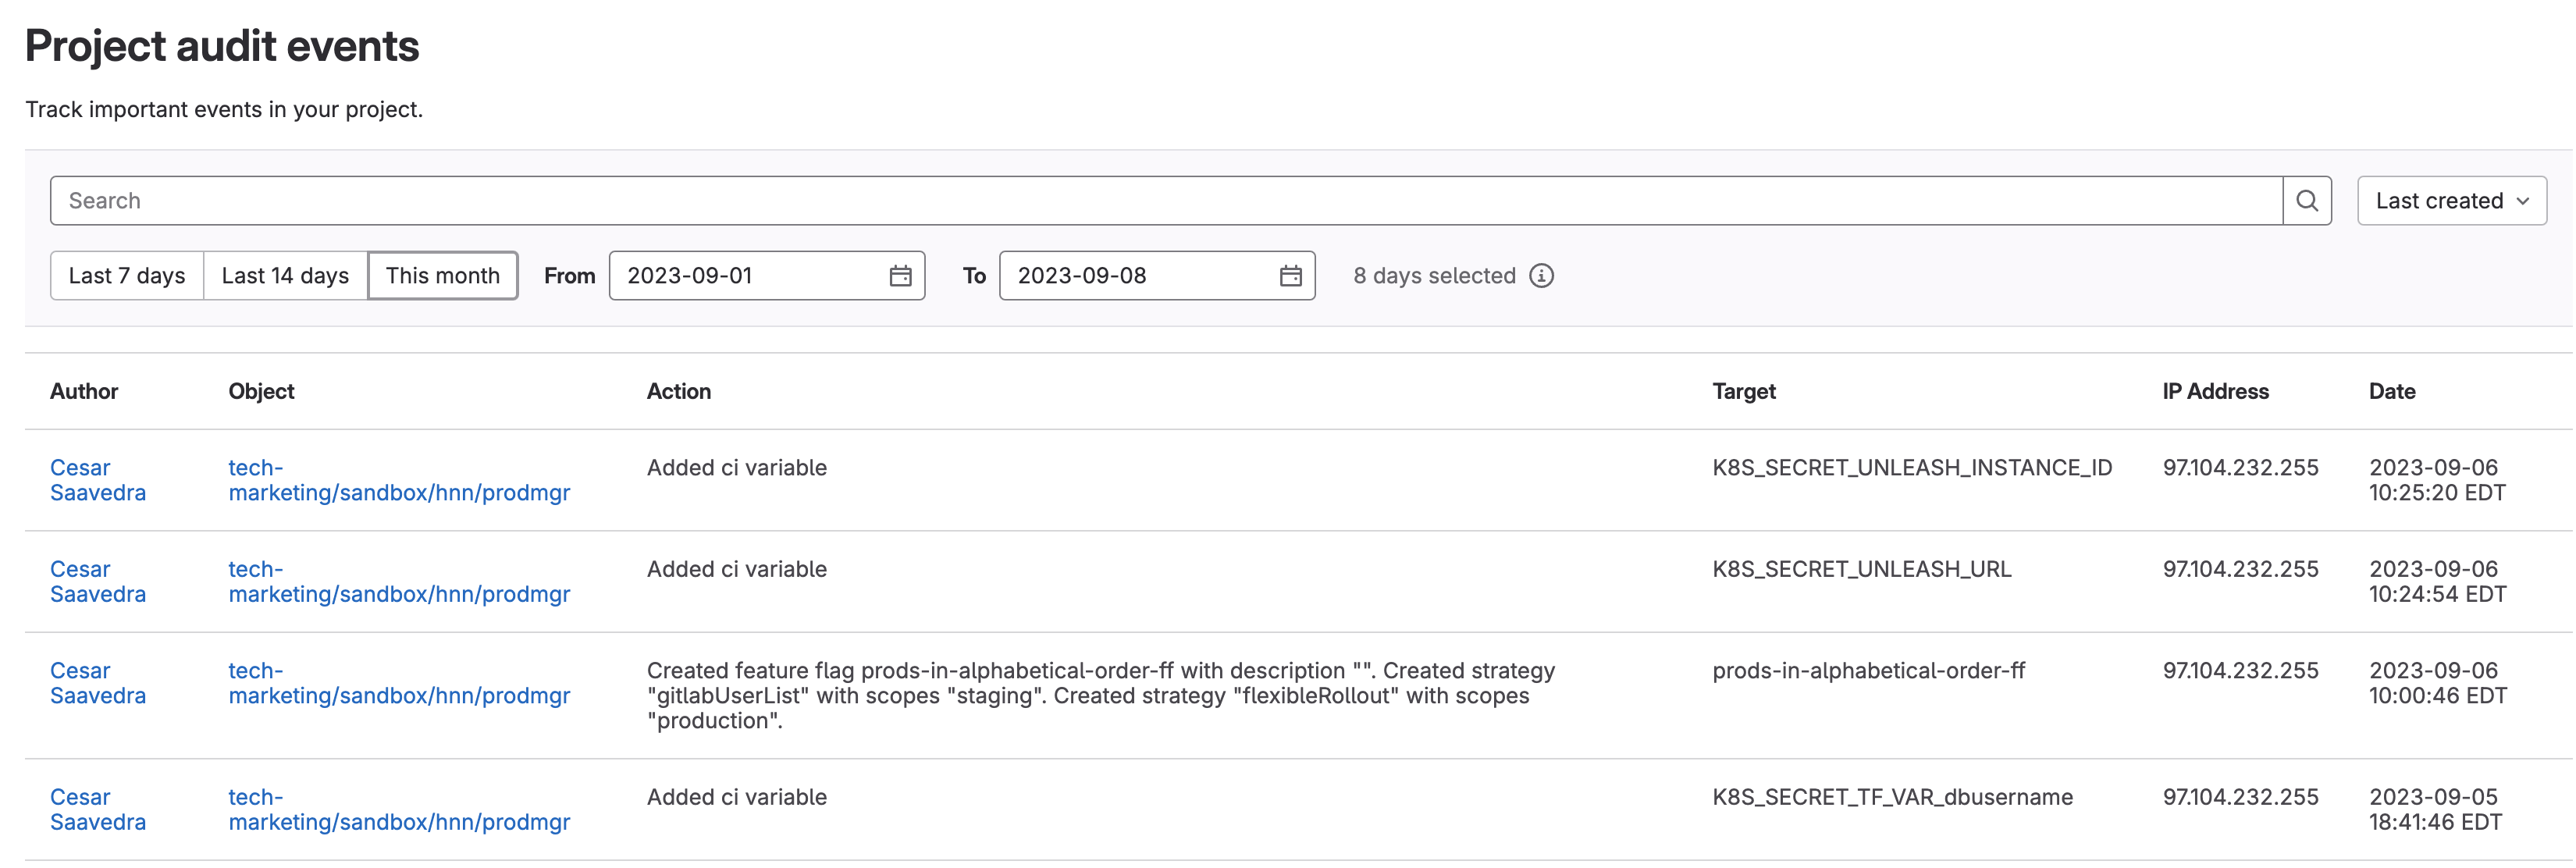 Audit events is an auditable list of actions that have been taken againt resources
This auditing allows you to identify when and who made changes to feature flags. It can also help preempt out-of-compliance scenarios and streamline audits to avoid penalties, providing an opportunity to optimize cost, and lower risk of unscheduled production outages.
Now you know how to create and use feature flags to lower your deployment risk.
Photo by Liam Desic on Unsplash