In the ever-evolving landscape of DevOps, platform engineers are increasingly seeking efficient and flexible tools to manage their GitLab resources, particularly for orchestrating continuous integration/continuous delivery (CI/CD) pipelines. Pulumi offers a unique approach to infrastructure as code (IaC) by allowing engineers to use familiar programming languages such as TypeScript, Python, Go, and others. This approach streamlines the automation of GitLab CI/CD workflows. Pulumi's declarative syntax, combined with its ability to treat infrastructure as software, facilitates version control, collaboration, and reproducibility, aligning seamlessly with the GitLab philosophy.
Let's explore the power of using Pulumi and GitLab.
What is Pulumi?
Pulumi is an IaC tool that allows you to manage resources in more than 150 supported cloud or SaaS products (including AWS and GitLab, which we will be demonstrating in this post). You can express your infrastructure with Pulumi using popular general-purpose programming languages like TypeScript, Python, and Go.
Pulumi is declarative (just like other popular IaC tools you may be familiar with), which means that you only need to describe the desired end state of your resources and Pulumi will figure out the order of create, read, update, and delete (CRUD) operations to get from your current state to your desired state.
It might seem strange at first to use a general-purpose programming language to express your infrastructure's desired state if you're used to tools like CloudFormation or Terraform, but there are considerable advantages to Pulumi's approach, including the following:
- Familiar tooling. You don't need any special tooling to use Pulumi. Code completion will work as expected in your favorite editor or IDE without any additional plugins. You can share Pulumi code using familiar packaging tools like npm, PyPI, etc.
- Familiar syntax. Unlike with DSL-based IaC tools, you don't need to learn special ways of indexing an array element, or creating loops or conditionals - you can just use the normal syntax of a language you already know.
The Pulumi product has an open source component, which includes the Pulumi command line and its ecosystem of providers, which provide the integration between Pulumi and the cloud and SaaS providers it supports. Pulumi also offers a free (for individual use) and paid (for teams and organizations) SaaS service called Pulumi Cloud, which provides state file and secrets management, among many other useful features. It’s a widely-supported open-source IaC tool.
Initializing the project
To complete this example you'll need:
- A Pulumi Cloud account. Pulumi Cloud is free for individual use forever and we'll never ask for your credit card. Pulumi Cloud will manage your Pulumi state file and handle any secrets encryption/decryption. Because it's free for individual use (no credit card required), we strongly recommend that you use Pulumi Cloud as your backend when learning how to use Pulumi.
- A GitLab account, group, and a GitLab token set to the
GITLAB_TOKENenvironment variable. - An AWS account and credentials with permissions to deploy identity and access management (IAM) resources. For details on how to configure AWS credentials on your system for use with Pulumi, see AWS Classic: Installation and Configuration.
This example will use two providers from the Pulumi Registry:
- The GitLab Provider will be used to manage resources like Projects, ProjectFiles (to initialize our project repository), ProjectHooks (for the integration with Pulumi Cloud), and ProjectVariables (to hold configuration for our CI/CD pipelines).
- The AWS Classic Provider will be used to manage AWS resources to create OpenID Connect (OIDC) connectivity between AWS and GitLab.
You can initialize your Pulumi project by changing into a new, empty directory, running the following command, and accepting all the default values for any subsequent prompts:
pulumi new typescript
This will bootstrap an empty Pulumi program. Now you can import the provider SDKs for the providers you'll need:
npm i @pulumi/aws @pulumi/gitlab
Your index.ts file is the entry point into your Pulumi program (just as you would expect in any other Node.js program) and will be the file to which you will add your resources. Add the following imports to the top of index.ts:
import * as gitlab from "@pulumi/gitlab";
import * as aws from "@pulumi/aws";
Now you are ready to add some resources!
Adding your first resources
First, let's define a variable that will hold the audience claim in our OIDC JWT token. Add the following code to index.ts:
const audience = "gitlab.com";
The above code assume you're using the GitLab SaaS (https://gitlab.com) If you are using a private GitLab install, your value should be the domain of your GitLab install, e.g. gitlab.example.com.
Then, you'll use a Pulumi function to grab an existing GitLab group by name and create a new public GitLab project in your GitLab group:
const group = gitlab.getGroup({
  fullPath: "my-gitlab-group", // Replace the value with the name of your GL group
});

const project = new gitlab.Project("pulumi-gitlab-demo", {
  visibilityLevel: "public",
  defaultBranch: "main",
  namespaceId: group.then(g => parseInt(g.id)),
  archiveOnDestroy: false // Be sure to set this to `true` for any non-demo repos you manage with Pulumi!
});
Creating OIDC resources
To allow GitLab CI/CD to request and be granted temporary AWS credentials, you'll need to create an OIDC provider in AWS that contains the thumbprint of GitLab's certificate, and then create an AWS role that GitLab is allowed to assume.
You'll scope the assume role policy so that the role can be only be assumed by the GitLab project you declared earlier. The role that GitLab CI/CD assumed will have full administrator access so that Pulumi can create and manage any resource within AWS. (Note that it is possible to grant less than FullAdministrator access to Pulumi, but FullAdministrator is often practically required, e.g. where IAM resources, like roles, need to be created. Role creation requires FullAdministrator. This consideration also applies to IaC tools like Terraform.)
Add the following code to index.ts:
const GITLAB_OIDC_PROVIDER_THUMBPRINT = "b3dd7606d2b5a8b4a13771dbecc9ee1cecafa38a";

const gitlabOidcProvider = new aws.iam.OpenIdConnectProvider("gitlab-oidc-provider", {
  clientIdLists: [`https://${audience}`],
  url: `https://${audience}`,
  thumbprintLists: [GITLAB_OIDC_PROVIDER_THUMBPRINT],
}, {
  deleteBeforeReplace: true, // URLs are unique identifiers and cannot be auto-named, so we have to delete before replace.
});

const gitlabAdminRole = new aws.iam.Role("gitlabAdminRole", {
  assumeRolePolicy: {
    Version: "2012-10-17",
    Statement: [
      {
        Effect: "Allow",
        Principal: {
          Federated: gitlabOidcProvider.arn,
        },
        Action: "sts:AssumeRoleWithWebIdentity",
        Condition: {
          StringLike: {
            // Note: Square brackets around the key are what allow us to use a
            // templated string. See:
            // https://stackoverflow.com/questions/59791960/how-to-use-template-literal-as-key-inside-object-literal
            [`${audience}:sub`]: pulumi.interpolate`project_path:${project.pathWithNamespace}:ref_type:branch:ref:*`
          },
        },
      },
    ],
  },
});

new aws.iam.RolePolicyAttachment("gitlabAdminRolePolicy", {
  policyArn: "arn:aws:iam::aws:policy/AdministratorAccess",
  role: gitlabAdminRole.name,
});
A few things to be aware of regarding the thumbprint:
- If you are self-hosting GitLab, you'll need to obtain the thumbprint from your private GitLab installation.
- If you're using GitLab SaaS, it's possible GitLab's OIDC certificate may have been rotated by the time you are reading this.
In either case, you can obtain the correct/latest thumbprint value by following AWS' instructions contained in Obtaining the thumbprint for an OpenID Connect Identity Provider in the AWS docs.
You'll also need to add the role's ARN as a project variable so that the CI/CD process can make a request to assume the role:
new gitlab.ProjectVariable("role-arn", {
  project: project.id,
  key: "ROLE_ARN",
  value: gitlabAdminRole.arn,
});
Project hook (optional)
Pulumi features an integration with GitLab via a webhook that will post the output of the pulumi preview directly to a merge request as a comment. For the webhook to work, you must have a Pulumi organization set up with GitLab as its SSO source. If you don't have a Pulumi organization and would like to try the integration, you can sign up for a free trial organization. The trial lasts 14 days, will give you access to all of Pulumi's paid features, and does not require a credit card. For full details on the integration, see Pulumi CI/CD & GitLab integration.
To set up the webhook, add the following to your index.ts file:
new gitlab.ProjectHook("project-hook", {
  project: project.id,
  url: "https://api.pulumi.com/workflow/gitlab",
  mergeRequestsEvents: true,
  enableSslVerification: true,
  token: process.env["PULUMI_ACCESS_TOKEN"]!,
  pushEvents: false,
});
Note that the above resource assumes that your Pulumi access token is stored as an environment variable. You may want to instead store the token in your stack configuration file. To do this, run the following command:
pulumi config set --secret pulumiAccessToken ${PULUMI_ACCESS_TOKEN}
This will store the encrypted value in your Pulumi stack configuration file (Pulumi.dev.yaml). Because the value is encrypted, you can safely commit your stack configuration file to git. You can access its value in your Pulumi program like this:
const config = new pulumi.Config();
const pulumiAccessToken = config.requireSecret("pulumiAccessToken");
For more details on secrets handling in Pulumi, see Secrets in the Pulumi docs.
Creating a repository and adding repository files
You'll need to create a git repository (a GitLab project) and add some files to it that will control the CI/CD process. First, create some files that you'll include in your GitLab repo:
mkdir -p repository-files/scripts
touch repository-files/.gitlab-ci.yml repository-files/scripts/{aws-auth.sh,pulumi-preview.sh,pulumi-up.sh}
chmod +x repository-files/scripts/{aws-auth.sh,pulumi-preview.sh,pulumi-up.sh}
Next, you'll need a GitLab CI/CD YAML file to describe the pipeline: which container image it should be run in and what the steps of the pipeline are. Place the following code into repository-files/.gitlab-ci.yml:
default:
  image:
    name: "pulumi/pulumi:3.91.1"
    entrypoint: [""]

stages:
  - infrastructure-update

pulumi-up:
  stage: infrastructure-update
  id_tokens:
    GITLAB_OIDC_TOKEN:
      aud: https://gitlab.com
  before_script:
    - chmod +x ./scripts/*.sh
    - ./scripts/aws-auth.sh
  script:
    - ./scripts/pulumi-up.sh
  only:
    - main # i.e., the name of the default branch

pulumi-preview:
  stage: infrastructure-update
  id_tokens:
    GITLAB_OIDC_TOKEN:
      aud: https://gitlab.com
  before_script:
    - chmod +x ./scripts/*.sh
    - ./scripts/aws-auth.sh
  script:
    - ./scripts/pulumi-preview.sh
  rules:
    - if: $CI_PIPELINE_SOURCE == 'merge_request_event'
The CI/CD process is fairly simple but illustrates the basic functionality needed for a production-ready pipeline (or these steps may be all your organization needs):
- Run the
pulumi previewcommand when a merge request is opened or updated. This will help the reviewer gain important context. Because IaC is necessarily stateful (the state file is what enables Pulumi to be a declarative tool), when reviewing changes reviewers must have both the code changes and the infrastructure changes to fully understand the impact of changes to the codebase. This process constitutes continuous integration. - Run the
pulumi upcommand when code is merged to the default branch (calledmainby default). This process constitutes continuous delivery.
Note that this example uses the pulumi/pulumi "kitchen sink" image that contains all the runtimes for all the languages Pulumi supports, along with some ancillary tools like the AWS CLI (which you'll need in order to use OIDC authentication). While the pulumi/pulumi image is convenient, it's also quite large (1.41 GB at the time of writing), which makes it relatively slow to initialize. If you're creating production pipelines using Pulumi, you may want to consider creating your own custom (slimmer) image that has exactly the tools you need installed, perhaps starting with one of Pulumi's language-specific images, e.g. pulumi/pulumi-nodejs.
Then you'll need to write the script that authenticates GitLab with AWS via OIDC. Place the following code in repository-files/scripts/aws-auth.sh:
#!/bin/bash

mkdir -p ~/.aws
echo "${GITLAB_OIDC_TOKEN}" > /tmp/web_identity_token
echo -e "[profile oidc]\nrole_arn=${ROLE_ARN}\nweb_identity_token_file=/tmp/web_identity_token" > ~/.aws/config

echo "length of GITLAB_OIDC_TOKEN=${#GITLAB_OIDC_TOKEN}"
echo "ROLE_ARN=${ROLE_ARN}"

export AWS_PROFILE="oidc"
aws sts get-caller-identity
For continuous integration, you'll need a script that will execute the pulumi preview command when a merge request is opened. Place the following code in repository-files/scripts/pulumi-preview.sh:
#!/bin/bash
set -e -x

export PATH=$PATH:$HOME/.pulumi/bin

yarn install
pulumi login
pulumi org set-default $PULUMI_ORG
pulumi stack select dev
export AWS_PROFILE="oidc"
pulumi preview
For continuous delivery, you'll need a similar script that will execute the pulumi up command when the Merge Request is merged to the default branch. Place the following code in repository-files/scripts/pulumi-up.sh:
#!/bin/bash
set -e -x

# Add the pulumi CLI to the PATH
export PATH=$PATH:$HOME/.pulumi/bin

yarn install
pulumi login
pulumi org set-default $PULUMI_ORG
pulumi stack select dev
export AWS_PROFILE="oidc"
pulumi up -y
Finally, you'll need to add these files to your GitLab Project. Add the following code block to your index.ts file:
[
  "scripts/aws-auth.sh",
  "scripts/pulumi-preview.sh",
  "scripts/pulumi-up.sh",
  ".gitlab-ci.yml",
].forEach(file => {
  const content = fs.readFileSync(`repository-files/${file}`, "utf-8");

  new gitlab.RepositoryFile(file, {
    project: project.id,
    filePath: file,
    branch: "main",
    content: content,
    commitMessage: `Add ${file},`,
    encoding: "text",
  });
});
Note that we're able to take advantage of general-purpose programming language features: We are able to create an array and use forEach() to iterate through its members, and we are able to use the fs.readFileSync() method from the Node.js runtime to read the contents of our file. This is powerful stuff!
Project variables and stack outputs
You'll need a few more resources to complete the code. Your CI/CD process will need a Pulumi access token in order to authenticate against the Pulumi Cloud backend which holds your Pulumi state file and handles encryption and decryption of secrets. You will also need to supply name of your Pulumi organization. (If you are using Pulumi Cloud as an individual, this is your Pulumi username.) Add the following to index.ts:
new gitlab.ProjectVariable("pulumi-access-token", {
  project: project.id,
  key: "PULUMI_ACCESS_TOKEN",
  value: process.env["PULUMI_ACCESS_TOKEN"]!,
  masked: true,
});

new gitlab.ProjectVariable("pulumi-org", {
  project: project.id,
  key: "PULUMI_ORG",
  value: pulumi.getOrganization(),
});
Finally, you'll need to add a stack output so that we can run the git clone command to test out our pipeline. Stack outputs allow you to access values within your Pulumi program from the command line or from other Pulumi programs. For more information, see Understanding Stack Outputs. Add the following to index.ts:
export const gitCloneCommand = pulumi.interpolate`git clone ${project.sshUrlToRepo}`;
Deploying your infrastructure and testing the pipeline
To deploy your resources, run the following command:
pulumi up
Pulumi will output a list of the resources it intends to create. Select yes to continue.
Once the command has completed, you can run the following command to get the git clone command for your GitLab repo:
pulumi stack output gitCloneCommand
In a new, empty directory, run the git clone command from your Pulumi stack output, e.g.:
git clone [email protected]:jkodroff/pulumi-gitlab-demo-9de2a3b.git
Change into the directory and create a new branch:
git checkout -b my-first-branch
Now you are ready to create some sample infrastructure in our repository. You can use the aws-typescript to quickly generate a simple Pulumi program with AWS resources:
pulumi new aws-typescript -y --force
The template includes a very simple Pulumi program that you can use to prove out the pipeline:
$ cat index.ts
import * as pulumi from "@pulumi/pulumi";
import * as aws from "@pulumi/aws";
import * as awsx from "@pulumi/awsx";

// Create an AWS resource (S3 Bucket)
const bucket = new aws.s3.Bucket("my-bucket");

// Export the name of the bucket
export const bucketName = bucket.id;
Commit your changes and push your branch:
git add -A
git commit -m "My first commit."
git push
In the GitLab UI, create a merge request for your branch:
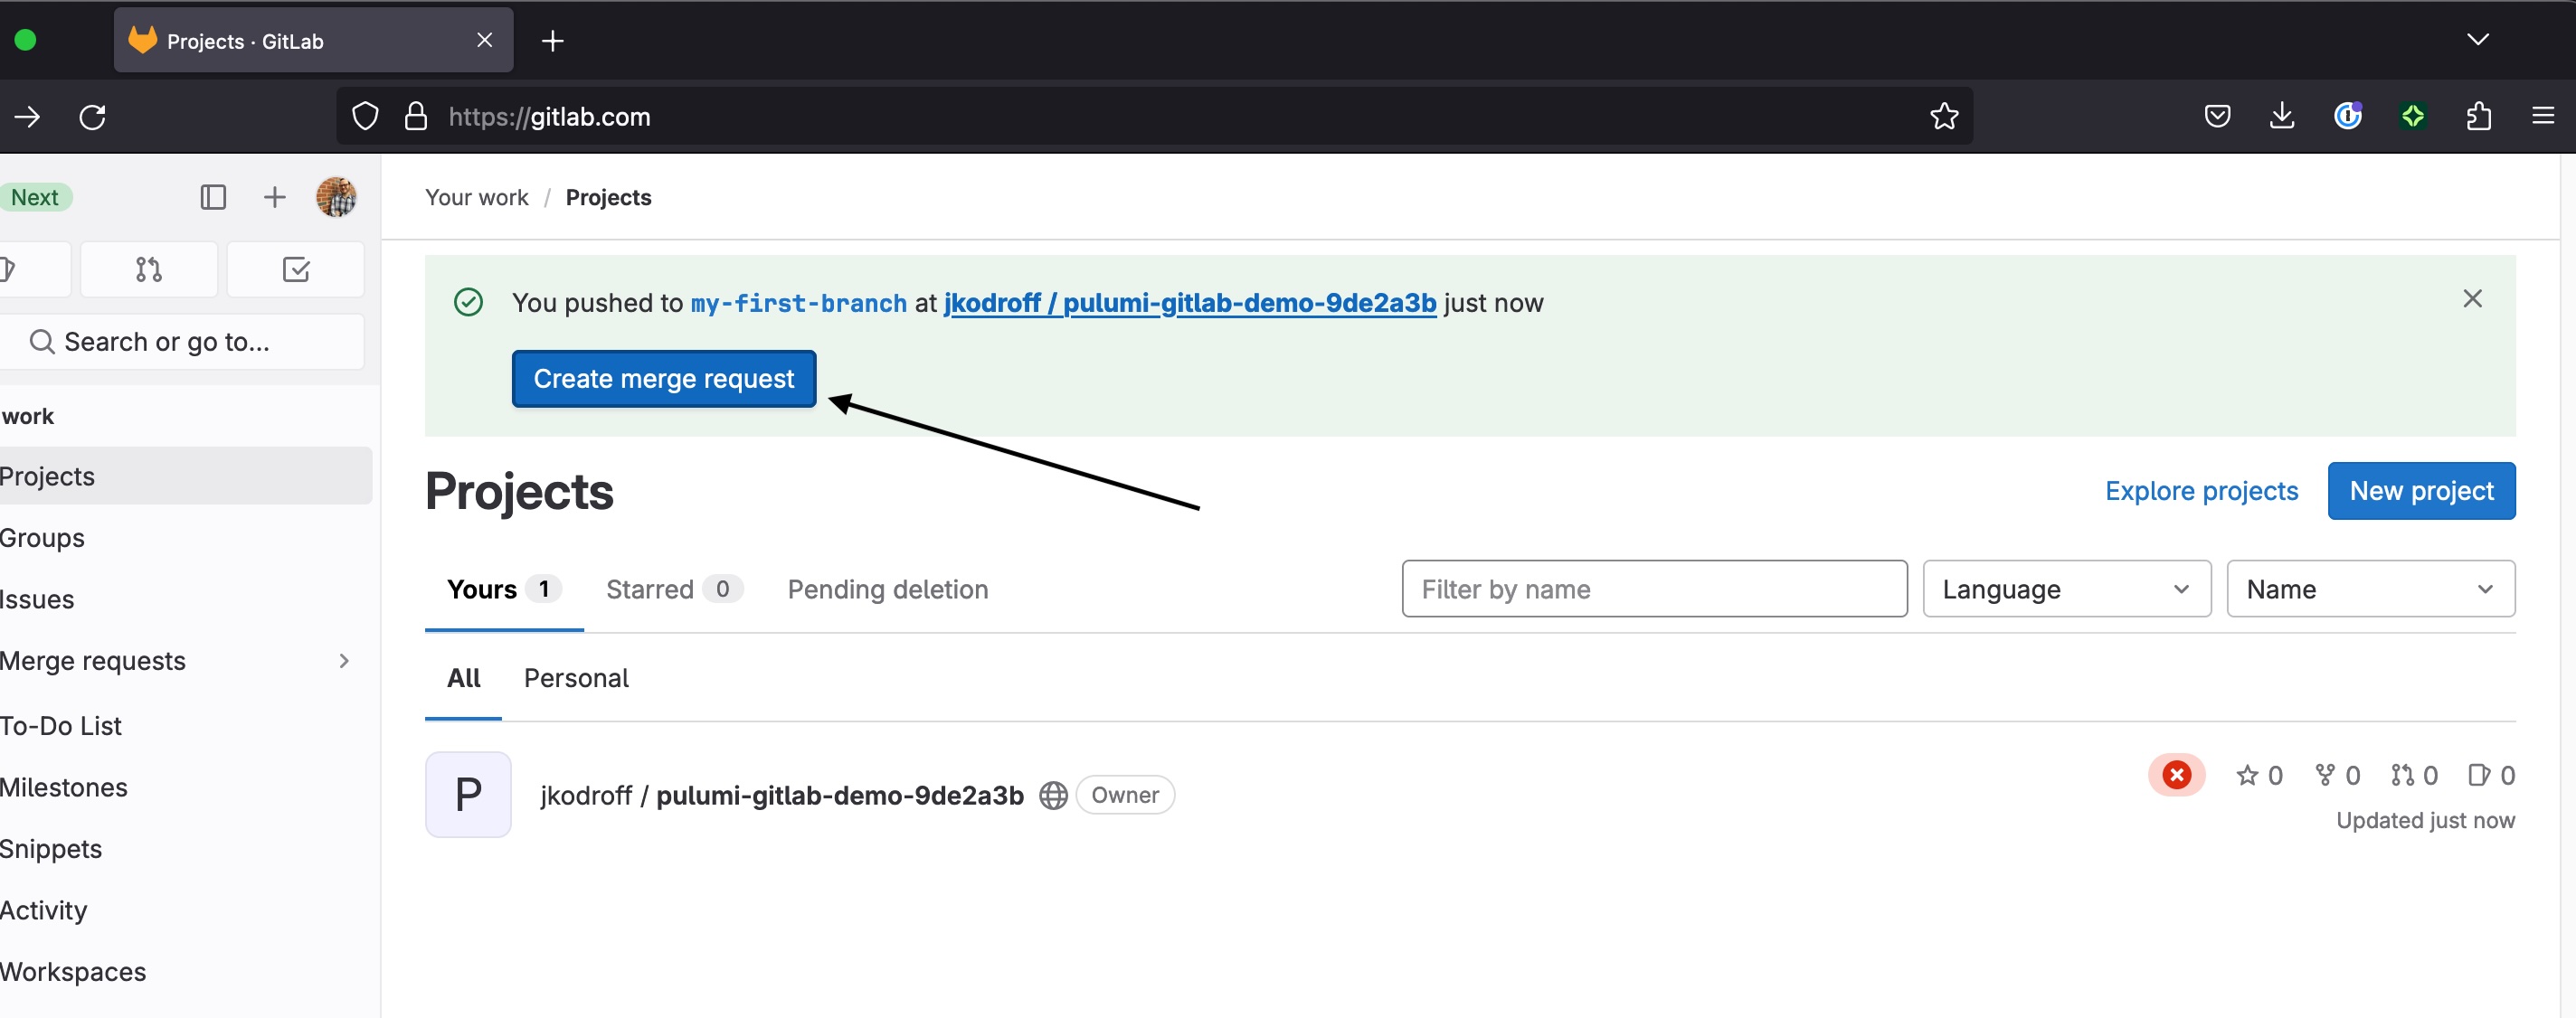
Your merge request pipeline should start running:
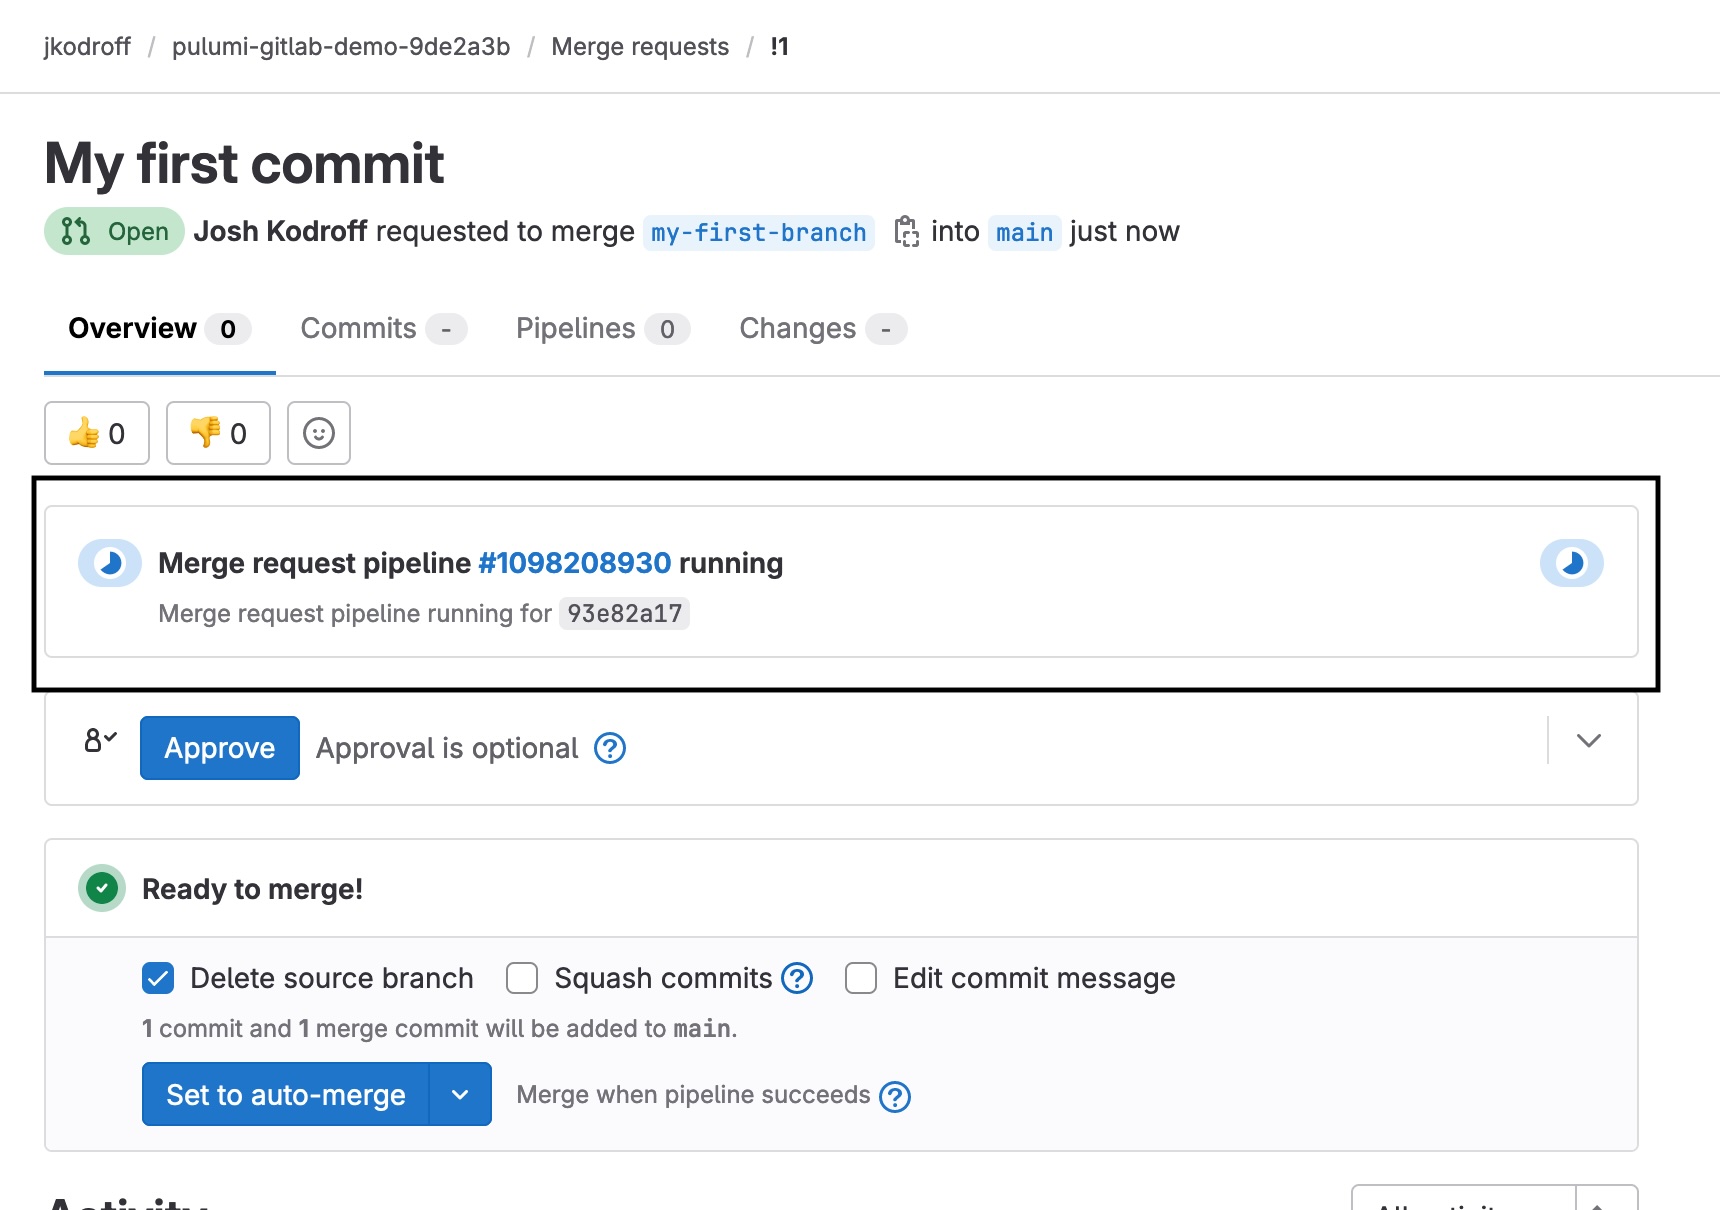
Once the pipeline completes, you should see the output of the pulumi preview command in the pipeline's logs:

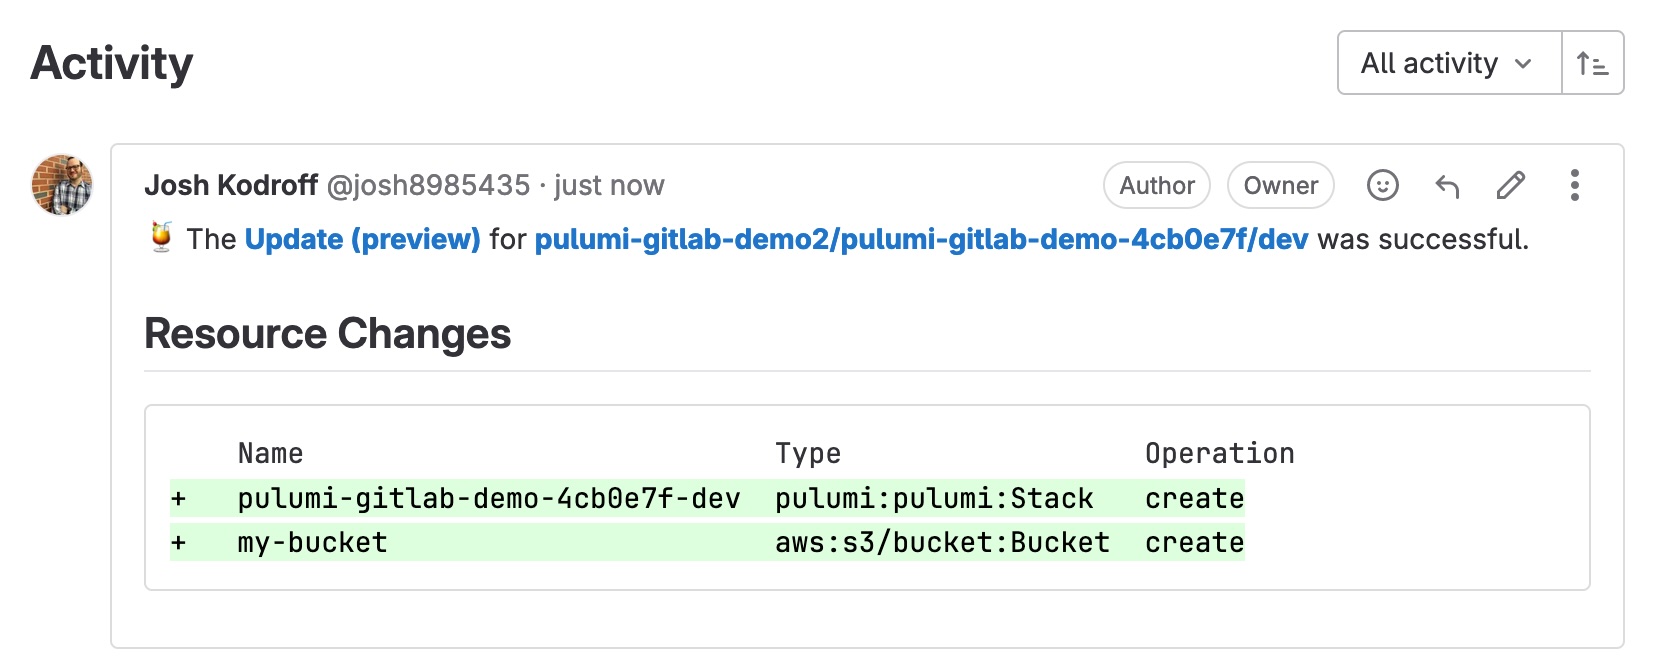
If you installed the optional webhook, you should see the results of pulumi preview posted back to the merge request as a comment:
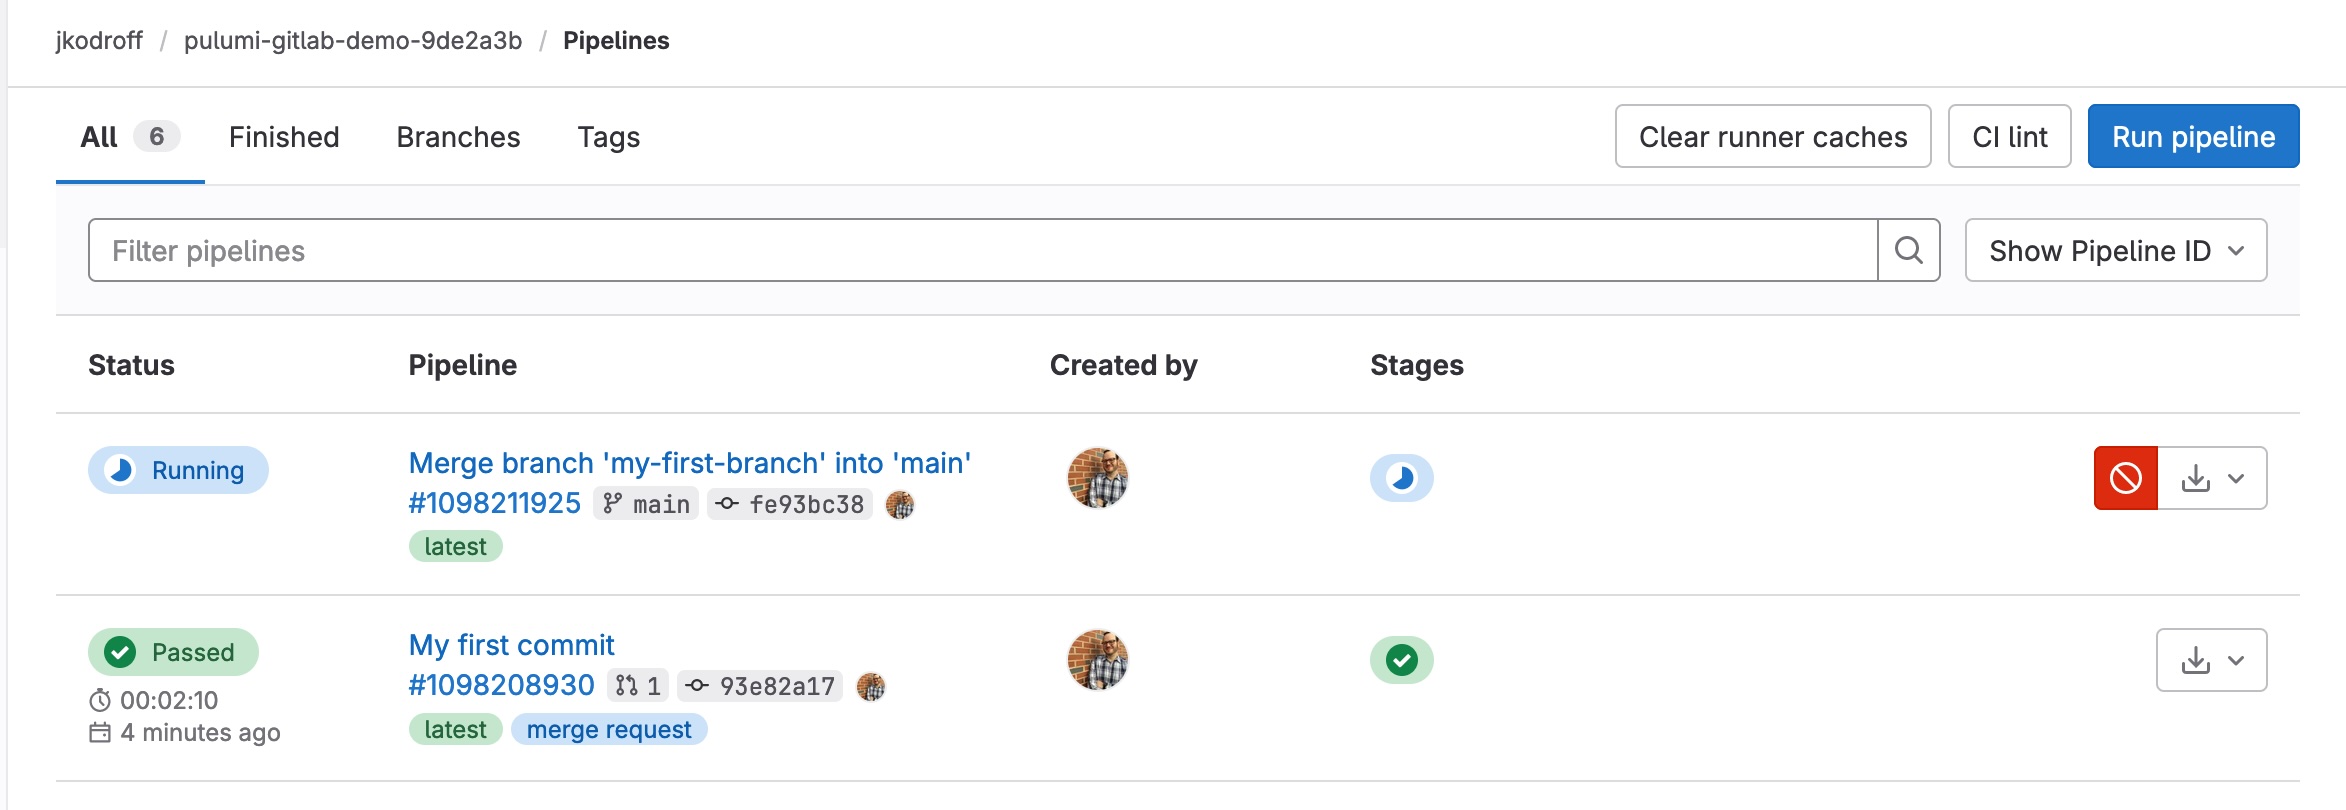
Once the pipeline has completed running, your merge request is ready to merge:
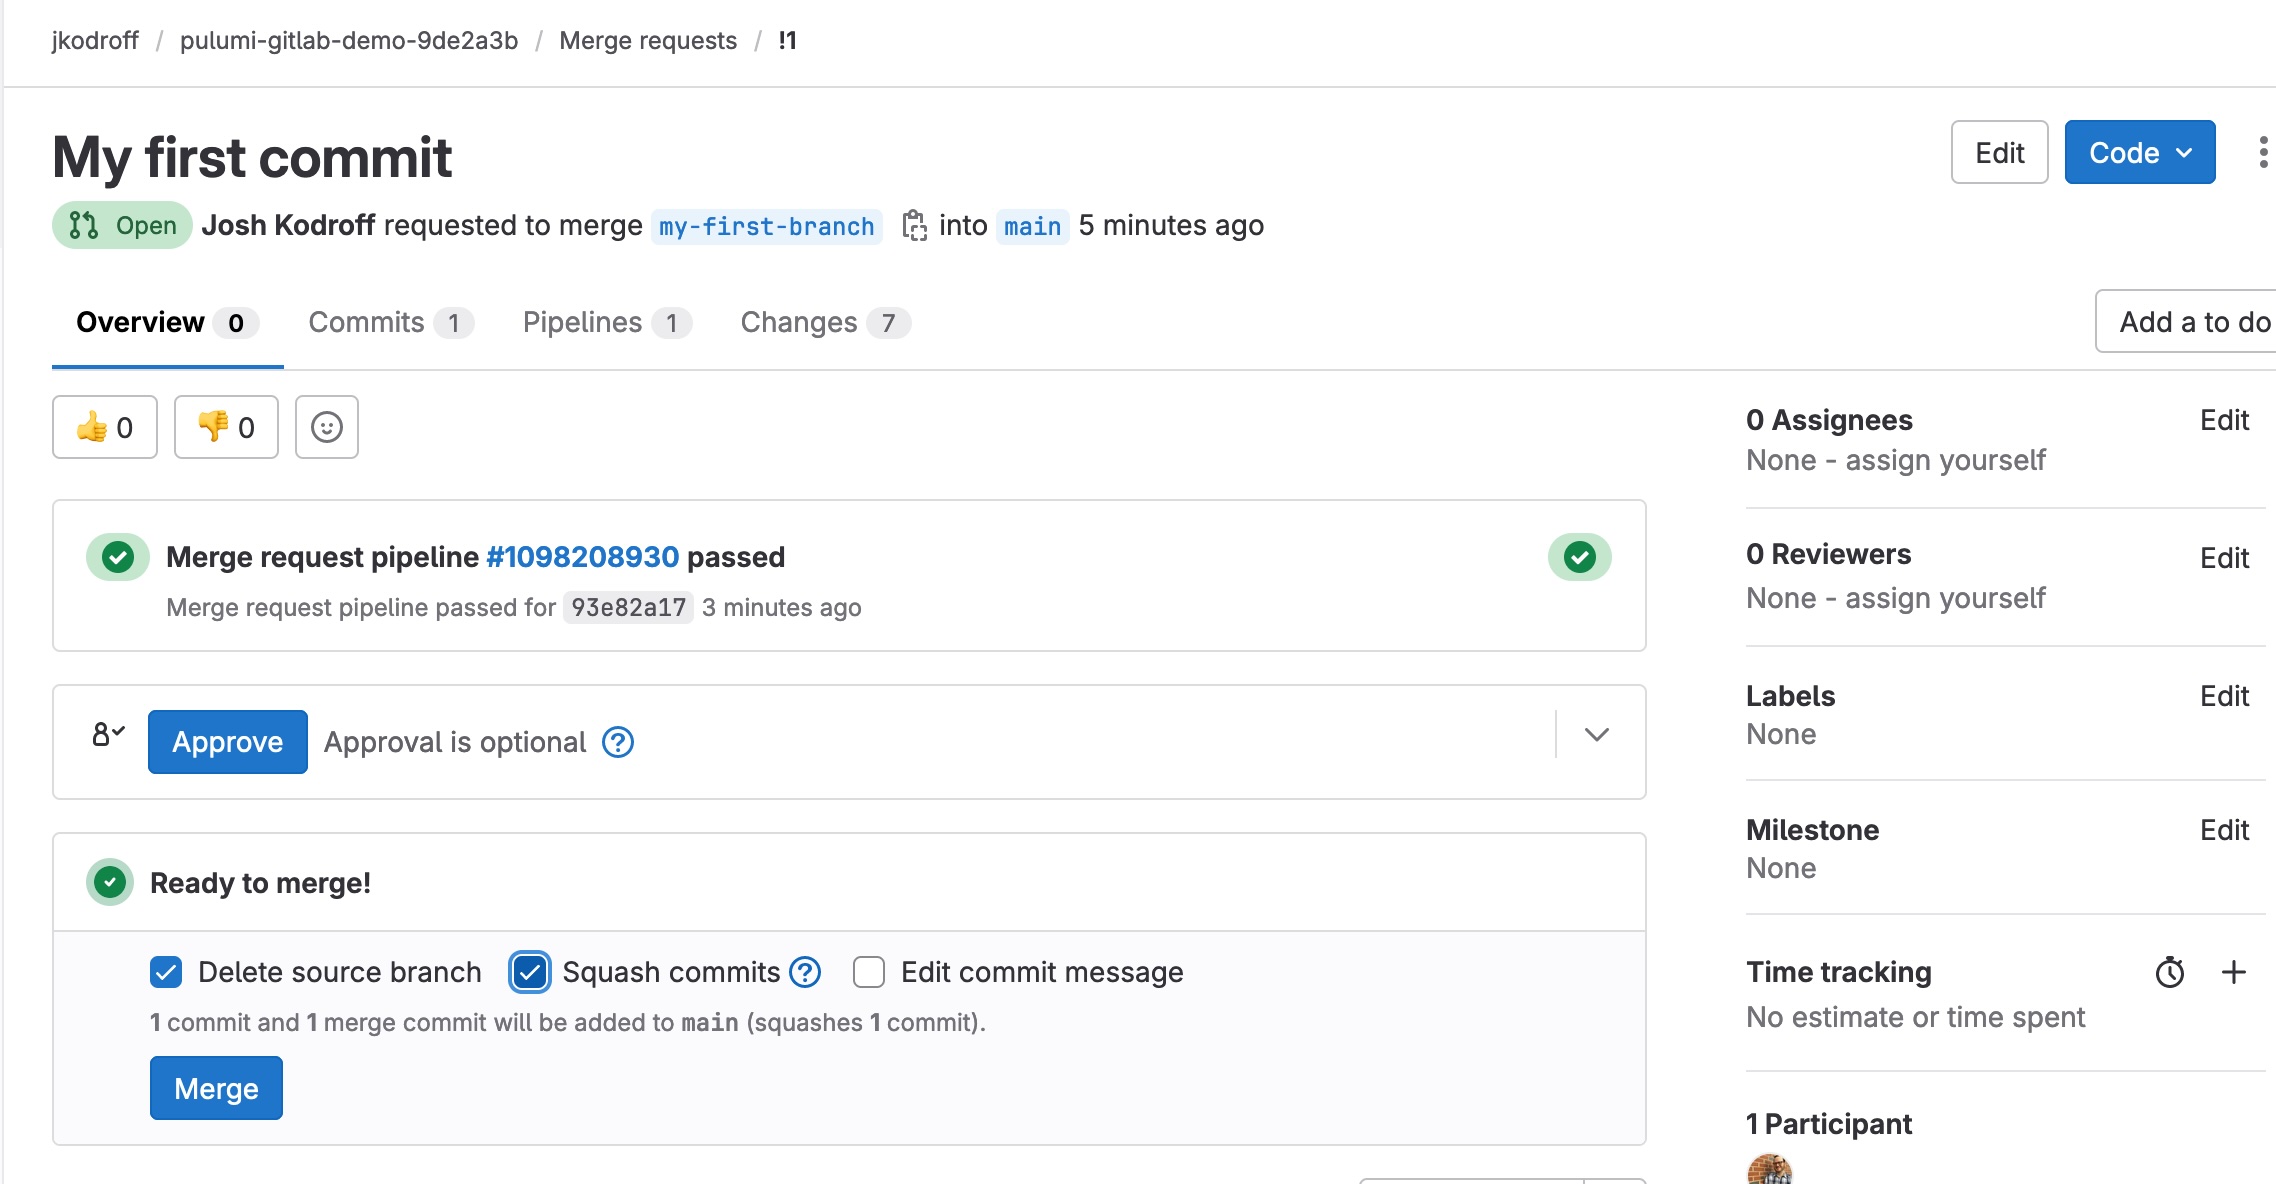
Merging the merge request will trigger the main branch pipeline. (Note that in this screen you will see a failed initial run of CI/CD on the main branch toward the bottom of the screen. This is normal and is caused by the initial upload of .gitlab-ci/yml to the main branch without a Pulumi program being present.)
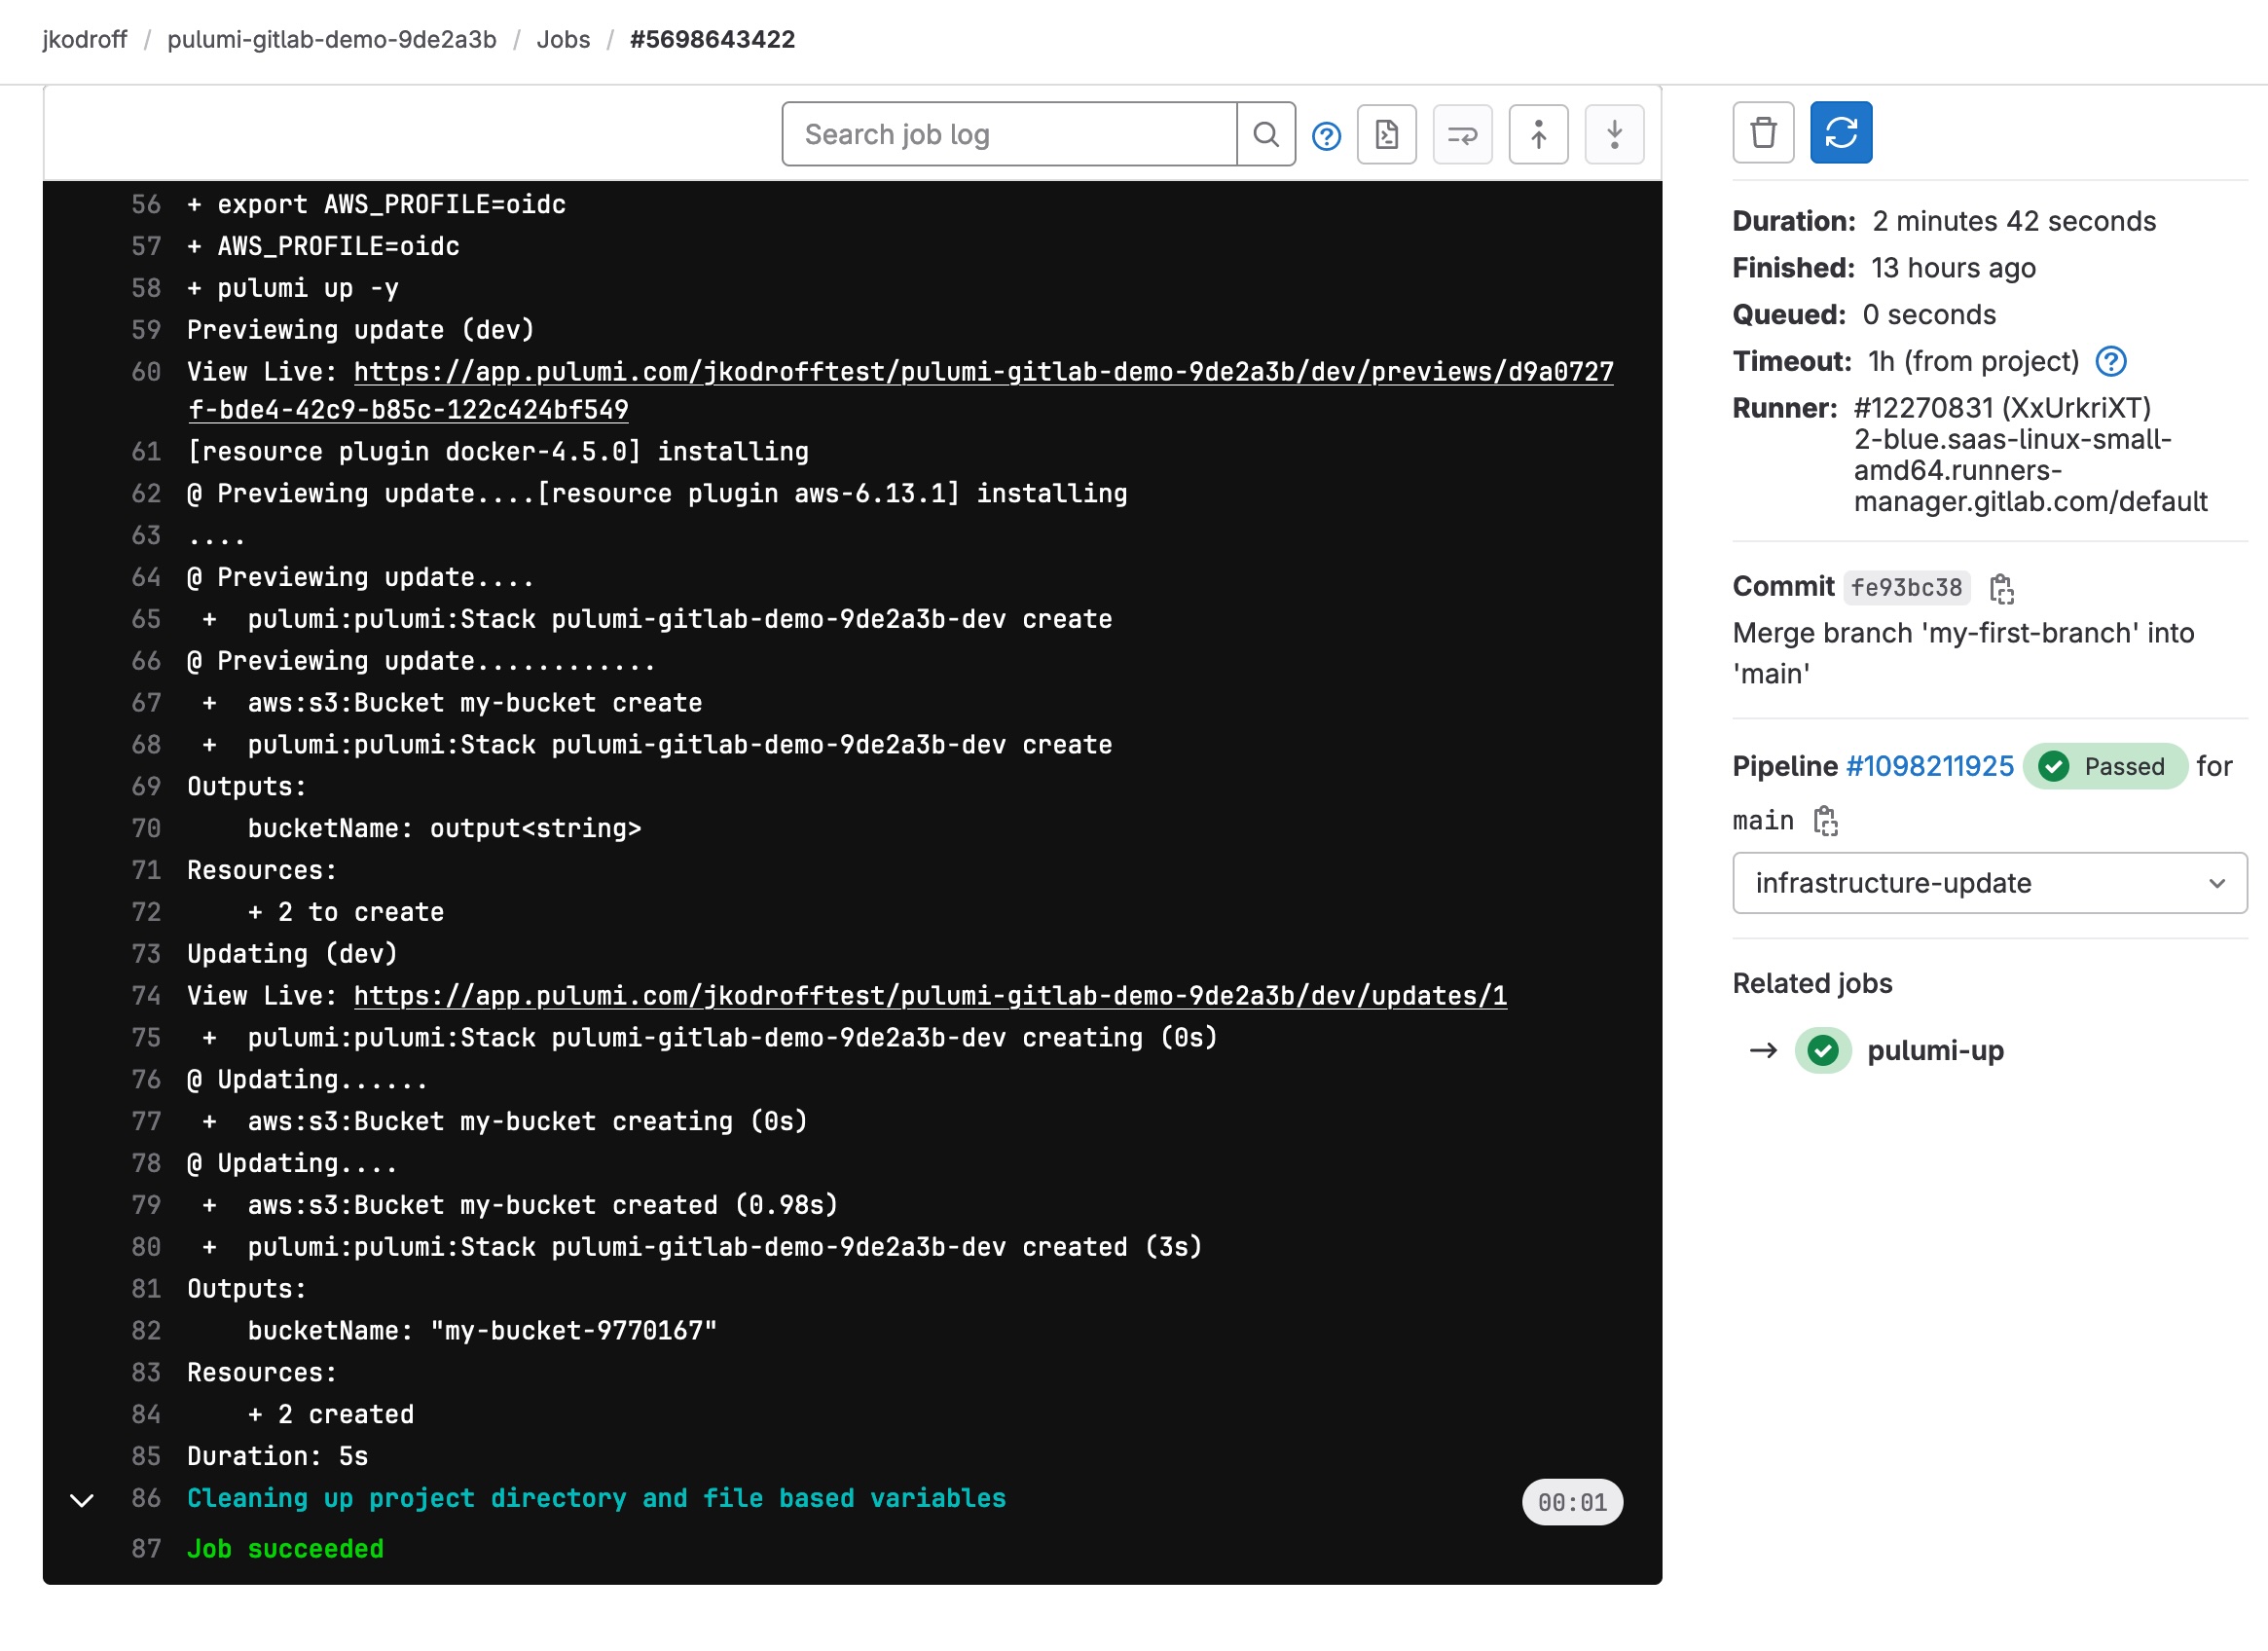
If you click into the main branch pipeline's execution, you can see your bucket has been created:
 To delete the bucket, run the following command in your local clone of the repository:
pulumi destroy
Alternatively, you could create a merge request that removes the bucket from your Pulumi program and run the pipelines again. Because Pulumi is declarative, removing the bucket from your program will delete it from AWS.
Finally, run the pulumi destroy command again in the Pulumi program with your OIDC and GitLab resources to finish cleaning up.
Next steps
Using IaC to define pipelines and other GitLab resources can greatly improve your platform team's ability to reliably and quickly manage the resources to keep application teams delivering. With Pulumi, you also get the power and expressiveness of using popular programming languages to express those resources!
If you liked what you read here, here are some ways you can enhance your CI/CD pipelines:
- Add Pulumi Policy Packs to your pipeline: Pulumi policy packs allow you to validate that your resources are in compliance with your organization's security and compliance policies. Pulumi's open source Compliance Ready Policies are a great place to start on your journey. Compliance Ready Policies contain policy rules for the major cloud providers for popular compliance frameworks like PCI-DSS and ISO27001, and policy packs are easy to integrate into your pipelines.
- Check out Pulumi ESC (Environments, Secrets, and Configuration): Pulumi ESC makes it easy to share static secrets like GitLab tokens and can even generate dynamic secrets like AWS OIDC credentials. ESC becomes especially useful when using Pulumi at scale because it reduces the duplication of configuration and secrets that are used by multiple Pulumi programs. You don't even have to use Pulumi IaC to benefit from Pulumi ESC - Pulumi ESC's command line can be used with any CLI tool like the AWS CLI.