Published on: August 19, 2016
9 min read
Posting to your GitLab Pages blog from iOS
Tutorial: Learn how to post to your GitLab Pages blog from anywhere, using your iOS device.

Speed and stability under load are advantages of using a static-site generator (SSG), but because building the site and uploading the generated HTML is done on a computer, are you stuck hauling around your laptop to post to your SSG-powered blog? Nope! In this post we'll show you how to harness the power of GitLab Pages update your site from your iOS device anywhere, anytime.
Requirements
You'll need an SSG-powered site set up on GitLab.com, of course (they're free and easy to set up!), but you'll also need an app for performing Git operations and for text editing on your iOS device.
In this tutorial, we'll post to a Hugo-based site (though it'll work with [any SSG that you use with GitLab Pages][pageshowto]) using Working Copy to handle Git operations and Editorial for text-editing. GitLab provides [a template][hugotemplate] that you can use to set up your own Hugo-powered SSG.
Note that these apps aren't free. Working Copy requires an in-app purchase to be enable pushing to a remote repository, and Editorial costs a small amount. Of course, there are other options available (you can explore some of them on the GitLab Community Applications page), but these are the apps we'll be using to describe the process in this tutorial.
Concept
GitLab Pages uses [GitLab CI][ci] to automate [building and deploying][cd] your SSG-powered
website when you push a commit to a certain branch (e.g., master). When GitLab CI
sees a new commit on this branch, it triggers the [GitLab Runner][gitlabrunner] to
execute the scripts in the [.gitlab-ci.yml][gitlabciyml] file you created when
you set up your SSG for GitLab Pages. There's a [great set of templates][templates]
for setting up your SSG of choice, including sample .gitlab-ci.yml files.
Since the process needs some (pretty straightforward) Git management, we need an
app to handle committing and pushing to GitLab. It's also a good reason to
checkout a new branch while you're working on your edits! Imagine you're drafting
a new article on your iPhone, then push it to master on GitLab so that you can
pick up where you left off on another device (say, your computer). GitLab CI will
pick up the commit, and publish a half-finished post automatically! By working on
a separate branch, you don't have to worry about that happening.
The details
Cloning your site's repository
Start by logging in to your GitLab account in Working Copy and cloning your website's repository to your iOS device by following the instructions in the app's user guide.
Creating a new branch
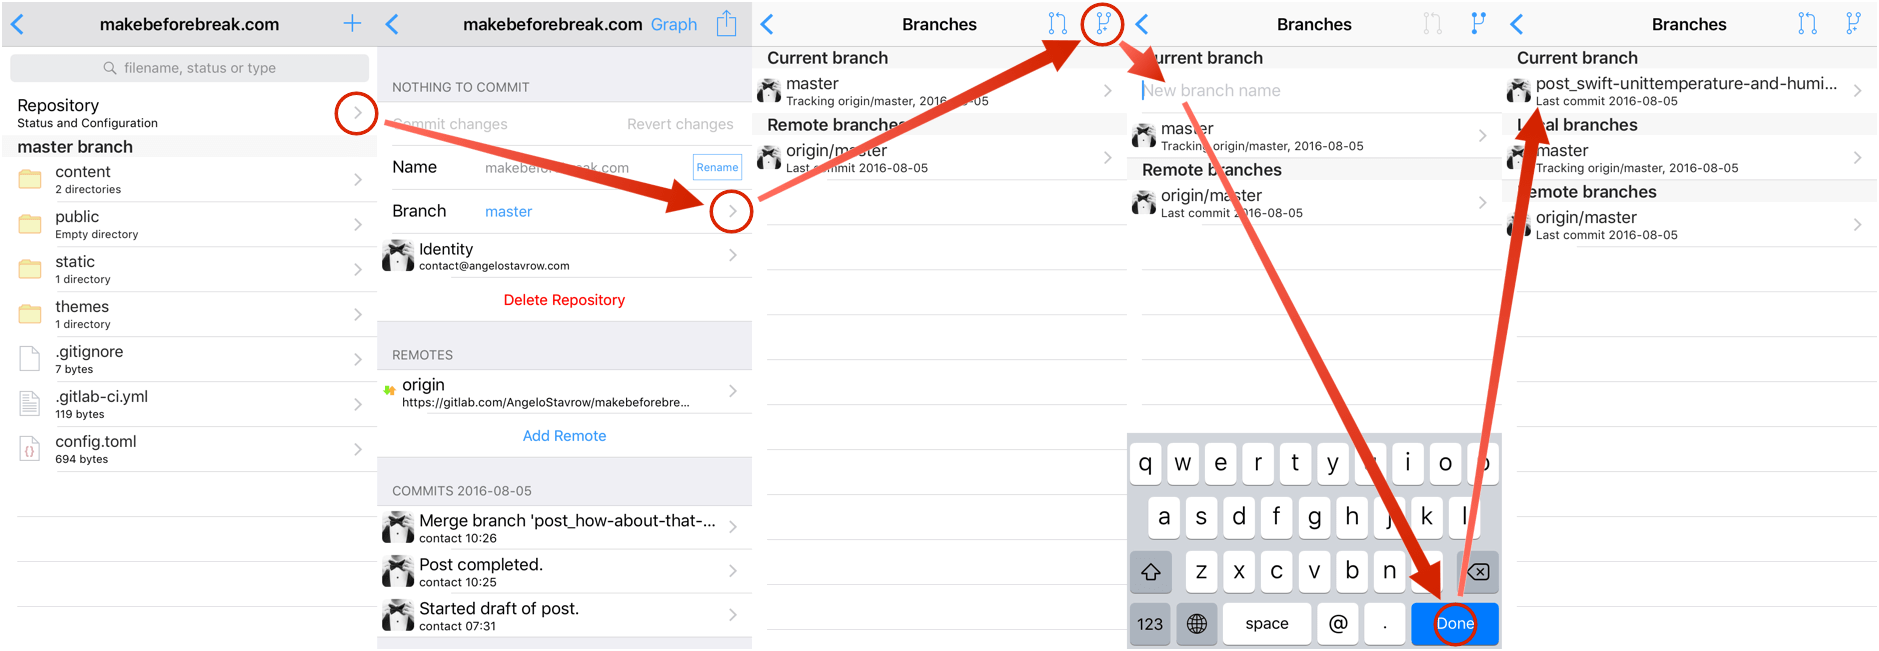
Next, navigate to your site's repository and create a new branch. In Editorial,
this is done by tapping the Repository cell, then the Branch cell, and then
the top-rightmost button (create new branch) in the navigation bar. Give your branch
a name (for example, something like post_title-of-article_yyyy-mm-dd might be
useful), and then tap on Done. Tap the < (back) button on the top-left of
the navigation bar twice to go back to your repository.
Creating a new file for the post
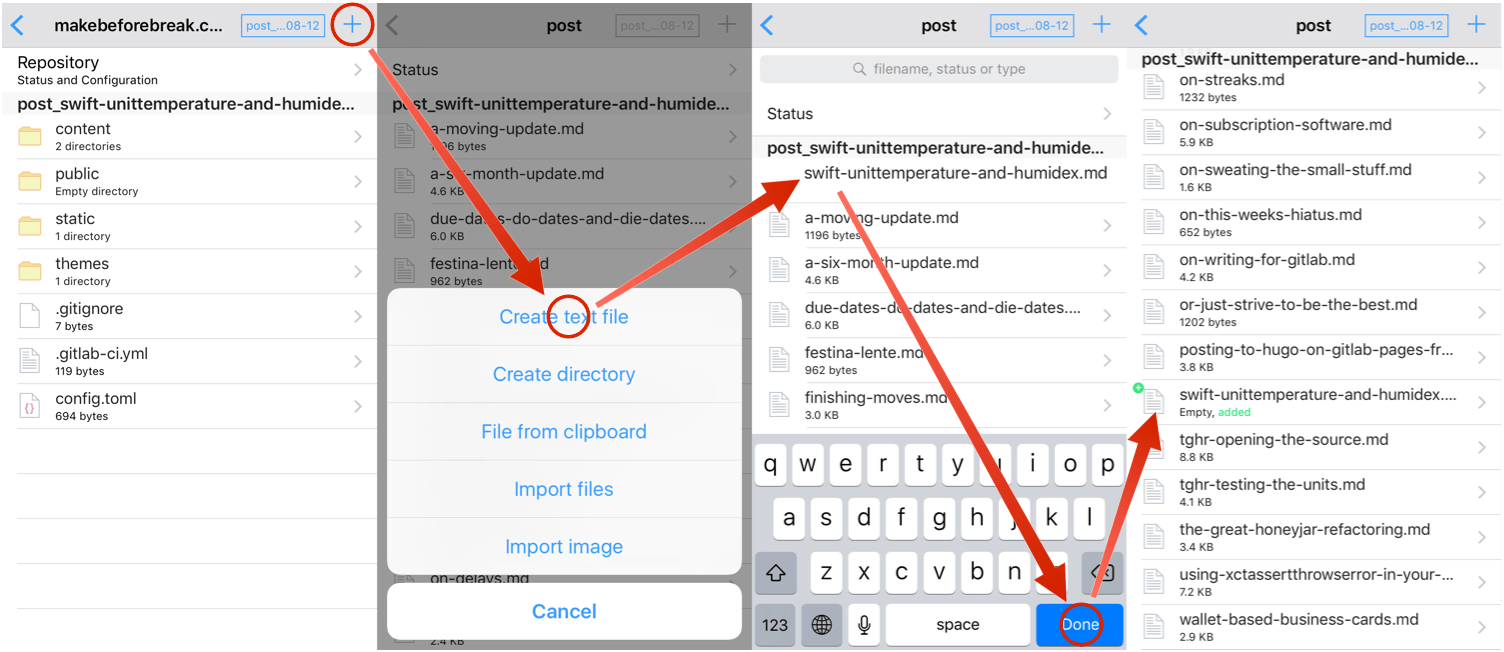
Now that you're on a new branch, navigate within your repository to the folder where
posts go. In Hugo's default [setup][hugoquickstart], this is /content/post—
navigating here, you should see all of your existing posts listed. To add a new
file, tap the + button in the top-right of the navigation bar, and from
the sheet that pops up, tap Create text file. Give the file a name (e.g.,
title-of-article.md). If you like, tap on the newly-created file to view details,
then go back.
Opening the file for editing
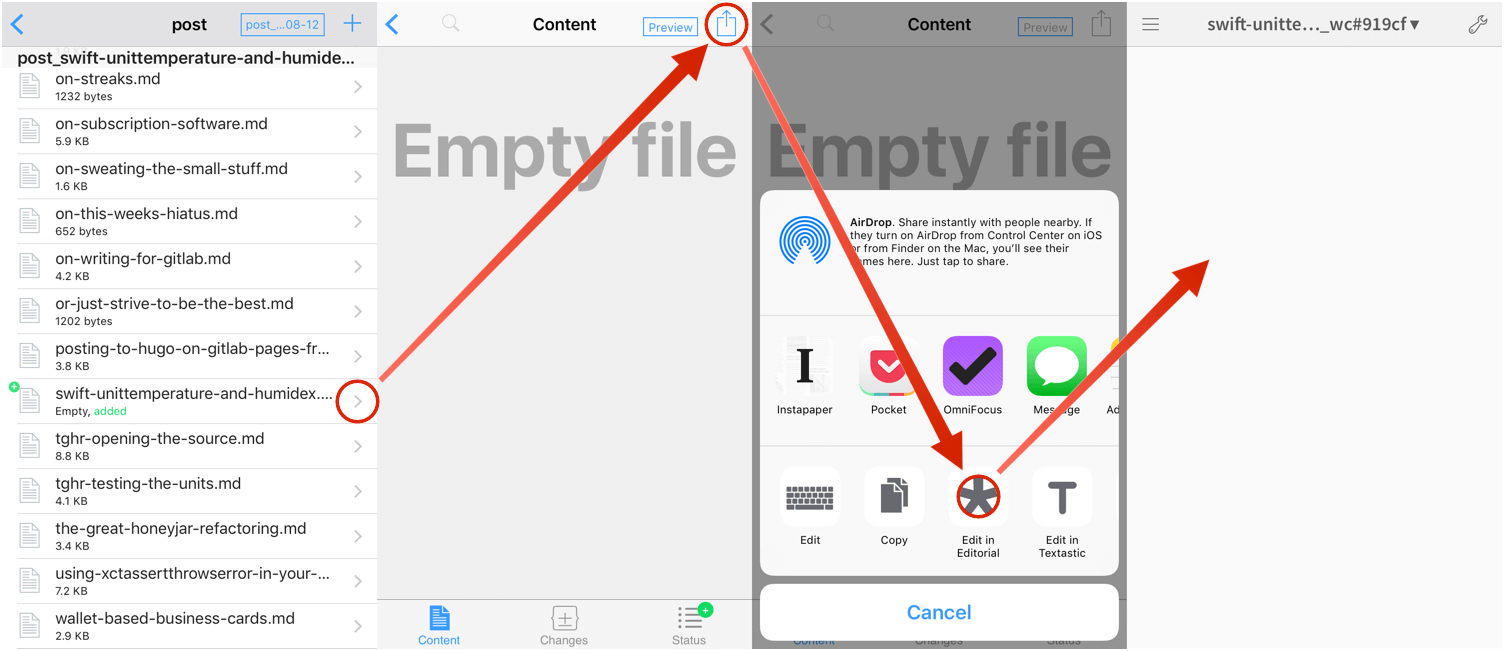
Of course, since the file is empty, you need to edit it to draft your post. Tap on the file in the table view to display the file contents (currently empty), then tap on the share icon in the upper-right corner of the navigation bar, and in the share sheet that pops up, tap Edit to begin editing the file in Working Copy, or—if you have it installed—tap Edit in Editorial to open the file in Editorial for writing. The first time you do so, Working Copy will let you know what's going to happen, and invite you to install the "Working Copy" workflow in Editorial. This will let you send the file back to Working Copy, ready for committing.
Adding required front matter
Hugo (and most other SSGs) require each post to have some [front matter][hugofrontmatter],
including a date, a title, and so on. One nice option with Editorial is that it
can natively expand TextExpander shortcuts without having to switch to
alternate keyboards. You can create a template for your front matter and, upon
opening the file in Editorial, type the shortcut (e.g., ;toml or ;yaml),
and—💥 poof💥—the shortcut will be expanded and ready for whatever
you need to enter.
Writing the post
You're now ready to type your article! Go ahead and type to your heart's content. You can swipe to the left from the edge of the screen in Editorial to show a Markdown preview of what you've written so far, in case you want to preview the post. Keep in mind that your SSG may not be using the same Markdown rendering engine as Editorial does, so if you're using non-standard Markdown elements, the final post may not look exactly the same.
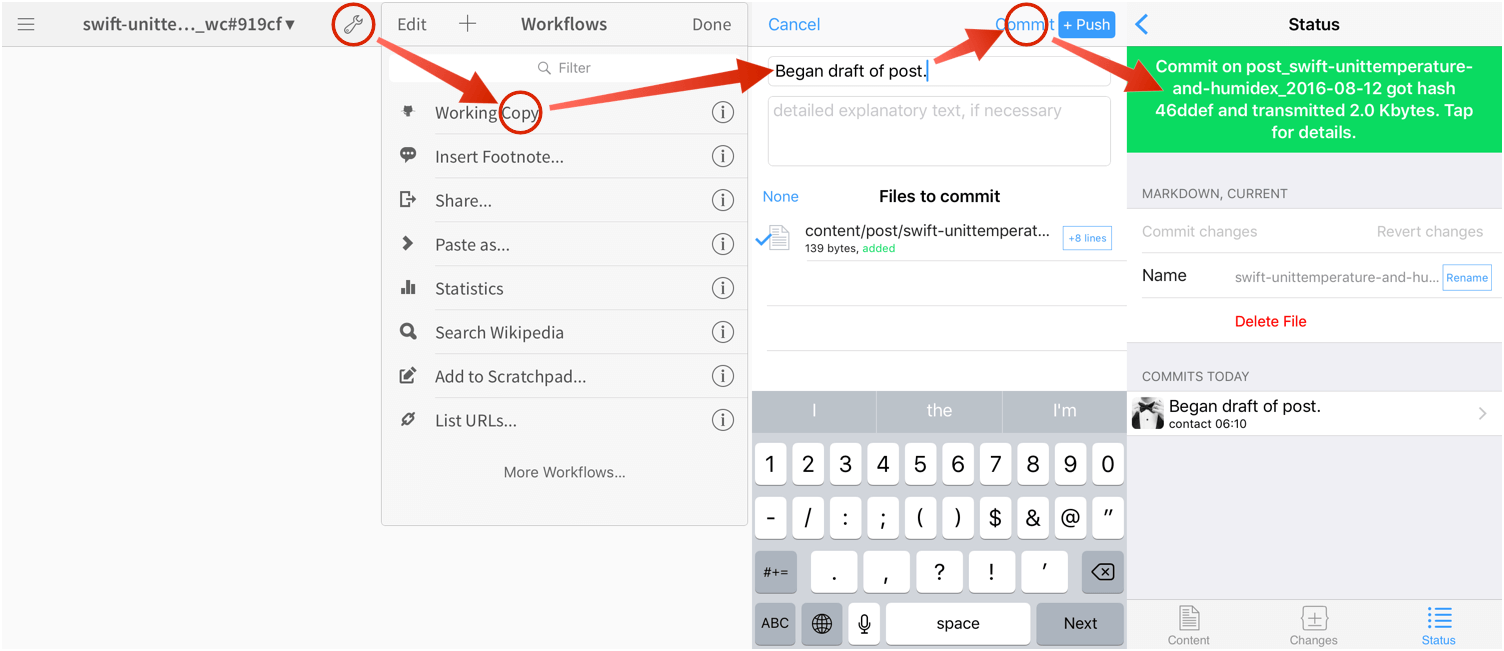
When you're at a point where you want to save and commit your progress, tap the 🔧 icon in the top-right of the navigation bar in Editorial, then tap the Working Copy workflow, and you'll be taken back to Working Copy, ready to commit. Enter a commit message and tap Commit in the navigation bar to commit your changes.
Adding images to your post
Want to add an image to your post? You can save a photo to your repository in Working
Copy by navigating to the right folder (in Hugo, images should be saved in the
static folder; other SSGs will vary), tapping the + button, and tapping
on Import image in the pop-up sheet. Select the images you want to add from
your photos (you may have to give Working Copy permission to access the library
first), and it'll be added to the repository. You then just have to reference them
appropriately in your Markdown file.
Committing your changes and pushing the content back to GitLab
Once you're ready to commit, tap the Repository field in Working Copy's repository navigator, then tap on the Commit changes button. You'll be prompted to enter a short summary, as well as an (optional) detailed explanation of the changes. Below the text fields, you'll see a list of files to commit (i.e., the text file you added for your post, and any images you uploaded in Working Copy).
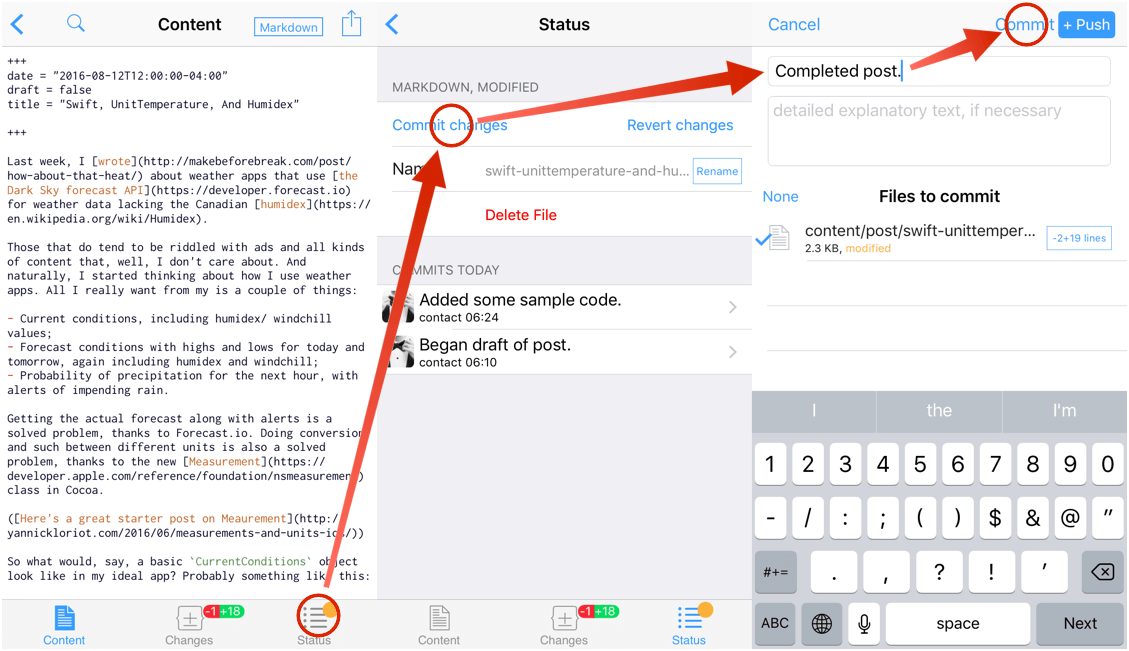
Once you've entered a commit message, the Commit button will be enabled in the top-right of the navigation bar. Next to it is a +Push toggle; if it's highlighted in blue, tapping on the commit button will commit the changes and push them to GitLab; otherwise, the commit will only take place on your iOS device. Tap the +Push button to toggle this behavior. This may be useful if you want to make multiple commits while you're working without a network connection, for example, then pushing them all at once to GitLab once you're connected again.
Merging the post branch into master to trigger CI and publish
So you've written your post, added some images, and pushed the changes to GitLab.
Want to publish from your iPhone? You can easily do so from GitLab! Launch
Safari and log in to GitLab, and create a new Merge Request as you normally
would to merge the changes in your post_title-of-article_yyyy-mm-dd branch to
master. Accept the merge and GitLab CI will pick up the changes, execute the
required scripts, and publish the changes to your site!
Final thoughts
The workflow described in this article might be for you if:
- you're the type to be struck by inspiration, and want to be able to draft something quickly, or
- you're often away from your computer, or
- you want to blog about your trip while you're travelling, or
- you simply prefer to use iOS devices in place of computers,
If any of these situations apply to you, this is a very convenient way to use a SSG for its benefits, without giving up your ability to work from anywhere.
However, there are some caveats to consider. For one, you can't render your site
locally on your iPhone to preview what your post (or other changes, for that matter)
will look like when it goes live. If you're still in the process of tweaking things,
or you haven't fully explored your SSG's Markdown rendering engine, that can be
a bit troublesome—for example, you may only find out after the post goes
live that it will correctly render an HTML entity by code (e.g., +) but not
by description (e.g., +). Oops. Of course, you can always sync your working
branch back to your computer and preview it there, if you really need to.
Additionally, if you're using your iPhone, the screen and virtual keyboard size may be uncomfortable for typing longer posts. You can certainly use an external Bluetooth keyboard, but this may not be practical, and it doesn't change the size of your phone's screen!
Finally, while Working Copy and Editorial are both excellent, professional-level apps, they may not be in your budget. Fortunately, you can always do everything outlined here via the GitLab website (creating new branches and files) as long as you have an internet connection; if you want to continue writing while offline, you can always copy and paste into one of [many text editors for iOS][itexteditors], several of which also feature Markdown previewing.
Whatever method you choose, it's comforting to know that GitLab has you covered should you want to post to your SSG-powered blog from your iOS device. What are your preferred mobile git clients and text editors? Tell us in the comments!
About the author
Angelo is a Quality Engineer and Software Developer living in Montreal, Canada. He believes that open, honest, collaboration is the best path towards building great things and great teams.
[ci]: /solutions/continuous-integration/ [cd]: /blog/continuous-integration-delivery-and-deployment-with-gitlab/ [templates]: https://gitlab.com/groups/pages [gitlabrunner]: http://doc.gitlab.com/ee/ci/quick_start/README.html#shared-runners [gitlabciyml]: /blog/gitlab-pages-setup/#gitlab-ci [pageshowto]: /blog/ssg-overview-gitlab-pages-part-3-examples-ci/ [hugoquickstart]: http://gohugo.io/overview/quickstart/ [hugofrontmatter]: https://gohugo.io/content/front-matter/ [hugotemplate]: https://gitlab.com/pages/hugo [itexteditors]: http://brettterpstra.com/ios-text-editors/

