
is now in public beta!
Published on: June 28, 2016
14 min read
Get started with OpenShift Origin 3 and GitLab
In this tutorial, we will see how to deploy GitLab in OpenShift using GitLab's official Docker image


Note: This article is deprecated. It is now recommended to use the official Kubernetes Helm charts for installing GitLab to OpenShift. Check out the official installation docs for details.
Note: This article has been moved to a technical article so it can be more easily updated. We recommend using the article.
OpenShift Origin is an open source container application platform created by RedHat, based on kubernetes and Docker. That means you can host your own PaaS for free and almost with no hassle.
In this tutorial, we will see how to deploy GitLab in OpenShift using GitLab's official Docker image while getting familiar with the web interface and CLI tools that will help us achieve our goal.
Prerequisites
OpenShift 3 is not yet deployed on RedHat's offered Online platform (openshift.com), so in order to test it, we will use an all-in-one Virtualbox image that is offered by the OpenShift developers and managed by Vagrant. If you haven't done already, go ahead and install the following components as they are essential to test OpenShift easily:
- VirtualBox
- Vagrant
- OpenShift Client (
ocfor short)
It is also important to mention that for the purposes of this tutorial, the latest Origin release is used:
- oc
v1.3.0(must be installed locally on your computer) - openshift
v1.3.0(is pre-installed in the VM image) - kubernetes
v1.3.0(is pre-installed in the VM image)
If you intend to deploy GitLab on a production OpenShift cluster, there are some limitations to bare in mind. Read on the limitations section for more information and follow the linked links for the relevant discussions.
Now that you have all batteries, let's see how easy it is to test OpenShift on your computer.
Getting familiar with OpenShift Origin
The environment we are about to use is based on CentOS 7 which comes with all the tools needed pre-installed: Docker, kubernetes, OpenShift, etcd.
Test OpenShift using Vagrant
As of this writing, the all-in-one VM is at version 1.3, and that's what we will use in this tutorial.
In short:
-
Open a terminal and in a new directory run:
vagrant init openshift/origin-all-in-one -
This will generate a Vagrantfile based on the all-in-one VM image
-
In the same directory where you generated the Vagrantfile enter:
vagrant up
This will download the VirtualBox image and fire up the VM with some preconfigured values as you can see in the Vagrantfile. As you may have noticed, you need plenty of RAM (5GB in our example), so make sure you have enough.
Now that OpenShift is set up, let's see how the web console looks like.
Explore the OpenShift web console
Once Vagrant finishes its thing with the VM, you will be presented with a message which has some important information. One of them is the IP address of the deployed OpenShift platform and in particular https://10.2.2.2:8443/console/. Open this link with your browser and accept the self-signed certificate in order to proceed.
Let's login as admin with username/password admin/admin. This is what the
landing page looks like:
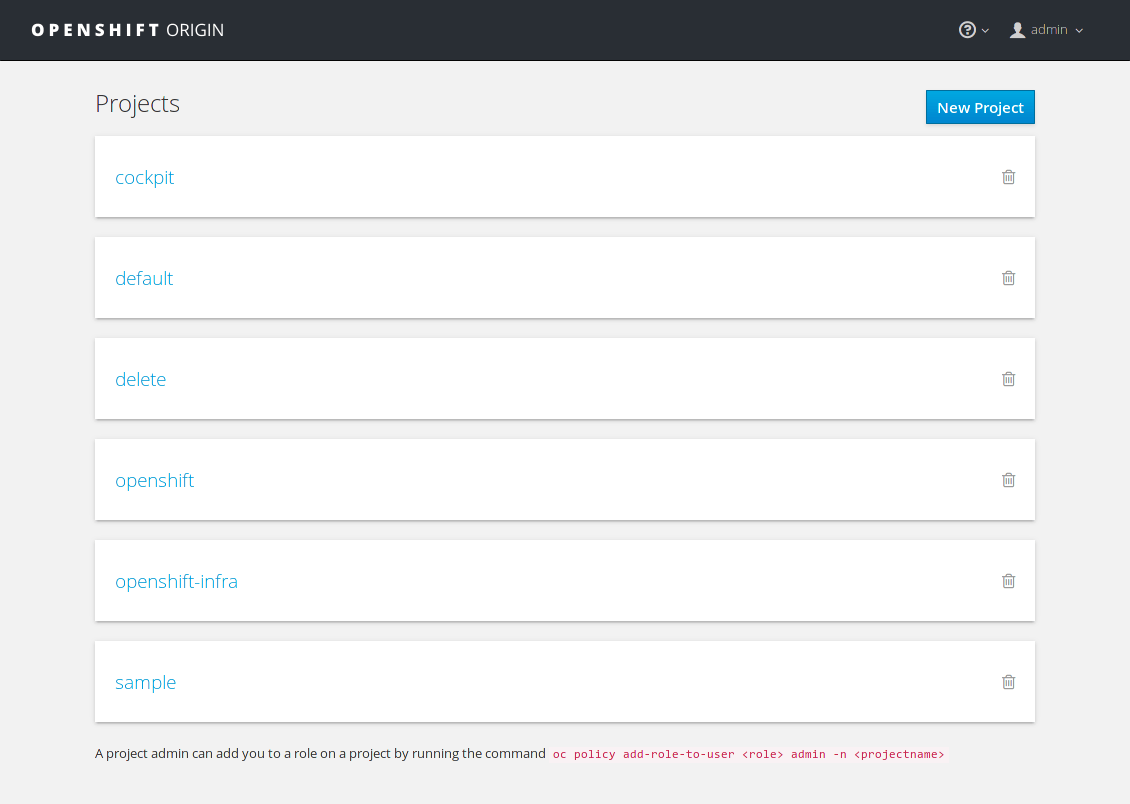
You can see that a number of projects are already created for testing purposes.
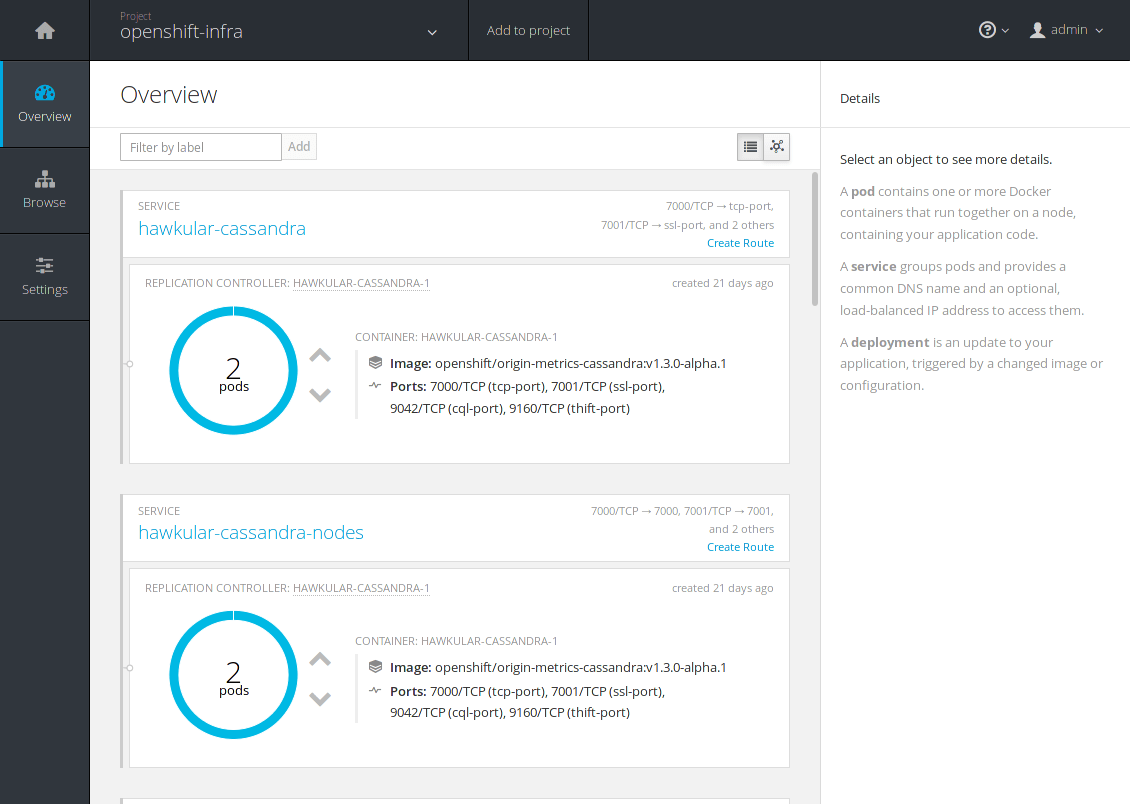
If you head over the openshift-infra project, a number of services with their
respective pods are there to explore.
We are not going to explore the whole interface, but if you want to learn about the key concepts of OpenShift, read the core concepts reference in the official documentation.
Explore the OpenShift CLI
OpenShift Client (oc), is a powerful CLI tool that talks to the OpenShift API
and performs pretty much everything you can do from the web UI and much more.
Assuming you have installed it, let's explore some of its main functionalities.
Let's first see the version of oc:
$ oc version

oc v1.3.0
kubernetes v1.3.0+52492b4
With oc help you can see the top level arguments you can run with oc and
interact with your cluster, kubernetes, run applications, create projects and
much more.
Let's login to the all-in-one VM and see how to achieve the same results like
when we visited the web console earlier. The username/password for the
administrator user is admin/admin. There is also a test user with username/
password user/user, with limited access. Let's login as admin for the moment:
$ oc login https://10.2.2.2:8443

Authentication required for https://10.2.2.2:8443 (openshift)
Username: admin
Password:
Login successful.

You have access to the following projects and can switch between them with 'oc project <projectname>':

  * cockpit
  * default (current)
  * delete
  * openshift
  * openshift-infra
  * sample

Using project "default".
Switch to the openshift-infra project with:
oc project openshift-infra
And finally, see its status:
oc status
The last command should spit a bunch of information about the statuses of the pods and the services, which if you look closely is what we encountered in the second image when we explored the web console.
You can always read more about oc in the OpenShift CLI documentation.
Troubleshooting the all-in-one VM
Using the all-in-one VM gives you the ability to test OpenShift whenever you want. That means you get to play with it, shutdown the VM, and pick up where you left off.
Sometimes though, you may encounter some issues, like OpenShift not running
when booting up the VM. The web UI may not responding or you may see issues
when trying to login with oc, like:
The connection to the server 10.2.2.2:8443 was refused - did you specify the right host or port?
In that case, the OpenShift service might not be running, so in order to fix it:
-
SSH into the VM by going to the directory where the Vagrantfile is and then run:
vagrant ssh -
Run
systemctland verify by the output that theopenshiftservice is not running (it will be in red color). If that's the case start the service with:sudo systemctl start openshift -
Verify the service is up with:
systemctl status openshift -l
Now you will be able to login using oc (like we did before) and visit the web
console.
Deploy GitLab
Now that you got a taste of what OpenShift looks like, let's deploy GitLab!
Create a new project
First, we will create a new project to host our application. You can do this either by running the CLI client:
$ oc new-project gitlab
or by using the web interface:
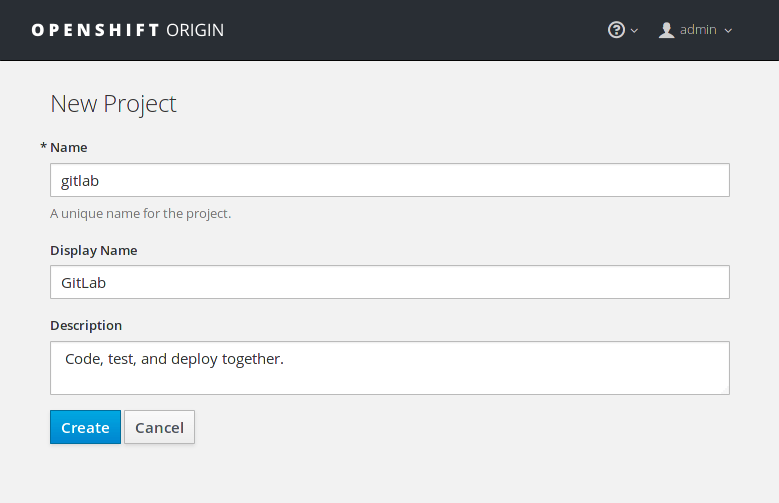
If you used the command line, oc automatically uses the new project and you
can see its status with:
$ oc status

In project gitlab on server https://10.2.2.2:8443

You have no services, deployment configs, or build configs.
Run 'oc new-app' to create an application.
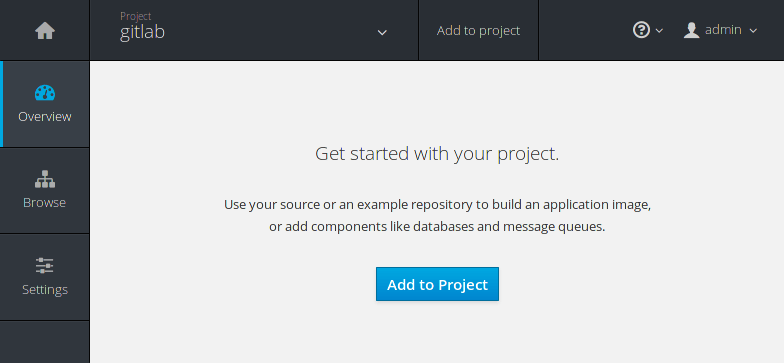
If you visit the web console, you can now see gitlab listed in the projects list.
The next step is to import the OpenShift template for GitLab.
Import the template
The template is basically a JSON file which describes a set of related object definitions to be created together, as well as a set of parameters for those objects.
The template for GitLab resides in the Omnibus GitLab repository under the
docker directory. Let's download it locally with wget:
wget https://gitlab.com/gitlab-org/omnibus-gitlab/raw/master/docker/openshift-template.json
And then let's import it in OpenShift:
oc create -f openshift-template.json -n openshift
Note
The -n openshift namespace flag is a trick to make the template available to all
projects. If you recall from when we created the gitlab project, oc switched
to it automatically, and that can be verified by the oc status command. If
you omit the namespace flag, the application will be available only to the
current project, in our case gitlab. The openshift namespace is a global
one that the administrators should use if they want the application to be
available to all users.
We are now ready to finally deploy GitLab!
Create a new application
The next step is to use the template we previously imported. Head over to the
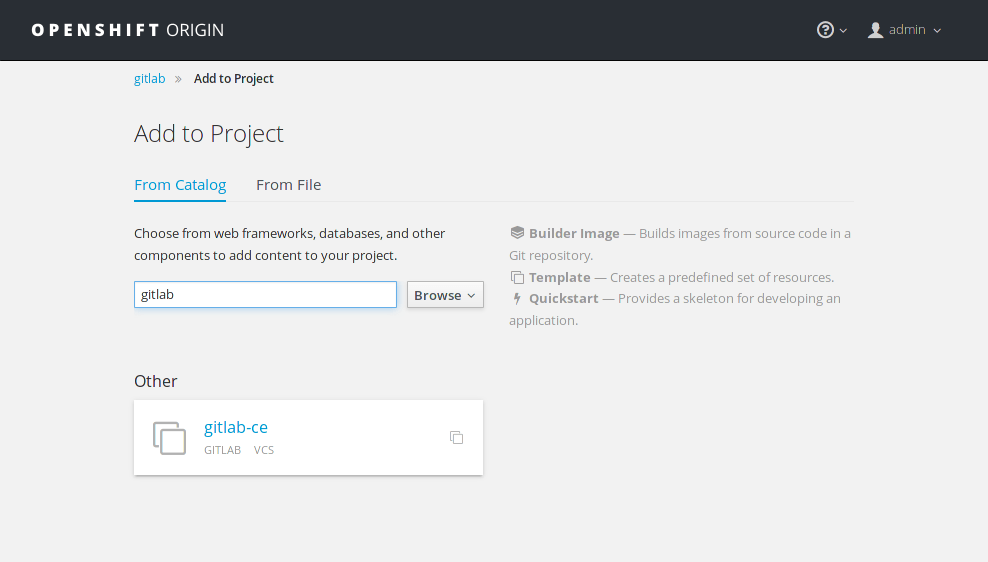
gitlab project and hit the Add to Project button.
This will bring you to the catalog where you can find all the pre-defined
applications ready to deploy with the click of a button. Search for gitlab
and you will see the previously imported template:
Select it, and in the following screen you will be presented with the predefined values used with the GitLab template:
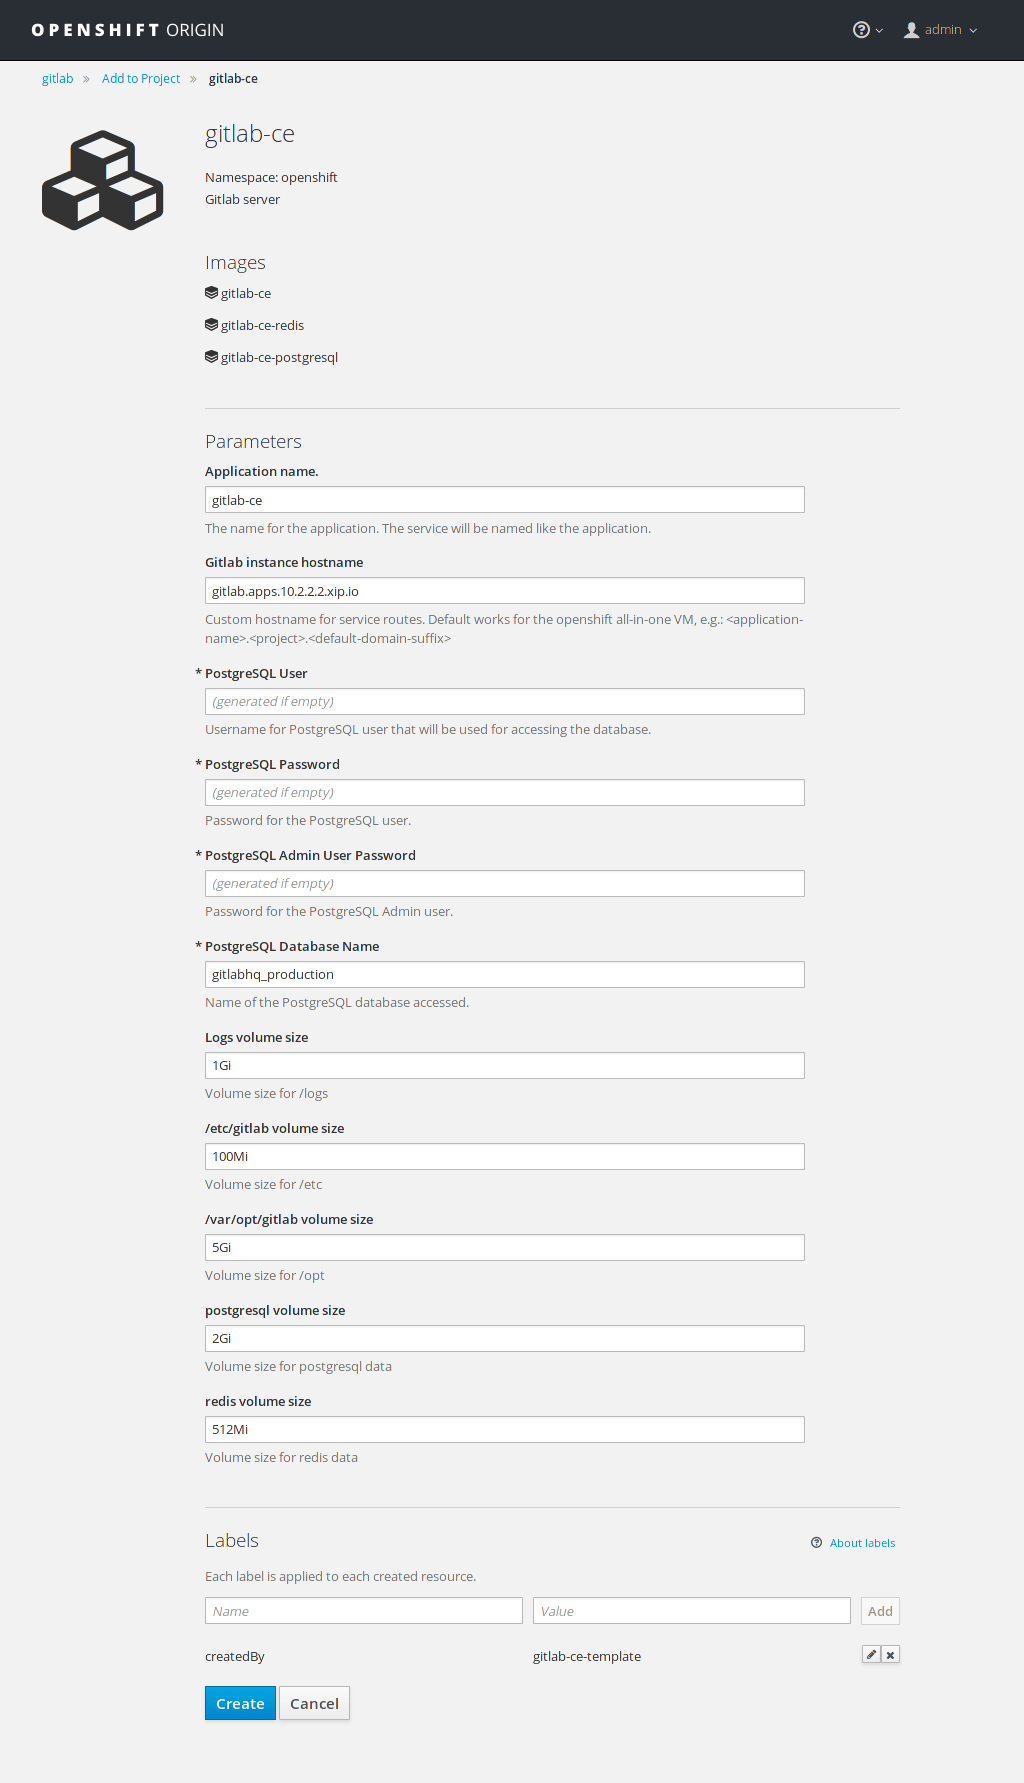
Notice at the top that there are three resources to be created with this template:
gitlab-cegitlab-ce-redisgitlab-ce-postgresql
While PostgreSQL and Redis are bundled in Omnibus GitLab, the template is using separate images as you can see from this line in the template.
The predefined values have been calculated for the purposes of testing out GitLab in the all-in-one VM. You don't need to change anything here, hit Create to start the deployment.
If you are deploying to production you will want to change the GitLab instance hostname and use greater values for the volume sizes. If you don't provide a password for PostgreSQL, it will be created automatically.
Note
The gitlab.apps.10.2.2.2.xip.io hostname that is used by default will
resolve to the host with IP 10.2.2.2 which is the IP our VM uses. It is a
trick to have distinct FQDNs pointing to services that are on our local network.
Read more on how this works in http://xip.io.
Now that we configured this, let's see how to manage and scale GitLab.
Manage and scale GitLab
Setting up GitLab for the first time might take a while depending on your internet connection and the resources you have attached to the all-in-one VM. GitLab's docker image is quite big (~500MB), so you'll have to wait until it's downloaded and configured before you use it.
Watch while GitLab gets deployed
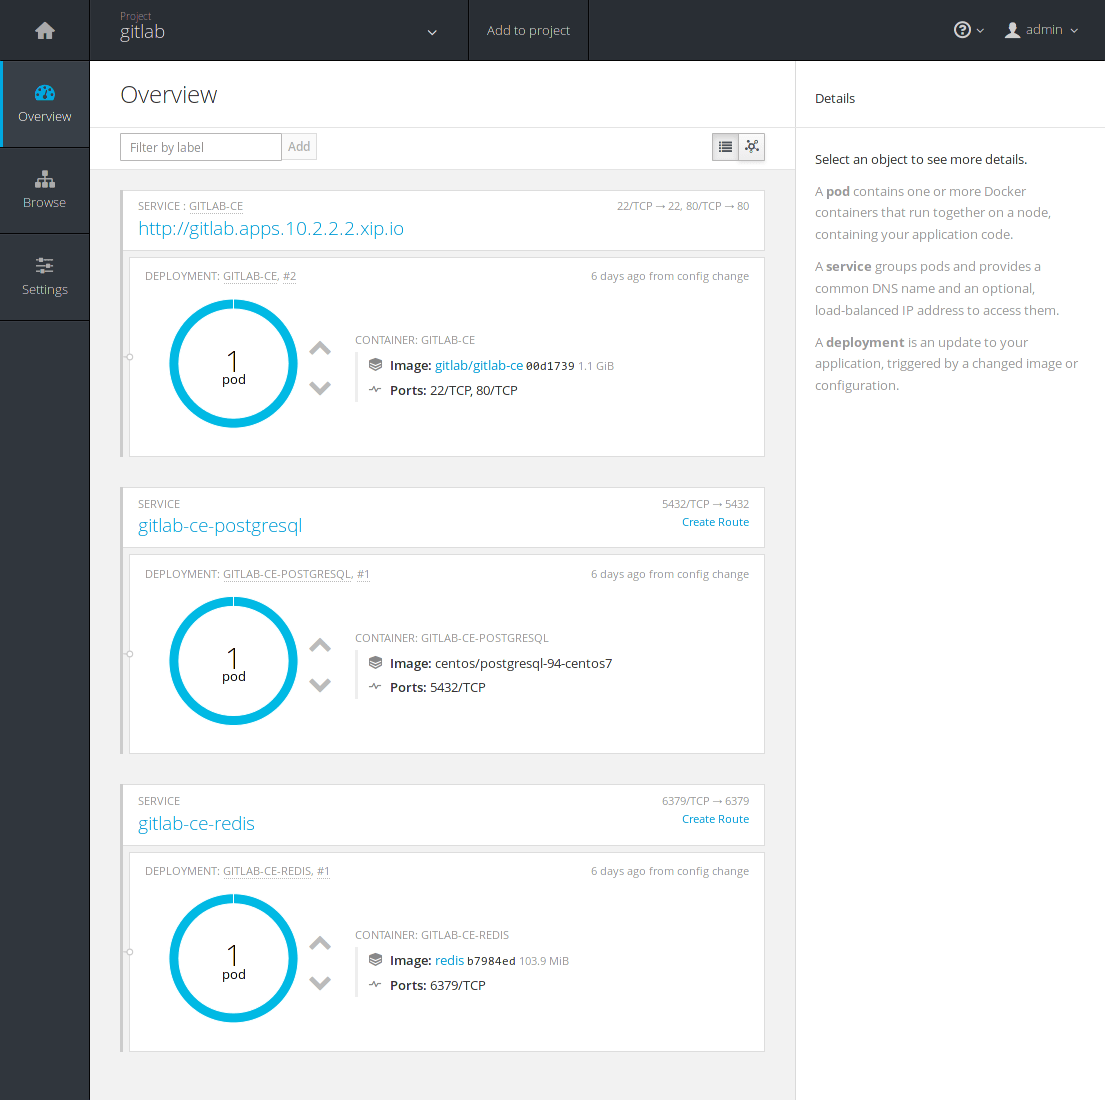
Navigate to the gitlab project at Overview. You can notice that the
deployment is in progress by the orange color. The Docker images are being
downloaded and soon they will be up and running.
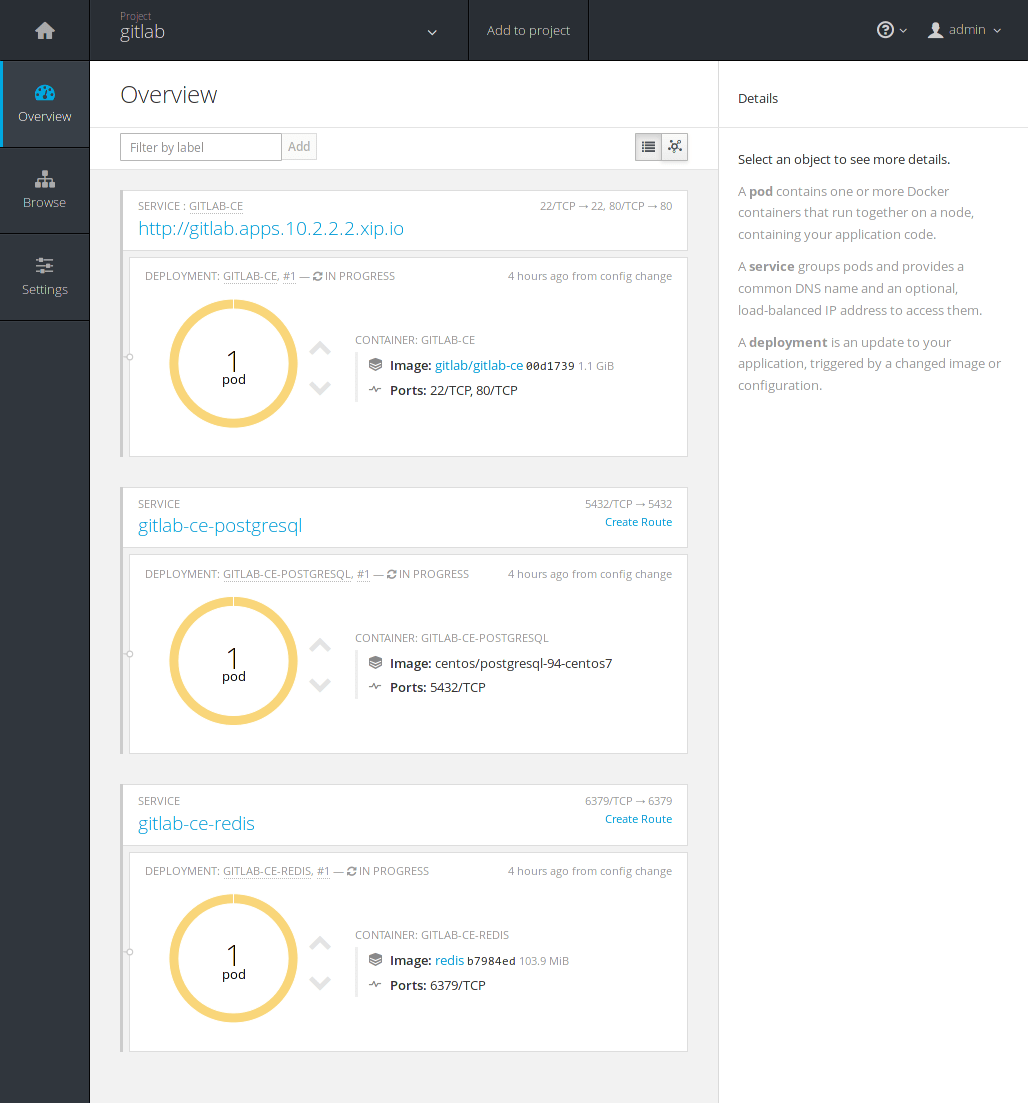
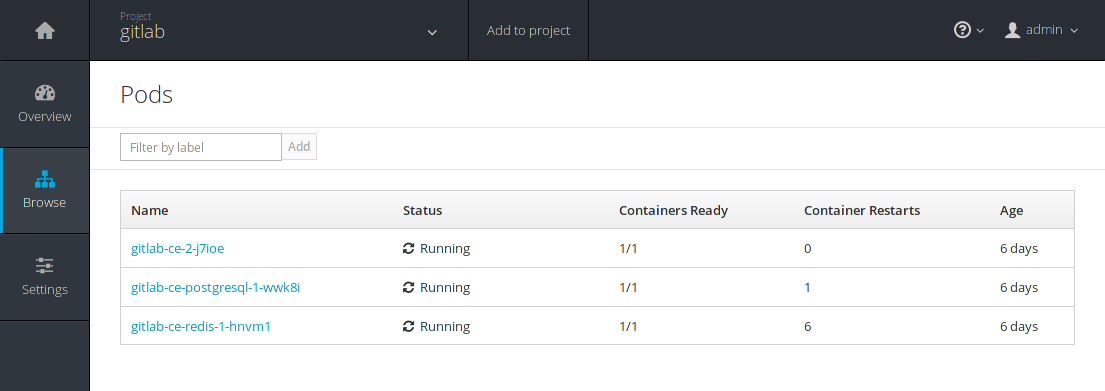
Switch to the Browse > Pods and you will eventually see all 3 pods in a running status. Remember the 3 resources that were to be created when we first created the GitLab app? This is where you can see them in action.
You can see GitLab being reconfigured by taking look at the logs in realtime.
Click on gitlab-ce-2-j7ioe (your ID will be different) and go to the Logs
tab.

At a point you should see a gitlab Reconfigured! message in the logs. Navigate back to the Overview and hopefully all pods will be up and running.
Congratulations! You can now navigate to your new shinny GitLab instance by
visiting http://gitlab.apps.10.2.2.2.xip.io where you will be asked to
change the root user password. Login using root as username and providing the
password you just set, and start using GitLab!
Scale GitLab with the push of a button
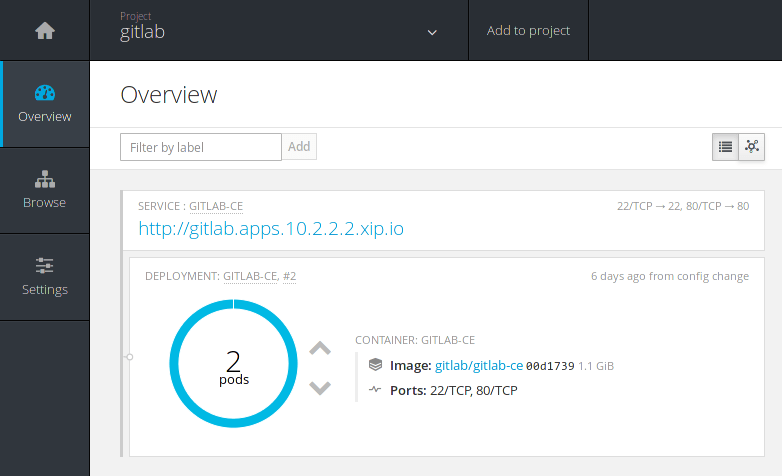
If you reach to a point where your GitLab instance could benefit from a boost of resources, you'd be happy to know that you can scale up with the push of a button.
In the Overview page just click the up arrow button in the pod where GitLab is. The change is instant and you can see the number of replicas now running scaled to 2.
Upping the GitLab pods is actually like adding new application servers to your cluster. You can see how that would work if you didn't use GitLab with OpenShift by following the HA documentation for the application servers.
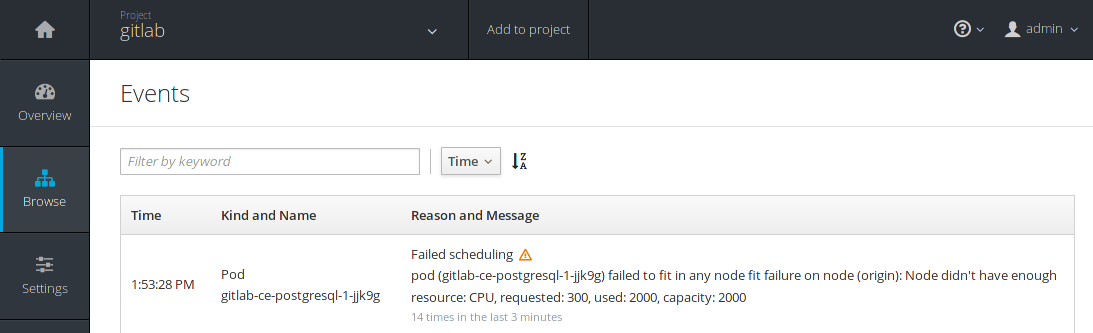
Bare in mind that you may need more resources (CPU, RAM, disk space) when you scale up. If a pod is in pending state for too long, you can navigate to Browse > Events and see the reason and message of the state.
Scale GitLab using the oc CLI
Using oc is super easy to scale up the replicas of a pod. You may want to
skim through the basic CLI operations to get a taste how the CLI
commands are used. Pay extra attention to the object types as we will use some
of them and their abbreviated versions below.
In order to scale up, we need to find out the name of the replication controller. Let's see how to do that using the following steps.
-
Make sure you are in the
gitlabproject:oc project gitlab -
See what services are used for this project:
oc get svcThe output will be similar to:
NAME CLUSTER-IP EXTERNAL-IP PORT(S) AGE gitlab-ce 172.30.243.177 <none> 22/TCP,80/TCP 5d gitlab-ce-postgresql 172.30.116.75 <none> 5432/TCP 5d gitlab-ce-redis 172.30.105.88 <none> 6379/TCP 5d -
We need to see the replication controllers of the
gitlab-ceservice. Get a detailed view of the current ones:oc describe rc gitlab-ceThis will return a large detailed list of the current replication controllers. Search for the name of the GitLab controller, usually
gitlab-ce-1or if that failed at some point and you spawned another one, it will be namedgitlab-ce-2. -
Scale GitLab using the previous information:
oc scale --replicas=2 replicationcontrollers gitlab-ce-2 -
Get the new replicas number to make sure scaling worked:
oc get rc gitlab-ce-2which will return something like:
NAME          DESIRED   CURRENT   AGE
gitlab-ce-2   2         2         5d
And that's it! We successfully scaled the replicas to 2 using the CLI.
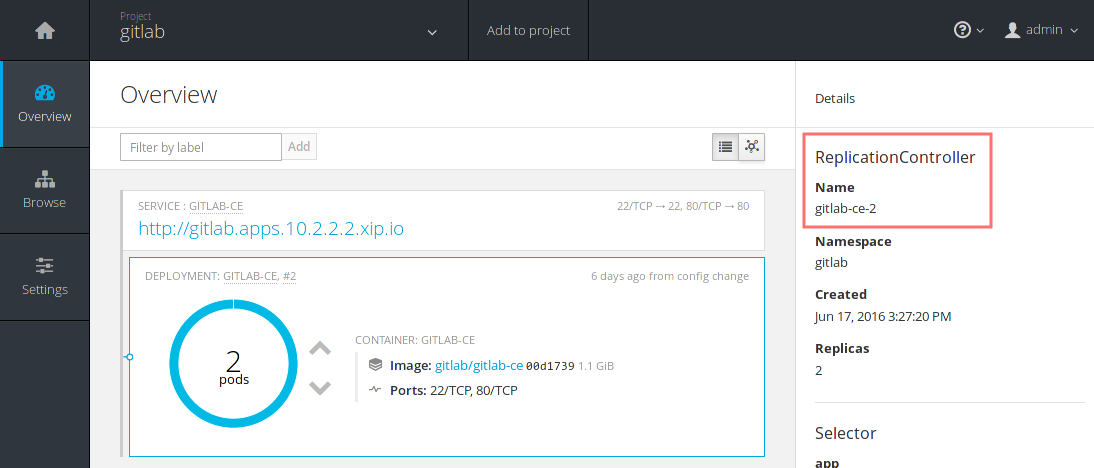
As always, you can find the name of the controller using the web console. Just click on the service you are interested in and you will see the details in the right sidebar.
Autoscaling GitLab
In case you were wondering whether there is an option to autoscale a pod based on the resources of your server, the answer is yes, of course there is.
We will not expand on this matter, but feel free to read the documentation on OpenShift's website about autoscaling.
Current limitations
As stated in the all-in-one VM page:
By default, OpenShift will not allow a container to run as root or even a non-random container assigned userid. Most Docker images in the Dockerhub do not follow this best practice and instead run as root.
The all-in-one VM we are using has this security turned off so it will not bother us. In any case, it is something to keep in mind when deploying GitLab on a production cluster.
In order to deploy GitLab on a production cluster, you will need to assign the
GitLab service account to the anyuid Security Context.
-
Edit the Security Context:
oc edit scc anyuid -
Add
system:serviceaccount:<project>:gitlab-ce-userto theuserssection. If you changed the Application Name from the default the user will will be<app-name>-userinstead ofgitlab-ce-user -
Save and exit the editor
Conclusion
By now, you should have an understanding of the basic OpenShift Origin concepts and a sense of how things work using the web console or the CLI.
GitLab was hard to install in previous versions of OpenShift, but now that belongs to the past. Upload a template, create a project, add an application and you are done. You are ready to login to your new GitLab instance.
And remember that in this tutorial we just scratched the surface of what Origin is capable of. As always, you can refer to the detailed documentation to learn more about deploying your own OpenShift PaaS and managing your applications with the ease of containers.
We want to hear from you
Enjoyed reading this blog post or have questions or feedback? Share your thoughts by creating a new topic in the GitLab community forum.
Share your feedback