Published on: December 8, 2016
13 min read
Git tips and tricks
Handy Git commands for everyday use


Git comes with a ton of commands, and that's probably an understatement.
The internet is full of Git tips and it's hard if not impossible to know them all, but sometimes you stumble upon an aha! moment that changes your whole workflow.
In this post, we gathered some Git tips and tricks we use at GitLab everyday. Hopefully they will add up to your aha! moment.
- TOC
Intro
Almost everybody at GitLab will need to use Git at some point. For newcomers
who know nothing about Git that can be a fearsome experience. We have a
Git cheatsheet and a #git-help chat channel where we ask questions and
provide help if some of us get stuck. That's a quick way to provide help, and
if something is complicated or someone has messed up their local repository and
needs immediate help, there's always a person to jump on a quick call.
Here's a pack of Git tricks that will leverage your Git-fu and you'll hopefully find useful. Remember, the list is far from exhaustive :)
Git's built-in help
The majority of users rely on sites like StackOverflow to find answers to their Git problems, but how often do you use Git's built-in help to find more about a command you are struggling with?
The most common commands
Run git help to print a list of the most common commands. You'll probably
notice you've used most of them, but how well do you really know them?
Thankfully, there is a help page for every command!
A help page for every command
Git's documentation is comprehensive and is automatically installed with Git.
Run git help <command> to find out all about a command's behavior and what
options it can take.
Git guides
Git comes with a handful of guides ready for you to explore. Run git help -g
to see what's available:
      The common Git guides are:

   attributes   Defining attributes per path
   everyday     Everyday Git With 20 Commands Or So
   glossary     A Git glossary
   ignore       Specifies intentionally untracked files to ignore
   modules      Defining submodule properties
   revisions    Specifying revisions and ranges for Git
   tutorial     A tutorial introduction to Git (for version 1.5.1 or newer)
   workflows    An overview of recommended workflows with Git
Jump to a Git tutorial with git help tutorial, go through the glossary with
git help glossary or learn about the most common commands with
git help everyday.
See the repository status in your terminal's prompt
It's very useful to be able to visualize the status of your repository at any
given time. While there are 3rd party tools that include this information
(oh-my-zsh anyone?), Git itself provides a script named git-prompt.sh
that does exactly that. You can download it and follow the
instructions in it to install and use it in your system. If you're using Linux
and have installed Git with your package manager, it may already be
present on your system, usually under /etc/bash_completion.d/.
Go ahead and replace your boring shell prompt with something like this:
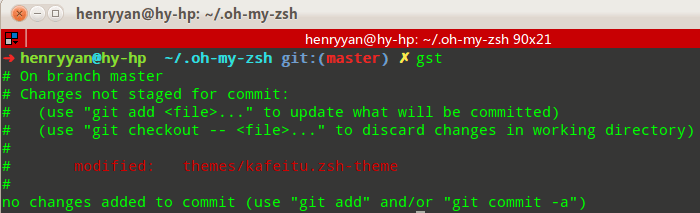
Taken from oh-my-zsh's themes wiki
Autocompletion for Git commands
You may also find it useful to use the completion scripts that provide Git
command completion for bash, tcsh and zsh. Again, follow the instructions
inside the scripts to learn how to install them. Once done, you can try out
typing a command.
Let's say you want to type git pull. If Git completion is enabled, typing
just the first letter with git p followed by Tab will show the
following:
      pack-objects   -- create packed archive of objects
pack-redundant -- find redundant pack files
pack-refs      -- pack heads and tags for efficient repository access
parse-remote   -- routines to help parsing remote repository access parameters
patch-id       -- compute unique ID for a patch
prune          -- prune all unreachable objects from the object database
prune-packed   -- remove extra objects that are already in pack files
pull           -- fetch from and merge with another repository or local branch
push           -- update remote refs along with associated objects
To show all available commands, type git in your terminal followed by
Tab+ Tab, and see the magic happening.

Git plugins
Since Git is free software, it's easy for people to write scripts that extend its functionality. Let's see some of the most common ones.
The git-extras plugin
If you want to enhance Git with more commands, you'll want to try out the
git-extras plugin. It includes commands like git info (show
information about the repository), git effort (number of commits per file),
and the list goes on. After you install it, make sure to visit
the documentation on the provided commands in order to understand
what each one does before using it.
The git-open plugin
If you want to quickly visit the website on which the repository you're on is
hosted, git-open is for you. All major providers are supported (GitLab, GitHub,
Bitbucket) and you can even use them all at the same time if you set
them as different remotes.
Install it, and try it out by cloning a repository from
GitLab.com. From your terminal navigate to that
repository and run git open to be transferred to the project's page on
GitLab.com.
It works by default for projects hosted on GitLab.com, but you can also use it with your own GitLab instances. In that case, make sure to set up the domain name with:
git config gitopen.gitlab.domain git.example.com
You can even open different remotes and branches if they have been set up. Read more in the examples section.
.gitconfig on steroids
The .gitconfig file contains information on how you want Git to behave on
certain circumstances. There are options you can set at a repository level,
but you can also set them in a global .gitconfig so that all local config
will inherit its values. This file usually resides in your home directory.
If not, either you'll have to create it manually or it will be automatically
be created when you issue a command starting with git config --global as
we'll see below.
The very first encounter with .gitconfig was probably when you set your
name and email address for Git to know who you are.
To know more about the options .gitconfig can take, see the Git documentation
on .gitconfig.
If you are using macOS or Linux, .gitconfig will probably be hidden if you are
trying to open it from a file manager. Either make sure the hidden files are
shown or open it using a command in the terminal: atom ~/.gitconfig.
Let's explore some of the most useful config options.
Set a global .gitignore
If you want to avoid committing files like .DS_Store, Vim swp files, etc.,
you can set up a global .gitignore file.
First create the file:
touch ~/.gitignore
Then run:
git config --global core.excludesFile ~/.gitignore
Or manually add the following to your ~/.gitconfig:
      [core]
  excludesFile = ~/.gitignore
Gradually build up your own useful list of things you want Git to ignore. Read the gitignore documentation to find out more.
Delete local branches that have been removed from remote on fetch/pull
You might already have a bunch of stale branches in your local repository that no longer exist in the remote one. To delete them in each fetch/pull, run:
git config --global fetch.prune true
Or manually add the following to your ~/.gitconfig:
      [fetch]
  prune = true
Enable Git's autosquash feature by default
Autosquash makes it quicker and easier to squash or fixup commits during an
interactive rebase. It can be enabled for each rebase using
git rebase -i --autosquash, but it's easier to turn it on by default.
git config --global rebase.autosquash true
Or manually add the following to your ~/.gitconfig:
      [rebase]
  autosquash = true
At this point, let us remind you of the perils of rebasing.
Git docs source(tip taken from thoughbot)
Extra info when using Git submodules
If you are using submodules, it might be useful to turn on the submodule summary. From your terminal run:
git config --global status.submoduleSummary true
Or manually add the following to your ~/.gitconfig:
      [status]
  submoduleSummary = true
Change the editor of Git's messages
You can change the default text editor for use by Git commands.
From git help var:
the order of preference is the $GIT_EDITOR environment variable, then
core.editor configuration, then $VISUAL, then $EDITOR, and then the
default chosen at compile time, which is usually vi.
Running git config --show-origin core.editor will tell you if core.editor
is set and from which file. This needs at least Git 2.8.
To change it to your favor editor (vim, emacs, atom, etc.), run:
git config --global core.editor vim
Or manually add the following to your ~/.gitconfig:
      [core]
  editor = vim
Change the tool with which diffs are shown
git diff is useful as it shows the changes that are not currently staged.
When running this command Git usually uses its internal tool and displays
the changes in your terminal.
If you don't like the default difftool there are a couple of others to choose from:
vimdiff- Vim's built-in vimdiffmagit- Emacs most popular tool is Magitmeld- A visual diff and merge tool written in Pythonkdiff3- A diff and merge program written in Qt
To change the default tool for watching diffs run the following:
git config --global diff.tool vimdiff
Or manually add the following to your ~/.gitconfig:
      [diff]
  tool = vimdiff
Also related is the merge.tool setting which can be set to a tool to be used
as the merge resolution program. Similarly:
git config --global merge.tool vimdiff
Or manually add the following to your ~/.gitconfig:
      [merge]
  tool = vimdiff
Aliases
Git commands can take a lot of flags at a time. For example, for a log graph you can use the following command:
git log --graph --pretty=format:'%Cred%h%Creset -%C(yellow)%d%Creset %s %Cgreen(%cr)%Creset' --abbrev-commit --date=relative
You sure don't want to type this every time you need to run it. For that purpose,
Git supports aliases, which are custom user-defined commands that build on top
of the core ones. They are defined in ~/.gitconfig under the [alias] group.
Open ~/.gitconfig with your editor and start adding stuff.
Add an alias to pretty log graphs
In your ~/.gitconfig add:
      [alias]
  lg = log --graph --pretty=format:'%Cred%h%Creset -%C(yellow)%d%Creset %s %Cgreen(%cr)%Creset' --abbrev-commit --date=relative
  lol = log --graph --decorate --pretty=oneline --abbrev-commit
Next time you want the pretty log to appear, run: git lg or git lol for
some pretty log graphs.
Add an alias to checkout merge requests locally
A merge request contains all the history from a repository, plus the additional commits added to the branch associated with the merge request. Note that you can checkout a public merge request locally even if the source project is a fork (even a private fork) of the target project.
To checkout a merge request locally, add the following alias to your ~/.gitconfig:
      [alias]
  mr = !sh -c 'git fetch $1 merge-requests/$2/head:mr-$1-$2 && git checkout mr-$1-$2' -
Now you can check out a particular merge request from any repository and any
remote. For example, to check out the merge request with ID 5 as shown in GitLab
from the upstream remote, run:
git mr upstream 5
This will fetch the merge request into a local mr-upstream-5 branch and check
it out. In the above example, upstream is the remote that points to GitLab
which you can find out by running git remote -v.
The Oh-my-zsh Git aliases plugin
If you are an Oh My Zsh user you'll probably know this already. Learn how you can enable the Git plugin provided with Oh My Zsh and start using the short commands to save time. Some examples are:
glinstead ofgit pullgpinstead ofgit pushgcoinstead ofgit checkout
Git command line tips
Here's a list of Git tips we gathered.
An alias of HEAD
Did you know @ is the same as HEAD? Using it during a rebase is a life saver:
git rebase -i @~2
Quickly checkout the previous branch you were on
A dash (-) refers to the branch you were on before the current one.
Use it to checkout the previous branch (source):
      # Checkout master
git checkout master

# Create and checkout to a new branch
git checkout -b git-tips

# Checkout master
git checkout master

# Checkout to the previous branch (git-tips)
git checkout -
Delete local branches which have already been merged into master
If you are working everyday on a project that gets contributions all the time, the local branches number increases without noticing it. Run the following command to delete all local branches that are already merged into master (source):
      # Make sure you have checked out master first
git checkout master

# Delete merged branches to master except master
git branch --merged master | grep -v "master" | xargs -n 1 git branch -d
In the event that you accidentally delete master (💩 happens), get it back with:
git checkout -b master origin/master
Delete local branches that no longer exist in the remote repo
To remove all tracking branches that you have locally but are no more present in
the remote repository (origin):
git remote prune origin
Use the --dry-run flag to only see what branches will be pruned, but not
actually prune them:
git remote prune origin --dry-run
If you want this to be run automatically every time you fetch/pull, see
how to add it to your .gitconfig.
Checking out a new branch from a base branch
You can checkout a new branch from a base branch without first checking out the base branch. Confusing? Here's an example.
If you are on a branch named old-branch and you want to
checkout new-branch based off master, you'd normally do:
      git checkout master
git checkout -b new-branch
There's a quicker way though. While still on the old-branch, run:
git checkout -b new-branch master
The pattern is the following:
git checkout -b new_branch base_branch
References
- Thoughbot's gitconfig file contains useful tips some of which are also present in this post
- A collection of Git tips
- Git and Vimdiff
- Git's official site
Conclusion
As always, writing something about Git, only scratches the surface. While some of the tips included in this post might come in handy, there are sure a lot of other stuff we're not familiar with.

Image: "Branching illustration" by Jason Long is licensed under CC BY 3.0
More to explore
View all blog posts


We want to hear from you
Enjoyed reading this blog post or have questions or feedback? Share your thoughts by creating a new topic in the GitLab community forum.
Share your feedback