
is now in public beta!
Published on: February 7, 2017
4 min read
Setting up GitLab Pages with Cloudflare Certificates
How to set up GitLab Pages with a Cloudflare SSL/TLS Certificate for your (sub)domain

Cloudflare SSL/TLS certificates are free to use. If you want your GitLab Pages site to work with them, it's as simple as could be. There's just a trick you might not know about (yet)!
We assume you're familiar with SSL/TLS, DNS, GitLab Pages, and Cloudflare.
Introduction
With GitLab Pages, you can deploy a static website with custom domains/subdomains and SSL/TLS support.
This tutorial responds to the issue "Support Cloudflare CA please!", and other cases where GitLab users asked specifically how to add a Cloudflare certificate to GitLab Pages. 😉 Anything else is outside the scope of this post.
If you don't know how to set up your GitLab Pages site, or why you should care about SSL/TLS:
- Take a look at the GitLab Pages overview
- Read the step-by-step tutorial Hosting on GitLab.com with GitLab Pages
- Read the series "Static Site Generators (SSGs)":
- Read the documentation on GitLab Pages
- Read an overview on the importance of HTTPS
In case you don't know about it yet, we're bringing GitLab Pages to GitLab Community Edition! 🎉
Step-by-step quick guide
To create this step-by-step guide, I'll use my subdomain
https://cloudflare.marcia.ml as an alias for the website
originally deployed to https://gitlab-tests.gitlab.io/jekyll.
The codebase is a simple Jekyll site built with its default theme, available at https://gitlab.com/gitlab-tests/jekyll.
STEP 1. DNS record
On Cloudflare, navigate to the tab DNS and create a new
DNS record (CNAME or A) pointing your
subdomain (CNAME) or root domain (A)
to your GitLab Pages site.
The image below shows both CNAME and A records
(for the purposes of this demo), but of course, you will only
need one of them. For this example, I used the CNAME record pointing gitlab-tests.gitlab.io to my subdomain cloudflare.marcia.ml:
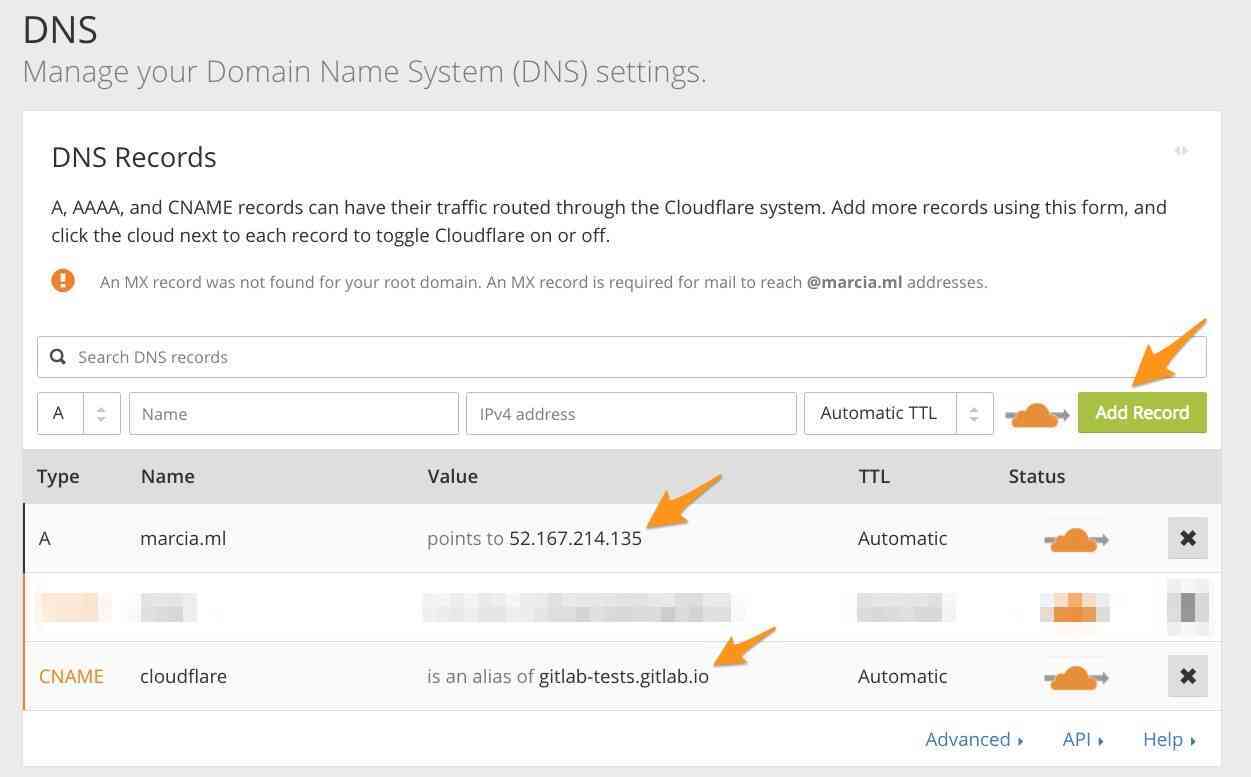
For projects on GitLab.com, the DNS A record should point your custom
domain to GitLab Pages' server IP address 35.185.44.232.
Note: This GitLab Pages IP address for GitLab.com changed from 52.167.214.135 to 35.185.44.232 in August 2018.
If you'd already set this up, just jump to the second step.
STEP 2. Generate your certificate
-
Navigate to the tab Crypto.
-
Generate your certificate:

-
Choose the domain, subdomain, or wildcard to apply the cert to, then click Next:

-
Your certificate and private key have been generated. Leave the tab and the modal window open:

STEP 3. Add the custom (sub)domain and the certificate to your GitLab Pages project
From a new tab, go to GitLab, and navigate to your project's Settings > Pages > + New Domain:
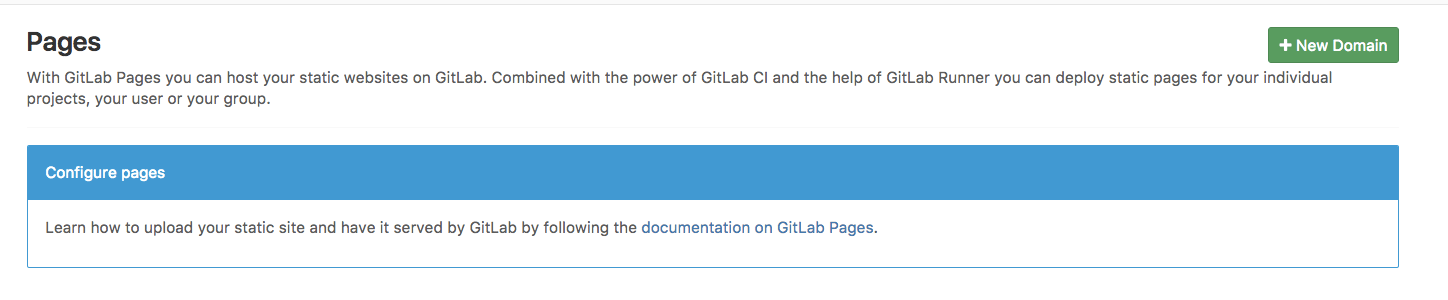
Copy the PEM certificate and the private key from the tab you've left open on Cloudflare, and paste it into their respective fields in GitLab:

STEP 4. The trick
Cloudflare doesn't combine both PEM and root certificates in one, so we need to copy the root certificate (aka "intermediate") Cloudflare Origin CA — RSA Root from the code block below, and paste it below your certificate (PEM) just added to GitLab:
Copy Cloudflare's Origin CA — RSA Root:
-----BEGIN CERTIFICATE-----
MIIEADCCAuigAwIBAgIID+rOSdTGfGcwDQYJKoZIhvcNAQELBQAwgYsxCzAJBgNV
BAYTAlVTMRkwFwYDVQQKExBDbG91ZEZsYXJlLCBJbmMuMTQwMgYDVQQLEytDbG91
ZEZsYXJlIE9yaWdpbiBTU0wgQ2VydGlmaWNhdGUgQXV0aG9yaXR5MRYwFAYDVQQH
Ew1TYW4gRnJhbmNpc2NvMRMwEQYDVQQIEwpDYWxpZm9ybmlhMB4XDTE5MDgyMzIx
MDgwMFoXDTI5MDgxNTE3MDAwMFowgYsxCzAJBgNVBAYTAlVTMRkwFwYDVQQKExBD
bG91ZEZsYXJlLCBJbmMuMTQwMgYDVQQLEytDbG91ZEZsYXJlIE9yaWdpbiBTU0wg
Q2VydGlmaWNhdGUgQXV0aG9yaXR5MRYwFAYDVQQHEw1TYW4gRnJhbmNpc2NvMRMw
EQYDVQQIEwpDYWxpZm9ybmlhMIIBIjANBgkqhkiG9w0BAQEFAAOCAQ8AMIIBCgKC
AQEAwEiVZ/UoQpHmFsHvk5isBxRehukP8DG9JhFev3WZtG76WoTthvLJFRKFCHXm
V6Z5/66Z4S09mgsUuFwvJzMnE6Ej6yIsYNCb9r9QORa8BdhrkNn6kdTly3mdnykb
OomnwbUfLlExVgNdlP0XoRoeMwbQ4598foiHblO2B/LKuNfJzAMfS7oZe34b+vLB
yrP/1bgCSLdc1AxQc1AC0EsQQhgcyTJNgnG4va1c7ogPlwKyhbDyZ4e59N5lbYPJ
SmXI/cAe3jXj1FBLJZkwnoDKe0v13xeF+nF32smSH0qB7aJX2tBMW4TWtFPmzs5I
lwrFSySWAdwYdgxw180yKU0dvwIDAQABo2YwZDAOBgNVHQ8BAf8EBAMCAQYwEgYD
VR0TAQH/BAgwBgEB/wIBAjAdBgNVHQ4EFgQUJOhTV118NECHqeuU27rhFnj8KaQw
HwYDVR0jBBgwFoAUJOhTV118NECHqeuU27rhFnj8KaQwDQYJKoZIhvcNAQELBQAD
ggEBAHwOf9Ur1l0Ar5vFE6PNrZWrDfQIMyEfdgSKofCdTckbqXNTiXdgbHs+TWoQ
wAB0pfJDAHJDXOTCWRyTeXOseeOi5Btj5CnEuw3P0oXqdqevM1/+uWp0CM35zgZ8
VD4aITxity0djzE6Qnx3Syzz+ZkoBgTnNum7d9A66/V636x4vTeqbZFBr9erJzgz
hhurjcoacvRNhnjtDRM0dPeiCJ50CP3wEYuvUzDHUaowOsnLCjQIkWbR7Ni6KEIk
MOz2U0OBSif3FTkhCgZWQKOOLo1P42jHC3ssUZAtVNXrCk3fw9/E15k8NPkBazZ6
0iykLhH1trywrKRMVw67F44IE8Y=
-----END CERTIFICATE-----
Paste it below your PEM certificate (jump a line between the
last row of your cert -----END CERTIFICATE----- and the
first row of the intermediate cert -----BEGIN CERTIFICATE-----):

STEP 5. Apply the changes
-
Click Create New Domain.
-
Ta-da! 🎉

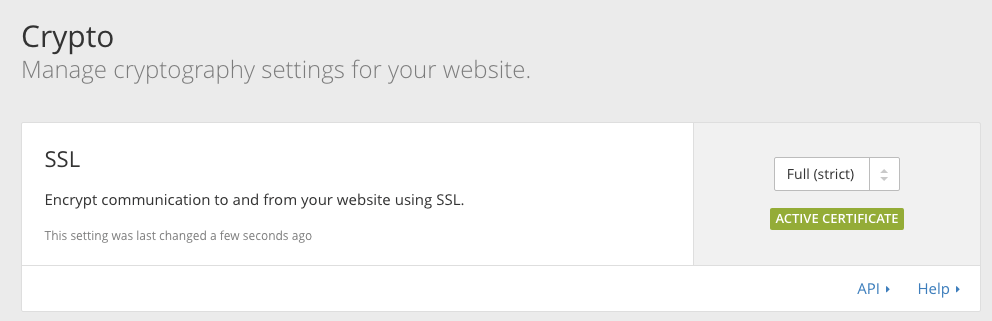
It works fine with the encryption set to "Full" or "Full (strict)" on Cloudflare:
Wrap up
That's it, now your site runs on HTTPS with a custom domain and a free Cloudflare certificate, valid up to 15 years!
Comments, questions, suggestions? Please comment below or tweet @GitLab! 😀
Cover image by Rita Morais, licensed under CC0 1.0.
We want to hear from you
Enjoyed reading this blog post or have questions or feedback? Share your thoughts by creating a new topic in the GitLab community forum.
Share your feedback