Published on: March 10, 2016
15 min read
Setting up GitLab CI for iOS projects
Learn how to set up GitLab CI for your iOS projects.
Note: This blog post was published in 2016. For more current info, check out Tutorial: iOS CI/CD with GitLab from June 2023 and our documentation on GitLab Mobile DevOps. Those both cover fastlane, fastlane match, code signing, signing certificates, provision profiles, App Store Connect, and more.
In this post I'll show you how to set up GitLab CI for your iOS mobile projects, step-by-step, from start to finish.
Why CI?
Continuous integration (CI) is great tool for helping developers be more productive and write higher- quality code. By automatically running a suite of tests every time a commit is pushed, everyone can see the results of changes to the codebase, and take action to make integration faster and easier.
GitLab comes with CI built-in for all projects, for free.
It's beyond the scope of this tutorial to go into details on best practices, workflows, and advantages/disadvantages of CI. In short, however, here's what happens when you enable it for your Xcode project:
- You make changes to your copy of the codebase and push a commit to GitLab.
- GitLab recognizes that the codebase has changed.
- GitLab triggers a build with the GitLab Runner you set up on your Mac for the project.
- The GitLab Runner runs through the build and test process you specified in the
.gitlab-ci.ymlconfiguration file. - The GitLab Runner reports its results back to GitLab.
- GitLab shows you the results of the build.
This post builds on Jeremy White's blog post, going into a little more detail and correcting some steps for the environment described in the next section.
Assumptions and environment
This post will provide a step-by-step guide to setting up GitLab CI for your iOS projects, from start to finish. First, however, we need to make a few assumptions.
GitLab's strategy document hinges on one key idea: everyone can contribute. As such, this post is written for readers of nearly all levels of experience. However, given that CI is a relatively advanced topic, we're going to assume some basic knowledge of how to create Xcode and GitLab projects, as well as some familiarity with Terminal and git.
This post was written with the following development environment in mind:
- A Mac running macOS 10.11.3 "El Capitan"
- Xcode 7.2.1 with command-line tools and the iOS 9.2 SDK installed
- GitLab.com v8.5
We'll also assume you've already created a new GitLab project. If you haven't, go ahead and do that now.
Setting up your Xcode project
We'll start by creating a new single-view iOS project in Xcode.

Give your project a name and make certain that the Include Unit Tests and Include UI Tests options are enabled for the project. Xcode will create a template test class with some sample tests, which we'll use in this post as the test suite that GitLab CI runs to verify a build. Choose a name for your project and click on Next.

Choose where you'll save your iOS project. If you like, let Xcode create the git repository on your Mac.

Once Xcode has created and opened your iOS project, you need to share its scheme. Apple's documentation defines schemes nicely:
A scheme is a collection of settings that specify which targets to build, what build configuration to use, and the executable environment to use when the product specified by the target is launched.
By sharing your scheme, GitLab CI gets context it needs to build and test your project.
To share a scheme in Xcode, choose Product > Scheme > Manage Schemes.
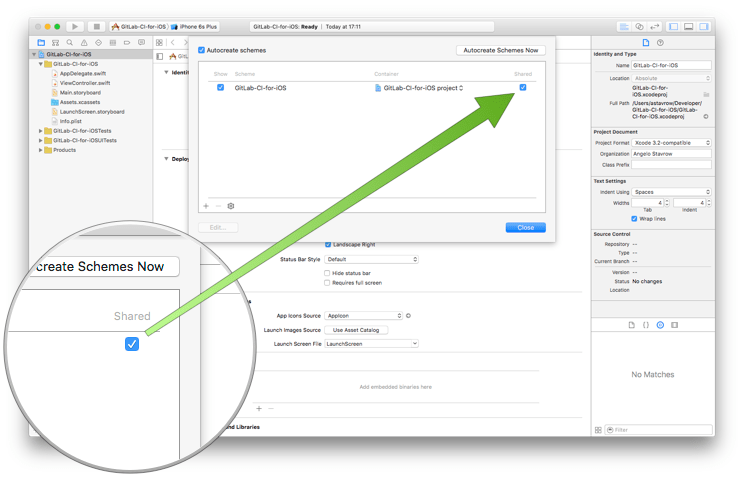
Click on the Close button.
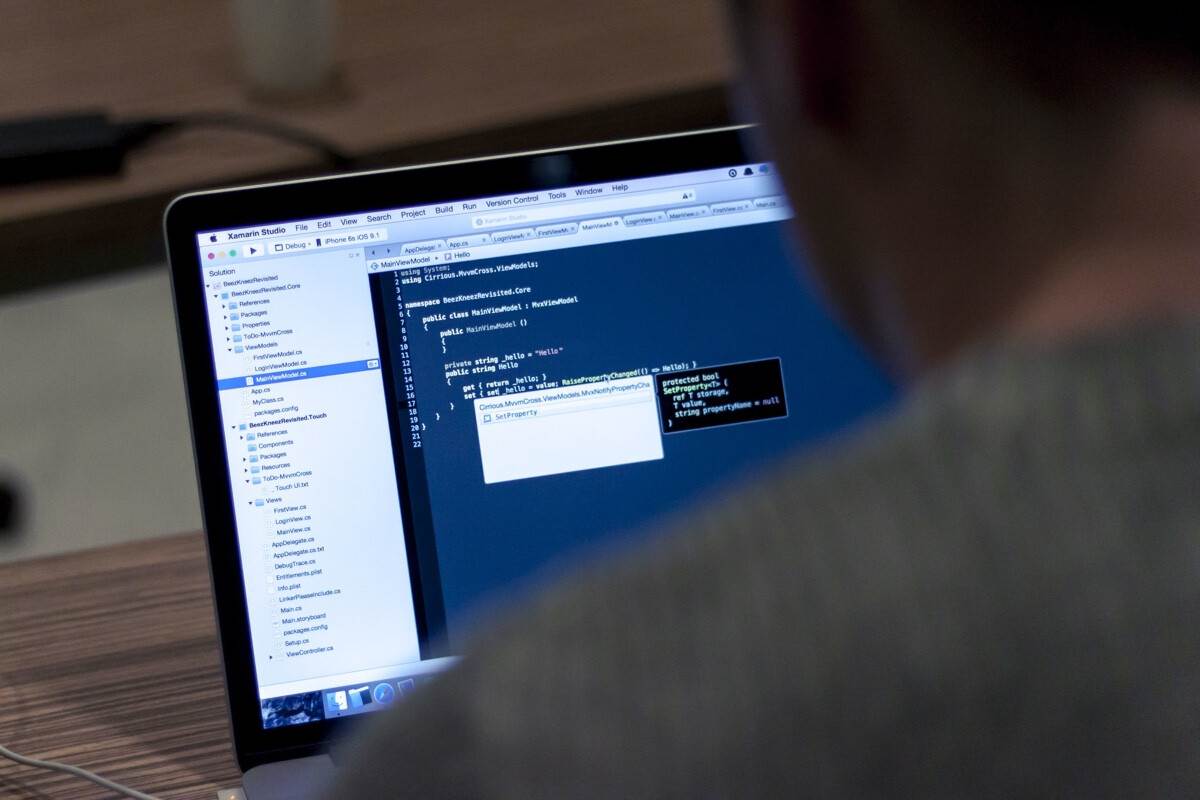
Your Xcode project has been created with two test files; one includes sample unit tests, and the other includes sample UI tests. You can run Product > Test to run these tests, which will build your project, launch the Simulator, install the project on the Simulator device, and run the test suite. You can see the results right in Xcode:

The green checkmarks next to the test functions (both in the file, and in the Test navigator) show that all tests passed. We won't be referring to the Xcode project anymore, so if you like, you can close it.
Next, open Terminal and navigate to the folder you created for your iOS project.
It's convenient to add a standard .gitignore file. For a Swift project, enter:
$ curl -o .gitignore https://www.toptal.com/developers/gitignore/api/swift
For an Objective-C project, enter:
$ curl -o .gitignore https://www.gitignore.io/api/objective-c
The curl command conveniently downloads the contents of the page at the given gitignore.io URL into a file named .gitignore.
If Xcode initialized the git repository for you, you'll need to set the origin
url to your GitLab project (replacing <username> with your GitLab username
and <project> with the project name:
$ git remote add origin [email protected]:<username>/<project>.git
The final step here is to install xcpretty. When Xcode builds and tests your project, xcpretty will transform the output into something more readable for you.
Installing and registering the GitLab Runner
The GitLab Runner is a service that's installed on your Mac, which runs the build and test process that you set up in a configuration file. You can follow the installation instructions for macOS, but we'll need to make some changes to the register the runner step:
      $ gitlab-ci-multi-runner register
WARNING: Running in user-mode.                     WARNING: The user-mode requires you to manually start builds processing:
WARNING: $ gitlab-runner run                       WARNING: Use sudo for system-mode:                 WARNING: $ sudo gitlab-runner...                   ```

If you're using self-managed GitLab, the coordinator URL will be http(s)://url-of-your-gitlab-instance/ci`.

```text
Please enter the gitlab-ci coordinator URL (e.g. https://gitlab.com/ci):
https://gitlab.com/ci
The CI token for your project is available on GitLab's Project Settings page, under Advanced Settings. Each project has a unique token.
      Please enter the gitlab-ci token for this runner:
<CI runner token from Project > Settings > Runner>
The register process suggests the name of your Mac as a description for the
runner. You can enter something different if you like, or just hit return to
continue.
      Please enter the gitlab-ci description for this runner:
[Your-Mac's-Name.local]:
Enter whatever tags you'd like to further identify this particular runner. It's
particularly helpful when you need a particular build environment—for example,
iOS 9.2 on Xcode 7.2 on macOS 10.11 could use tags like ios_9-2, xcode_7-2,
and osx_10-11. This way, we can filter our build stages in GitLab by toolchain,
platform, etc.
      Please enter the gitlab-ci tags for this runner (comma separated):
ios_9-2, xcode_7-2, osx_10-11
The GitLab Runner will register the runner and give it a unique runner ID.
Registering runner... succeeded runner=s8Bgtktb
The GitLab Runner has to run xcodebuild to build and test the project, so we
select shell as the executor:
      Please enter the executor: virtualbox, ssh, shell, parallels, docker, docker-ssh:
shell
Runner registered successfully. Feel free to start it, but if it's running
already the config should be automatically reloaded!
Continue with the rest of the Runner installation instructions (install and
start), per the documentation.
Go to the Runners page in your Project Settings and voilà:
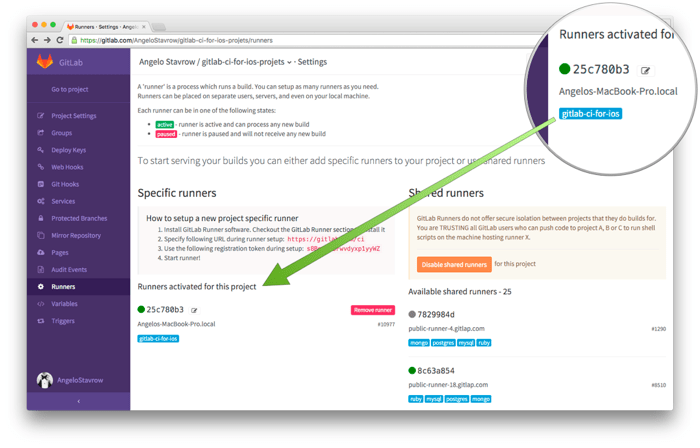
Your GitLab Runner is recognized and (almost) ready to go!
You can verify this by running
      $ gitlab-ci-multi-runner verify
WARNING: Running in user-mode.                     WARNING: The user-mode requires you to manually start builds processing:
WARNING: $ gitlab-runner run                       WARNING: Use sudo for system-mode:                 WARNING: $ sudo gitlab-runner...
Veryfing runner... is alive                         runner=25c780b3
Note that they have the same ID (in this case, 25c780b3).
The last thing to do is to configure the build and test settings. To do so, open your text editor and enter the following:
      stages:
  - build

build_project:
  stage: build
  script:
    - xcodebuild clean -project ProjectName.xcodeproj -scheme SchemeName | xcpretty
    - xcodebuild test -project ProjectName.xcodeproj -scheme SchemeName -destination 'platform=iOS Simulator,name=iPhone 6s,OS=9.2' | xcpretty -s
  tags:
    - ios_9-2
    - xcode_7-2
    - osx_10-11
Save this file in your Xcode project folder as .gitlab-ci.yml, and don't forget
the period at the beginning of the file name!
Update: To clarify, the
.gitlab-ci.ymlfile should go in the folder you created for your iOS project, which is also typically where your Xcode project file (ProjectName.xcodeproj) is found. Thanks to commenter Palo for pointing this out!
Let's go through the file with some detail:
- The file first describes the
stagesavailable to eachjob. For simplicity, we have one stage (build) and one job (build_project). - The file then provides the settings for each
job. Thebuild_projectjob runs two scripts: one to clean the Xcode project, and then another to build and test it. You can probably skip the cleaning script to save time, unless you want to be sure that you're building from a clean state. - Under
tags, add the tags you created when you registered the GitLab Runner.
There are also some things to look out for:
- Make sure to replace all references to
ProjectNamewith the name of your Xcode project; if you're using a different scheme than the default, then make sure you pass in the properSchemeNametoo (the default is the same as theProjectName). - In the
xcodebuild testcommand, notice the-destinationoption is set to launch an iPhone 6S image running iOS 9.2 in the Simulator; if you want to run a different device (iPad, for example), you'll need to change this. - If you're using a workspace rather than a project (e.g., because your app uses Cocoapods), change the
-project ProjectName.xcodeprojoptions to-workspace WorkspaceName.xcworkspace. There are several options available to customize your build; runxcodebuild --helpin the Terminal to explore these further.
There's a simple tool for "linting" (i.e., validating) your .gitlab-ci.yml in
GitLab. From your GitLab project page, click on CI/CD > Jobs in the sidebar, then in
the upper-right corner, click on CI lint:

Paste the contents of your .gitlab-ci.yml file into the text box and click on
Validate. You should see something like:
Status: syntax is correct
This won't tell you if your project name or the Simulator chosen is correct, so be sure to double-check these settings.
The .gitlab-ci.yml file is extremely customizable. You can limit jobs to run
on success or failure, or depending on branches or tags, etc.—read through
the documentation to get a feeling
for just how flexible and powerful it is.
Setting up your GitLab project for CI
Actually, there's really not much to do here! CI is enabled by default on new projects. If your iOS project has some environment variables you want to keep secret, but you want to keep the project public on GitLab, you may want to disable Public builds in Project Settings, under Continuous Integration. This will hide the build results from everyone except members of the project.
You may also want to go to Runners under your Project Settings and click Disable shared runners, as they're not needed anyhow—we're using a project-specific runner.
We're now ready to trigger a CI build!
How to trigger builds
To trigger a build, all you have to do is push a commit to GitLab. From the Terminal:
      $ git add .
$ git commit -m "First commit."
[...commit info...]
$ git push origin master
[...push info...]
If everything worked, and you installed the GitLab Runner on the same machine, you'll notice that Simulator launches, installs your iOS app and launches it, and then goes back to the home screen.
Go to the Builds page of your GitLab project and have a look at the results!

Click on the ✔︎ success button to see the build output:

Here you'll see the output from all the steps you requested in your .gitlab-ci.yml
file. At the bottom of the log, you should see something like:
      All tests
Test Suite GitLab-CI-for-iOSTests.xctest started
GitLab_CI_for_iOSTests
    . testExample (0.001 seconds)
    T testPerformanceExample measured (0.000 seconds)
    . testPerformanceExample (0.324 seconds)


     Executed 2 tests, with 0 failures (0 unexpected) in 0.325 (0.328) seconds

All tests
Test Suite GitLab-CI-for-iOSUITests.xctest started
GitLab_CI_for_iOSUITests
    . testExample (3.587 seconds)


     Executed 1 test, with 0 failures (0 unexpected) in 3.587 (3.589) seconds


Build succeeded.
Now you can go ahead and start writing tests for your code, and every time you push a commit, GitLab will diligently fetch the project, clean it, and then build and test it. If the build fails, you can take action to fix the commit.
Starting and stopping the runner on your Mac
The GitLab Runner includes several convenient commands, which you can list easily:
      $ gitlab-ci-multi-runner --help
NAME:
   gitlab-ci-multi-runner - a GitLab Runner

USAGE:
   gitlab-ci-multi-runner [global options] command [command options] [arguments...]

VERSION:
   1.0.4 (014aa8c)

AUTHOR(S):
   Kamil Trzciński <[email protected]>

COMMANDS:
   archive  find and archive files (internal)
   artifacts    upload build artifacts (internal)
   extract  extract files from an archive (internal)
   exec     execute a build locally
   list     List all configured runners
   run      run multi runner service
   register register a new runner
   install  install service
   uninstall    uninstall service
   start    start service
   stop     stop service
   restart  restart service
   status   get status of a service
   run-single   start single runner
   unregister   unregister specific runner
   verify   verify all registered runners
   help, h  Shows a list of commands or help for one command

GLOBAL OPTIONS:
   --debug          debug mode [$DEBUG]
   --log-level, -l "info"   Log level (options: debug, info, warn, error, fatal, panic)
   --help, -h           show help
   --version, -v        print the version
You may want to stop the Runner so that a build isn't immediately triggered by a pushed commit:
      $ gitlab-ci-multi-runner stop
$ gitlab-ci-multi-runner status
gitlab-runner: Service is not running.
In this case, any builds pushed will show up as pending and will be triggered as soon as you restart the Runner:
      $ gitlab-ci-multi-runner start
$ gitlab-ci-multi-runner status
gitlab-runner: Service is running!
Any pending builds in the queue will then be triggered, launching Simulator and running the test suite normally.
Advanced: archiving the project automatically
Let's say that, if we commit to the master branch, we want GitLab CI to not only build and
test the project, but also provide some continuous delivery, where it creates an
application archive, and uploads it to GitLab.
We start by modifying our .gitlab-ci.yml file to add an archive stage and an
archive_project job:
      stages:
  - build
  - archive

build_project:
  stage: build
  script:
    - xcodebuild clean -project ProjectName.xcodeproj -scheme SchemeName | xcpretty
    - xcodebuild test -project ProjectName.xcodeproj -scheme SchemeName -destination 'platform=iOS Simulator,name=iPhone 6s,OS=9.2' | xcpretty -s
  tags:
    - ios_9-2
    - xcode_7-2
    - osx_10-11

archive_project:
  stage: archive
  script:
    - xcodebuild clean archive -archivePath build/ProjectName -scheme SchemeName
    - xcodebuild -exportArchive -exportFormat ipa -archivePath "build/ProjectName.xcarchive" -exportPath "build/ProjectName.ipa" -exportProvisioningProfile "ProvisioningProfileName"
  only:
    - master
  artifacts:
    paths:
    - build/ProjectName.ipa
  tags:
    - ios_9-2
    - xcode_7-2
    - osx_10-11
The archive_project job runs two scripts: the first cleans and archives your
Xcode project, and the second builds an .ipa file; the only setting means that
this job will only run when we commit to master. Notice that it also defines
artifacts; after the ProjectName.ipa application archive is created, this
option uploads it to GitLab, where you can later download it from the Build page.
In the archive_project job's exportArchive script, make sure you pass in the
correct ProvisioningProfileName. It's possible that the archive_project job
will fail if your developer keys are in the login Keychain, because it's not unlocked
in the script. The simplest way to fix this without putting your password in a
script is to open Keychain Access on your Mac and drag and drop them to the System
Keychain.
Now, when we commit to master, the build will also show us the archive results, along with the option to download or browse our build artifacts!

Other salient points
- This workflow should work for any kind of Xcode project, including tvOS,
watchOS, and macOS. Just be sure to specify the appropriate Simulator device in
your
.gitlab-ci.ymlfile. - If you want to push a commit but don't want to trigger a CI build, simply add
[ci skip]to your commit message. - If the user that installed the GitLab runner isn't logged in, the runner won't run. So, if builds seem to be pending for a long time, you may want to check on this!
- If you're working on a team, or if your project is public, you may want to install the GitLab Runner on a dedicated build machine. It can otherwise be very distracting to be using your machine and have Simulator launch unexpectedly to run a test suite.
- The test project used in this particular tutorial is available here,
but the Runner is permanently stopped. Note that the project isn't tied to a particular
team, so provisioning isn't an issue here; in fact, no provisioning profile is specified.
You, however, may need to add some parameters to the build scripts
in your
.gitlab-ci.ymlfile if you see provisioning errors in your build output.
About guest author Angelo Stavrow
Angelo is a Quality Engineer and Software Developer living in Montreal, Canada. He believes that open, honest, collaboration is the best path towards building great things and great teams.
More to explore
View all blog posts


We want to hear from you
Enjoyed reading this blog post or have questions or feedback? Share your thoughts by creating a new topic in the GitLab community forum.
Share your feedback