Published on: April 7, 2016
13 min read
Hosting on GitLab.com with GitLab Pages
Learn how to host your website on GitLab.com with GitLab Pages

In this article we provide you with detailed information about using GitLab Pages to host your website for free on GitLab.com.
We've prepared a step-by-step tutorial on creating a new project for GitLab Pages so you won't get lost in the process.
GitLab Pages supports static websites and builds any Static Site Generator (SSG), such as Jekyll, Hugo, Hexo, Middleman and Pelican.
We are assuming that you are familiar with Git and with the web development process, from creation to publishing.
What's in this tutorial?
- TOC
Getting Started
There are two ways of getting started with GitLab Pages: either you fork an existing project, or you create a new one for yourself.
On the GitLab Pages Quick Start Guide, which is, by the way, a site built with Middleman, you will find the steps for forking an existing project from a list of examples prepared for you. There are some popular SSGs, like Jekyll, Hugo, Hexo, Brunch, etc.
However, if you want to understand the process of creating a new project from scratch, this post is for you.
On the official documentation you can learn about GitLab Pages, but here we will focus on the steps for creating your own project.
Note: GitLab Pages was introduced in GitLab EE 8.3. It is available for GitLab.com and GitLab Enterprise Edition users. Update: GitLab 8.17 brought GitLab Pages to GitLab Community Edition! Enjoy!
Website Types
In general, you are allowed to create and host two sorts of websites with GitLab Pages:
- User/Group Websites - a single site per user or group
- Project Websites - as many sites you want
You can find out more about them on the docs.
A note regarding GitLab Groups and Namespaces
Creating a group on GitLab is very useful when you have several projects with the same subject. A group has its own namespace, which is unique for each group (and for each user).
The important matter is, when you create your account on GitLab, it's better to choose a username for
yourself as a person, not as a company. You can create your "company username" later, as a group
namespace. For example, let's say your name is "John Doe" and your company is called "Foo Main".
First, register yourself as johndoe and later create a group called Foo Main within the namespace of
foomain. This will allow you to separate your personal projects from your company ones.
If you follow this tip, you will be able to access your personal site under https://username.gitlab.io
and your company site under https://groupname.gitlab.io.
About GitLab CI for GitLab Pages
The key to having everything up and running as expected is the GitLab CI configuration file, called .gitlab-ci.yml.
This file configures how your website will be built by a Runner. It is written in YAML, which has its own syntax, so we recommend you follow this quick start guide before setting it up. It needs to be placed at your root directory.
The most important fact is that with GitLab CI, you take control over your builds. They won't be in an invisible black box where you don't know what is going on! You can actually see any build running live by navigating to your project's Pipelines > Builds > Build ID. You can also add any command to your script. This is far beyond useful as it allows you to do pretty much anything you do on your local machine!
For example, you can add any Jekyll Plugin to your Jekyll site,
you can require any gem you need in your Gemfile, run npm, run bundle and much more.
Bottom line, it's as handy as having your own command line on your GitLab UI.
Additionally, you can have a distinct .gitlab-ci.yml for each repository - even for each branch.
This means you can test your script in parallel branches before pushing to your main branch.
If the build succeeds, you merge. If it doesn't, you can make adjustments and try building
again without messing up your main branch.
Before you push any .gitlab-ci.yml to your project, you can
validate its syntax with the tool called CI Lint.
You need to be logged into your account to have access to this tool.
It's found by navigating to your project's Pipelines: there is a button at the top-right of your screen.
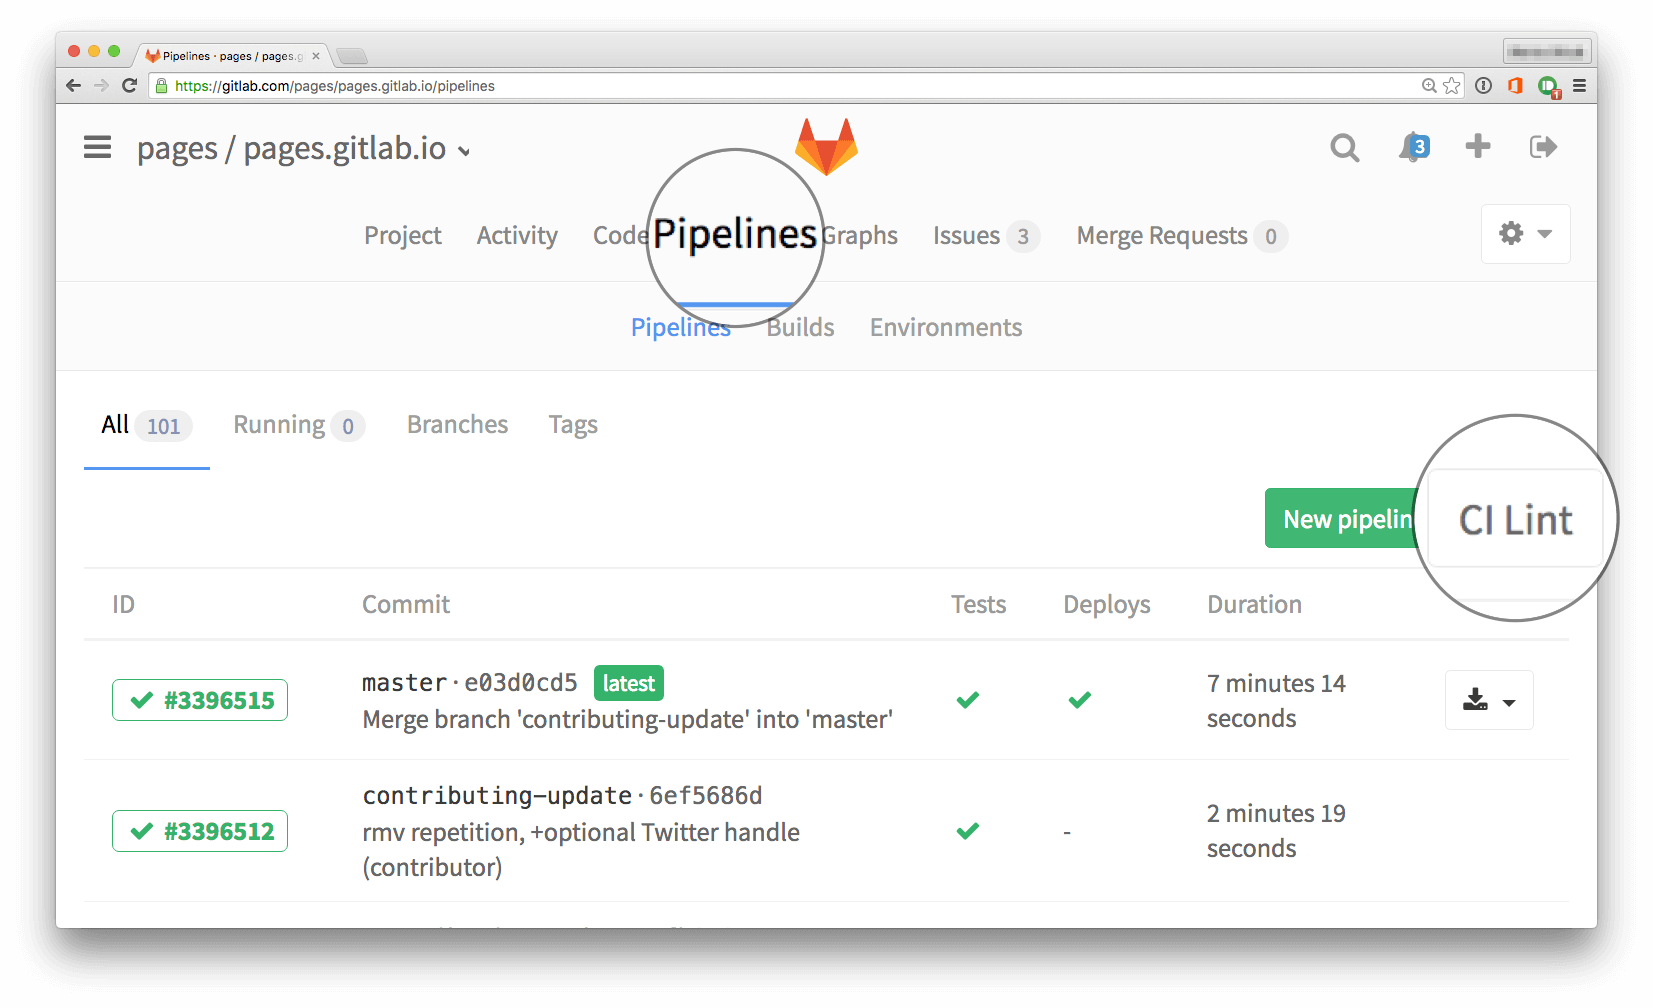
You can read through the full documentation for .gitlab-ci.yml for more information.
Creating new GitLab Pages projects
Here is an overview of the steps we'll take, assuming you already have your GitLab.com account:
- Create a new project
- Add the configuration file (
.gitlab-ci.yml) - Upload your website content
- Add your custom domain (optional)
- Done!
Step-by-step
Now we will go through this process step-by-step. Update: watch the video tutorial on How to Publish a Website with GitLab Pages on GitLab.com from a forked project!
Step 1: Create a new project
This is as straight-forward as you can imagine:
- On your dashboard you will see a big green button called + New Project. Click on it.
- Set the first things up:
- Project path - your project's name, accessed via
https://gitlab.com/namespace/projectname - Privacy - choose if you want your project to be visible and accessible just for you (
private), just for GitLab.com users (internal) or free to anyone to view, clone, fork and download it (public)
- Project path - your project's name, accessed via
Note: you can host your website on GitLab.com even if it is stored in a private repository. If you do so, you can have your project protected - only the static site will be visible to the public - via "Inspect Element" or "View-Source" from their web browsers.
Step 2: Add the configuration file: .gitlab-ci.yml
Now we can have some fun! Let's tell GitLab CI how to build the site. You will see a few examples below (options A, B, and C) to understand how they work.
Option A: GitLab CI for plain HTML websites
In order to build your plain HTML site with GitLab Pages,
your .gitlab-ci.yml file doesn't need much:
      pages:
  stage: deploy
  script:
  - mkdir .public
  - cp -r * .public
  - mv .public public
  artifacts:
    paths:
    - public
  only:
  - main
What this code is doing is creating a job called pages
telling the Runner to deploy the website artifacts
to a public path,
whenever a commit is pushed only to the main branch.
All pages are created after the build completes successfully and the artifacts for the pages job are uploaded to GitLab.
Option B: GitLab CI for Jekyll websites
Jekyll is so far the most popular Static Site Generator (SSG) available, that's why we'll use it as a first example for configuring our GitLab CI. On the next section you'll find more examples for SSGs already tested with GitLab Pages.
Jekyll is written in Ruby and generates static blog-aware websites. Blog-aware means a website generator will create blog-style content, such as lists of content in reverse chronological order, archive lists, and other common blog-style features.
We can write dynamically with Liquid, Markdown and YAML and Jekyll builds the static site (HTML, CSS, JS) for us. You will find the same functionality for every SSG, yet each of them uses its own environment, template system, markup language, etc.
If you want GitLab Pages to build your Jekyll website, you can start with the simple script below:
      image: ruby:2.1

pages:
  script:
  - gem install jekyll
  - jekyll build -d public/
  artifacts:
    paths:
    - public
  only:
  - main
This code requires the script to run on
the environment of Ruby 2.1.x,
installs the Jekyll gem, and builds the site
to the public path.
The result affects only the main branch.
For building a regular Jekyll site, you can just
copy this code and paste it into your .gitlab-ci.yml.
If you are familiar with Jekyll, you will probably want to use Bundler to build your Jekyll site. We've prepared an example for that. Also, if you want to use a specific Jekyll version, you can find an example in the Jekyll Themes group I set up for the purposes of this post. And of course, since you are the one who controls how GitLab CI builds your site, you are free to use any Jekyll Plugins. Yep!
Option C: GitLab CI for Hexo websites
Let's see another example. Hexo is a powerful blog-aware framework built with NodeJS, a server-side JavaScript environment based on Google V8 high-performance engine.
To build our Hexo site, we can start with this .gitlab-ci.yml:
      image: node:4.2.2

pages:
  cache:
    paths:
    - node_modules/

  script:
  - npm install hexo-cli -g
  - npm install
  - hexo deploy
  artifacts:
    paths:
    - public
  only:
    - main
Note that the Docker image we require is node:4.2.2.
We are archiving npm modules into the cache, installing hexo-cli and deploying
our hexo site to the default public directory, uploaded to GitLab as artifacts.
The pages job is only affecting the main branch.
On the Pages group you will find a default Hexo site deployed with GitLab Pages, and on this group, another example with a slightly different configuration.
Step 3: Upload your website content
Push the content to your remote project and keep an eye on the build!
Don't forget: when you are using GitLab Pages with a Static Site Generator,
do not upload the directory which your SSG generated locally,
otherwise you'll have duplicated contents and you might face build errors.
For example, do not commit the _site directory (Jekyll) or the build directory
(Middleman) or the public directory (Hexo). You can do this automatically by adding
them to a .gitignore file, placed at your project's root directory.
E.g., if you are building a Jekyll site, your .gitignore will have this line:
_site
A .gitignore is very useful to avoid uploading to your remote repository any file or folder within your project.
If you want to know more about it, check the .gitignore official docs.
Step 4: Add your custom domain
Note: Custom CNAMEs with TLS support were introduced in GitLab EE 8.5.
If you want, you are free to add your own domain(s) name to your website hosted by GitLab.com.
It's not required though, you can always use the standard GitLab Pages default domain names.
Features
- Besides including your own domain, you can add your custom subdomain to your GitLab Pages project (e.g.,
subdomain.example.com) - You can enter more than one domain alias per project (e.g.,
example.com,example.netmy.example.organdanother-example.compointing to your project undermynamespace.gitlab.ioormynamespace.gitlab.io/myproject). A domain alias is like having multiple front doors to one location. - If you want to enable an HTTPS secure connection to your domains, you can affix your own SSL/TLS digital certificate to each custom domain or subdomain you've added to your projects.
Steps to set up a custom domain
- From your project's dashboard, go to Settings () > Pages > New Domain
- Add your domain to the first field:
mydomain.com - If you have an SSL/TLS digital certificate and its key, add them to their respective fields. If you don't, just leave the fields blank.
- Click on Create New Domain.
- Finally, access your domain control panel and create a new DNS
Arecord pointing to the IP of GitLab Pages server:
mydomain.com A 35.185.44.232
Note: This GitLab Pages IP address for GitLab.com changed from 52.167.214.135 to 35.185.44.232 in August 2018.
Alternatively, a similar procedure can be applied for custom subdomains:
- Add the subdomain to the first field:
subdomain.mydomain.com - Then create a new DNS
CNAMErecord pointing tomyusername.gitlab.io:
subdomain.mydomain.com CNAME myusername.gitlab.io
Repeat these steps for any additional domain aliases.
Note that how you set up your DNS records will depend upon which company you used to register your domain name. Every company has its own methods for DNS Zone Management. On this link you can find an overview for some providers, it might help you to follow through. Please contact your provider directly if you need some extra help.
Ordinarily, DNS propagation needs some time to take effect, so don't worry if you can't access your website under your custom domain instantaneously. Wait a few minutes and check it again.
Examples
Check out the Pages official group for a list of example projects, where you can explore some good options for Static Site Generators for Ruby, NodeJS and Python environments. You can also find more specific examples on the following groups, which I prepared for the purposes of this post:
- Jekyll Themes (Ruby/Jekyll)
- Middleman Themes (Ruby/Middleman)
- Themes and Templates (Miscellaneous)
- HTML Themes (plain HTML)
Note: these themes, templates and SSGs were casually chosen and listed on this post to provide you with some distinct GitLab CI configurations.
FAQ
Is all of this really free to use?
Yes, it is! On GitLab.com you can create your free account and enjoy all its features, including unlimited private repositories, projects, websites, and contributors. Also, you'll have 10GB disk space per project, 1GB per Pages artifacts, and unlimited total disk space. Awesome, isn't it? Why don't you take a peek at the public projects?
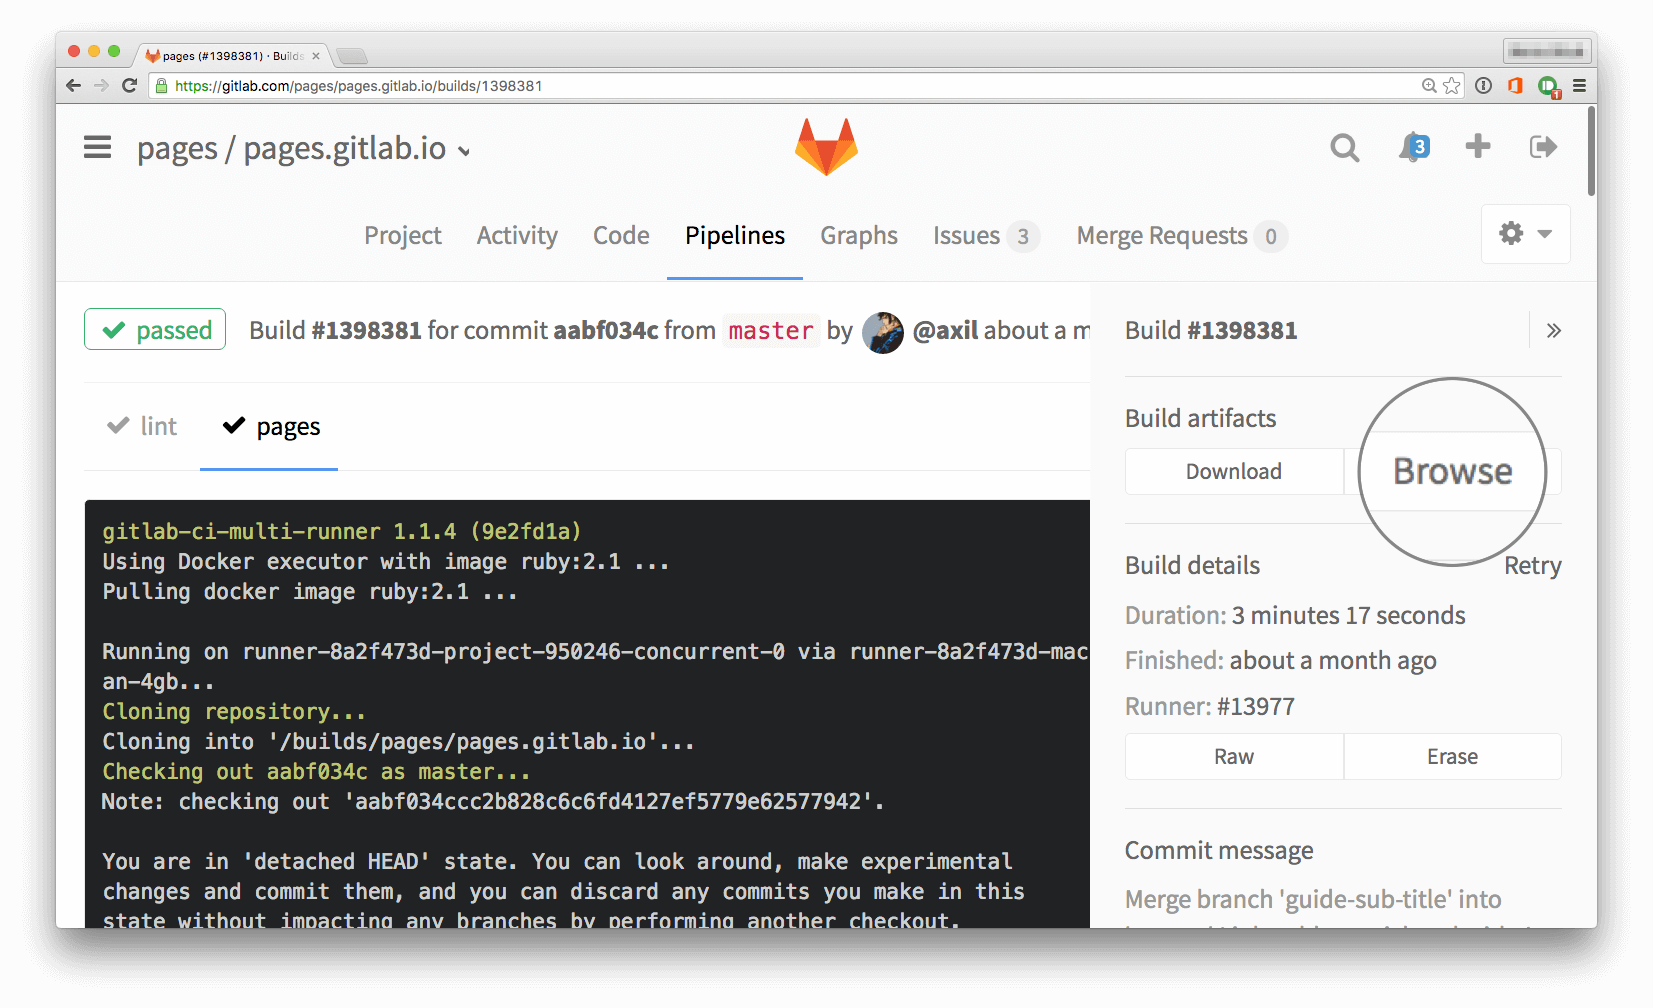
Where is the public folder?
When a build succeeds, you'll find your static site at your project's Pipelines > Builds > Build ID > Browse. You can download the artifacts from the same screen.
Can I really use any Static Site Generator?
Yes, you can use any Static Site Generator available.
Can I use free SSL/TLS digital certificates?
Yes, absolutely! Need a suggestion? Try Let's Encrypt or Cloudflare.
Can I contribute to the themes?
Sure! You are very welcome to contribute to the groups mentioned above. To do that, please set your website up and make sure it's working as you expected. Then, add an issue to the group you're interested in. Don't forget to include a link to your project. After a brief evaluation, we'll be glad to fork your project and present your theme to our community!
Can I use .php pages and connect databases with my sites?
No. GitLab Pages hosts static websites only (HTML, CSS and JS).
Getting Help
If you need some help regarding GitLab Pages on GitLab.com, feel free to use one of our channels. You can also open an issue on the Pages group.
Conclusion
Hopefully now you understand how GitLab Pages works and how to create your new site.
Follow @GitLab on Twitter and stay tuned for updates!
We're looking forward to seeing your sites!
Note: this post has been updated (June 17th, 2016) to match the new GitLab UI.
About guest author Marcia Ramos
Marcia is a backend web developer specialized in WordPress and Jekyll sites at Virtua Creative, though she does some frontend too. Her daily work is based on version-controlled systems for almost 15 years. She is driven by her thirst for knowledge and her eagerness to continuously expand her horizons. When she is not coding, she is writing articles, studying, teaching or contributing to open source projects here and there. Update: she's joined the GitLab Team in May, 2016.
More to explore
View all blog posts


We want to hear from you
Enjoyed reading this blog post or have questions or feedback? Share your thoughts by creating a new topic in the GitLab community forum.
Share your feedback