
is now in public beta!
Published on: July 31, 2020
9 min read
How to build containers with the AWS Fargate Custom Executor for GitLab Runner and AWS CodeBuild
Build containers with the AWS Fargate Custom Executor for GitLab Runner and AWS CodeBuild
AWS Fargate does not allow containers to run in privileged mode. This means Docker-in-Docker (DinD), which enables the building and running of container images inside of containers, does not work with the AWS Fargate Custom Executor driver for GitLab Runner. The good news is that users don't have to be blocked by this and may use a cloud-native approach to build containers, effectively leveraging a seamless integration with AWS CodeBuild in the CI/CD pipeline.
We provide in-depth instructions on how to autoscale GitLab CI on AWS Fargate in GitLab Runner's documentation. In this blog post, we explain how to instrument CI containers and source repositories to trigger AWS CodeBuild and use it to build container images.
Architecture overview
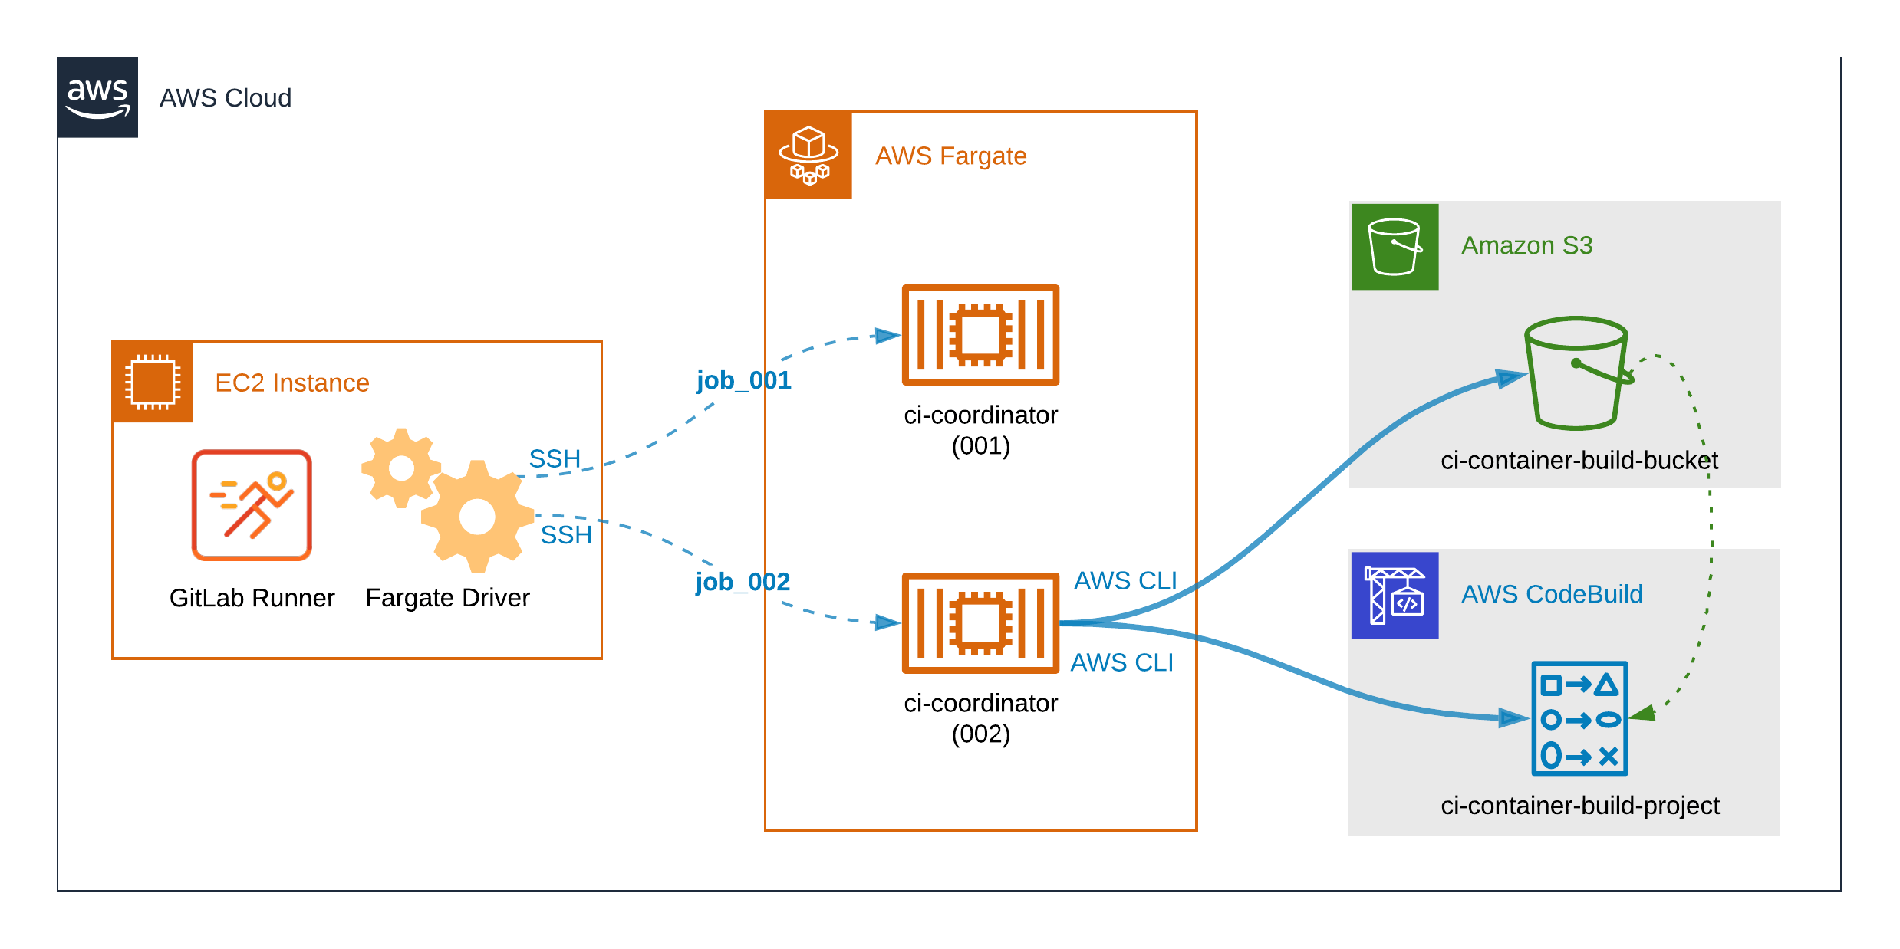 How distinct CI workloads run on Fargate.
The picture above illustrates distinct GitLab CI workloads running on Fargate. The container identified by ci-coordinator (001) is running a typical CI job which does not build containers, so it does not require additional configuration or dependencies. The second container, ci-coordinator (002), illustrates the problem to be tackled in this post: The CI container includes the AWS CLI in order to send content to an Amazon S3 Bucket, trigger the AWS CodeBuild job, and fetch logs.
Prerequisites
Once these prerequisites are configured, you can dive into the six-step process to configure CI containers and source repositories to trigger AWS CodeBuild and use it to build container images.
- The AWS Fargate Custom Executor driver for GitLab Runner must be set-up appropriately.
- Ensure the AWS IAM user permissions include the ability to create and configure S3 and CodeBuild resources.
- AWS IAM user or service role with permissions to upload files to S3, start CodeBuild jobs, and read CloudWatch Logs.
- AWS IAM user with permissions to create and configure IAM Policies and Users.
Step 1: Create an AWS S3 bucket
- In the top menu of AWS Management Console click Services.
- In the Storage section, select
S3. - Click
Create bucket. - Choose a descriptive name (
ci-container-build-bucketwill be used as example) and select your preferred region. - Leave all other fields with default values and click
Create bucket. - In the Buckets list, click the name of the bucket you created.
- Click
Create folder. - Give it the
gitlab-runner-buildsname. - Click
Save.
Step 2: Create an AWS CodeBuild Project
- Using the AWS Console, click
Servicesin the top menu - Select
CodeBuildin the Developer Tools section - Click
Create build project - In
Project Nameenterci-container-build-project - In
Source providerselectAmazon S3 - In
Bucketselect theci-container-build-bucketcreated in step one - In S3 object key or S3 folder enter
gitlab-runner-builds/build.zip - In
Environment image, selectManaged image - For
Operating systemselect your preferred OS from the available options - For
Runtime(s), chooseStandard. - For
Image, selectaws/codebuild/standard:4.0 - For
Image version, selectAlways use the latest image for this runtime version - For
Environment typeselectLinux - Check the
Privilegedflag - For the
Service roleselectNew service roleand note the sugggestedRole name - For
Build specificationsselectUse a buildspec file - Scroll down to the bottom of the page and click "Create build project"
Step 3: Build the CI container image
As stated in Autoscaling GitLab CI on AWS Fargate, a custom container is required to run GitLab CI jobs on Fargate. Since the solution relies on communicating with S3 and CodeBuild, you'll need to have the AWS CLI tool available in the CI container.
Install the zip tool to make S3 communication smoother. As an example of a Ubuntu-based container, the lines below must be added to the CI container's Dockerfile:
      RUN apt-get update -qq -y \
    && apt-get install -qq -y curl unzip zip \
    && curl -Lo awscliv2.zip https://awscli.amazonaws.com/awscli-exe-linux-x86_64.zip \
    && unzip awscliv2.zip \
    && ./aws/install
Step 4: Add CodeBuild configuration to the repository
By default, CodeBuild looks for a file named buildspec.yml in the build source. This file will instruct CodeBuild on how to build and publish the resulting container image. Create this file with the content below and commit it to the git repository (if you changed the Buildspec name when configuring the CodeBuild project in Step 2, please create the file accordingly):
      version: 0.2

phases:
  install:
    commands:
      - nohup /usr/local/bin/dockerd --host=unix:///var/run/docker.sock --host=tcp://127.0.0.1:2375 --storage-driver=overlay2&
      - timeout 15 sh -c "until docker info; do echo .; sleep 1; done"
  build:
    commands:
      - echo Build started on `date`
      - docker -v
      - docker build -t <IMAGE-TAG> .
      - echo Build completed on `date`
Step 5: Set up the GitLab CI job
Now we will set up the GitLab CI job that will pull everything together.
Interacting with CodeBuild through the AWS CLI
The CI job will need to interact with AWS Cloud to start CodeBuild jobs, poll the status of the jobs, and fetch logs. Commands such as aws codebuild and aws logs help to tackle this, so let's use them in a script, codebuild.sh:
      #!/bin/bash

build_project=ci-container-build-project
build_id=$(aws codebuild start-build --project-name $build_project --query 'build.id' --output text)
build_status=$(aws codebuild batch-get-builds --ids $build_id --query 'builds[].buildStatus' --output text)

while [ $build_status == "IN_PROGRESS" ]
do
    sleep 10
    build_status=$(aws codebuild batch-get-builds --ids $build_id --query 'builds[].buildStatus' --output text)
done

stream_name=$(aws codebuild batch-get-builds --ids $build_id --query 'builds[].logs.streamName' --output text)
group_name=$(aws codebuild batch-get-builds --ids $build_id --query 'builds[].logs.groupName' --output text)

aws logs get-log-events --log-stream-name $stream_name --log-group-name $group_name --query 'events[].message' --output text
echo Codebuild completed with status $build_status
Add a job to build the resulting container
Once the steps one through five are complete, the source repository will be structured as follows:
      /sample-repository
  ├── .gitlab-ci.yml
  ├── buildspec.yml
  ├── codebuild.sh
  ├── Dockerfile
  ├── <APPLICATION-FILES>
The final step to build the container is to add a job to .gitlab-ci.yml:
      dockerbuild:
  stage: deploy
  script:
    - zip build.zip buildspec.yml Dockerfile <APPLICATION-FILES>
    - aws configure set default.region <REGION>
    - aws s3 cp build.zip s3://ci-container-build-bucket/gitlab-runner-builds/build.zip
    - bash codebuild.sh
Below are some definitions from terms in the script:
<APPLICATION-FILES>is a placeholder for the files that will be required to successfully build the resulting container image using theDockerfile, e.g.,package.jsonandapp.jsin a Node.js applicationDockerfileis used to build the resulting image. Note: It is not the same file used to build the CI container image, mentioned in Step 3: Build the CI container image- Zip and AWS CLI must be installed in the CI container to make the script work – refer to Step 3: Build the CI container image for details
Step 6: Set up AWS credentials
The final step is to set up the AWS credentials. As we already mentioned, the CI job will interact with AWS through the AWS CLI to perform a number of operations, and to do that, the AWS CLI needs to authenticate as an IAM user with the permissions listed below. We recommend you create a new user and grant it minimal privileges instead of using your personal AWS user account. For the sake of simplicity, we suggest this approach to complete this walk-through guide.
This AWS user only needs programmatic access and do not forget to make note of its Access key ID and Secret access key – they will be needed later. A simple way to grant only the minimal privileges for the new user is to create a customer managed policy since it can be directly attached to the user. A group might also be used to grant the same privileges for more users, but it is not mandatory for running the sample workflow.
- S3
      {
  "Effect": "Allow",
  "Action": "s3:PutObject",
  "Resource": "arn:aws:s3:::ci-container-build-bucket/gitlab-runner-builds/*"
}
- CodeBuild
      {
  "Effect": "Allow",
  "Action": ["codebuild:StartBuild", "codebuild:BatchGetBuilds"],
  "Resource": "arn:aws:codebuild:<REGION>:<ACCOUNT-ID>:project/ci-container-build-project"
}
- CloudWatch Logs
      {
  "Effect": "Allow",
  "Action": "logs:GetLogEvents",
  "Resource": "arn:aws:logs:<REGION>:<ACCOUNT-ID>:log-group:/aws/codebuild/ci-container-build-project:log-stream:*"
}
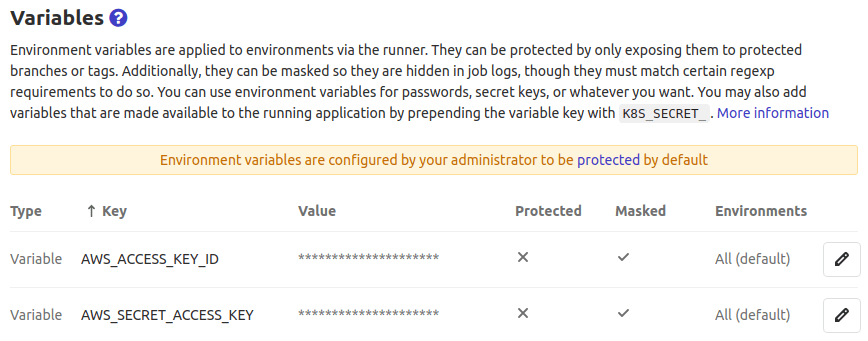
The access credentials can be provided to AWS CLI through GitLab CI environment variables. Please go to your GitLab Project's CI/CD Settings, click Expand in the Variables section, add AWS_ACCESS_KEY_ID and AWS_SECRET_ACCESS_KEY with the values you got from the AWS Management Console after creating the IAM user. See the image below for the result you can expect:
Using an IAM Role and Amazon ECS temporary/unique security credentials is also possible, but not covered in this tutorial.
Step 7: It's showtime
With all configurations in place, commit the changes and trigger a new pipeline to watch the magic happen!
Just need the highlights?
- The CI job script added in Step 5 compresses the resulting container image build files into
build.zip build.zipis then uploaded to the S3 Bucket we created in Step 1: Create an Amazon S3 Bucket- Next,
codebuild.shstarts a CodeBuild job based on the project created in Step 2: Create an AWS CodeBuild Project (Note: that project has an S3 object as its source provider) - Finally, the CodeBuild job downloads
gitlab-runner-builds/build.zipfrom S3, decompresses it and – frombuildspec.yml– builds the resulting container image
A sample repository, demonstrating everything described in the article is available here.
Cleanup
If you want to perform a cleanup after testing the custom executor with AWS Fargate and CodeBuild, you should remove the following objects:
- AWS S3 bucket created in Step 1
- AWS CodeBuild project created in Step 2
RUNcommand added to the CI container image in Step 3- The
buildspec.ymlfile created in Step 4 - The
codebuild.shfile created in Step 5 - The
dockerbuildjob added to.gitlab-ci.ymlin Step 5 - IAM policy, user (and maybe group) created in Step 6
- GitLab CI/CD variables in Step 6
Read more about GitLab and AWS: -How autoscaling GitLab CI works on AWS Fargate -GitLab 12.10 released with Requirements Management and Autoscaling CI on AWS Fargate -Announcing 32/64-bit Arm Runner Support for AWS Graviton2
Cover image by Lucas van Oort on Unsplash
We want to hear from you
Enjoyed reading this blog post or have questions or feedback? Share your thoughts by creating a new topic in the GitLab community forum.
Share your feedback