Published on: March 26, 2019
16 min read
How to connect GitLab and Pantheon to streamline Drupal and WordPress workflows
Our guest author, a Developer Programs Engineer at Pantheon, shares how to automate WordPress deployments using GitLab CI/CD.

As a member of the developer relations team at Pantheon, I’m always looking for new ways to help WordPress and Drupal developers solve workflow problems with automation. To this end, I love exploring new tools and how they can be used effectively together.
One frequent problem I see teams facing is the dreaded single staging server.
It’s not fun to wait in line for your turn to use the staging server or to send clients a URL and tell them to review some work but ignore other, incomplete pieces.
Multidev environments, one of Pantheon’s advanced developer tools, solves this issue by allowing environments matching Git branches to be created on demand. Each multidev environment has its own URL and database, making independent work, QA, and approval possible without developers stepping on each other's toes.
However, Pantheon doesn’t provide source control management (SCM) or continuous integration and continuous deployment (CI/CD) tooling. Instead, the platform is flexible enough to be integrated with your preferred tools.
The next problem I see consistently is teams using different tools to manage development work and to build and deploy that work.
For example, using one tool for SCM and something else for CI/CD. Having to jump between tools to edit code and diagnose failing jobs is cumbersome.
GitLab solves this problem by providing a full suite of development workflow tools, such as SCM, with features like issues and merge requests, best-in-class CI/CD, and a container registry, to name a few. I haven't come across another application that is so complete to manage development workflow.
As someone who loves automation, I explored connecting Pantheon to GitLab so that commits to the master branch on GitLab deploy to the main dev environment on Pantheon. Additionally, merge requests on GitLab can create and deploy code to Pantheon multidev environments.
This tutorial will walk you through setting up the connection between GitLab and Pantheon so you, too, can streamline your WordPress and Drupal workflow.
This can be done with GitLab repository mirroring, but we will be setting it up manually to get some experience with GitLab CI and have the ability to expand beyond just deployment in the future.
Background
For this post, you need to know that Pantheon breaks each site down into three components: code, database, and files.
The code portion of a Pantheon site includes the CMS files, such as WordPress core, plugins and themes. These files are managed in a Git repository hosted by Pantheon, which means we can deploy code from GitLab to Pantheon with Git.
When Pantheon refers to files, it is the media files, such as images, for your site. These are typically uploaded by site users and are ignored in Git.
You can create a free account, learn more about the Pantheon workflow, or sign up for a live demo on pantheon.io.
Assumptions
My project is named pantheon-gitlab-blog-demo, both on Pantheon and GitLab. You should use a unique project name. This tutorial uses a WordPress site. Drupal can be substituted, but some modification will be needed.
I'll also be using the Git command line but you can substitute a graphical interface if you prefer.
Create the projects
First up, create a new GitLab project – we'll come back to this in a little bit.
Now, create a new WordPress site on Pantheon. After your new site is created, you will need to install WordPress for the site dashboard.
You might be tempted to make some changes, such as adding or removing plugins, but please refrain. We haven't connected the site to GitLab yet and want to make sure all code changes, e.g. adding or removing plugins, go through GitLab.
After WordPress is installed, go back to the Pantheon site dashboard and change the development mode to Git.
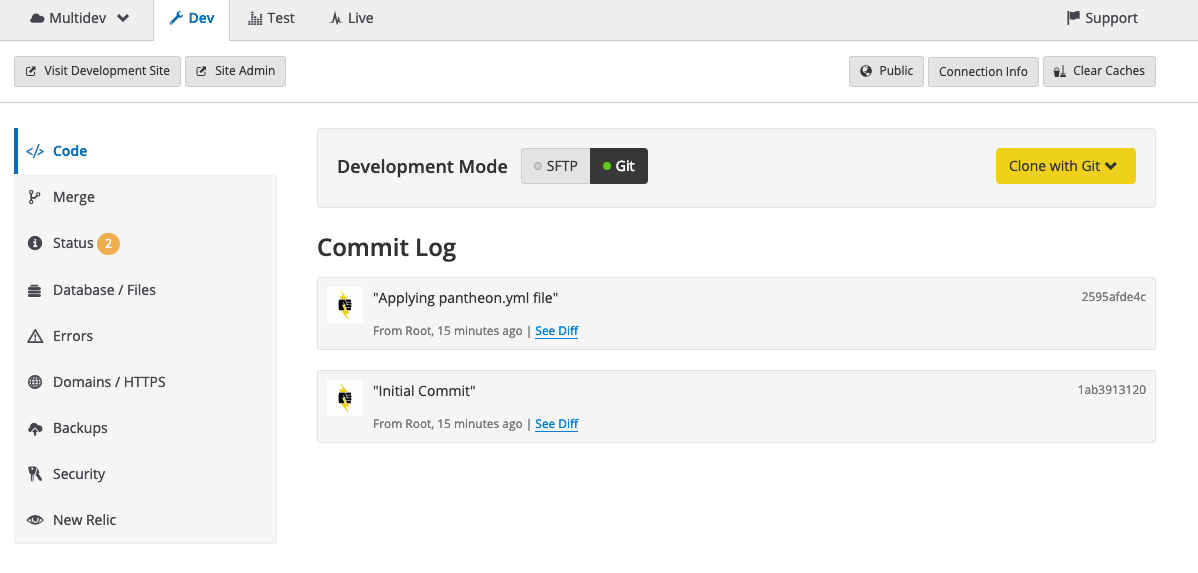
Initial commit to GitLab
Next, we need to get the starting WordPress code from the Pantheon site over to GitLab. In order to do this, we will clone the code from the Pantheon site Git repository locally, then push it to the GitLab repository.
To make this easier, and more secure, add an SSH key to Pantheon to avoid entering your password when cloning Pantheon Git repository. While you're at it, add an SSH key to GitLab as well.
To do this, clone the Pantheon site locally by copying the command in the Clone with Git drop-down field from the site dashboard.
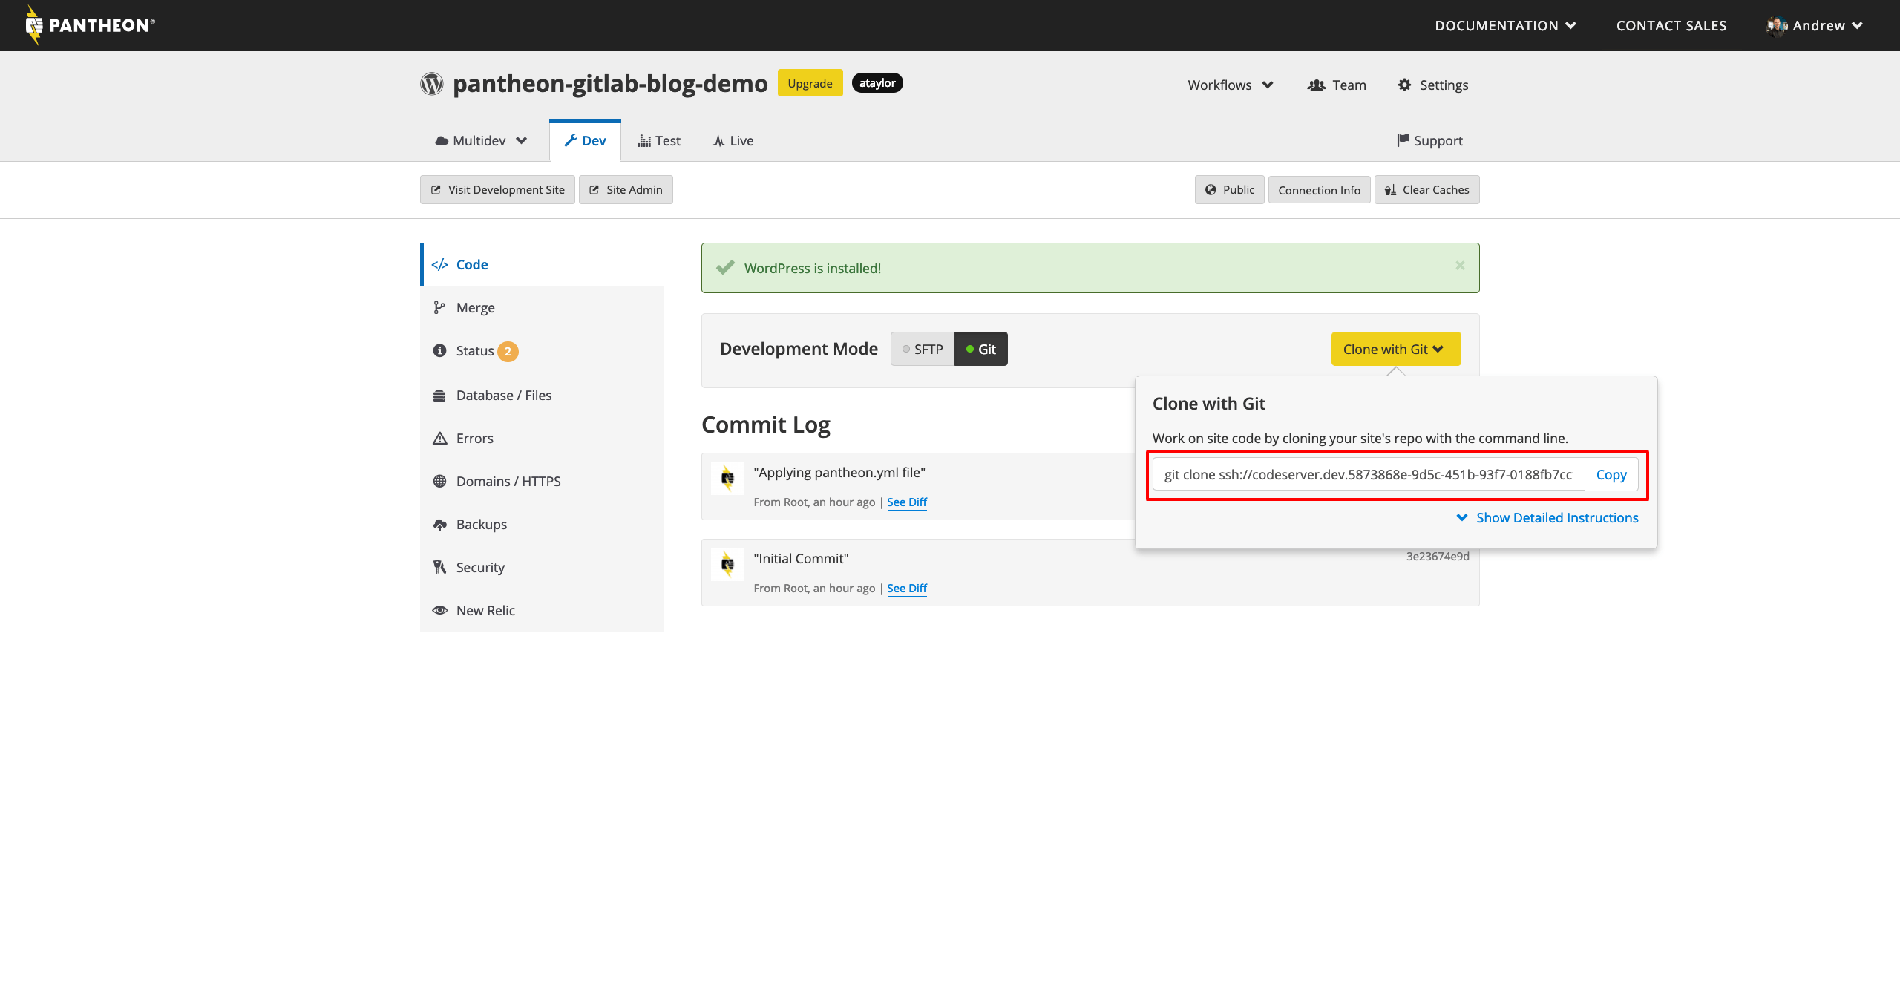
If you need help, see the Pantheon Start With Git documentation.
Next, we want to change the git remote origin to point to GitLab, instead of Pantheon. This can be done with the git remote command.
Head over to your GitLab project and grab the repository URL, which can be found at in the Clone drop-down of the project details screen. Be sure to use the Clone with SSH variant of the GitLab repository URL, since we set up an SSH key earlier.

The default git remote for the local copy of our code repository is origin. We can change it with git remote set-url origin [GitLab repository URL], replacing [GitLab repository URL] with your actual GitLab repository URL.
Finally, run git push origin master --force to send the WordPress code from the Pantheon site to GitLab.
The --force flag is only needed as part of this one-time step. Subsequent git push commands to GitLab won't need it.
Set up credentials and variables
Remember how we added an SSH key locally to authorize with Pantheon and GitLab? Well, an SSH token can also be used to authorize GitLab and Pantheon.
GitLab has some great documentation, and we will be looking at the SSH keys when using the Docker executor section of the Using SSH keys with GitLab CI/CD doc.
At this point, we will need to do the first two steps: Create a new SSH key pair locally with ssh-keygen and Add the private key as a variable to your project.
When done, SSH_PRIVATE_KEY should be set as a GitLab CI/CD Environment Variables in the project settings.
To take care of the third and fourth steps, create .gitlab-ci.yml file with the following contents:
before_script:
  # See https://docs.gitlab.com/ee/ci/ssh_keys/
  - eval $(ssh-agent -s)
  - echo "$SSH_PRIVATE_KEY" | tr -d '\r' | ssh-add - > /dev/null
  - mkdir -p $HOME/.ssh && echo "StrictHostKeyChecking no" >> "$HOME/.ssh/config"
  - git config --global user.email "$GITLAB_USER_EMAIL"
  - git config --global user.name "Gitlab CI"
Don't commit the .gitlab-ci.yml file just yet, we will be adding more to it in the next section.
Now, we need to take care of step 5, add the public key from the one you created in the first step to the services that you want to have an access to from within the build environment.
In our case, the service we want to access from GitLab is Pantheon. Follow the Pantheon doc to Add Your SSH Key to Pantheon to complete this step.
Be sure that the private SSH key is in GitLab and the public key is on Pantheon
We will also need to set some additional environment variables. The first one should be named PANTHEON_SITE, and the value will be the machine name of your Pantheon site. and the value will be the machine name of your Pantheon site.
You can get the machine name from the end of the Clone with Git command. Since you already cloned the site locally, it will be the directory name of your local repository.
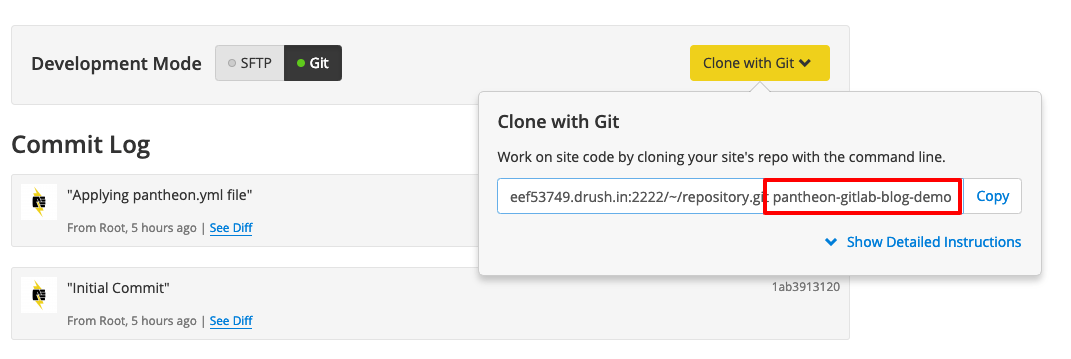
The next GitLab CI environment variable to set is PANTHEON_GIT_URL, which will be the Git repository URL of the Pantheon site that we used earlier.
Enter just the SSH repository URL, leaving off git clone and the site machine name at the end.
Phew! Now that setup is done, we can move on to finishing our .gitlab-ci.yml file.
Create the deployment job
What we will be doing with GitLab CI initially is very similar to what we did with Git repositories earlier. This time though, we will add the Pantheon repository as a second Git remote and then push the code from GitLab to Pantheon.
To do this, we will set up a stage named deploy and a job named deploy:dev, as it will deploy to the dev environment on Pantheon. The resulting .gitlab-ci.yml file should look like this:
stages:
- deploy

before_script:
  # See https://docs.gitlab.com/ee/ci/ssh_keys/
  - eval $(ssh-agent -s)
  - echo "$SSH_PRIVATE_KEY" | tr -d '\r' | ssh-add - > /dev/null
  - mkdir -p $HOME/.ssh && echo "StrictHostKeyChecking no" >> "$HOME/.ssh/config"
  - git config --global user.email "$GITLAB_USER_EMAIL"
  - git config --global user.name "Gitlab CI"

deploy:dev:
  stage: deploy
  environment:
    name: dev
    url: https://dev-$PANTHEON_SITE.pantheonsite.io/
  script:
    - git remote add pantheon $PANTHEON_GIT_URL
    - git push pantheon master --force
  only:
    - master
SSH_PRIVATE_KEY, PANTHEON_SITE, and PANTHEON_GIT_URL should all look familiar - they are the environment variables we set up earlier. Having environment variables will allow us to re-use the values multiple times in our .gitlab-ci.yml file, while having one place to update them, should they change in the future.
Finally, add, commit, and push the .gitlab-ci.yml file to send it to GitLab.
Verify the deployment
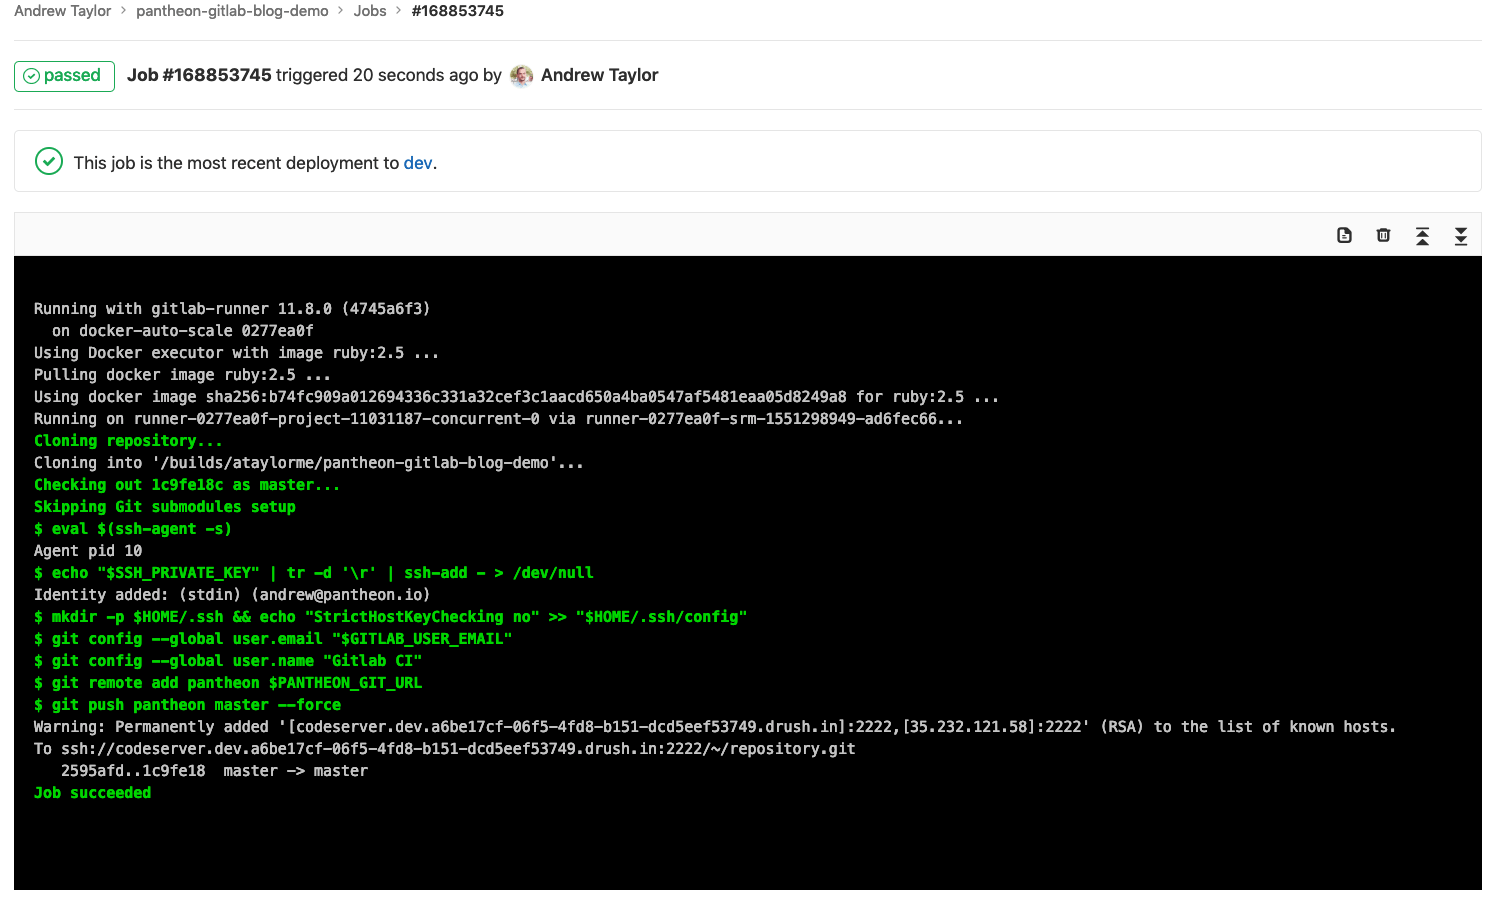
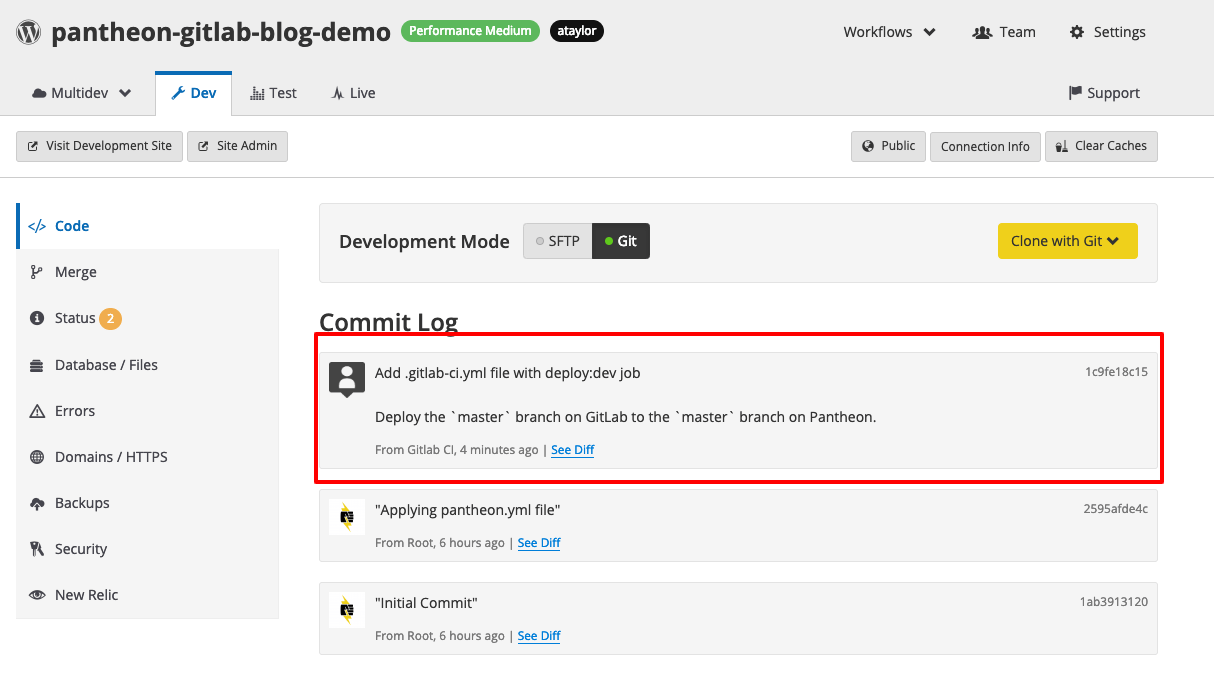
If everything was done correctly, the deploy:dev job run on GitLab CI/CD, succeed and send the .gitlab-ci.yml commit to Pantheon. Let's take a look!
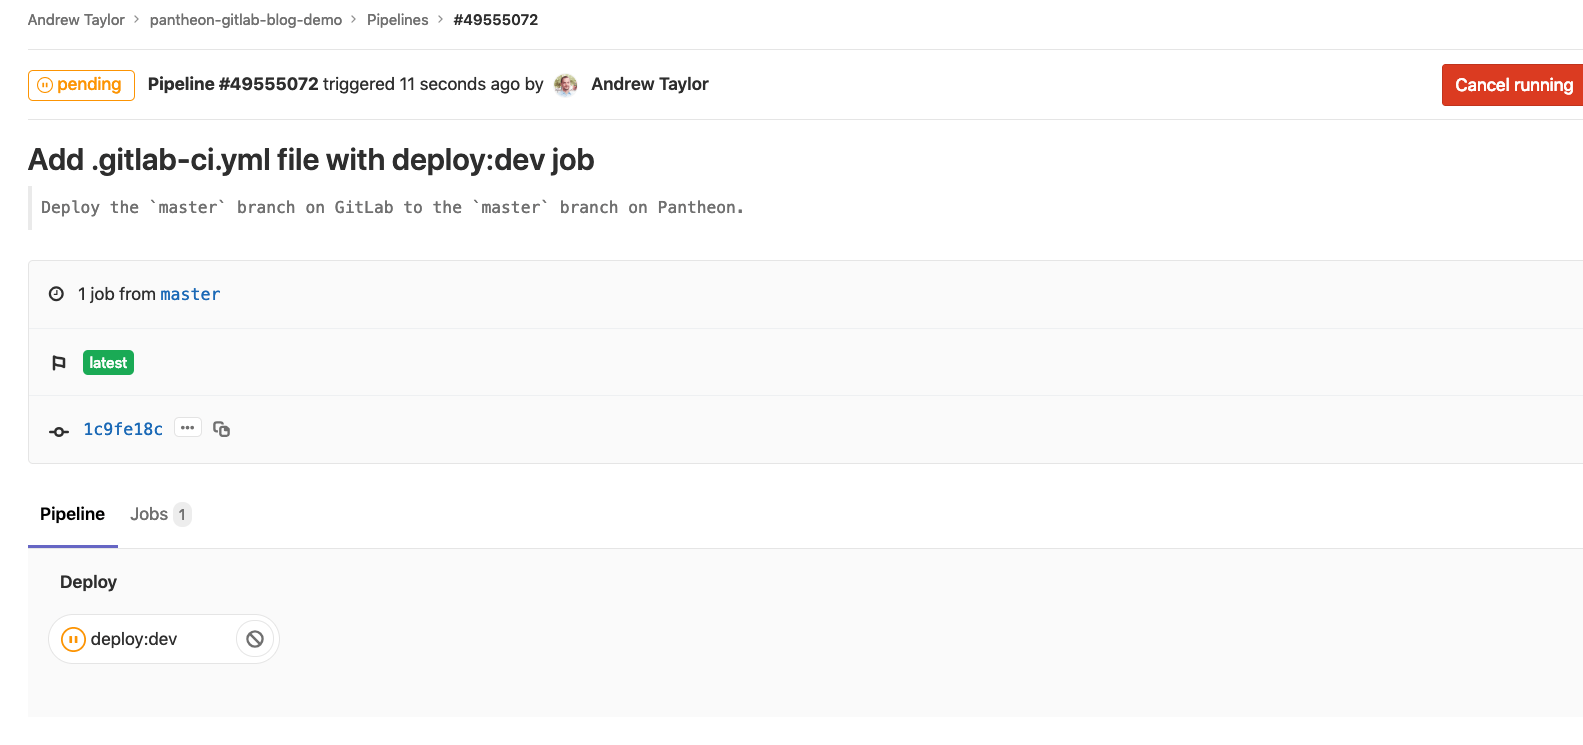
Sending merge request branches to Pantheon
This next section makes use of my favorite Pantheon feature, multidev, which allows you to create additional Pantheon environments on demand associated with Git branches.
This section is entirely optional as multidev access is restricted, however, if you do have multidev access, having GitLab merge requests automatically create multidev environments on Pantheon is a huge workflow improvement.
We will start by making a new Git branch locally with git checkout -b multidev-support. Now, let's edit .gitlab-ci.yml again.
I like to use the merge request number in the Pantheon environment name. For example, the first merge request would be mr-1, the second would be mr-2, and so on.
Since the merge request changes, we need to define these Pantheon branch names dynamically. GitLab makes this easy by providing predefined environment variables.
We can use $CI_MERGE_REQUEST_IID, which provides the merge request number. Let's put that to use, along with our global environment variables from earlier, and add a new deploy:multidev job to the end of our .gitlab-ci.yml file.
deploy:multidev:
  stage: deploy
  environment:
    name: multidev/mr-$CI_MERGE_REQUEST_IID
    url: https://mr-$CI_MERGE_REQUEST_IID-$PANTHEON_SITE.pantheonsite.io/
  script:
    # Checkout the merge request source branch
    - git checkout $CI_COMMIT_REF_NAME
    # Add the Pantheon git repository as an additional remote
    - git remote add pantheon $PANTHEON_GIT_URL
    # Push the merge request source branch to Pantheon
    - git push pantheon $CI_COMMIT_REF_NAME:mr-$CI_MERGE_REQUEST_IID --force
  only:
    - merge_requests
This should look very similar to our deploy:dev job, only pushing a branch to Pantheon instead of master.
After you add and commit the updated .gitlab-ci.yml file, push this new branch to GitLab with git push -u origin multidev-support.
Next, let's create a new merge request from our multidev-support branch by following the Create merge request prompt.

After creating the merge request, look for the CI/CD job deploy:multidev to run.
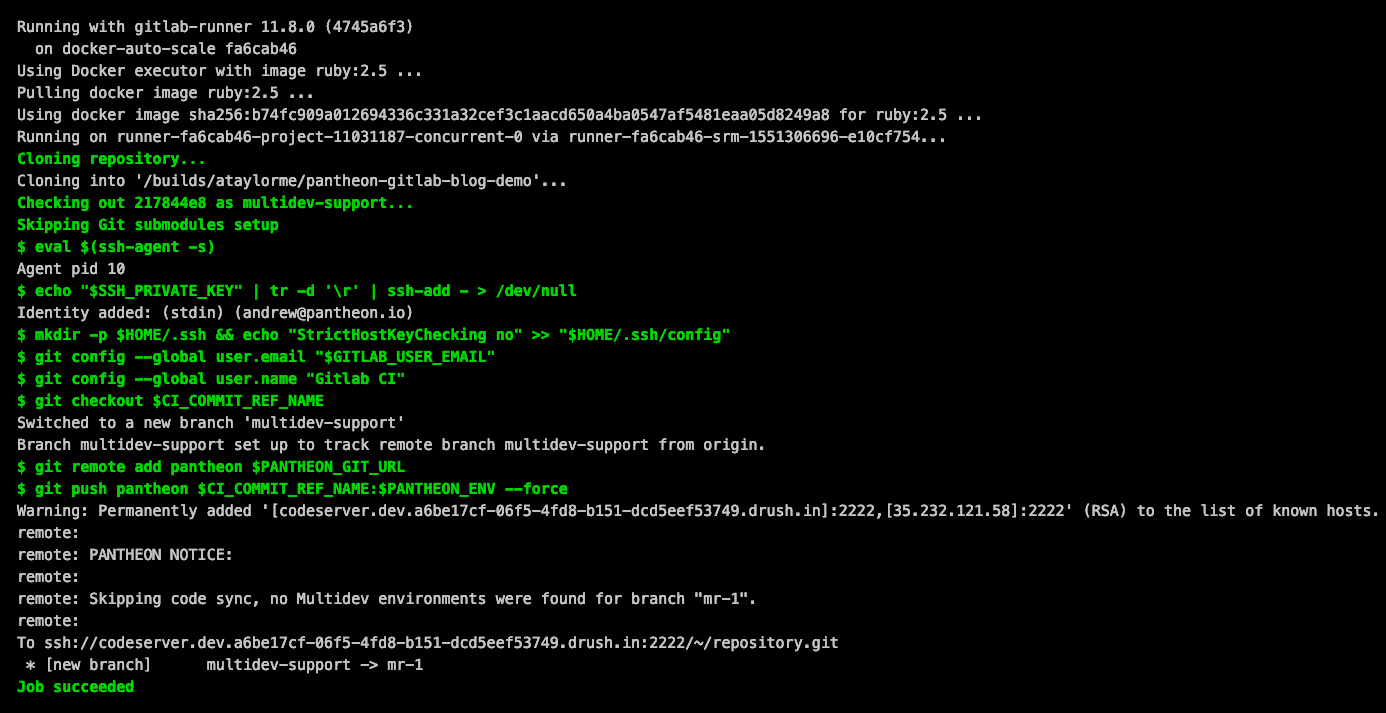
Look at that – a new branch was sent to Pantheon. However, when we go to the multidev section of the site dashboard on Pantheon there isn't a new multidev environment.

Let's look at the Git Branches section.

Our mr-1 branch did make it to Pantheon after all. Go ahead and create an environment from the mr-1 branch.

Once the multidev environment has been created, head back to GitLab and look at the Operations > Environments section. You will notice entries for dev and mr-1.
This is because we added an environment entry with name and url to our CI/CD jobs. If you click on the open environment icon, you will be taken to the URL for the multidev on Pantheon.
Automating multidev creation
We could stop here and try to remember to create a multidev environment each time there is a new merge request, but we can automate that process as well!
Pantheon has a command line tool, Terminus, that allows you to interact with the platform in an automated fashion. Terminus will allow us to provision our multidev environments from the command line – perfect for use in GitLab CI.
We will need a new merge request to test this, so let's create a new branch with git checkout -b auto-multidev-creation.
In order to use Terminus in GitLab CI/CD jobs we will need a machine token to authenticate with Terminus and a container image with Terminus available.
Create a Pantheon machine token, save it to a safe place, and add it as a global GitLab environment variable named PANTHEON_MACHINE_TOKEN.
If you don't remember how to add GitLab environment variables, scroll up to where we defined PANTHEON_SITE earlier in the tutorial.
Building a Dockerfile with Terminus
If you don't have Docker or aren't comfortable working with Dockerfile files, you can use my image registry.gitlab.com/ataylorme/pantheon-gitlab-blog-demo:latest and skip this section.
GitLab has a container registry that allows us to build and host a Dockerfile for use in our project. Let's create a Dockerfile that has Terminus available, so we can interact with Pantheon.
Terminus is a PHP-based command line tool, so we will start with a PHP image. I prefer to install Terminus via Composer so I'll be using the official Docker Composer image as a base. Create a Dockerfile in your local repository directory with the following contents:
# Use the official Composer image as a parent image
FROM composer:1.8

# Update/upgrade apk
RUN apk update
RUN apk upgrade

# Make the Terminus directory
RUN mkdir -p /usr/local/share/terminus

# Install Terminus 2.x with Composer
RUN /usr/bin/env COMPOSER_BIN_DIR=/usr/local/bin composer -n --working-dir=/usr/local/share/terminus require pantheon-systems/terminus:"^2"
Follow the Build and push images section of the container registry documentation to build an image from the Dockerfile and upload it to GitLab.
Visit the Registry section of your GitLab project. If things went according to plan you will see your image listed. Make a note of the image tag link, as we will need to use that in our .gitlab-ci.yml file.

The script section of our deploy:multidev job is starting to get long, so let's move it to a dedicated file. Create a new file private/multidev-deploy.sh with the following contents:
#!/bin/bash

# Store the mr- environment name
export PANTHEON_ENV=mr-$CI_MERGE_REQUEST_IID

# Authenticate with Terminus
terminus auth:login --machine-token=$PANTHEON_MACHINE_TOKEN

# Checkout the merge request source branch
git checkout $CI_COMMIT_REF_NAME

# Add the Pantheon Git repository as an additional remote
git remote add pantheon $PANTHEON_GIT_URL

# Push the merge request source branch to Pantheon
git push pantheon $CI_COMMIT_REF_NAME:$PANTHEON_ENV --force

# Create a function for determining if a multidev exists
TERMINUS_DOES_MULTIDEV_EXIST()
{
    # Stash a list of Pantheon multidev environments
    PANTHEON_MULTIDEV_LIST="$(terminus multidev:list ${PANTHEON_SITE} --format=list --field=id)"

    while read -r multiDev; do
        if [[ "${multiDev}" == "$1" ]]
        then
            return 0;
        fi
    done <<< "$PANTHEON_MULTIDEV_LIST"

    return 1;
}

# If the mutltidev doesn't exist
if ! TERMINUS_DOES_MULTIDEV_EXIST $PANTHEON_ENV
then
    # Create it with Terminus
    echo "No multidev for $PANTHEON_ENV found, creating one..."
    terminus multidev:create $PANTHEON_SITE.dev $PANTHEON_ENV
else
    echo "The multidev $PANTHEON_ENV already exists, skipping creating it..."
fi
The script is in the private directory as it is not web accessible on Pantheon. Now that we have a script for our multidev logic, update the deploy:multidev section of .gitlab-ci.yml so that it looks like this:
deploy:multidev:
  stage: deploy
  environment:
    name: multidev/mr-$CI_MERGE_REQUEST_IID
    url: https://mr-$CI_MERGE_REQUEST_IID-$PANTHEON_SITE.pantheonsite.io/
  script:
    # Run the multidev deploy script
    - "/bin/bash ./private/multidev-deploy.sh"
  only:
    - merge_requests
In order to make sure our jobs run with the custom image created earlier, add an image definition with the registry URL to .gitlab-ci.yml. My complete .gitlab-ci.yml file now looks like this:
image: registry.gitlab.com/ataylorme/pantheon-gitlab-blog-demo:latest

stages:
- deploy

before_script:
  # See https://docs.gitlab.com/ee/ci/ssh_keys/
  - eval $(ssh-agent -s)
  - echo "$SSH_PRIVATE_KEY" | tr -d '\r' | ssh-add - > /dev/null
  - mkdir -p $HOME/.ssh && echo "StrictHostKeyChecking no" >> "$HOME/.ssh/config"
  - git config --global user.email "$GITLAB_USER_EMAIL"
  - git config --global user.name "Gitlab CI"

deploy:dev:
  stage: deploy
  environment:
    name: dev
    url: https://dev-$PANTHEON_SITE.pantheonsite.io/
  script:
    - git remote add pantheon $PANTHEON_GIT_URL
    - git push pantheon master --force
  only:
    - master

deploy:multidev:
  stage: deploy
  environment:
    name: multidev/mr-$CI_MERGE_REQUEST_IID
    url: https://mr-$CI_MERGE_REQUEST_IID-$PANTHEON_SITE.pantheonsite.io/
  script:
    # Run the multidev deploy script
    - "/bin/bash ./private/multidev-deploy.sh"
  only:
    - merge_requests
Add, commit, and push private/multidev-deploy.sh and .gitlab-ci.yml. Now, head back to GitLab and wait for the CI/CD job to finish. The multidev creation takes a few minutes, so be patient.
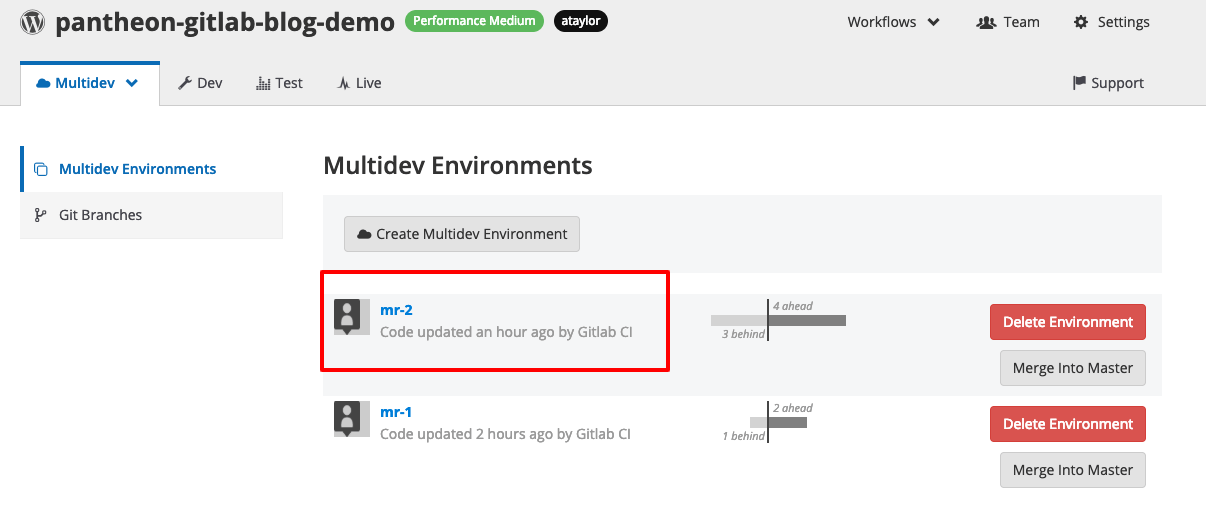
When it is finished, go check out the multidev list on Pantheon. Voila! The mr-2 multidev is there.
Conclusion
Opening a merge request and having an environment spin up automatically is a powerful addition to any team's workflow.
By leveraging the powerful tools offered by both GitLab and Pantheon, we can connect GitLab to Pantheon in an automated fashion.
Since we used GitLab CI/CD, there is room for growth in our workflow as well. Here are a few ideas to get you started:
- Add a build step.
- Add automated testing.
- Add a job to enforce coding standards.
- Add dynamic application security testing.
Drop me a line with any thoughts you have on GitLab, Pantheon, and automation.
P.S. Did you know Terminus, Pantheon’s command line tool, is extendable via plugins?
Over at Pantheon, we have been hard at work on version 2 of our Terminus Build Tools Plugin, complete with GitLab support. If you don't want to do all this setup for each project, I encourage you to check it out and help us test the v2 beta. The terminus build:project:create command just needs a Pantheon token and GitLab token. From there, it will spin up one of our example projects, complete with Composer and automated testing, create a new project on GitLab, a new site on Pantheon, and connect the two by setting up environment variables and SSH keys.
About the guest author
Andrew Taylor is a Developer Programs Engineer at Pantheon.

