Published on: July 7, 2025
6 min read
Fast and secure AI agent deployment to Google Cloud with GitLab
Follow this step-by-step guide, complete with a demo application, to learn how to use agentic AI, along with GitLab's native integrations and CI/CD components.


Agentic AI is transforming how we build intelligent applications, but deploying AI agents securely and efficiently can be challenging. In this tutorial, you'll learn how to deploy an AI agent built with Google's Agent Development Kit (ADK) to Cloud Run using GitLab's native integrations and CI/CD components.
What are AI agents and why do they matter?
Agentic AI represents a significant evolution in artificial intelligence. Unlike traditional generative AI tools that require constant human direction, AI agents leverage advanced language models and natural language processing to take independent action. These systems can understand requests, make decisions, and execute multistep plans to achieve goals autonomously.
This tutorial uses Google's ADK, a flexible and modular framework for developing and deploying AI agents. While optimized for Gemini and the Google ecosystem, ADK is model-agnostic, deployment-agnostic, and built for compatibility with other frameworks.
Our demo application: Canada City Advisor
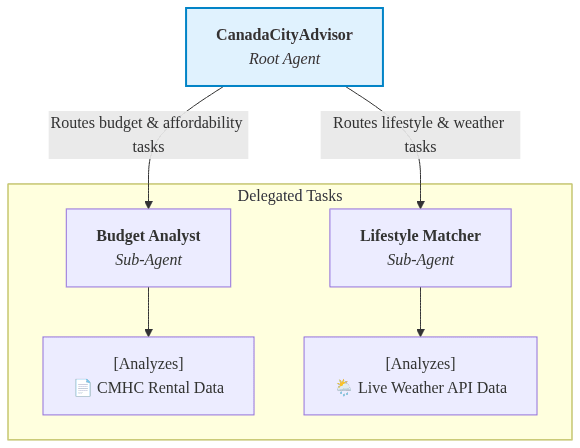
To demonstrate the deployment process, we'll work with a practical example: the Canada City Advisor. This AI agent helps users find their ideal Canadian city based on their preferences and constraints.
Here's how it works:
- Users input their budget requirements and lifestyle preferences.
- The root agent coordinates two sub-agents:
- A budget analyzer agent that evaluates financial constraints. This draws data obtained from the Canada Mortgage and Housing Corporation.
- A lifestyle preferences agent that matches cities to user needs. This includes a weather service that uses Open-Meteo to get the proper city information.
- The system generates personalized city recommendations
This multi-agent architecture showcases the power of agentic AI - different specialized agents working together to solve a complex problem. The sub-agents are only invoked when the root agent determines that budget and lifestyle analysis are needed.
Prerequisites
Before we begin, ensure you have:
- A Google Cloud project with the following APIs enabled:
- Cloud Run API
- Artifact Registry API
- Vertex AI API
- A GitLab project for your source code
- Appropriate permissions in both GitLab and Google Cloud
Step 1: Set up IAM integration with Workload Identity Federation
The first step establishes secure, keyless authentication between GitLab and Google Cloud using Workload Identity Federation. This eliminates the need for service account keys and improves security.
In your GitLab project:
- Navigate to Settings > Integrations > Google Cloud IAM.
- Provide the following information:
- Project ID: Your Google Cloud project ID
- Project Number: Found in your Google Cloud console
- Pool ID: A unique identifier for your workload identity pool
- Provider ID: A unique identifier for your identity provider
GitLab will generate a script for you. Copy this script and run it in your Google Cloud Shell to create the Workload Identity Federation.
Step 2: Configure Google Artifact Registry integration
Next, we'll set up the connection to Google Artifact Registry where our container images will be stored.
- In GitLab, go to Settings > Integrations > Google Artifact Registry.
- Enter:
- Google Cloud Project ID: Same as in Step 1
- Repository Name: Name of an existing Artifact Registry repository
- Location: The region where your repository is located
Important: The repository must already exist in Artifact Registry. GitLab won't create a new one for you in this context.
GitLab will generate commands to set up the necessary permissions. Run these in Google Cloud Shell.
Additionally, add these roles to your service principal for Cloud Run deployment:
roles/run.adminroles/iam.serviceAccountUserroles/cloudbuild.builds.editor
You can add these roles using the following gcloud commands:
      GCP_PROJECT_ID="<your-project-id>" #replace
GCP_PROJECT_NUMBER="<your-project-number>" #replace
GCP_WORKLOAD_IDENTITY_POOL="<your-pool-id>" #replace

gcloud projects add-iam-policy-binding ${GCP_PROJECT_ID} \
  --member="principalSet://iam.googleapis.com/projects/${GCP_PROJECT_NUMBER}/locations/global/workloadIdentityPools/${GCP_WORKLOAD_IDENTITY_POOL}/attribute.developer_access/true" \
  --role='roles/run.admin'

gcloud projects add-iam-policy-binding ${GCP_PROJECT_ID} \
  --member="principalSet://iam.googleapis.com/projects/${GCP_PROJECT_NUMBER}/locations/global/workloadIdentityPools/${GCP_WORKLOAD_IDENTITY_POOL}/attribute.developer_access/true" \
  --role='roles/iam.serviceAccountUser'

gcloud projects add-iam-policy-binding ${GCP_PROJECT_ID} \
  --member="principalSet://iam.googleapis.com/projects/${GCP_PROJECT_NUMBER}/locations/global/workloadIdentityPools/${GCP_WORKLOAD_IDENTITY_POOL}/attribute.developer_access/true" \
  --role='roles/cloudbuild.builds.editor'
Step 3: Create the CI/CD pipeline
Now for the exciting part – let's build our deployment pipeline! GitLab's CI/CD components make this remarkably simple.
Create a .gitlab-ci.yml file in your project root:
      stages:
  - build
  - test
  - upload
  - deploy

variables:
  GITLAB_IMAGE: $CI_REGISTRY_IMAGE/main:$CI_COMMIT_SHORT_SHA
  AR_IMAGE: $GOOGLE_ARTIFACT_REGISTRY_REPOSITORY_LOCATION-docker.pkg.dev/$GOOGLE_ARTIFACT_REGISTRY_PROJECT_ID/$GOOGLE_ARTIFACT_REGISTRY_REPOSITORY_NAME/main:$CI_COMMIT_SHORT_SHA

build:
  image: docker:24.0.5
  stage: build
  services:
    - docker:24.0.5-dind
  before_script:
    - docker login -u $CI_REGISTRY_USER -p $CI_REGISTRY_PASSWORD $CI_REGISTRY
  script:
    - docker build -t $GITLAB_IMAGE .
    - docker push $GITLAB_IMAGE

include:
  - template: Jobs/Dependency-Scanning.gitlab-ci.yml  # https://gitlab.com/gitlab-org/gitlab/blob/master/lib/gitlab/ci/templates/Jobs/Dependency-Scanning.gitlab-ci.yml
  - template: Jobs/SAST.gitlab-ci.yml  # https://gitlab.com/gitlab-org/gitlab/blob/master/lib/gitlab/ci/templates/Jobs/SAST.gitlab-ci.yml
  - template: Jobs/Secret-Detection.gitlab-ci.yml  # https://gitlab.com/gitlab-org/gitlab/blob/master/lib/gitlab/ci/templates/Jobs/Secret-Detection.gitlab-ci.yml
  - component: gitlab.com/google-gitlab-components/artifact-registry/upload-artifact-registry@main
    inputs:
      stage: upload
      source: $GITLAB_IMAGE
      target: $AR_IMAGE
  - component: gitlab.com/google-gitlab-components/cloud-run/deploy-cloud-run@main
    inputs:
      stage: deploy
      project_id: "<your-project-id>" #replace
      service: "canadian-city"
      region: "us-central1"
      image: $AR_IMAGE
The pipeline consists of four stages:
- Build: Creates the Docker container with your AI agent
- Test: Runs security scans (container scanning, dependency scanning, SAST)
- Upload: Pushes the container to Artifact Registry
- Deploy: Deploys to Cloud Run
The great thing about using GitLab's CI/CD components is that you only need to provide a few parameters - the components handle all the complex authentication and deployment logic.
Step 4: Deploy and test
With everything configured, it's time to deploy:
- Commit your code and
.gitlab-ci.ymlto your GitLab repository. - The pipeline will automatically trigger.
- Monitor the pipeline progress in GitLab's CI/CD interface.
- Once complete, find your Cloud Run URL in the Google Cloud Console.
You'll see each stage execute:
- Build stage creates your container.
- Test stage runs comprehensive security scans.
- Upload stage pushes to Artifact Registry.
- Deploy stage creates or updates your Cloud Run service.
Security benefits
This approach provides several security advantages:
- No long-lived credentials: Workload Identity Federation eliminates service account keys.
- Automated security scanning: Every deployment is scanned for vulnerabilities.
- Audit trail: Complete visibility of who deployed what and when.
- Principle of least privilege: Fine-grained IAM roles limit access.
Summary
By combining GitLab's security features with Google Cloud's powerful AI and serverless platforms, you can deploy AI agents that are both secure and scalable. The integration between GitLab and Google Cloud eliminates much of the complexity traditionally associated with such deployments.
Use this tutorial's complete code example to get started now. Not a GitLab customer yet? Explore the DevSecOps platform with a free trial.
We want to hear from you
Enjoyed reading this blog post or have questions or feedback? Share your thoughts by creating a new topic in the GitLab community forum.
Share your feedback