

GitLab 16.0 introduced Remote Development workspaces (beta), an exciting addition to the GitLab platform that empowers teams to build and deliver software more efficiently.
This guide provides step-by-step instructions on how to create a workspace directly from your GitLab account and work directly from the remote development environment. You will work in the Web IDE, a Visual Studio Code browser version, seamlessly integrated into the workspace.
From this quick start, you will learn how to create a workspace, use the Web IDE Terminal to install dependencies or start your server, and view your running application.
To learn more about Remote Development in GitLab, we recommend reading this informative blog post, "A first look at workspaces," and the workspaces docs.
Here are the steps covered in this tutorial:
- Prerequisites
- Locate DevFile at the root of repository
- Create your workspace
- Install dependencies and previewing your application in the workspace
- Make changes to the application and previewing the updated version
- Commit the change
- Explore the demo
- Try out workspaces
Prerequisites
Prior to enabling developers to create workspaces, there are a few prerequisites such as bring your own Kubernetes cluster, and install and configure the GitLab agent for Kubernetes on it. Additionally, certain configuration steps must be completed on the cluster. You can find detailed instructions for all these steps in our workspaces prequisites documentation. Once the prerequisites are properly configured, developers who hold Developer role or above within the root group will gain the ability to create workspaces.
Locate DevFile at the root of repository
A devfile is a declarative configuration file, in YAML syntax, used to define and describe the development environment for a software project. It provides a standardized way to specify the necessary tools, languages, runtimes, and other components required for developing an application.
To initiate a workspace, it is necessary to have a devfile located at the root of the repository. In this blog post, we will utilize a project that contains a devfile, accessible here.
      schemaVersion: 2.2.0
components:
  - name: tooling-container
    attributes:
      gl/inject-editor: true
    container:
      # NOTE: THIS IMAGE EXISTS ONLY FOR DEMO PURPOSES AND WILL NOT BE MAINTAINED
      image: registry.gitlab.com/gitlab-org/remote-development/gitlab-remote-development-docs/debian-bullseye-ruby-3.2-node-18.12:rubygems-3.4-git-2.33-lfs-2.9-yarn-1.22-graphicsmagick-1.3.36-gitlab-workspaces
      memoryRequest: 1024M
      memoryLimit: 2048M
      cpuRequest: 500m
      cpuLimit: 1000m
      endpoints:
      - name: http-3000
        targetPort: 3000
For more information, see the GitLab documentation and devfile documentation.
Create your workspace
- Make sure you have a Developer role or above in the root group, and the above prerequisites configured properly.
- Fork this project to the GitLab group for which you have a Developer role or above.
- Switch contexts and select
Your work.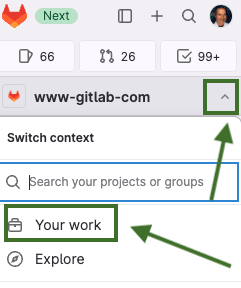
- Select
Workspaces. - Select
New workspace. - Select the project you forked or another project that has a
.devfile.yamlfile at the root of the repository. - Select the cluster agent owned by the group the project belongs to.
- In
Time before automatic termination, enter the number of hours until the workspace automatically terminates. This timeout is a safety measure to prevent a workspace from consuming excessive resources or running indefinitely. - Select
Create workspace.
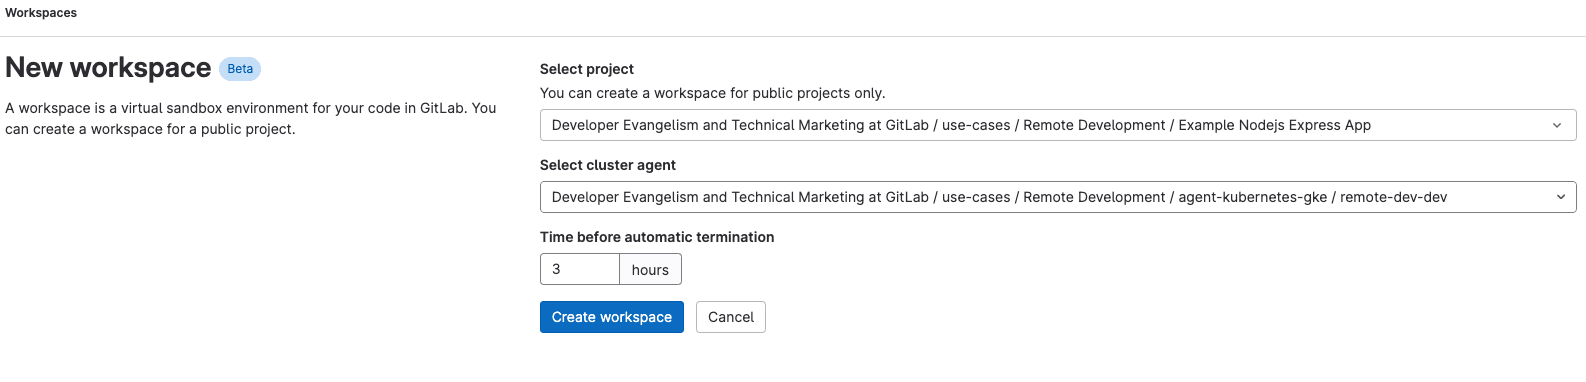
The workspace will be deployed to the cluster and might take a few minutes to start. To access the workspace, under Preview, select the workspace link.

Install dependencies and previewing your application in the workspace
After creating your workspace, the Web IDE using VS Code is injected into it, and the repository is cloned to the image. Consequently, you gain immediate access to your code and can commence working on it right away.
You can now open the terminal, install any missing dependencies, and start the application.
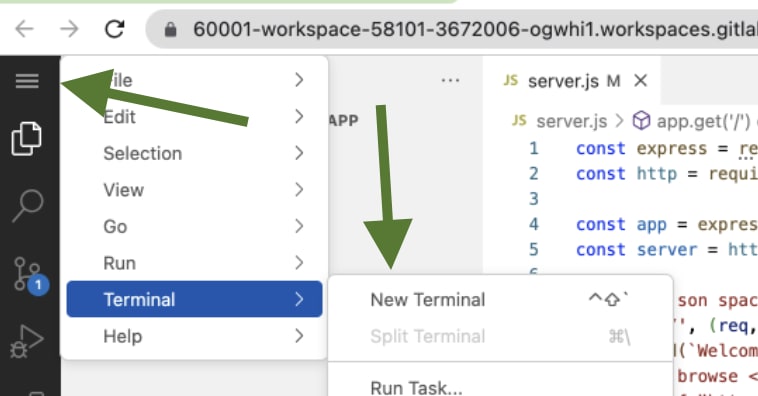
- To open the terminal, from the left menu, select
Terminal,New Terminal. - Type
npm installto install the dependencies listed in the package.json file. - Type
npm startto start the application.
The log will indicate that the application has started on port 3000.
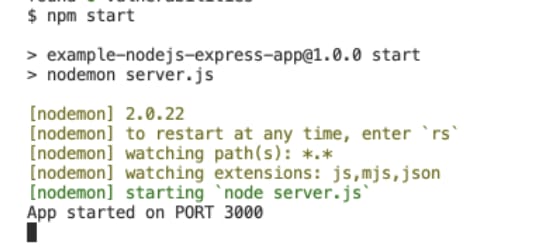
You can now access your application by opening the browser and using the workspace URL. Change the number before ‘workspace’ in the URL to the port number on which your application is listening (e.g., 3000). For example, if your workspace URL is https://<prefix>-workspace-73241-25728545-rqvpjm.workspaces.gitlab.dev, and your application is running on port 3000, update <prefix> to 3000 to access your application.
Make changes to the application and previewing the updated version
In the Web IDE, navigate to the server.js file, modify the text in line 9.
Afterward, refresh the browser where your application is opened to see the applied changes.
Commit the change
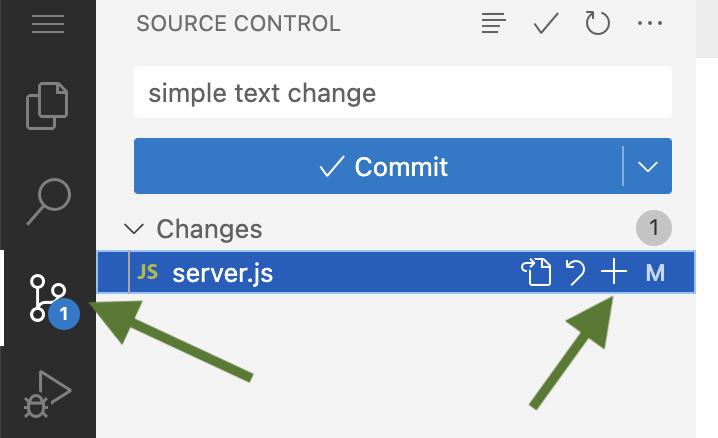
- In the Web IDE click on the merge icon in the activity bar.
- Click the line with the
server.jsto view your change side by side. - To stage your change, click the plus icon next to
server.js. - Type a commit message describing your change.
- Click Commit.
- Click Sync changes to push the commit to the GitLab server.
More resources
- Explore further with this click-through demo of workspaces.
- Learn how to install VS Code on a cloud provider VM and set up remote access.
Try out workspaces
Remote Development workspaces offer a convenient and efficient way to work on projects without the need for local development setups. They provide a streamlined workflow and enable developers to focus on writing code rather than dealing with complex environment setups.
By adopting workspaces, developers can collaborate effectively, improve productivity, and simplify the development process.
Give workspaces a try and revolutionize your remote development experience today!
FAQ
What are GitLab Remote Development workspaces?
GitLab Remote Development workspaces are cloud-based development environments that let you work on GitLab projects without setting up local dependencies. They were introduced in beta with GitLab 16.0 and run directly in a Web IDE powered by Visual Studio Code.
What are the prerequisites for creating a workspace?
You need to bring your own Kubernetes cluster, install and configure the GitLab agent for Kubernetes on it, and complete the required cluster configuration steps. Developers must also hold a Developer role or above within the root group.
What is a devfile and why is it required?
A devfile is a YAML-based declarative configuration file that defines the development environment for a project, including tools, runtimes, and resource limits. A devfile must be present at the root of your repository before you can create a workspace.
How do you create a workspace in GitLab?
Navigate to "Your work," select "Workspaces," then "New workspace," and choose your project, cluster agent, and automatic termination timeout before selecting "Create workspace." The workspace is then deployed to your cluster and may take a few minutes to start.
How do you access a running application inside a workspace?
Once your application is running, update the prefix in your workspace URL to the port number your application is listening on, such as 3000. This lets you preview the application directly in your browser from within the workspace.
Can you commit code changes from within a workspace?
Yes, you can stage changes, write a commit message, commit, and sync changes to the GitLab server all from within the Web IDE integrated into the workspace.
What happens when a workspace reaches its termination time?
Workspaces automatically terminate after the timeout duration you set when creating the workspace. This is a safety measure to prevent workspaces from consuming excessive resources or running indefinitely.
Why should teams use GitLab workspaces instead of local development setups?
Workspaces eliminate the complexity of configuring local environments, enabling developers to focus on writing code and collaborate more effectively. They provide a streamlined, reproducible workflow that simplifies the overall development process.
Cover image by Pankaj Patel on Unsplash