Published on: August 10, 2020
5 min read
How to secure your dependencies with GitLab and WhiteSource
We walk you through how to configure WhiteSource in your GitLab instance to enhance your application security.


GitLab's WhiteSouce integration empowers developers to enhance application security directly within the GitLab UI. The integration provides dependency scanning with in-depth analysis, along with actionable insights, and auto-remediation. WhiteSource for GitLab enhances your team's productivity, security, and compliance.
Rhys Arkins, Product Director at WhiteSource, and I hosted a webinar on "Harnessing development to scale AppSec" showcasing the features of GitLab's WhiteSource integration for open source dependency scanning.
This blog post will guide you through setting up WhiteSource in your private GitLab instance and show you how the integration with WhiteSource enhances your application's security within GitLab.
Installing the WhiteSource integration
First, let's go over how to install the WhiteSource integration. In this section, I will review how to set up GitLab service credentials, generate a WhiteSource configuration, build WhiteSource containers, and how to run them in a Kubernetes cluster.
Requirements for WhiteSource integration
But first, the WhiteSource integration requires that you have the following setup:
- GitLab on-prem instance: The GitLab instance where the WhiteSource integration will run.
- WhiteSource account: Provides access to the WhiteSource integration.
- Kubernetes cluster: Deploys the WhiteSource containers.
Create GitLab service credentials
The next step is to create GitLab service credentials. This can be accomplished in three simple steps:
- In your GitLab instance, go to
Admin Area > System Hooksand create a system hook as follows:- URL:
https://whitesource.INGRESS_URL.com/payload - Secret Token: Make up a token, you can use
openssl rand -base64 12 - Trigger: All except
Tag push events - Enable SSL Verification:
Yes
- URL:
Note: Make sure you save the secret token for use in the next section.
- Create a user named
@whitesource, with a developer role. An email is not required. - As the
@whitesourceuser, go toSettings > Access tokensand create a personal access token:- Name:
WhiteSourceToken - Scopes:
all
- Name:
- Remember to save the access token for use in the next section.
Generate the WhiteSource configuration
Next, we generate the WhiteSource configuration, which is used to configure the WhiteSource integration containers. This can be done in a few simple steps:
- Login to WhiteSource and click on
the
Integratetab.
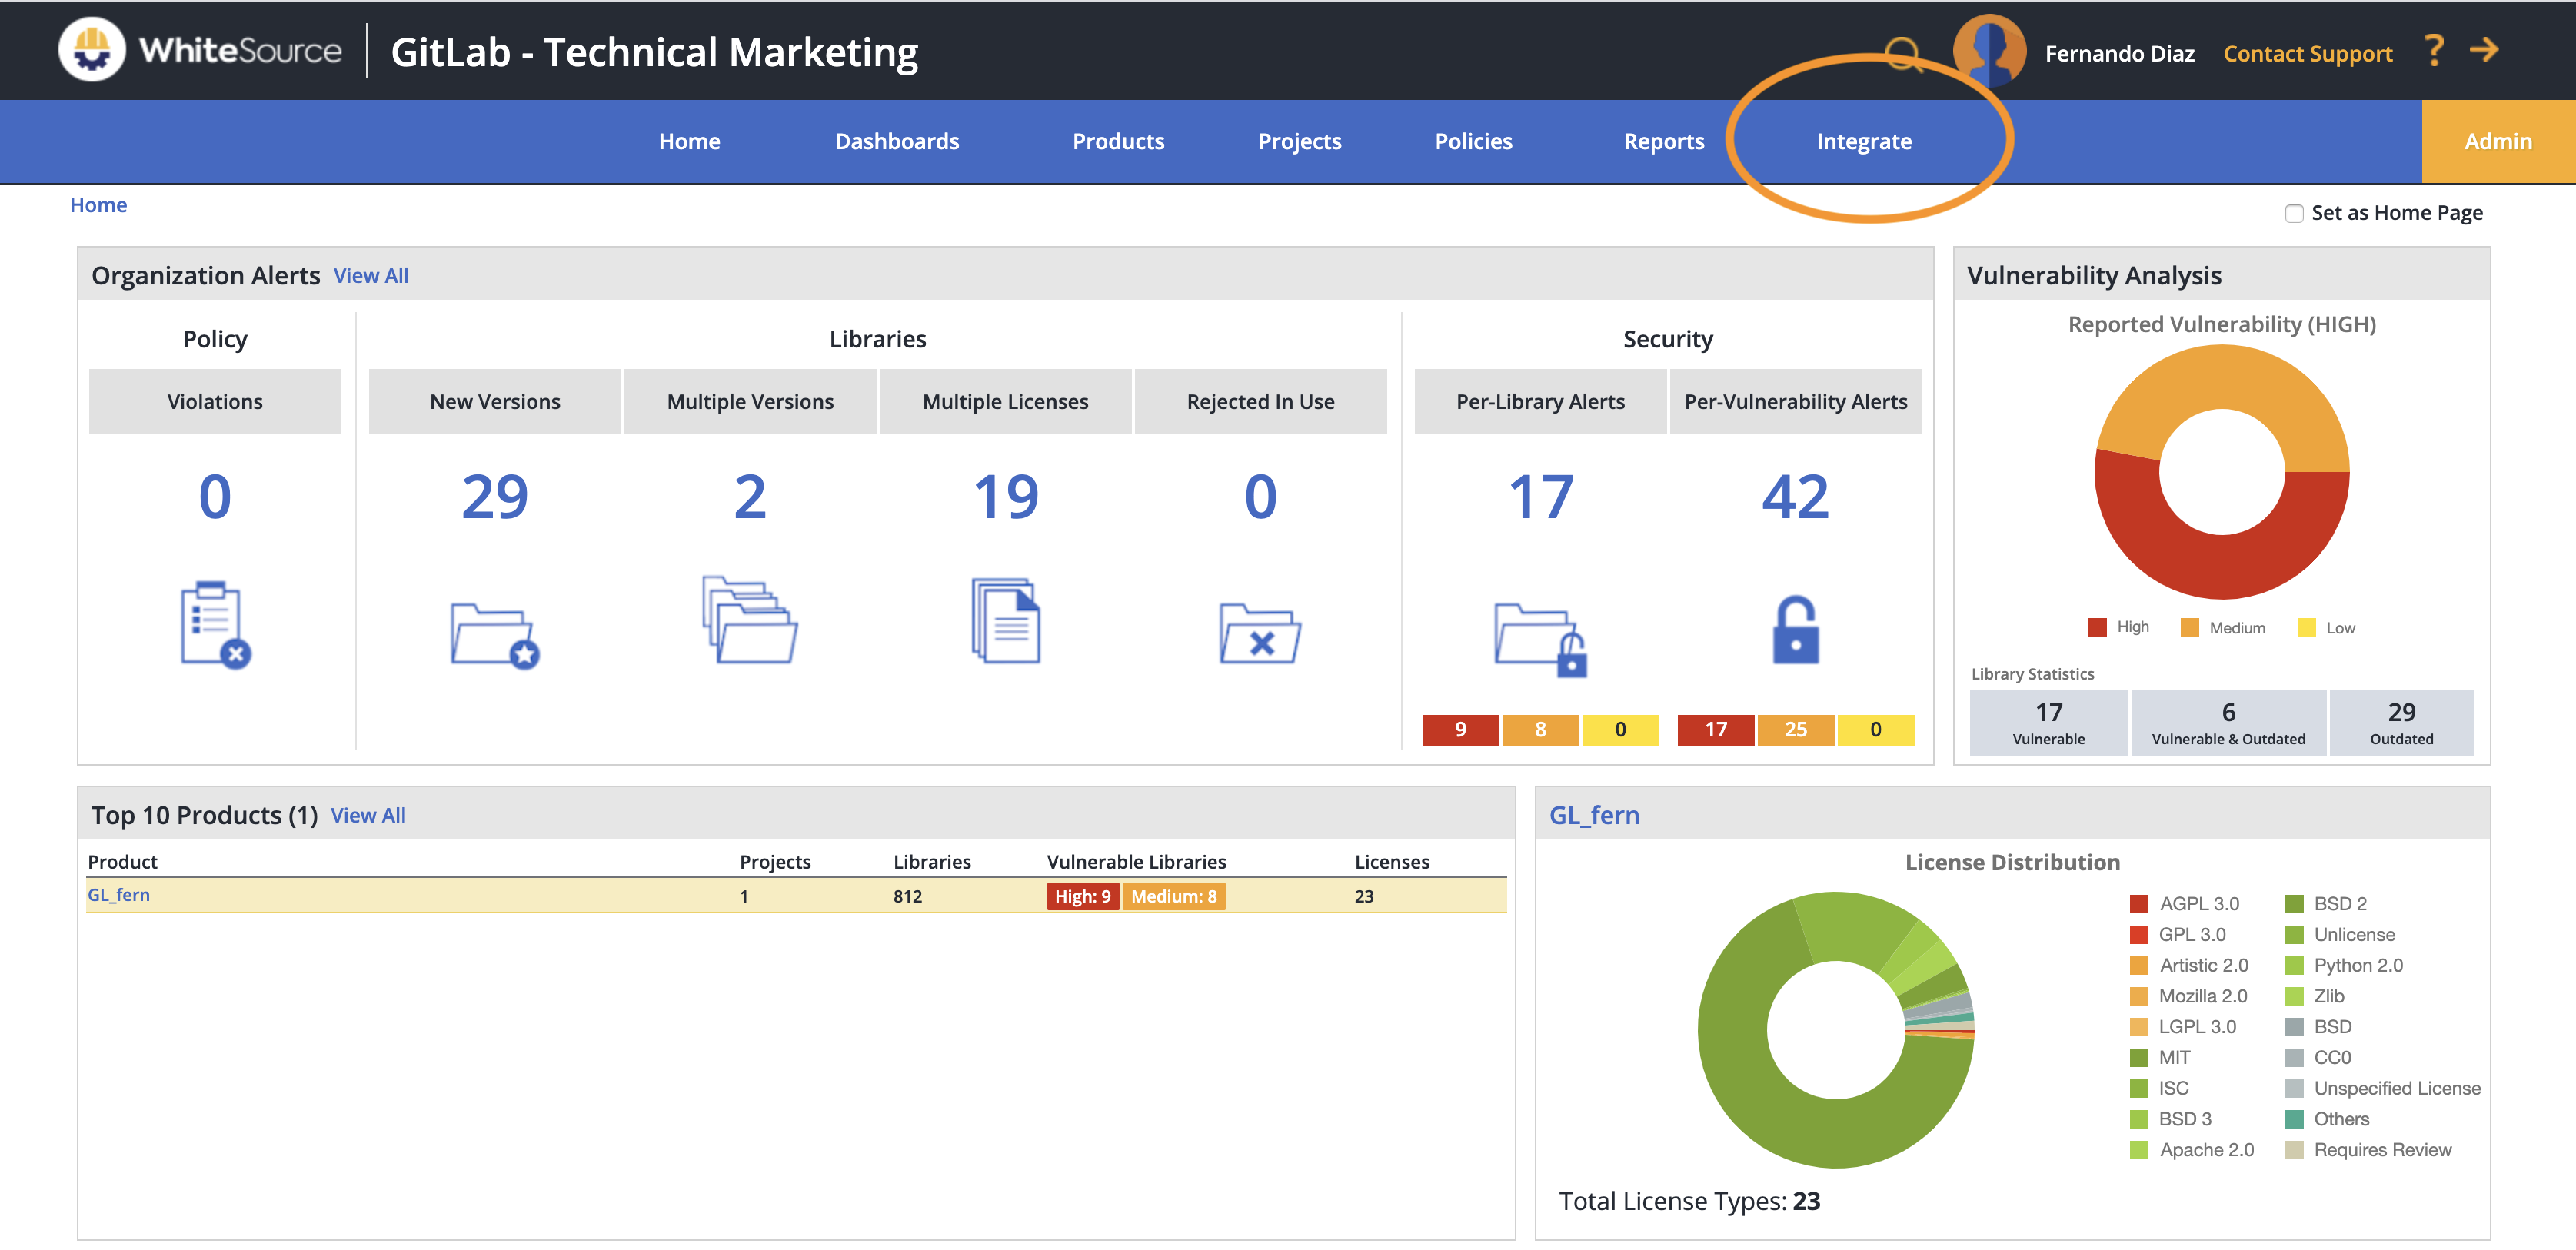 WhiteSource mainpage
- Expand the
WhiteSource for GitLab serverbar and fill the following:- GitLab Server API URL:
https://GITLAB_SERVER_URL/api/v4 - GitLab Webhook URL:
https://whitesource.INGRESS_URL.com/payload - GitLab Webhook secret: Use the same secret generated in GitLab credentials section
- GitLab personal access token:
@whitesourceuser access token
- GitLab Server API URL:
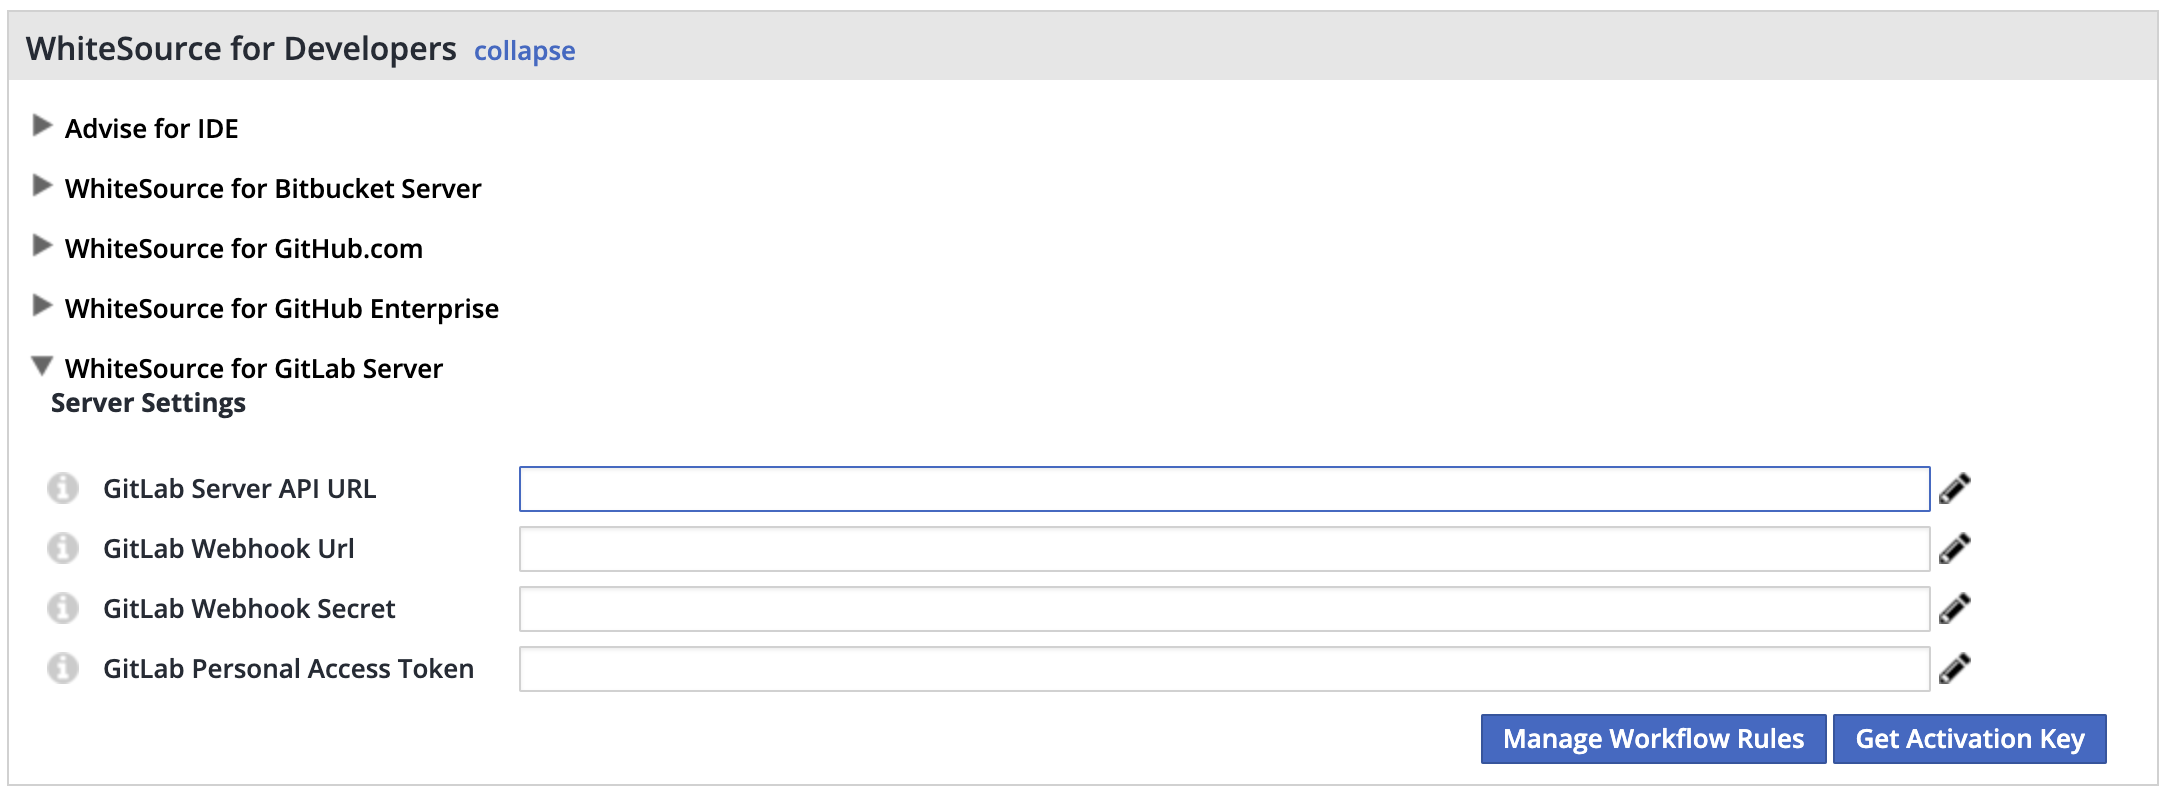 WhiteSource integrations page
- Press
Get Activation Keyand copy the generated key - Open the wss-configurator with your browser
- Select
Exportfrom the menu, and select the prop.json - Click on the
Generaltab - Paste the generated key and click
Exportto save a newprop.jsonfile
Build the WhiteSource containers
- Move the generated prop.json from the previous section to wss-gls-app, wss-remediate, and wss-scanner.
- Build and push the Docker containers:
      $ docker build -t wss-gls-app:19.12.2 whitesource/wss-gls-app/docker
$ docker push wss-gls-app:19.12.2

$ docker build -t wss-scanner:19.12.1.2 whitesource/wss-scanner/docker
$ docker push wss-scanner:19.12.1.2

$ docker build -t wss-remediate:19.12.2 whitesource/wss-remediate/docker
$ docker push wss-remediate:19.12.2
Running the WhiteSource containers
GitLab provides native Kubernetes cluster integration. This means that GitLab allows you to deploy software from GitLab CI/CD pipelines directly to your Kubernetes cluster.
WhiteSource containers can be deployed and managed within the same Kubernetes cluster used to deploy your application, all by running a simple Helm commands.
- Download the WhiteSource Helm chart
- Edit values.yaml
- In vaules.yaml set
whitesource.ingressto https://whitesource.INGRESS_URL.com
You can get the INGRESS_URL from your Kubernetes cluster settings
 Ingress URL location
- Make sure Ingress is installed.
 Installing Ingress
- Install Helm
- Deploy WhiteSource with Helm template:
helm upgrade -f helm/whitesource/values.yaml --install whitesource-gitlab ./helm/whitesource
Using WhiteSource
Once the WhiteSource plugin has been installed we can add the @whitesource user to the repositories
we wish to scan. A merge request (MR) with the .whitesource file will be generated automatically.
WhiteSource will now scan your repository and generate issues for all the vulnerabilities discovered on the main (master) branch. These issues will provide detailed information on the vulnerability as well as how to resolve it. Some issues can even be auto-remediated.
 WhiteSource vulnerability issues
Each time a new MR is pushed, a WhiteSource scan will run, and provide a detailed output.
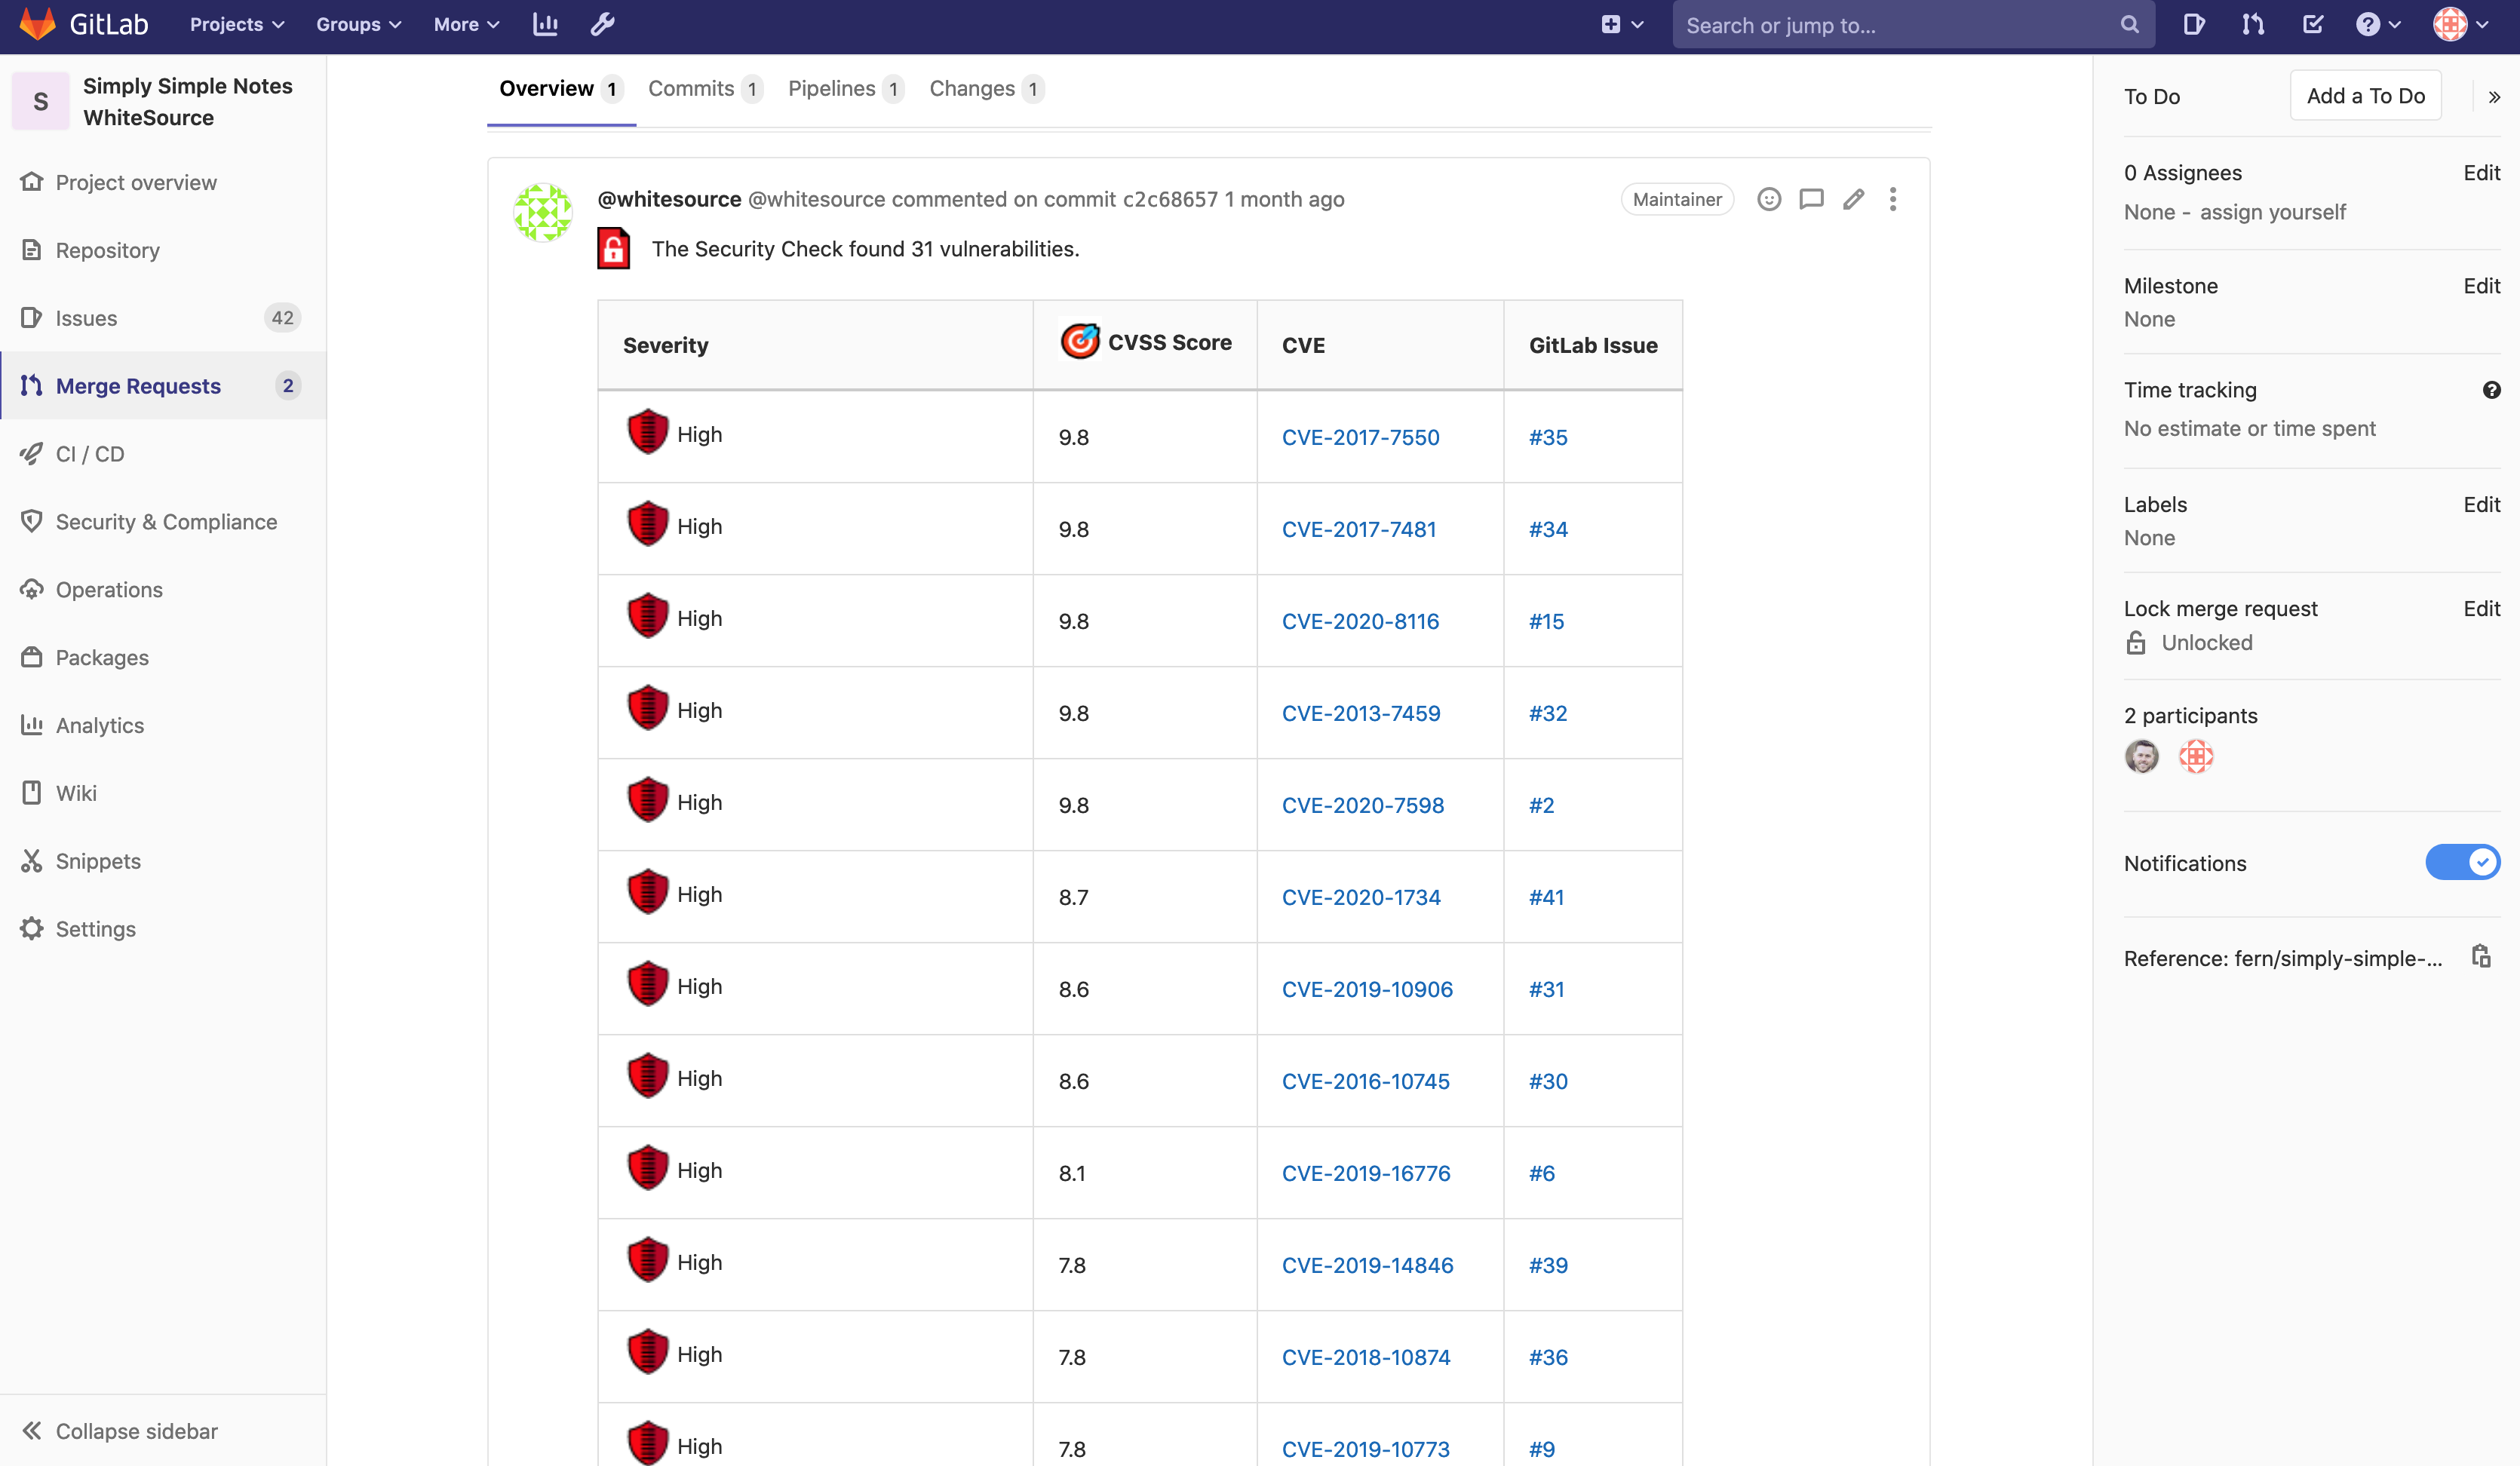 WhiteSource MR scanning
Each link provided by WhiteSource shows detailed information on the vulnerabilities the scan detected:
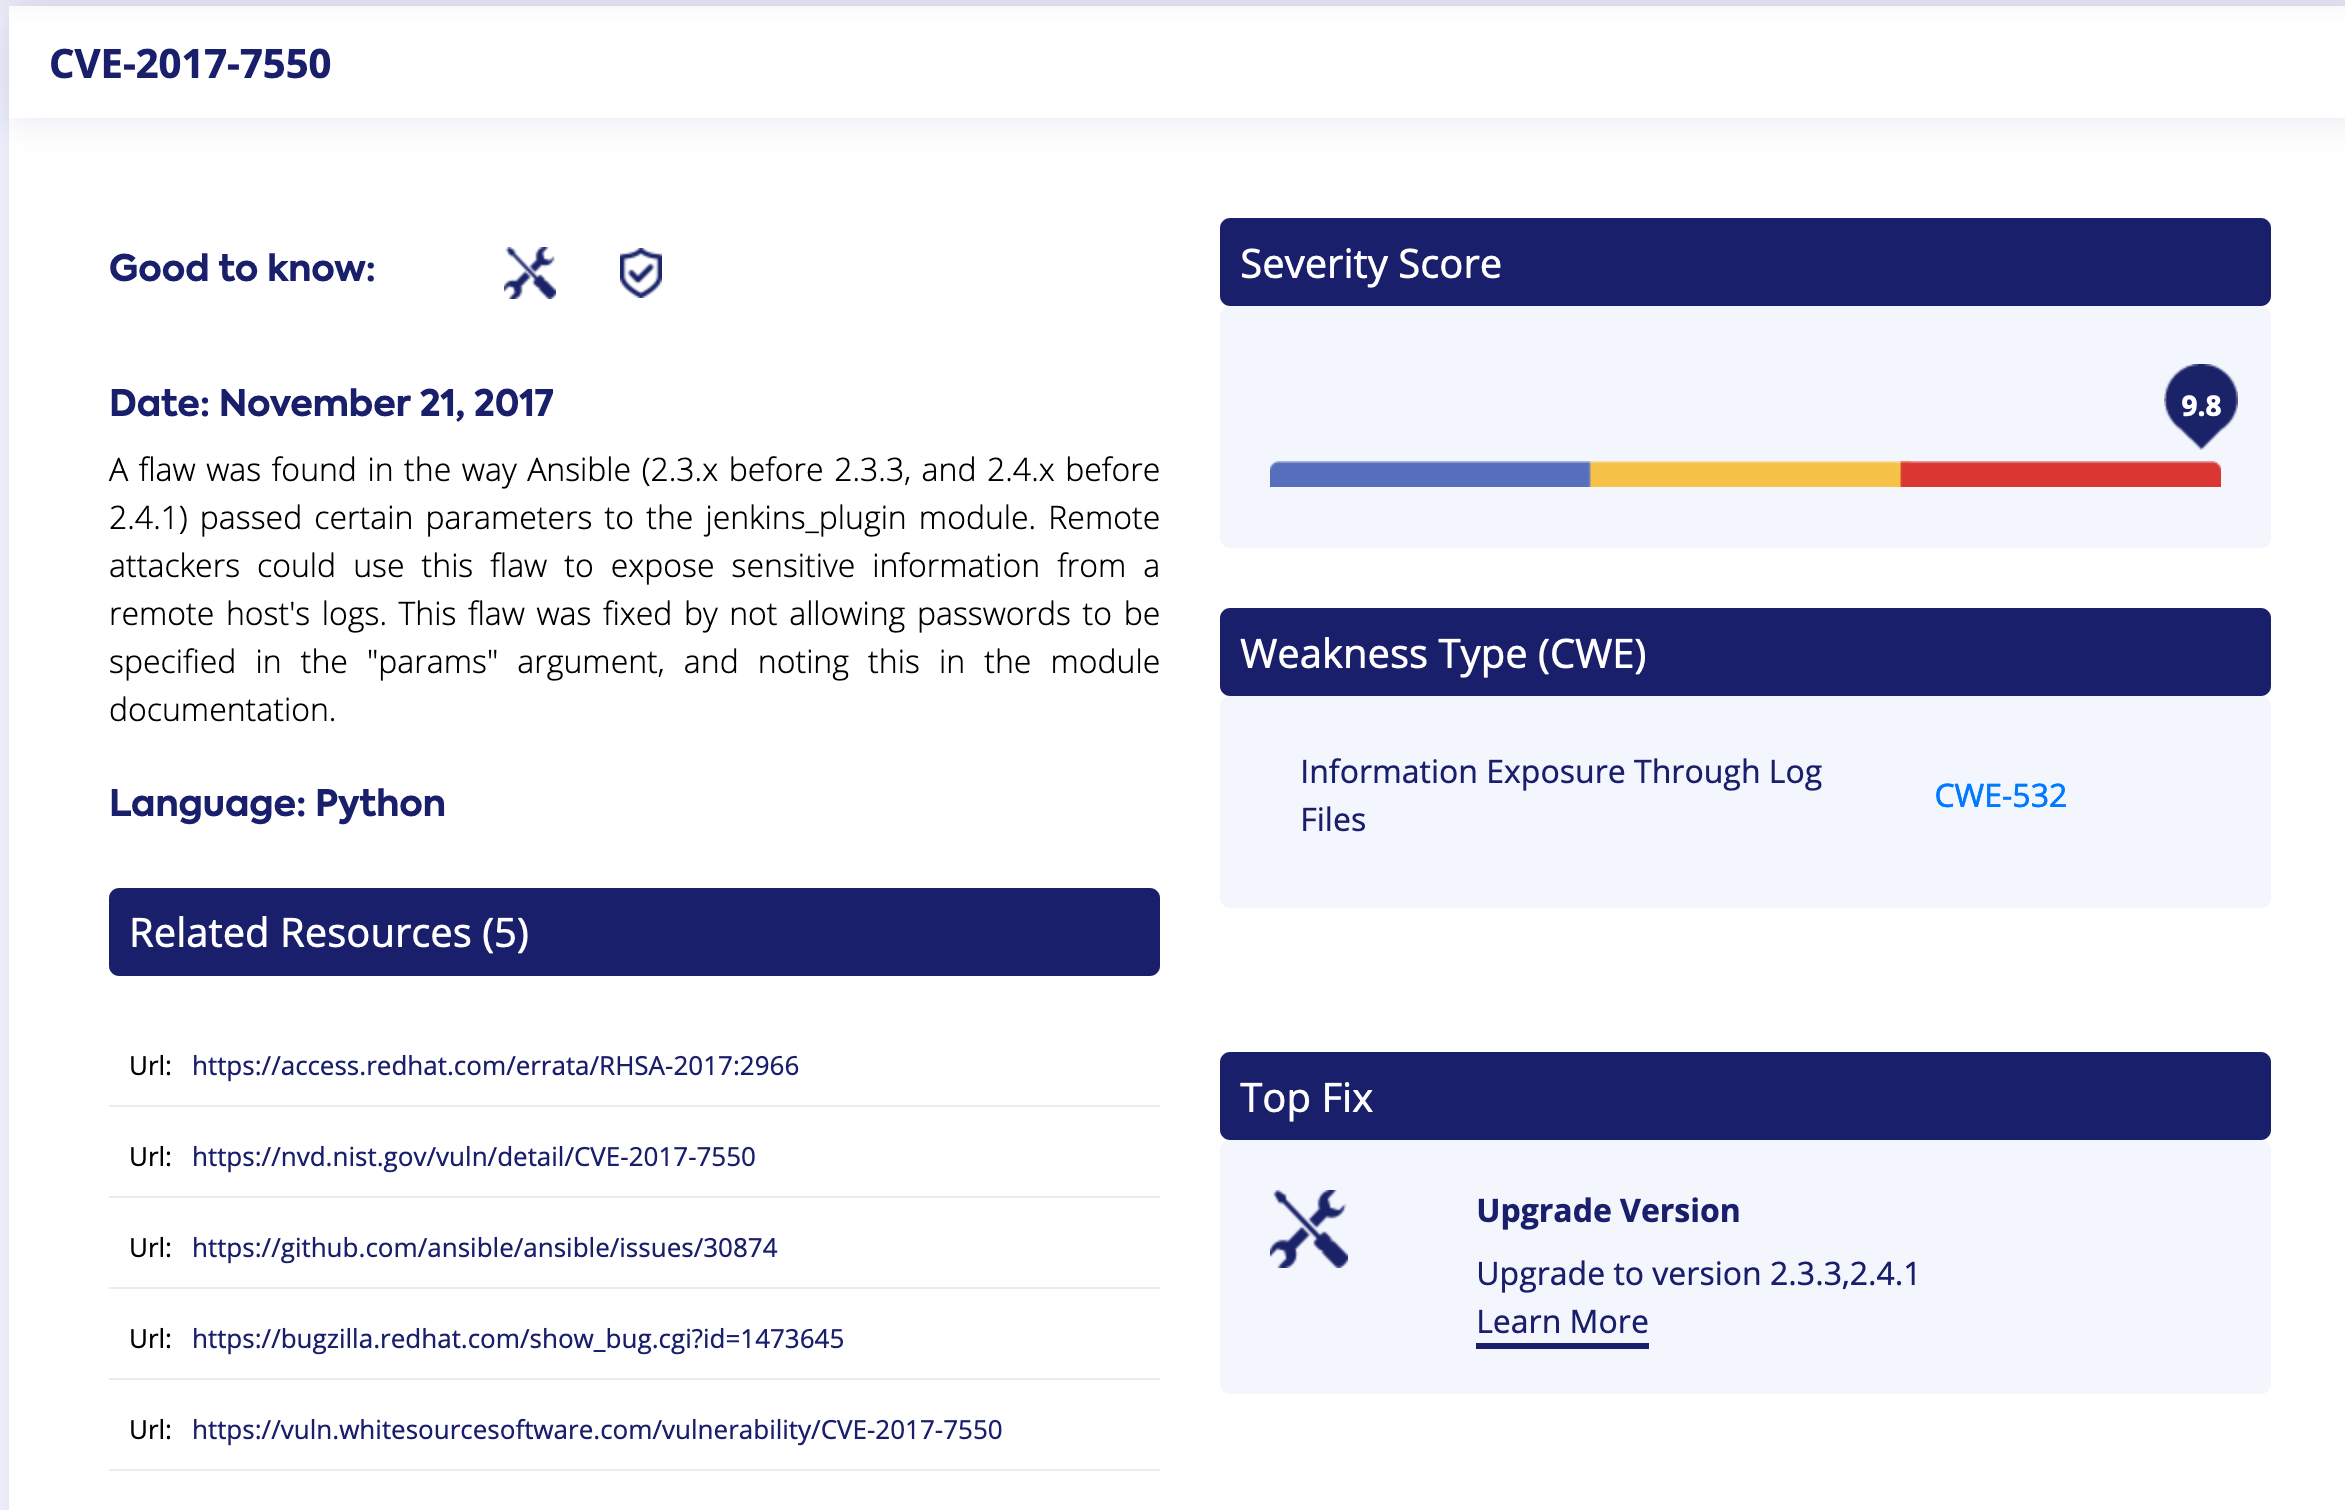 WhiteSource vulnerability information
WhiteSource can be integrated into the GitLab Security Dashboard so that your security team can manage the status of these vulnerabilites. Access to the Security Dashboard requires a GitLab Ultimate account.
For integrating WhiteSource to the Security Dashboard, add the following to the CI.yaml:
      whitesource-security-publisher:
  image: openjdk:8-jdk
  when: manual
  script:
    - curl "{{WEBHOOK_URL}}/securityReport?repoId=$CI_PROJECT_ID&repoName=$CI_PROJECT_NAME&ownerName=$CI_PROJECT_NAMESPACE&branchName=$CI_COMMIT_REF_NAME&defaultBranchName=$CI_DEFAULT_BRANCH&commitId=$CI_COMMIT_SHA" -o gl-dependency-scanning-report-ws.json
  artifacts:
    paths:
      - gl-dependency-scanning-report-ws.json
    reports:
      dependency_scanning:
        - gl-dependency-scanning-report-ws.json
    expire_in: 30 days
For more details on the integration checkout WhiteSource for GitLab. Learn more at DevSecOps and checkout the Secure direction page for more information on the upcoming features and integrations.
Learn more about application security at GitLab
- How application security engineers can use GitLab to secure their projects
- Get better container security with GitLab: 4 real-world examples
- How to capitalize on GitLab Security tools with external CI
Cover image by Alexandra Avelar on Unsplash
We want to hear from you
Enjoyed reading this blog post or have questions or feedback? Share your thoughts by creating a new topic in the GitLab community forum.
Share your feedback