
is now in public beta!
Published on: August 19, 2024
5 min read
How to stream logs through the GitLab Dashboard for Kubernetes
In GitLab 17.2, users can now view Kubernetes pod and container logs directly via the GitLab UI. This tutorial shows how to use this new feature to simplify monitoring Kubernetes infrastructure.


Developers are context-switching more frequently, needing to understand and use multiple tools to accomplish complex tasks. These tools all have different user experiences and often do not present all the information needed to successfully develop, troubleshoot, and ship critical features. It is challenging enough to release and monitor software changes without also needing to understand so many tools.
With the addition of pod log streaming through the GitLab Dashboard for Kubernetes in v17.2, developers can go straight from a merge request review to watching a deployment rolled out to Kubernetes. This new feature will:
- allow developers to avoid switching tooling
- ease the process of troubleshooting and monitoring deployments and post-deployment application health
- strengthen GitOps workflows to easily manage application and infrastructure changes
The new feature allows GitLab users to view the logs of pods and containers directly via the GitLab UI. In previous versions of GitLab, users could configure a GitLab project to view pods deployed to certain namespaces on an associated cluster. This new feature allows users to further monitor workloads running on Kubernetes without needing to switch to another tool.
In the sections below, you will learn how to use this new feature by adding a Kubernetes cluster to a GitLab project, deploying a sample workload to a cluster, and viewing the logs of this workload running on a cluster.
Need to know the basics of Kubernetes? Read this quick introductory blog.
Configure a GitLab project to view Kubernetes resources
Before proceeding with this section, the following prerequisites are required:
- a remote Kubernetes cluster (i.e., not running locally on your machine)
- access to a GitLab v17.2 account
- this repository forked to a GitLab group to which you have access
- Helm CLI
- kubectl CLI
Once you have satisfied the prerequisites involved, add an agent configuration file to the GitLab project you forked. The configuration file allows users to control permissions around how GitLab users may interact with the associated Kubernetes cluster.
You can use the configuration file included in this GitLab project by changing the following file: .gitlab/agents/k8s-agent/config.yaml. Replace the <GitLab group> in the id property shown below with the group where you have forked the example project. This config file will allow GitLab to access your cluster via an agent that can be installed on your cluster.
user_access:
  access_as:
    agent: {}
  projects:
    - id: <GitLab group>/gitlab-k8s-log-streaming-example
Once the above file is edited, you can commit and push these changes to the main branch of the project.
Add GitLab Kubernetes agent to cluster
With the agent configuration file added, now add the cluster to GitLab by installing an agent on your cluster. In the GitLab UI, go to your project and, on the left side of the screen, select Operate > Kubernetes clusters. Once on this page, select the Connect a cluster button on the right side of the screen. From the dropdown menu, you can then select the agent, which should be k8s-agent. Click Register to get instructions for how to install the agent on your cluster.
The instructions presented to you after registering the agent will be to run a helm command that will install the GitLab agent on your cluster. Before running the command locally, you will want to ensure your Kubernetes context is targeting the cluster you want to work with. Once you have verified you are using the correct kubeconfig locally, you can run the helm command to install the agent on your cluster.
Once both pods are running, GitLab should be able to connect to the agent. Run the following command to wait for the pods to start up:
kubectl get pods -n gitlab-agent-k8s-agent -w
Deploy sample application to your cluster
Before you can view logs of a workload through GitLab, you first need to have something running on your cluster. To do this, you can run the following kubectl command locally.
kubectl apply -f https://gitlab.com/gitlab-da/tutorials/cloud-native/gitlab-k8s-log-streaming-example/-/raw/main/k8s-manifests/k8s.yaml
After the command runs successfully, you are now ready to complete the final step to set up a Kubernetes dashboard via GitLab.
View pod logs through the GitLab UI
To add the Kubernetes dashboard via the GitLab UI, go to your project and, on the left side of the screen, select Operate > Environments. On the top right side of the screen, select the Create an environment.
Next, you can give your environment a name, select the GitLab agent (i.e. k8s-agent), and pick a namespace for the Kubernetes dashboard to focus on. Since the application is running in the gitlab-k8s-log-streaming-example-dev namespace, select this option from the namespace dropdown. After naming the environment and selecting the agent and namespace, click Save.
After creating the environment, you should now see information about the application’s pods displayed via the GitLab UI.
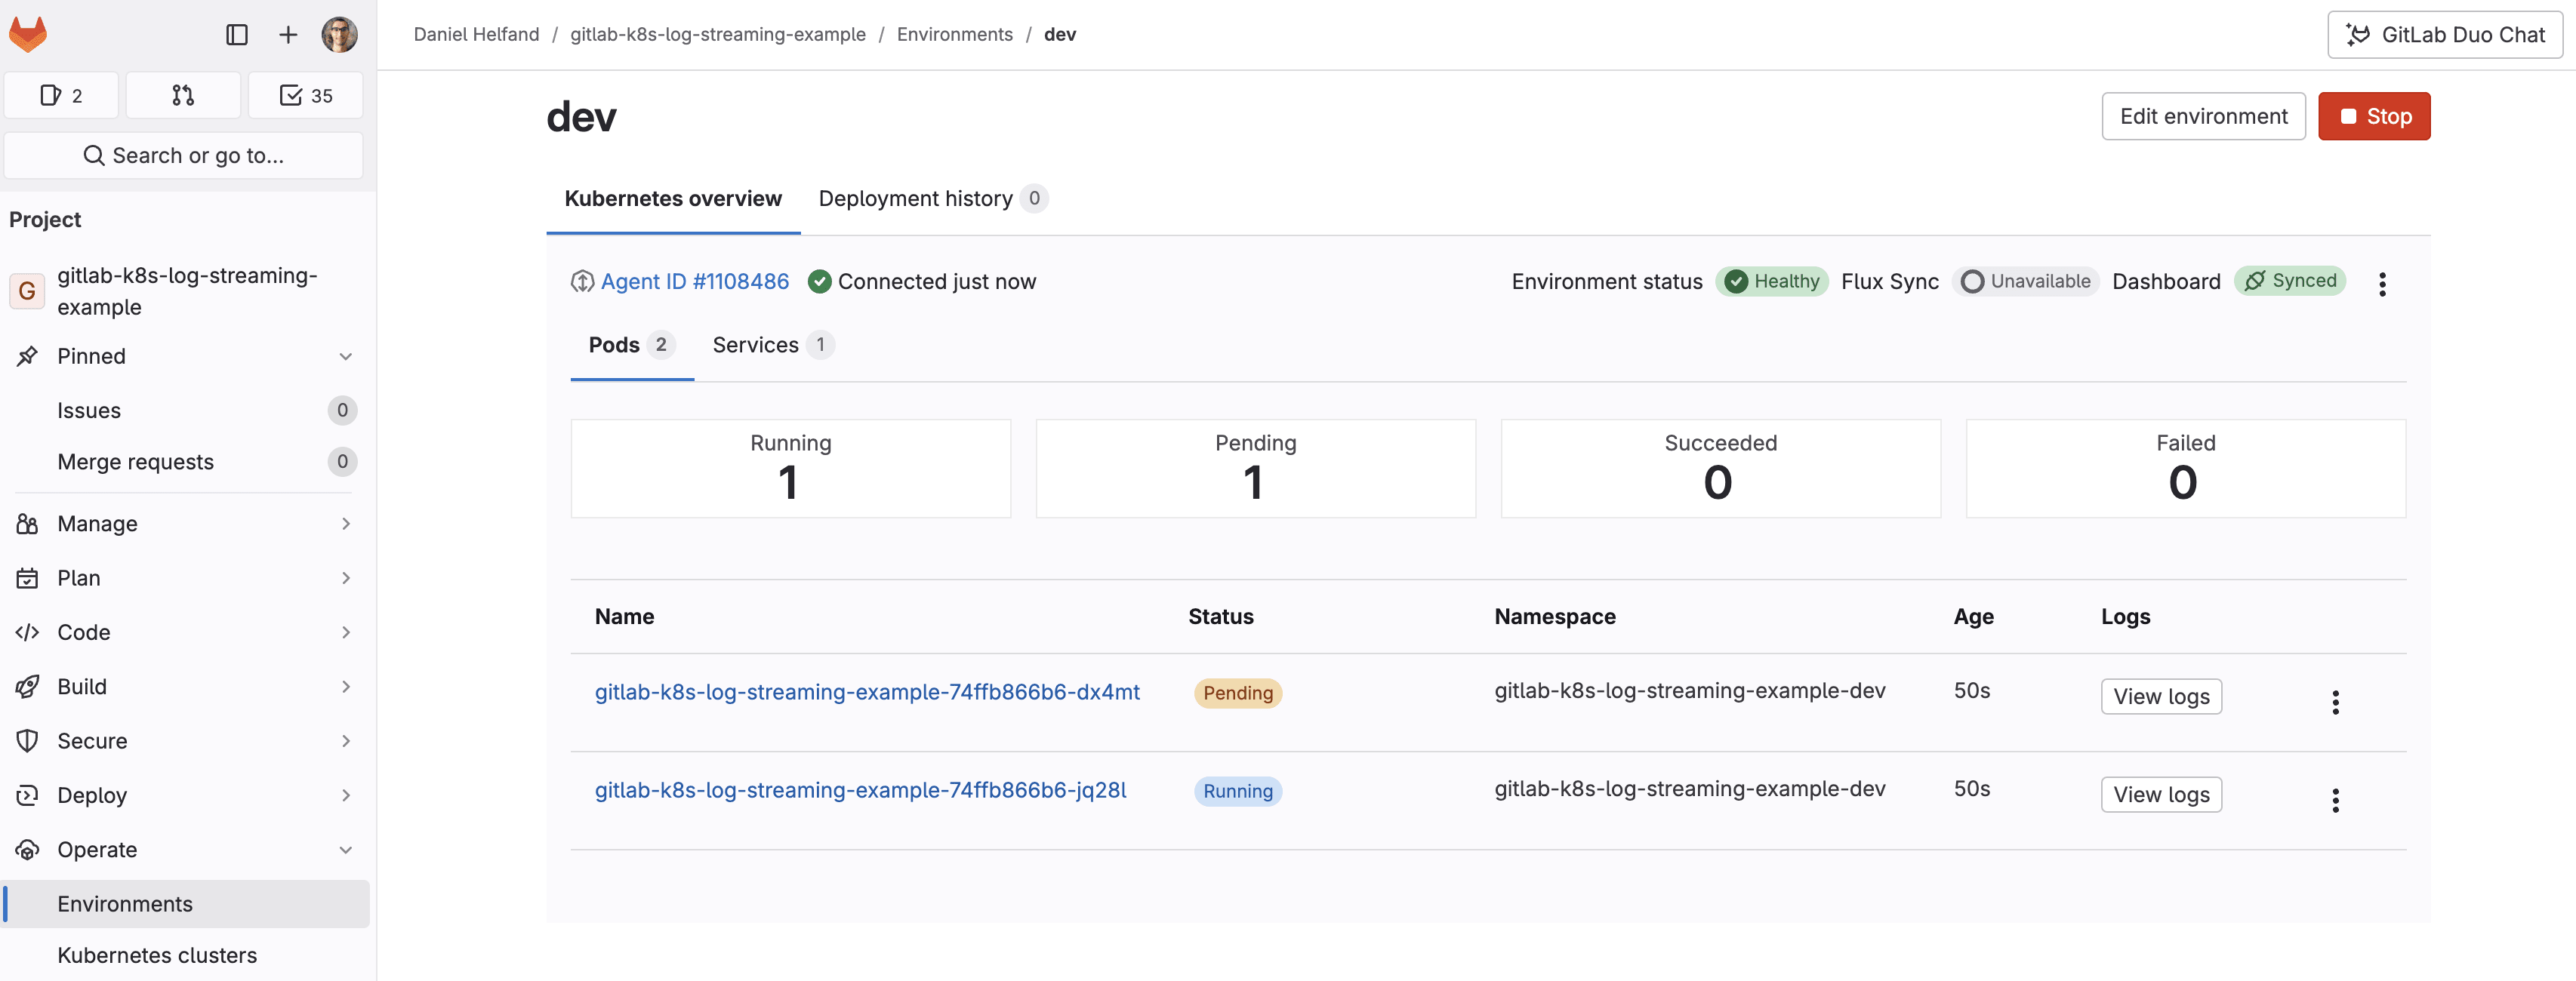
Go to the right side of the screen and click View Logs to see logs for one of the pods associated with the application.

Try it out and share feedback
The introduction of pod log streaming in GitLab v17.2 will help GitLab users get one step closer to managing complex deployments to Kubernetes, as well as monitoring and troubleshooting issues post deployment via a common user experience. We are excited to hear more about users’ experiences with this new enhancement and how it helps improve DevOps workflows around Kubernetes. To share your experience with us, you can open an issue to the project associated with this tutorial. Or, comment directly in the Kubernetes log streaming feedback issue to report information to the GitLab engineering team.
More information on getting started with the GitLab Dashboard for Kubernetes can be found in the documentation here.
To explore the GitLab Dashboard for Kubernetes as well as other more advanced features of GitLab, sign up for our free trial of GitLab Ultimate.
We want to hear from you
Enjoyed reading this blog post or have questions or feedback? Share your thoughts by creating a new topic in the GitLab community forum.
Share your feedback