Published on: January 23, 2025
15 min read
How-to: GitLab Single Sign-on with SAML, SCIM, and Azure’s Entra ID
Follow this detailed walk-through of the configuration steps required to configure GitLab Single Sign-on, using Microsoft Azure’s Entra ID as the identity provider.

As organizations increase in size, it becomes increasingly difficult and critical to ensure that the right team members have access to the right groups and projects within their development platform. GitLab offers some powerful methods to manage user access, especially now with custom roles, but performing this at scale through a point-and-click user interface can be frustrating. However, all is not lost. You can use Security Assertion Markup Language (SAML) and System for Cross-domain Identity Management (SCIM) as a solution. (There are moments where I’m grateful for acronyms.)
I was researching this topic for a particular customer, and walking through the GitLab documentation on the capabilities, but I never felt like I truly understood the integration. As is often the case, especially when dealing with integrating components, the knowledge from experience far outweighs that gained from reading or watching. In that light, I wanted to share my steps along this path and invite you all to join me. All you need is a free trial of Microsoft Azure Entra ID and GitLab Premium with a top-level group on GitLab.com.
Note: This exercise produces a working integration, however, for production environments there may be necessary deviations. For example, the user account email for the identity provider (Entra ID in this case) will likely not match your GitLab account email.
Creating the application in Entra ID
First, go to the Entra ID admin center. Within the Applications area, select Enterprise Applications. We’re going to create a new application, and then create our own application.

With our new application created, we can start configuring the single sign-on (SSO) parameters for our application. For this task, you may want to have side-by-side browser windows. One window on your Entra ID application, and another window on the SAML settings for your GitLab group. Those settings are located under **Settings**, then SAML SSO on the left side of your GitLab window, as shown in Figure 2. If you don’t see this option, you aren’t in the top-level group, don’t have permission to configure SAML, or don’t have GitLab Premium enabled for that group. 
Within your Entra ID interface, select **Single sign-on** and click the SAML card. 
With the side-by-side view, the SAML configuration settings are on the left and the GitLab SSO settings on the right. 
Now we can start copying and pasting parameters. Within the Entra ID interface, select **Edit** within the “Basic SAML Configuration” block. The parameter sources and destination are identified in the following table. | Source (GitLab) | Destination (Entra ID) | | :---------------- | :------: | | Identifier | Identifier (Entity ID) | | Assertion consumer service URL | Reply URL (Assertion Consumer Service URL) | | GitLab single sign-on URL | Sign on URL (Optional) |
Once completed, your side-by-side view should appear similar to the following (noting the URLs are unique to your environment).

Click **Save** within the Entra ID “Basic SML Configuration” window to save your hard work thus far. Note: You may need to click on the “X” in the upper right of the “Basic SAML Configuration” window if it doesn’t close automatically. After this window closes, you may get a popup to test single sign-on with your application. Select **No, I’ll test later**, because we still have more work to do (there is always more work to do). ## Configuring attributes and claims Within the Entra ID user interface, look for the section for “Attributes and Claims,” and click the **Edit** pencil icon. The first thing we want to do is modify the Unique User identifier (Name ID) value, so click on that row and set the Source attribute to **user.objectid**. Additionally, the Name identifier format must be updated, and set to **Persistent**. 
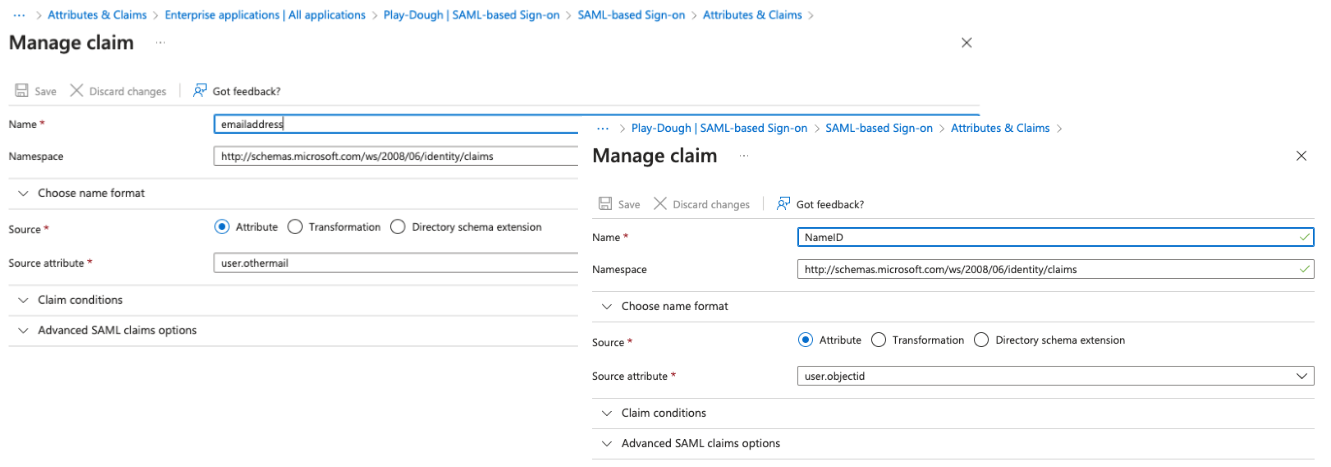
Save that claim configuration. Now we have additional claims to configure, but there are only three that we need here. So, feel free to go wild and delete those default four items under **Additional claims**, or you can edit the existing ones to match the table below. Note that these values (specifically, the Name) are case sensitive.
| Name | Namespace | Source Attribute | | :---------------- | :------: | :------: | |emailaddress |http://schemas.microsoft.com/ws/2008/06/identity/claims | user.otheremail | | NameID | http://schemas.microsoft.com/ws/2008/06/identity/claims |user.objectid |
The resulting claims configuration should appear as follows. Note the use of **otheremail** for the “emailaddress” attribute. This was necessary for me as my primary email addresses within Entra ID are not the addresses used on GitLab.com. If you recall, when I set up my “user," I modified the contact information to include my gitlab.com email address as one of my “Other emails.” 
With your attributes configured, under the Advance settings, enable **Include attribute name format** setting. 
Your "Attributes and Claims" window should now look similar to Figure 9 below. 
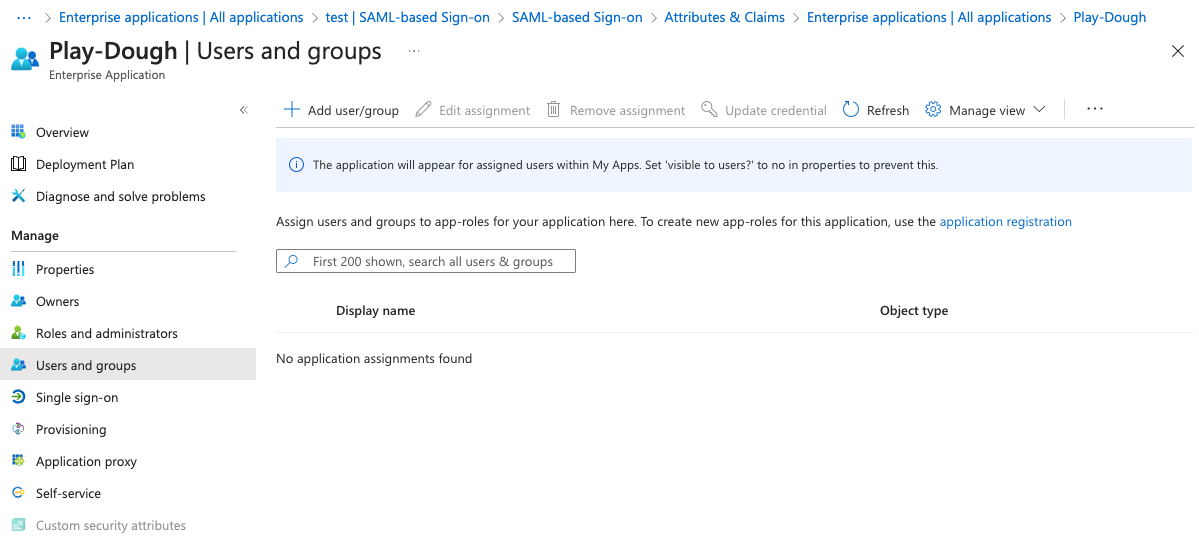
If you’re happy, or at least relatively content, with your configuration, click the “X” in the top right corner of the "Attributes and Claims" window to close it. ## Configuring and assigning users Now that we have our application configured, we need to ensure that our users have been assigned to that application. I'll assume you’re working with a test instance that does not have the same email address as what is configured within your GitLab.com namespace. So let’s go to the “Users and groups” within the Entra ID user interface for your configured application. 
Select **Add user/group**, and under the “Users and groups” where it says “None Selected,” click that text. Now you can select the user(s) to add to your application. These are the users that will be permitted to log into GitLab, authenticating themselves through Entra ID. 
Once selected, at the bottom of that page, click **Select**, and at the bottom of the next, select **Assign**. Now you should have a user assigned to your application. 
Next, we need to ensure that the GitLab.com email address for that user is configured correctly. By clicking on the user itself, we can modify or configure some additional information about that user. We can see below, the User principal name, which is based on an “onmicrosoft” domain. This is not the email address I have associated with my GitLab.com account. If you recall that we set the “Email address” attribute to “otheremail,” this is where we now configure that “other” email address. 
Click the option to **Edit properties** for the user, and click on the **Contact Information** heading. Here we can add other emails – more specifically, the email address utilized for your GitLab.com account. 
That should complete the configuration parameters that we need in Entra ID, but wait, there’s more. Within the GitLab side now, you will need to configure a couple parameters. First, you might as well enable SAML for the group as that’s kind of a key piece here. GitLab offers some additional options to disable password authentication or enforce SSO to reduce the security risks within your application, but we’ll leave those unchecked for now. Similar to the table above, we’ll need a couple things from Entra ID to configure into GitLab. Please refer to the table below.
| Source (Entra ID) | Destination (GitLab) | | :---------------- | :------: | |Login URL |Identity provider single sign-on URL | | Thumbprint | Certificate fingerprint|

Lastly, you want to configure the default membership role for users logging in via SAML. Note that the access that you set for users here will cascade down to other groups and projects within your top-level group. Therefore, I would strongly recommend NOT setting this role to be “Owner.” Either “Guest” or “Minimal Access” would be acceptable options here, depending on the security posture of your organization. For more information about what these roles can and can not do, refer to the GitLab documentation on [Roles and Permissions](https://docs.gitlab.com/ee/user/permissions.html#roles). Now, save your work on the GitLab interface by clicking that beautiful blue **Save changes** button. With your GitLab settings saved, you can now test your setup. I would encourage you to do this both through the “Verify SAML Configuration” on the GitLab system as well as with the Entra ID SSO "Test" button. ## Troubleshooting SAML In addition to the troubleshooting steps included within [GitLab documentation](https://docs.gitlab.com/ee/user/group/saml_sso/troubleshooting.html), I wanted to include a couple other items that I personally experienced. If you get an error stating that the SAML reference did not contain an email address, check the Claim name for your email within the “Attributes and Claims” section within your Entra ID application. With GitLab 16.7, we added support for the “2008” attribute names, and at least for the email address setting, I found the default “xmlsoap” name for the email address claim to be a disappointing failure. Another common error is “SAML Name ID and email address do not match your user account.” As you may suspect, this error is caused by a mismatch of the “NameID” and “emailaddress” attributes within the Entra ID application. This could be a misconfiguration of the “Attributes and Claims,” but it could also be that the properties of your test user don’t match your configuration. One helpful method to identify exactly what is coming through the SAML exchange is to use a SAML Tracer or SAML Message Decoder plugin with your web browser. ## SCIM Now that you have SAML configured to enable users to log in via your Entra ID application, let’s make sure that people are assigned to the proper group(s) upon login. This can be incredibly helpful at scale, where instead of manually identifying which groups the particular users belong to, GitLab can learn this information from your identity application, Entra ID in this case. Because SCIM utilizes groups to identify group membership, we need to create a group within Entra ID and add the relevant user(s) to the group. For this we’ll need the main administration menu for Entra ID. 
We’re going to create a new group and assign our user(s) to that group. So click **New group** and configure a new group, which only requires you to configure a “Group name.” I used the default group type of “Security.” Leave the “Membership type” as “Assigned.” From this window, we can also assign the members. 
Once you’ve added the member(s), click **Create** in the bottom of that window. With your group created, and the user(s) assigned to the group, we can configure SCIM. Immediately below the SAML configuration section within the GitLab UI, you’ll see the “SCIM Token” area. Here you can generate a new token, and copy the endpoint URL, both of which will be useful for the next steps. Note that if you forget or already have a SCIM token, it can be reset. 
With this information saved, return to your Entra ID application configuration. Within the left side menu, you’ll find the following: 
Within the "Provisioning" section, click on **New Configuration**, which opens a new page where that token and URL from GitLab will be used. 
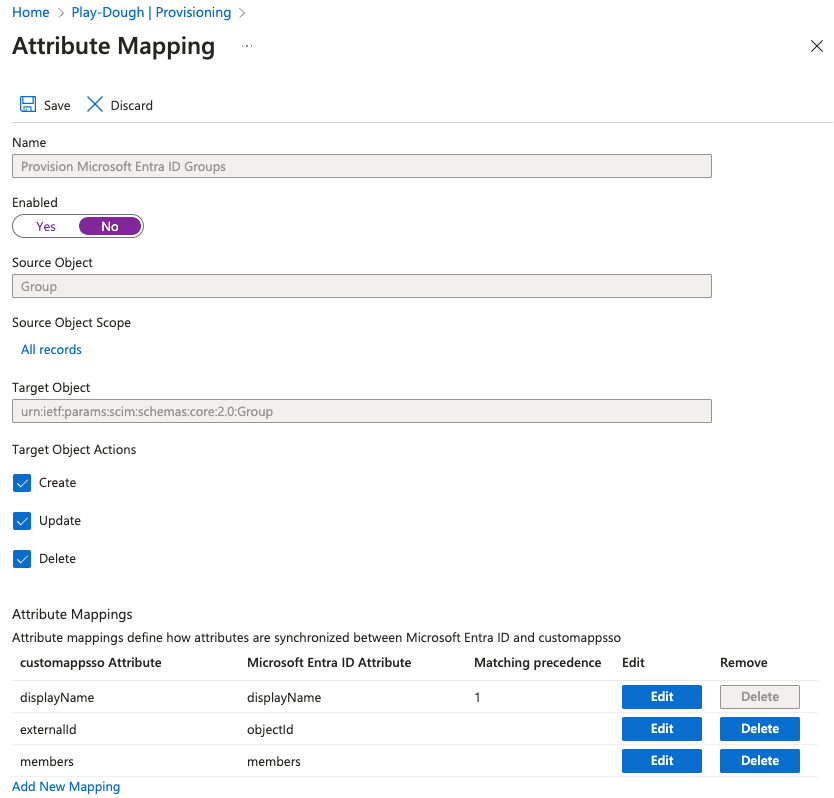
Feel free to test the connection to ensure that you’ve configured the parameters properly. After testing, click on the **Create** button to establish the configuration and work on our mappings and settings. You may need to click the “X” in the top right corner of the panel to return to the overview configuration. Expand the “Mappings,” which includes two parameters; “Provision Microsoft Entra ID Groups” and “Provision Microsoft Entra ID Users.” SCIM group provisioning isn’t currently supported in GitLab, and although it doesn’t break the integration, keeping group provisioning enabled may cause negligible error messages. Therefore, we want to disable “Provision Microsoft Entra ID Groups,” so click that entry and set the “Enabled” field to “No.” 
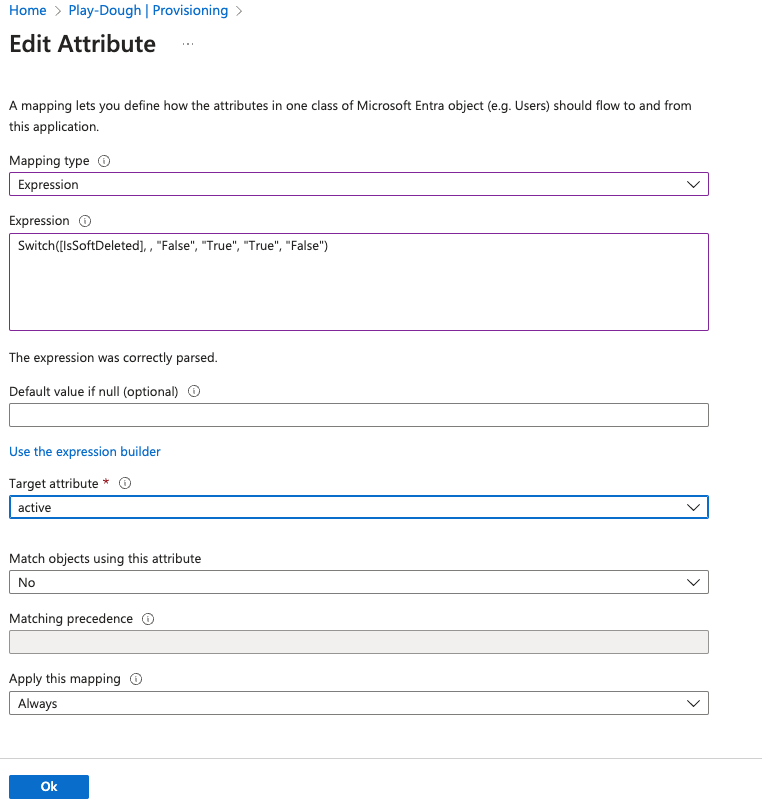
Save that configuration and select “Provision Microsoft Entra ID Users.” Validate that all three "Target Object Actions" are enabled, and then proceed to the “Attribute Mapping” section. Delete all existing mappings available to delete (I find this easier because attributes can’t be assigned twice), and then configure the Attribute Mappings per the following table: | customappsso Attribute (Destination) | Microsoft Entra ID Attribute (Source) | Matching Precedence | Mapping Type | | :---------------- | :------: | :------: | :------: | |externalID|objectId|1|Direct| |active|Switch([IsSoftDeleted], , "False", "True", "True", "False")| |Expression| |userName|mailNickname| |Direct| |name.formatted|displayName| |Direct| |Emails[type eq “other”].value|userPrincipalName||Direct|

After configuring all of the attribute mappings, the result should be similar to that found in Figure 22. 
Note the use of the “other” email within the **customappssso** attribute. This relates back to the “other” email we configured for the user back in the Entra ID user properties. In a production situation, the emails for the SSO account and the email address for the account within GitLab should match. With your mapping complete (congratulations, Ptolemy), there are some advanced configuration settings necessary. Underneath the "Attribute Mappings," click the box for “Show advanced options.” Once this box is checked, a link called “Edit attribute list for customappsso” is revealed. 
Click that link, and ensure that the Name “ID” is both “Primary Key” and “Required,” and that “externalID” is also “Required.” These attributes both refer to a unique user ID generated by Entra ID. However, although the “id” itself is required, it is not consistently provided within the API calls. Therefore, GitLab relies on the “externalID” to ensure the proper connection between the Entra ID and GitLab user accounts. 
Save these settings, and then close the “Attribute Mapping” page with the “X” in the top right of the window. Return to the "Application Provisioning" section and click **Start provisioning**. Within GitLab, we need to configure the association between the group we configured within Entra ID and the level of access we want those users to have within the GitLab top-level group. Note that this association can be configured on each sub-group within GitLab for more extensive provisioning, but within GitLab, permissions flow downhill. Whatever permission you set for a user at a top-level group, or sub-group, will cascade down to all projects and groups contained therein. Within the "Settings" portion of the GitLab menu, select **SAML Group Links**. Here is where you’ll configure the group name and determine what access level, or role, members of the Entra ID Group will have within this particular GitLab Group. 
As shown in Figure 26, I’ve configured my membership to The Academy such that any users within the dev-security group from Entra ID will be granted Developer access. Note that this is a slight variation of what a typical production environment would look like. In most instances, the user account within the identity provider (Entra ID, in this case) would match the user’s corporate account email (and we wouldn’t require “other” emails). When configured properly, if the user does not already have an account on GitLab, one will be created for them tied to their SSO account. 
Now that you’ve completed the configuration, give it a try! From another browser, preferably in private mode to ignore any cookies or other yummy artifacts, paste the link for the GitLab SSO URL found in the GitLab SAML configurations. You should be prompted to log in with your Entra ID credentials and gain the proper access to your GitLab group! Congratulations, you’ve made it! I hope you’ve learned from and appreciate the work here, and we can all rejoice in the fact that the users within the Play-Dough app can now all properly authenticate, with the right permissions, to The Academy! > Don't have a GitLab account? [Sign up for a free trial today](https://about.gitlab.com/free-trial/devsecops/). ## Read more - [The ultimate guide to enabling SAML and SSO on GitLab.com](https://about.gitlab.com/blog/the-ultimate-guide-to-enabling-saml/) - [SAML SSO for GitLab.com groups documentation](https://docs.gitlab.com/ee/user/group/saml_sso/)

