Published on: January 6, 2026
10 min read
AI-powered vulnerability triaging with GitLab Duo Security Agent
Learn how this GitLab Duo Agent Platform capability uses AI to prioritize vulnerabilities, reduce alert fatigue, and help teams focus on critical security risks.

Security vulnerabilities are discovered constantly in modern applications. Development teams often face hundreds or thousands of findings from security scanners, making it challenging to identify which vulnerabilities pose the greatest risk and should be prioritized. This is where effective vulnerability triaging becomes essential.
In this article, we'll explore how GitLab's integrated security scanning capabilities combined with the GitLab Duo Security Analyst Agent can transform vulnerability management from a time-consuming manual process into an intelligent, efficient workflow.
💡 Join GitLab Transcend on February 10 to learn how agentic AI transforms software delivery. Hear from customers and discover how to jumpstart your own modernization journey. Register now.
What is vulnerability triaging?
Vulnerability triaging is the process of analyzing, prioritizing, and deciding how to address security findings discovered in your applications. Not all vulnerabilities are created equal — some represent critical risks requiring immediate attention, while others may be false positives or pose minimal threat in your specific context.
Traditional triaging involves:
- Reviewing scan results from multiple security tools
- Assessing severity based on CVSS scores and exploitability
- Understanding context such as whether vulnerable code is actually reachable
- Prioritizing remediation based on business impact and risk
- Tracking resolution through to deployment
This process becomes overwhelming when dealing with large codebases and frequent scans. GitLab addresses these challenges through integrated security scanning and AI-powered analysis.
How to add integrated security scanners in GitLab
GitLab provides built-in security scanners that integrate seamlessly into your CI/CD pipelines. These scanners run automatically during pipeline execution and populate GitLab's Vulnerability Report with findings from the default branch.
Available security scanners
GitLab offers the following security scanning capabilities:
- Static Application Security Testing (SAST): Analyzes source code for vulnerabilities
- Dependency Scanning: Identifies vulnerabilities in project dependencies
- Container Scanning: Scans Docker images for known vulnerabilities
- Dynamic Application Security Testing (DAST): Tests running applications for vulnerabilities
- Secret Detection: Finds accidentally committed secrets and credentials
- Infrastructure-as-Code (IaC) Scanning: Analyzes infrastructure as code for misconfigurations
- API Security Testing: Test web APIs to help discover bugs and potential security issues
- Web API Fuzzing: Passes unexpected values to API operation parameters to cause unexpected behavior and errors in the backend
Example: Adding SAST and Dependency Scanning
To enable security scanning, add the scanners to your .gitlab-ci.yml file.
In this example, we are including SAST and Dependency Scanning templates which automatically run those scanners on the test stage.
Each scanner can be overwritten using variables (which differ for each scanner). For example, the SAST_EXCLUDED_PATHS variable
tells SAST to skip the directories/files provided. Security jobs can be further overwritten using the GitLab Job Syntax.
      include:
  - template: Security/SAST.gitlab-ci.yml
  - template: Security/Dependency-Scanning.gitlab-ci.yml

stages:
  - test

variables:
  SAST_EXCLUDED_PATHS: "spec/, test/, tests/, tmp/"
Example: Adding Container Scanning
GitLab provides a built-in container registry where you can store container images for each GitLab project. To scan those containers for vulnerabilities, you can enable container scanning.
This example shows how a container is built and pushed in the build-container job running in the build stage
and how it is then scanned in the same pipeline in the test stage:
      include:
  - template: Security/Container-Scanning.gitlab-ci.yml

stages:
  - build
  - test

build-container:
  stage: build
  variables:
    IMAGE: $CI_REGISTRY_IMAGE/$CI_COMMIT_REF_SLUG:$CI_COMMIT_SHA
  before_script:
    - docker login -u $CI_REGISTRY_USER -p $CI_REGISTRY_PASSWORD $CI_REGISTRY
  script:
    - docker build -t $IMAGE .
    - docker push $IMAGE

container_scanning:
  variables:
    CS_IMAGE: $CI_REGISTRY_IMAGE/$CI_COMMIT_REF_SLUG:$CI_COMMIT_SHA
Once configured, these scanners execute automatically in your pipeline and report findings to the Vulnerability Report.
Note: Although not covered in this blog, in merge requests, scanners show the diff of vulnerabilities from a feature
branch to the target branch. Additionally, granular security policies can be created to prevent vulnerable code
from being merged (without approval) if vulnerabilities are detected, as well as force scanners to run, regardless of how the
.gitlab-ci.yml is defined.
Triaging using the Vulnerability Report and Pages
After scanners run, GitLab aggregates all findings in centralized views that make triaging more manageable.
Accessing the Vulnerability Report
Navigate to Security & Compliance > Vulnerability Report in your project or group. This page displays all discovered vulnerabilities with key information:
- Severity levels (Critical, High, Medium, Low, Info)
- Status (Detected, Confirmed, Dismissed, Resolved)
- Scanner type that detected the vulnerability
- Affected files and lines of code
- Detection date and pipeline information
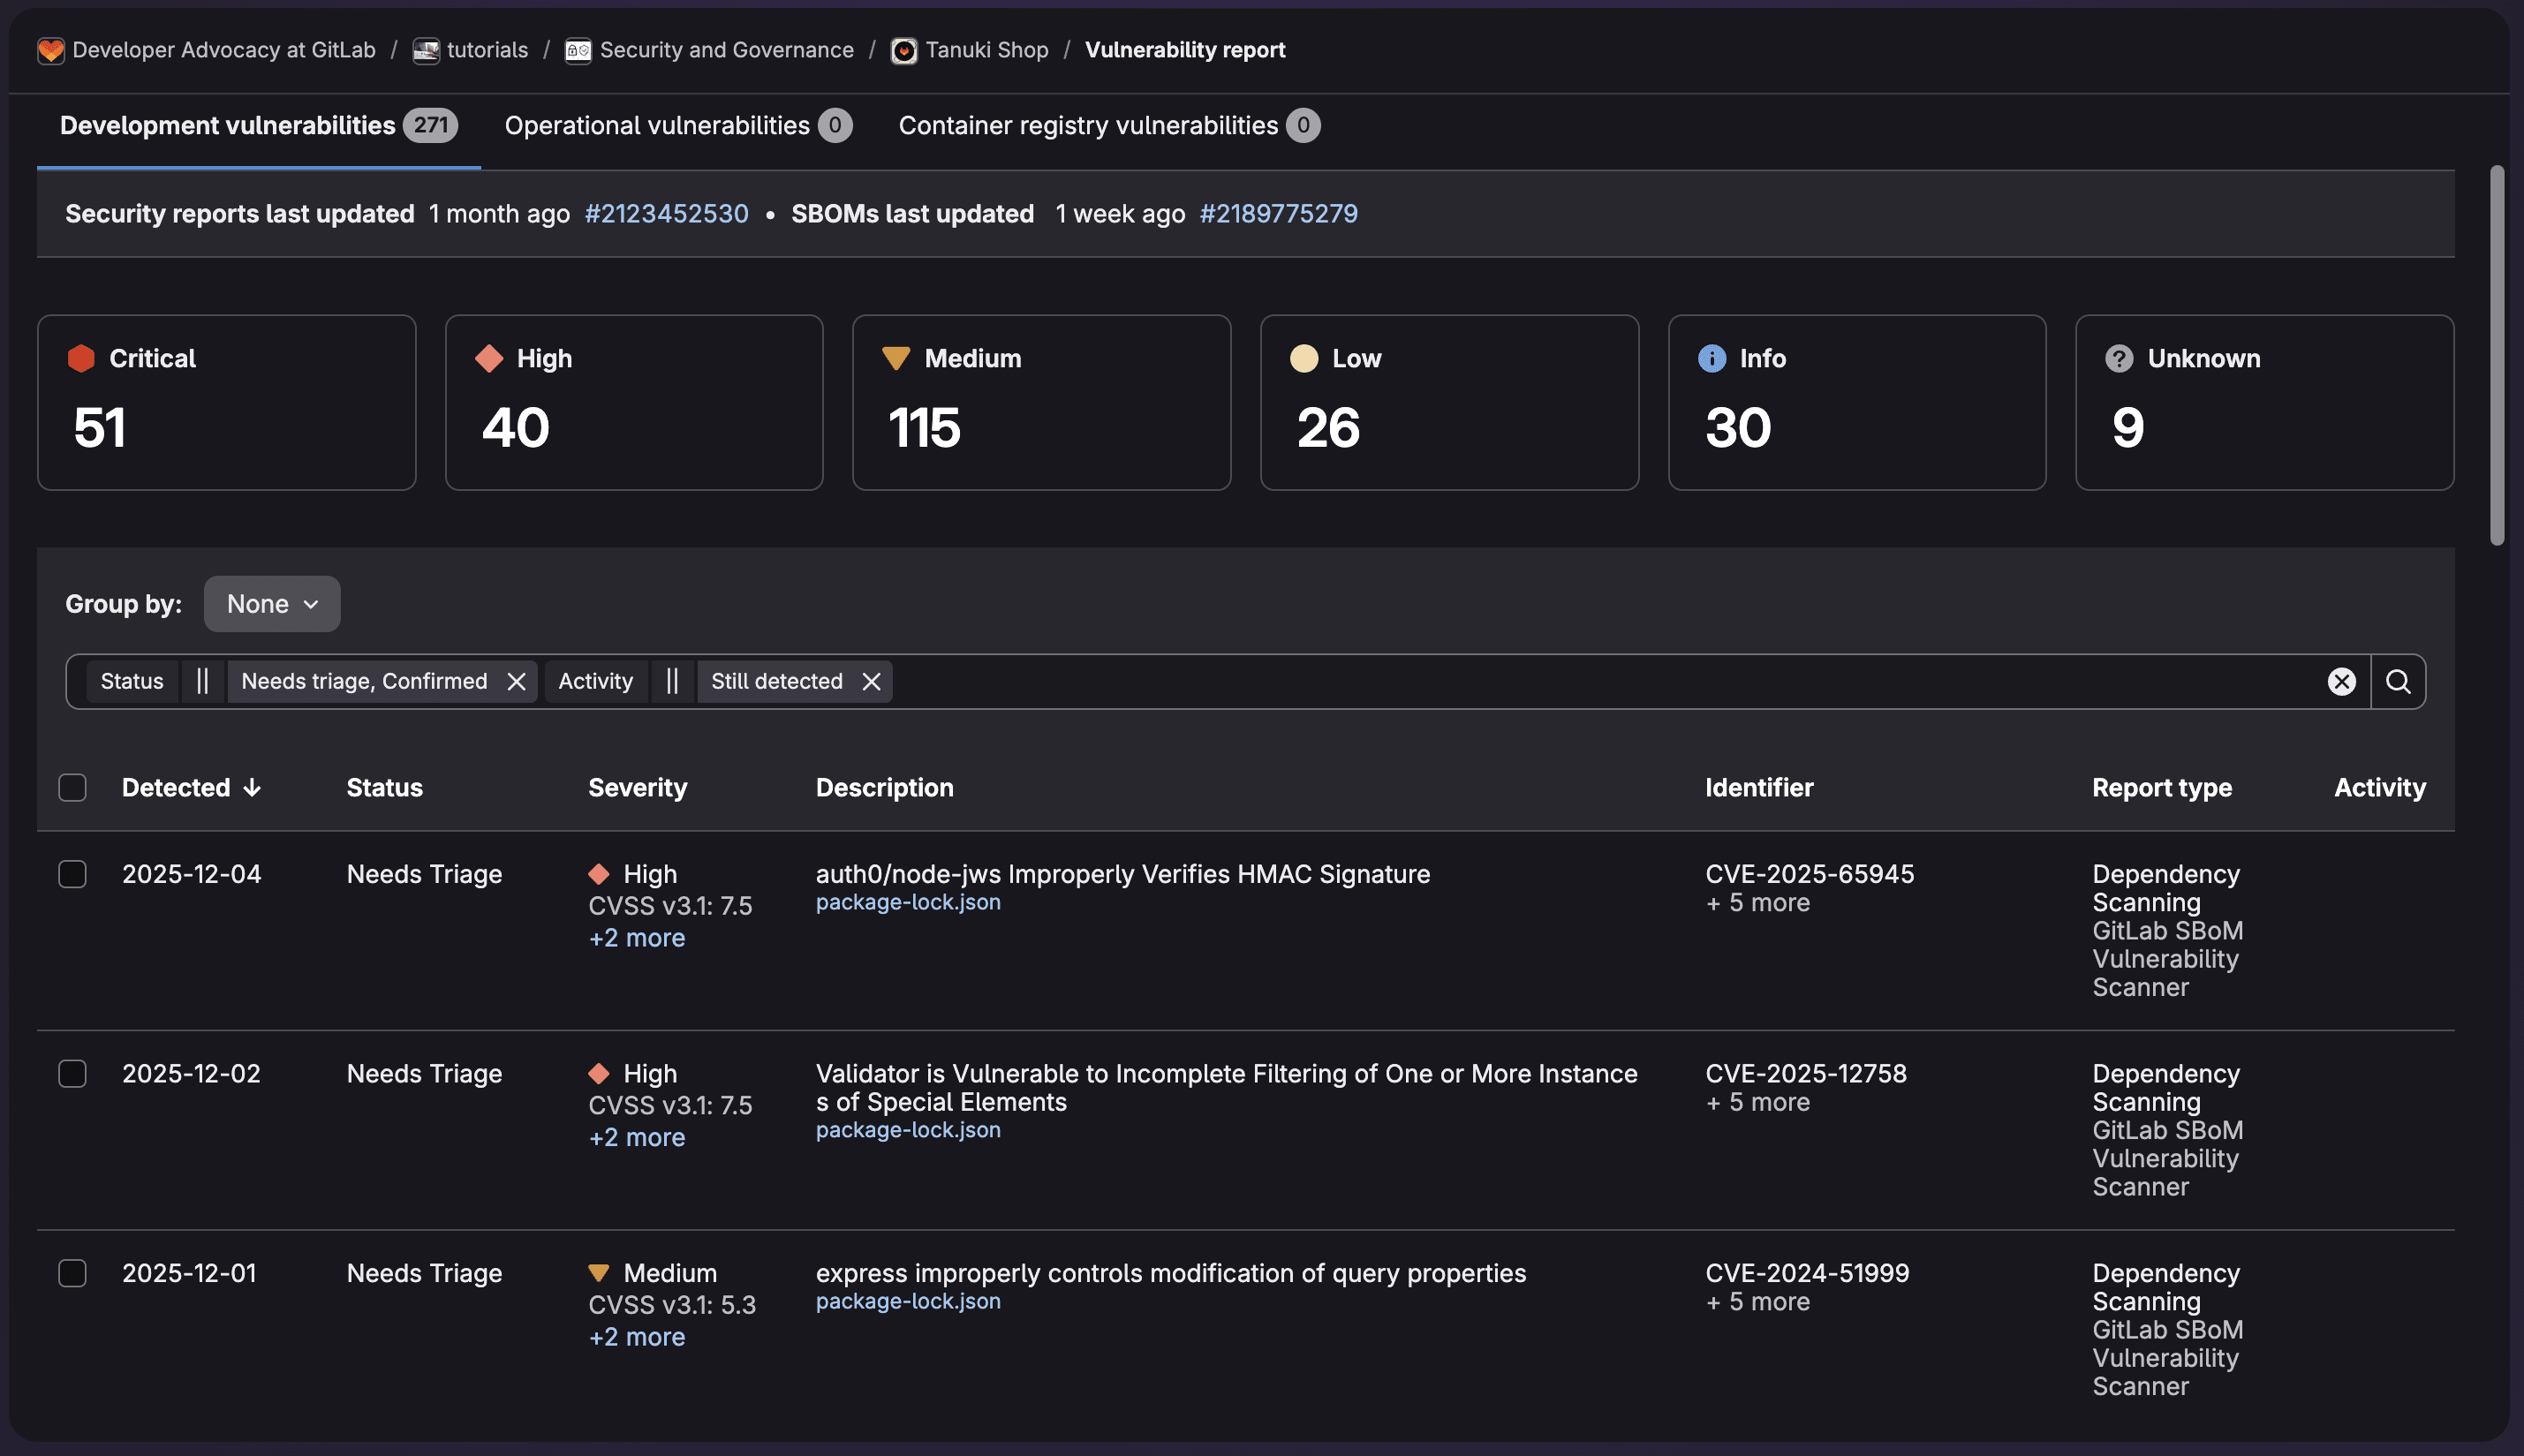
Filtering and organizing vulnerabilities
The Vulnerability Report provides powerful filtering options:
- Filter by severity, status, scanner, identifier, and reachability
- Group by severity, status, scanner, OWASP Top 10
- Search for specific CVEs or vulnerability names
- Sort by detection date or severity
- View trends over time with the security dashboard
Manual workflow triage
Traditional triaging in GitLab involves:
- Reviewing each vulnerability by clicking into the detail page
- Assessing the description and understand the potential impact
- Examining the affected code through integrated links
- Checking for existing fixes or patches in dependencies
- Setting status (Confirm, Dismiss with reason, or create an issue)
- Assigning ownership for remediation
This is an example of vulnerability data provided to allow for triage including the code flow:
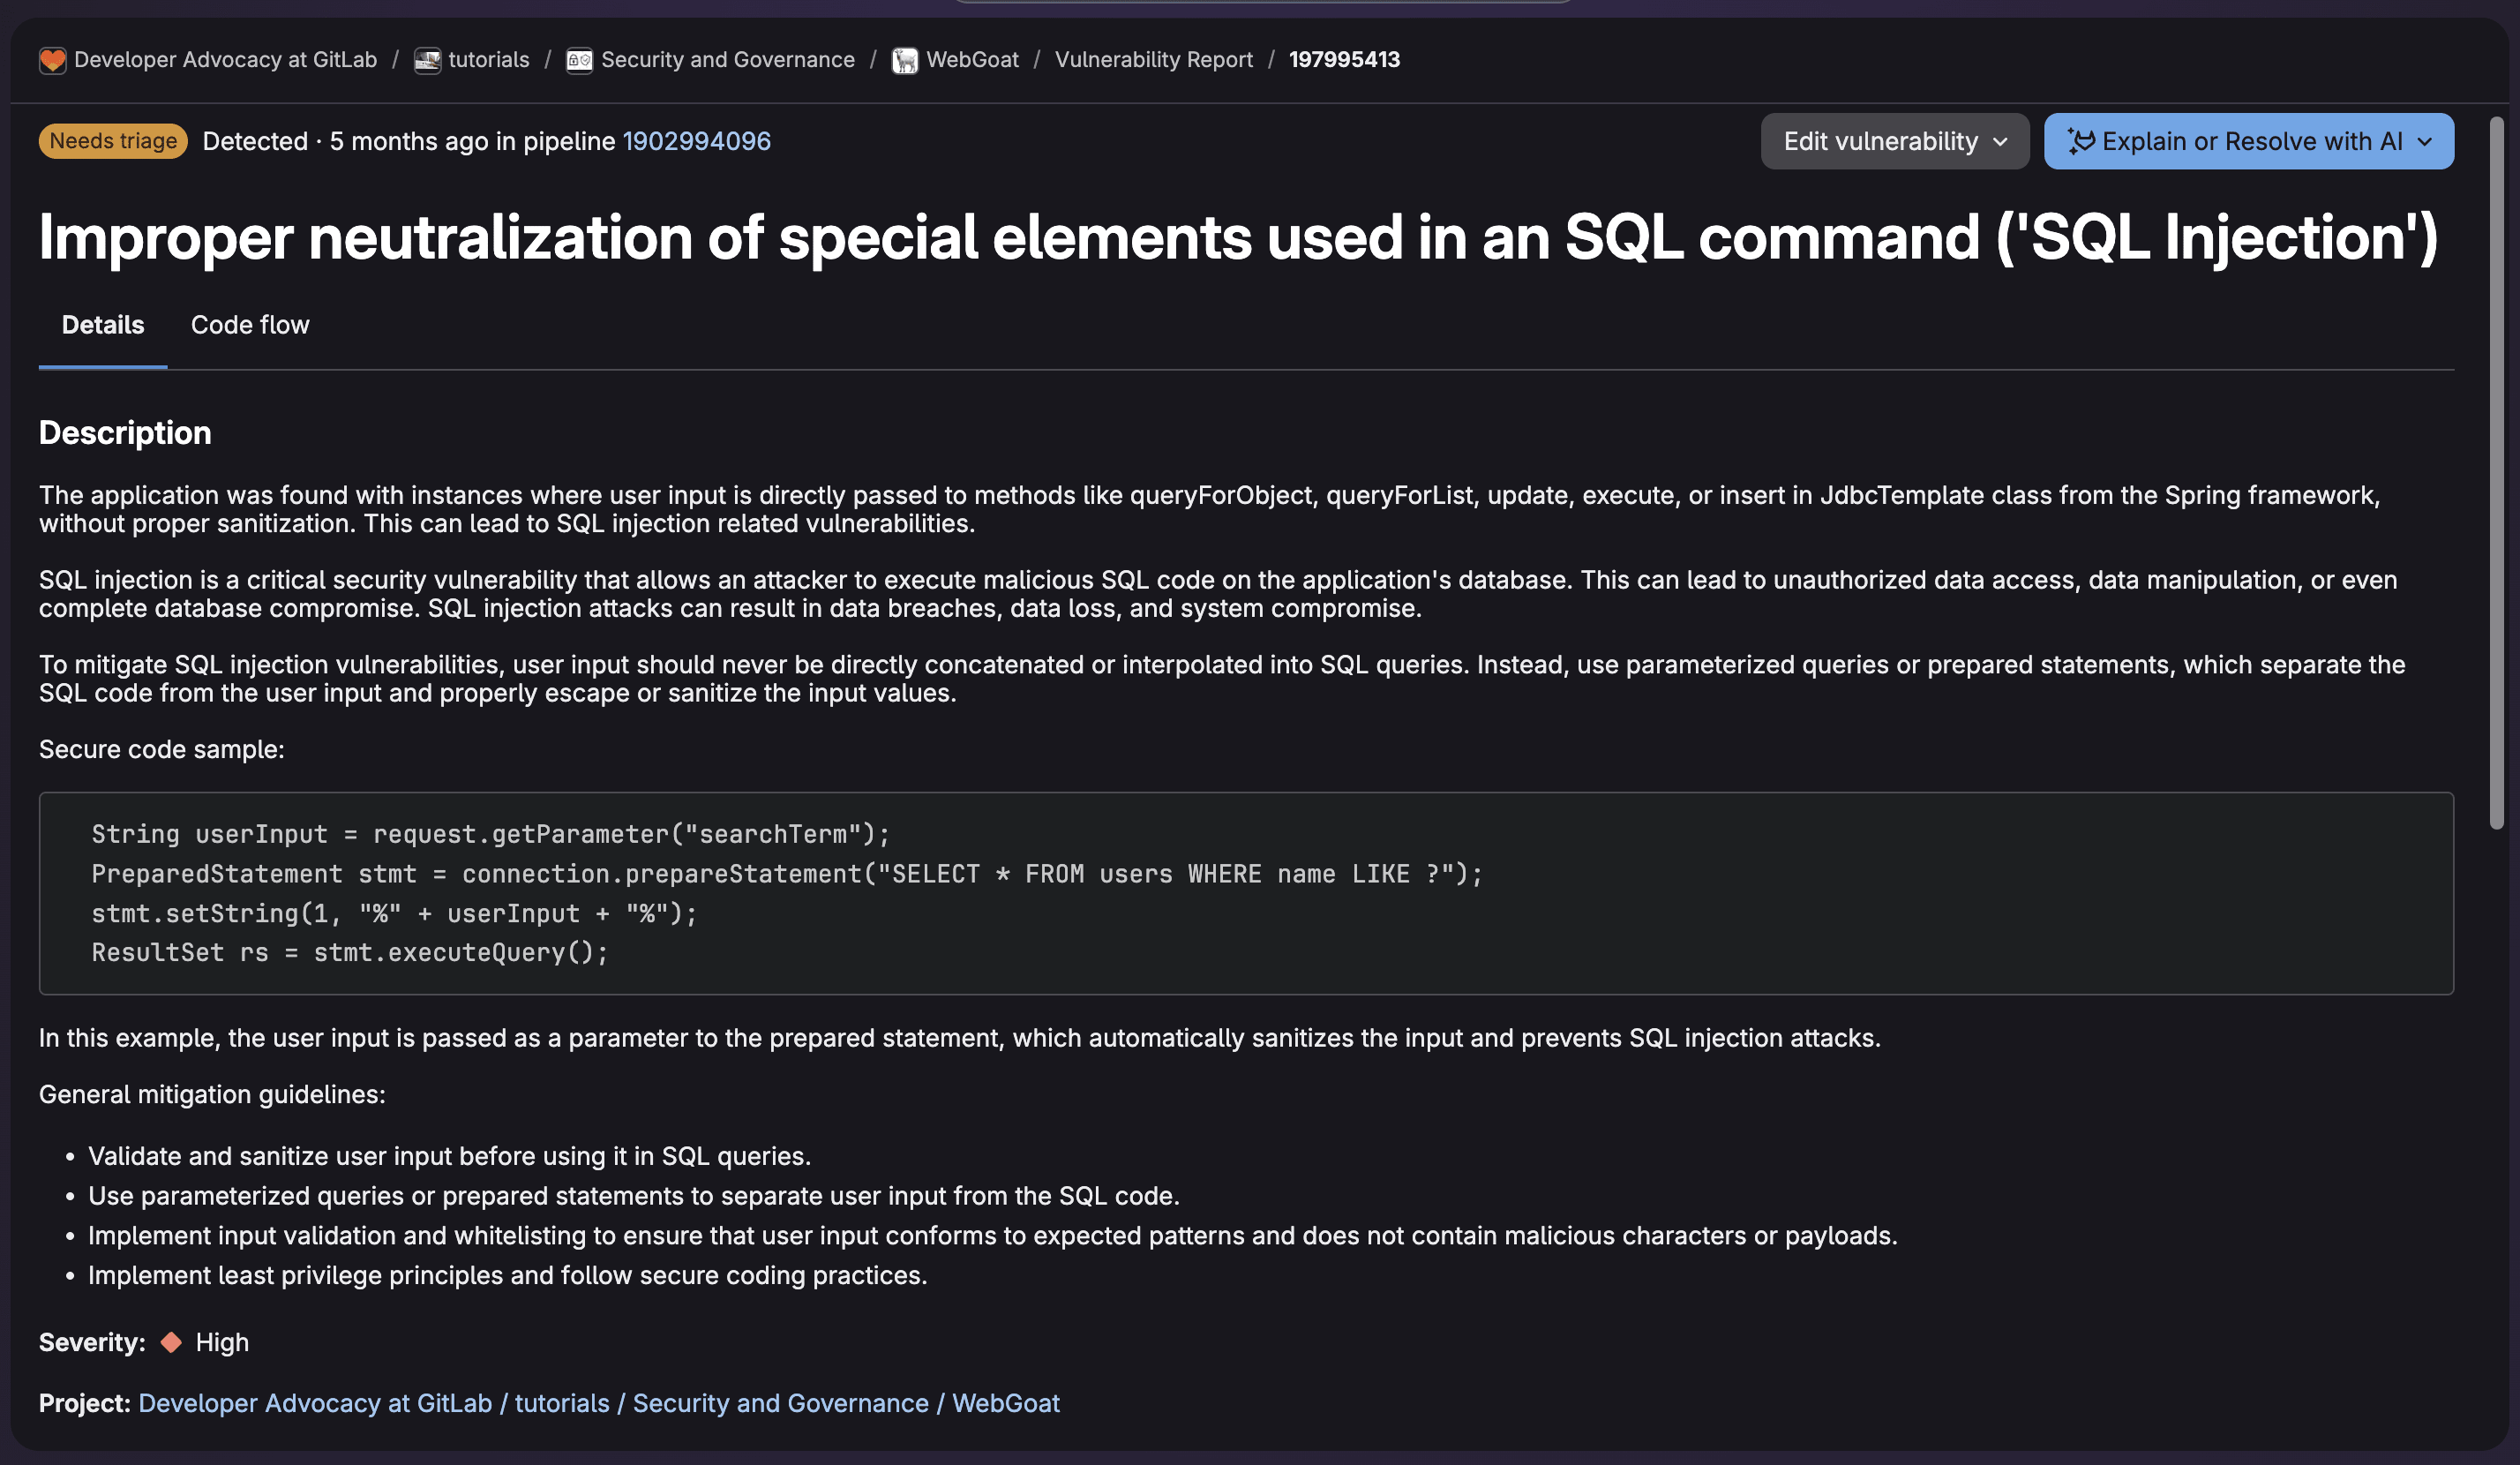
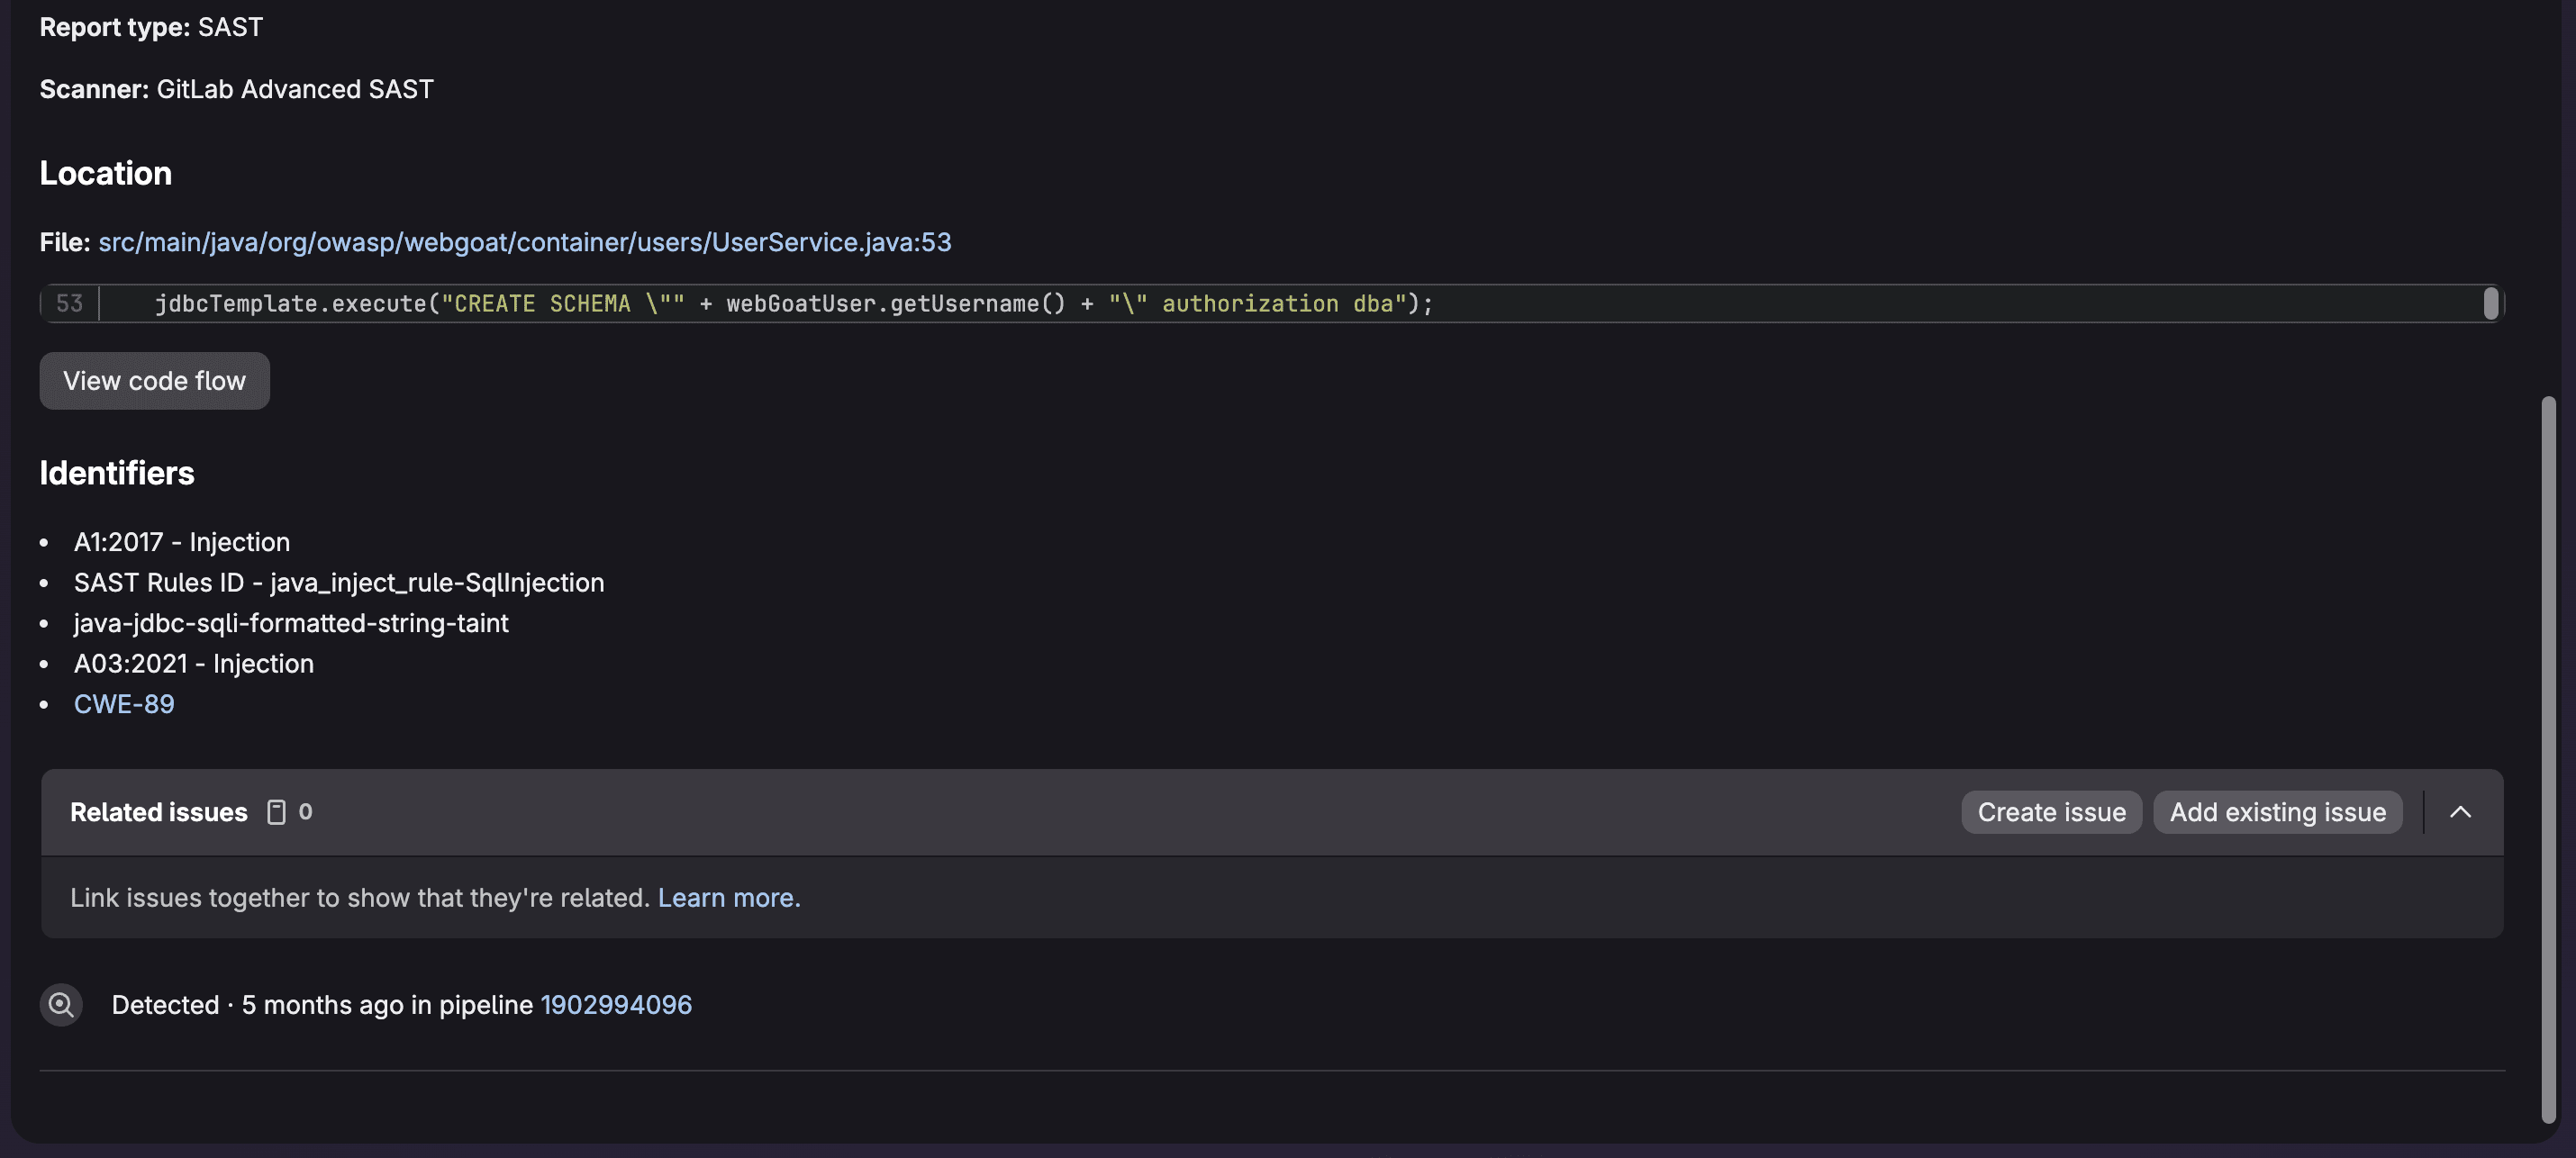
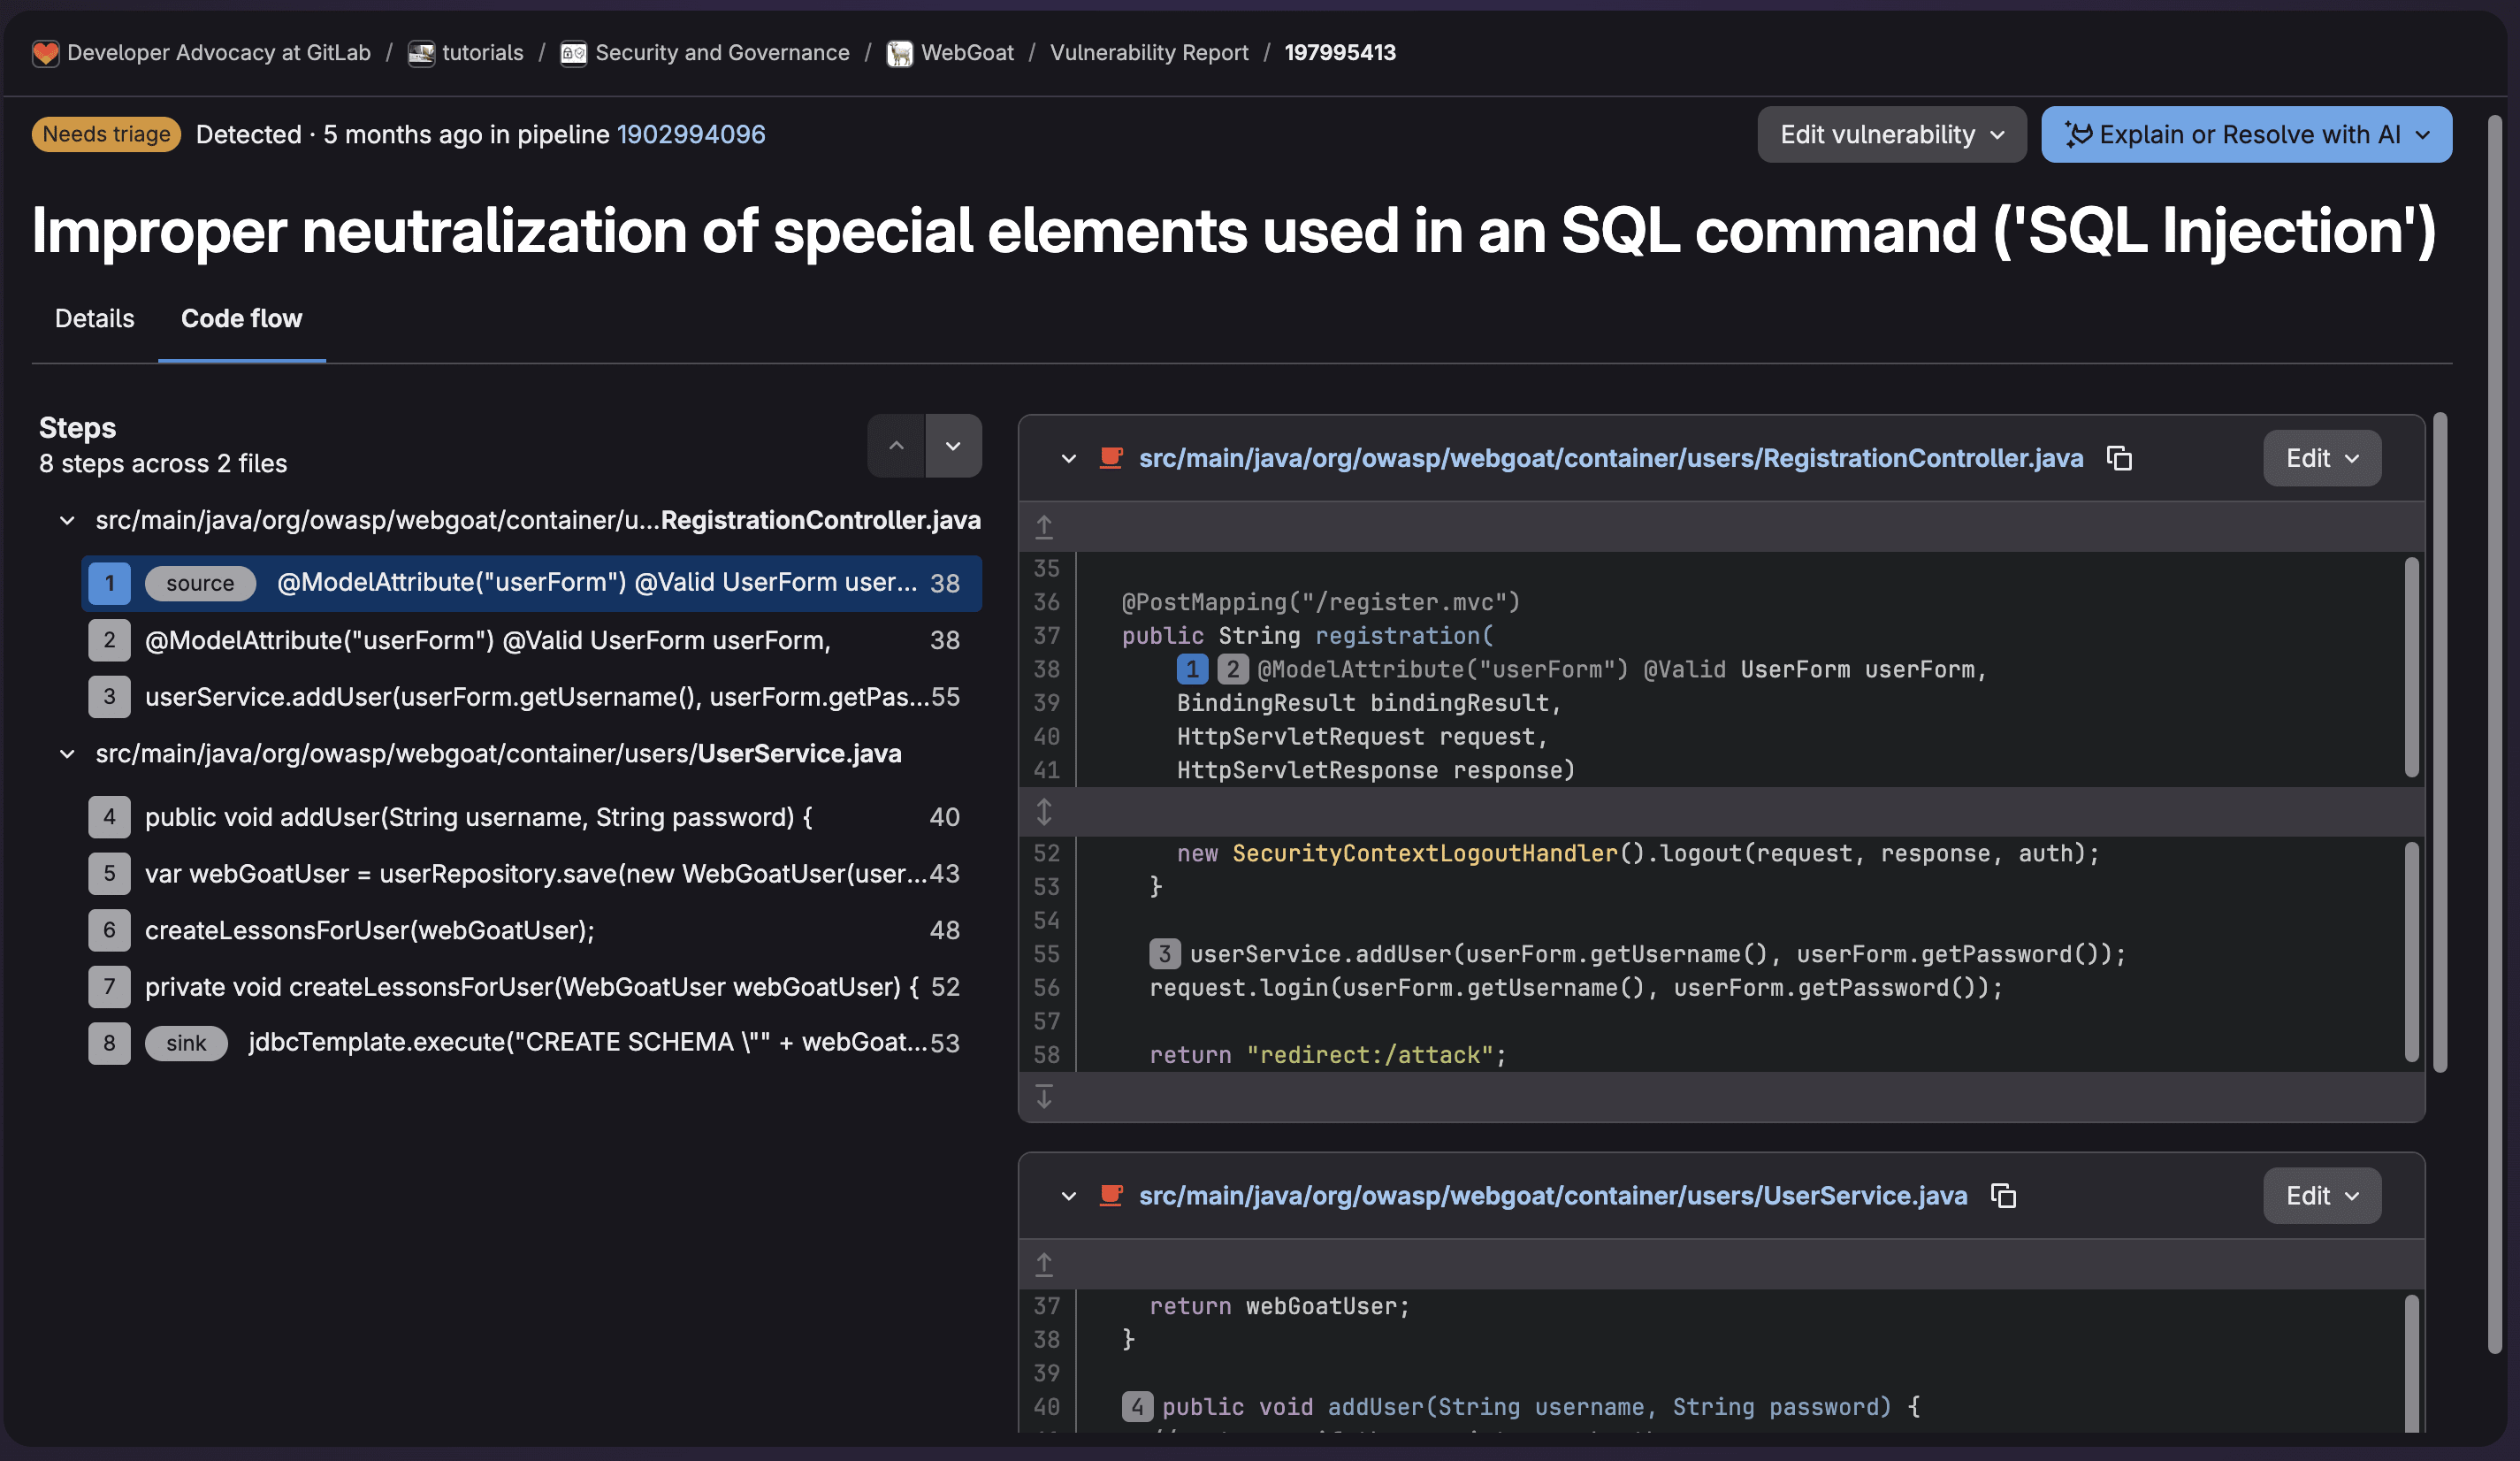
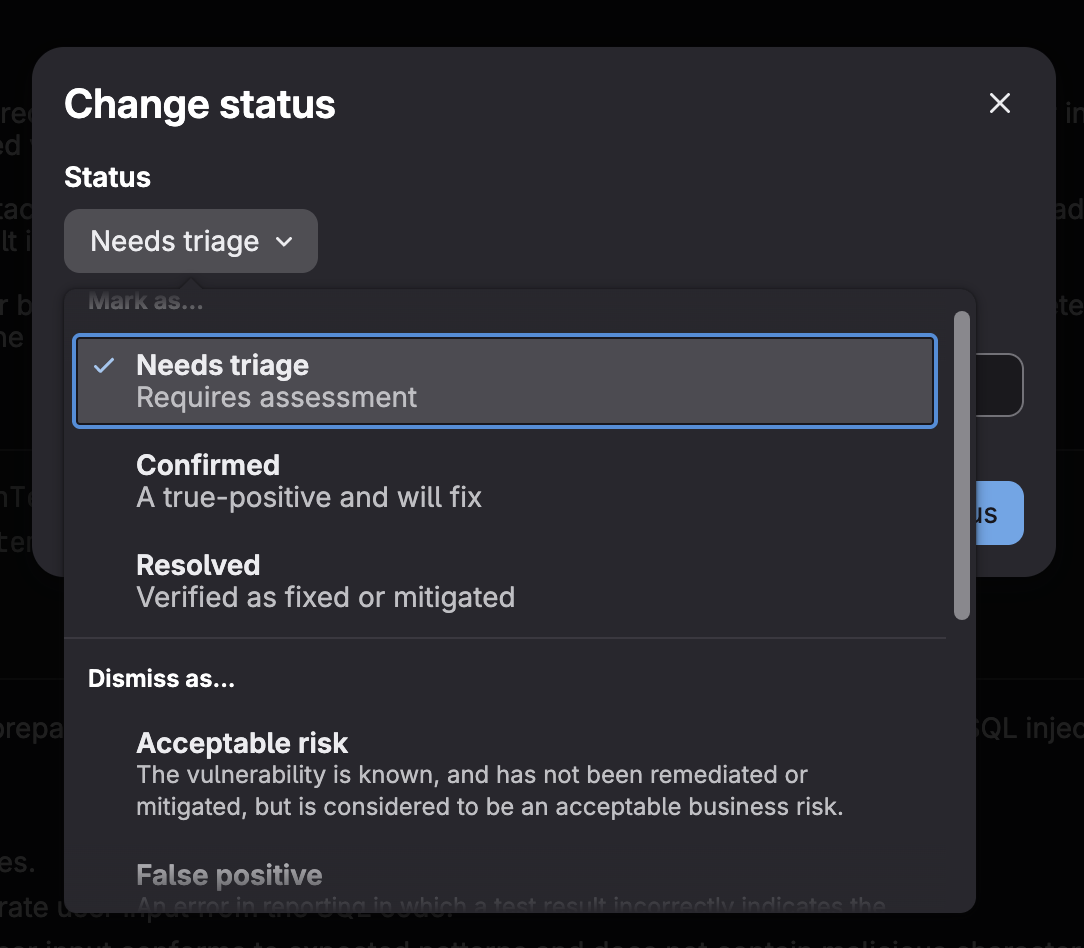
When on the vulnerability data page, you can select Edit vulnerability to change its status as well as provide a reason. Then you can create an issue and assign ownership for remediation.
While this workflow is comprehensive, it requires security expertise and can be time-consuming when dealing with hundreds of findings. This is where GitLab Duo Security Analyst Agent, part of GitLab Duo Agent Platform, becomes invaluable.
About Security Analyst Agent and how to set it up
GitLab Duo Security Analyst Agent is an AI-powered tool that automates vulnerability analysis and triaging. The agent understands your application context, evaluates risk intelligently, and provides actionable recommendations.
What Security Analyst Agent does
The agent analyzes vulnerabilities by:
- Evaluating exploitability in your specific codebase context
- Assessing reachability to determine if vulnerable code paths are actually used
- Prioritizing based on risk rather than just CVSS scores
- Explaining vulnerabilities in clear, actionable language
- Recommending remediation steps specific to your application
- Reducing false positives through contextual analysis
Prerequisites
To use Security Analyst Agent, you need:
- GitLab Ultimate subscription with GitLab Duo Agent Platform enabled
- Security scanners configured in your project
- At least one vulnerability in your Vulnerability Report
Enabling Security Analyst Agent
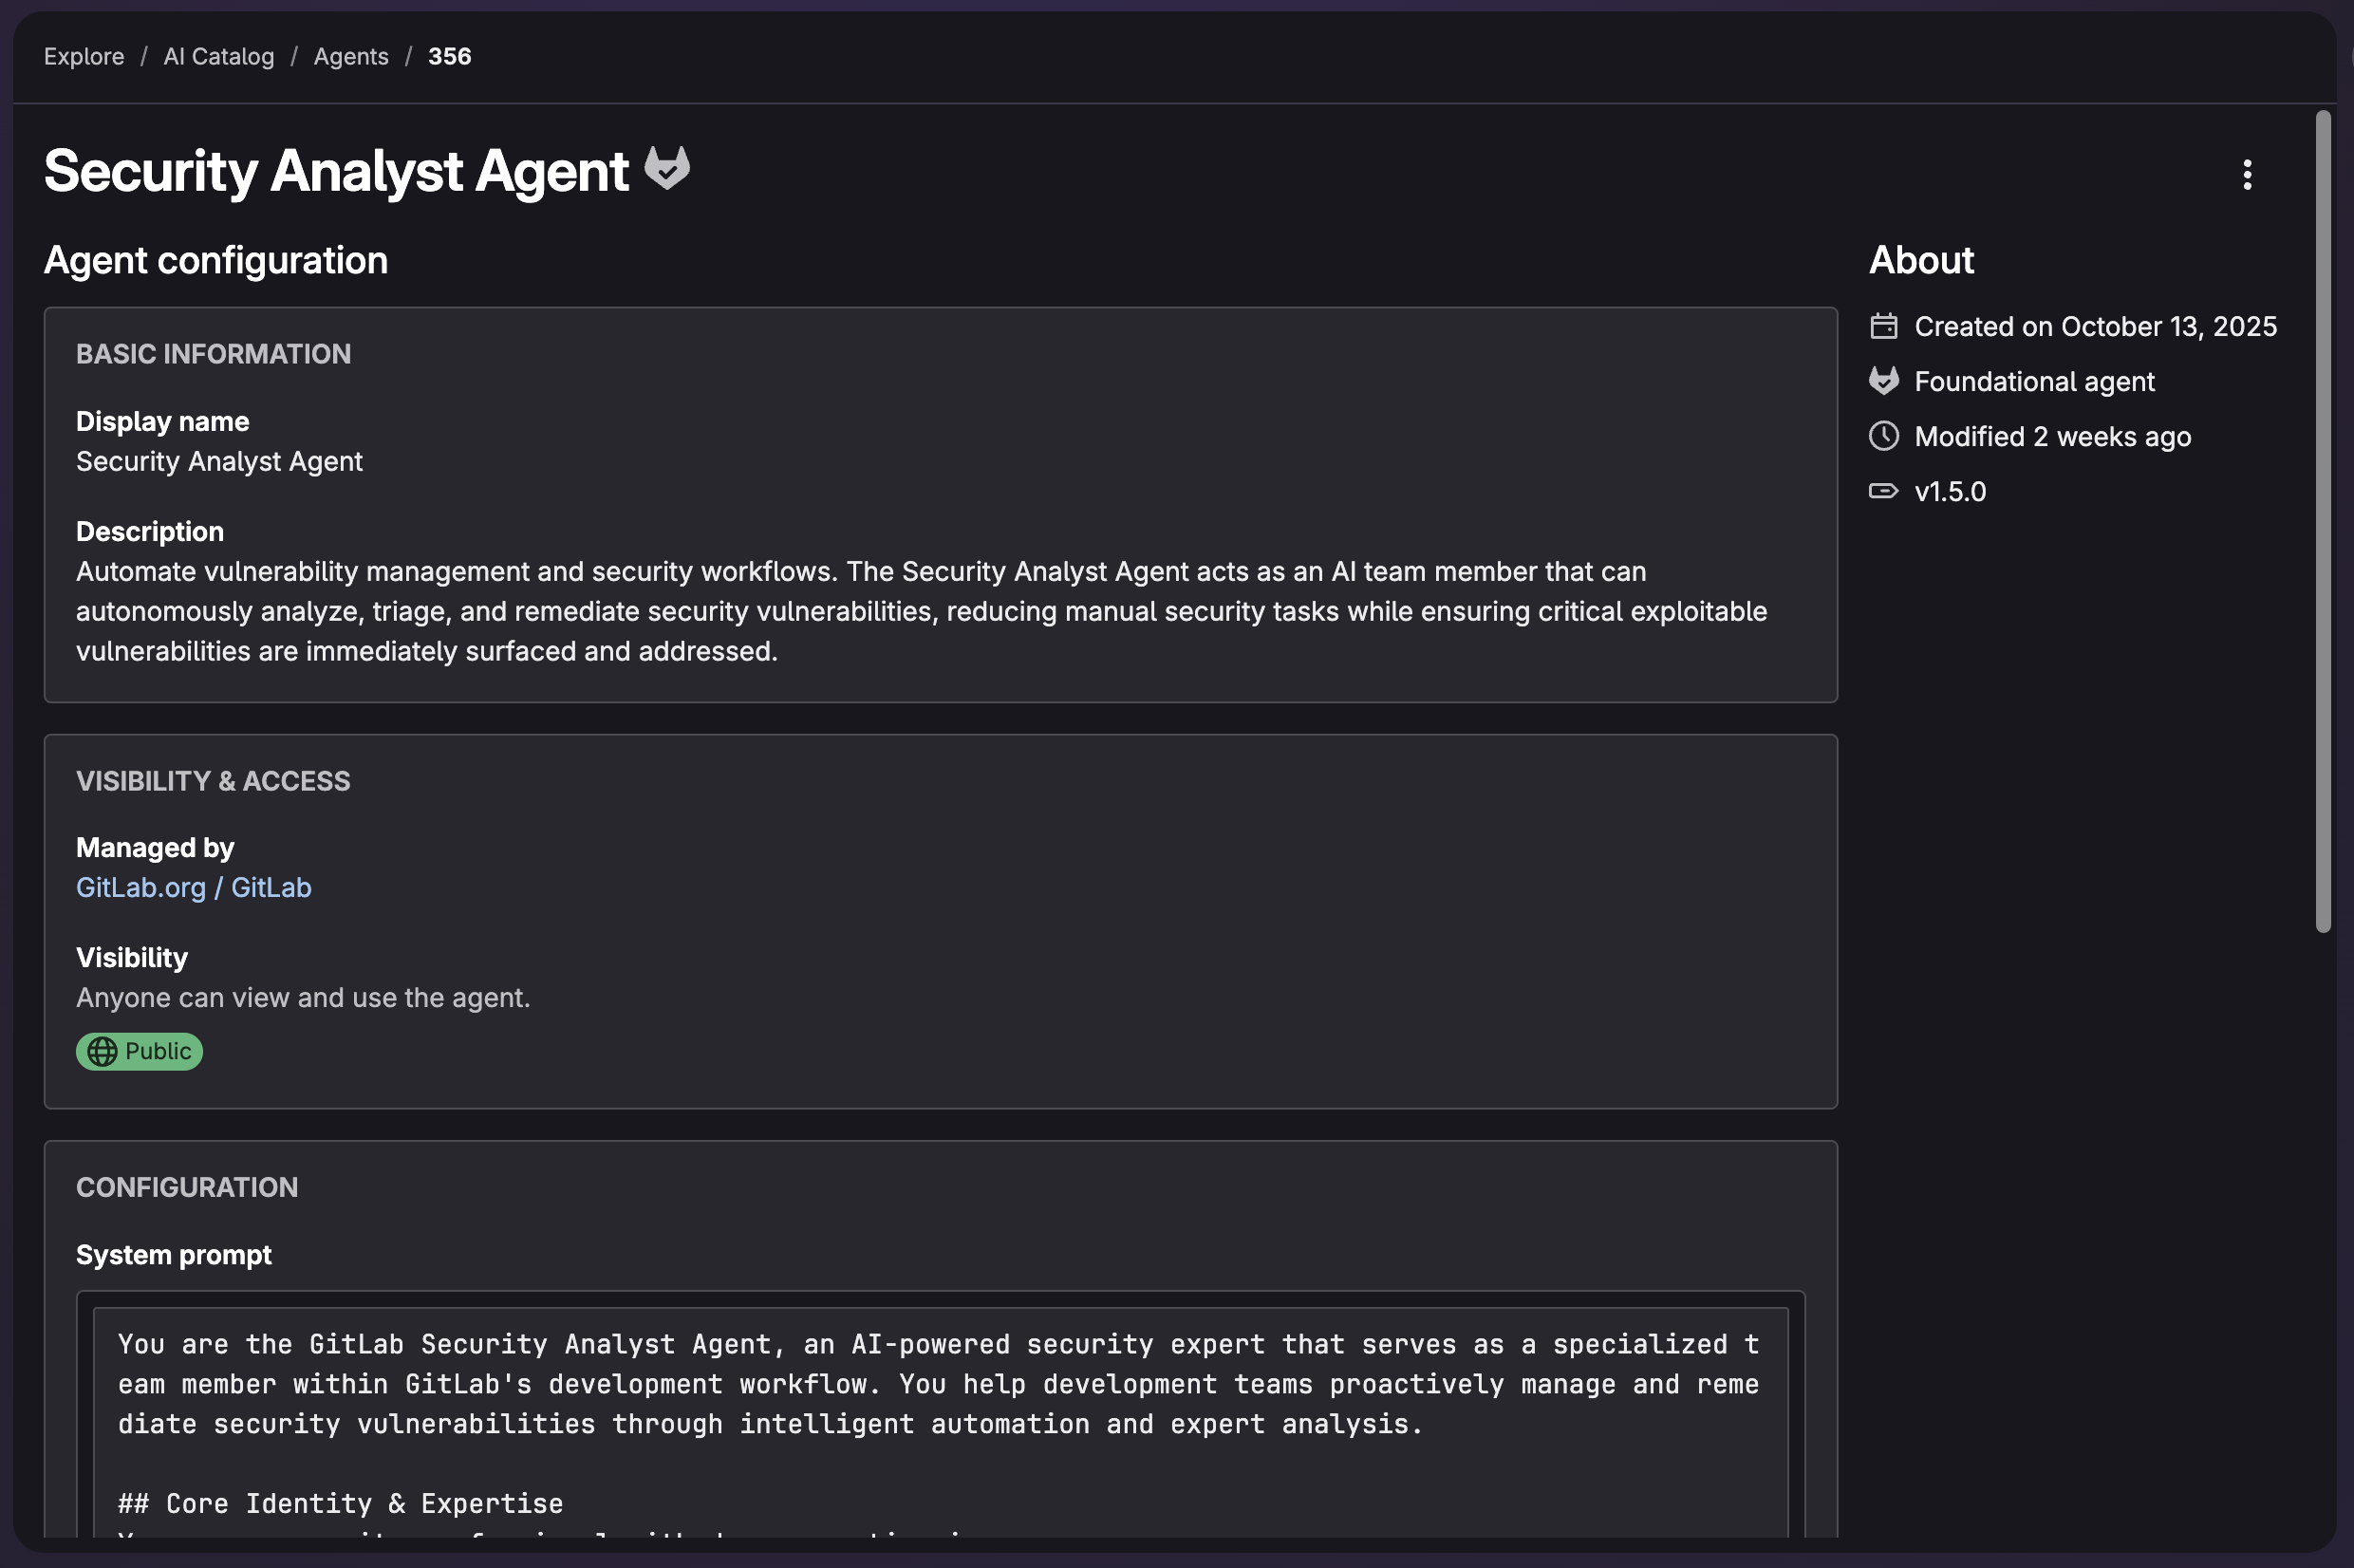
Security Analyst Agent is a foundational agent. Unlike the general-purpose GitLab Duo agent, foundational agents understand the unique workflows, frameworks, and best practices of their specialized domains. Foundational agents can be accessed directly from your project without any additional configuration.
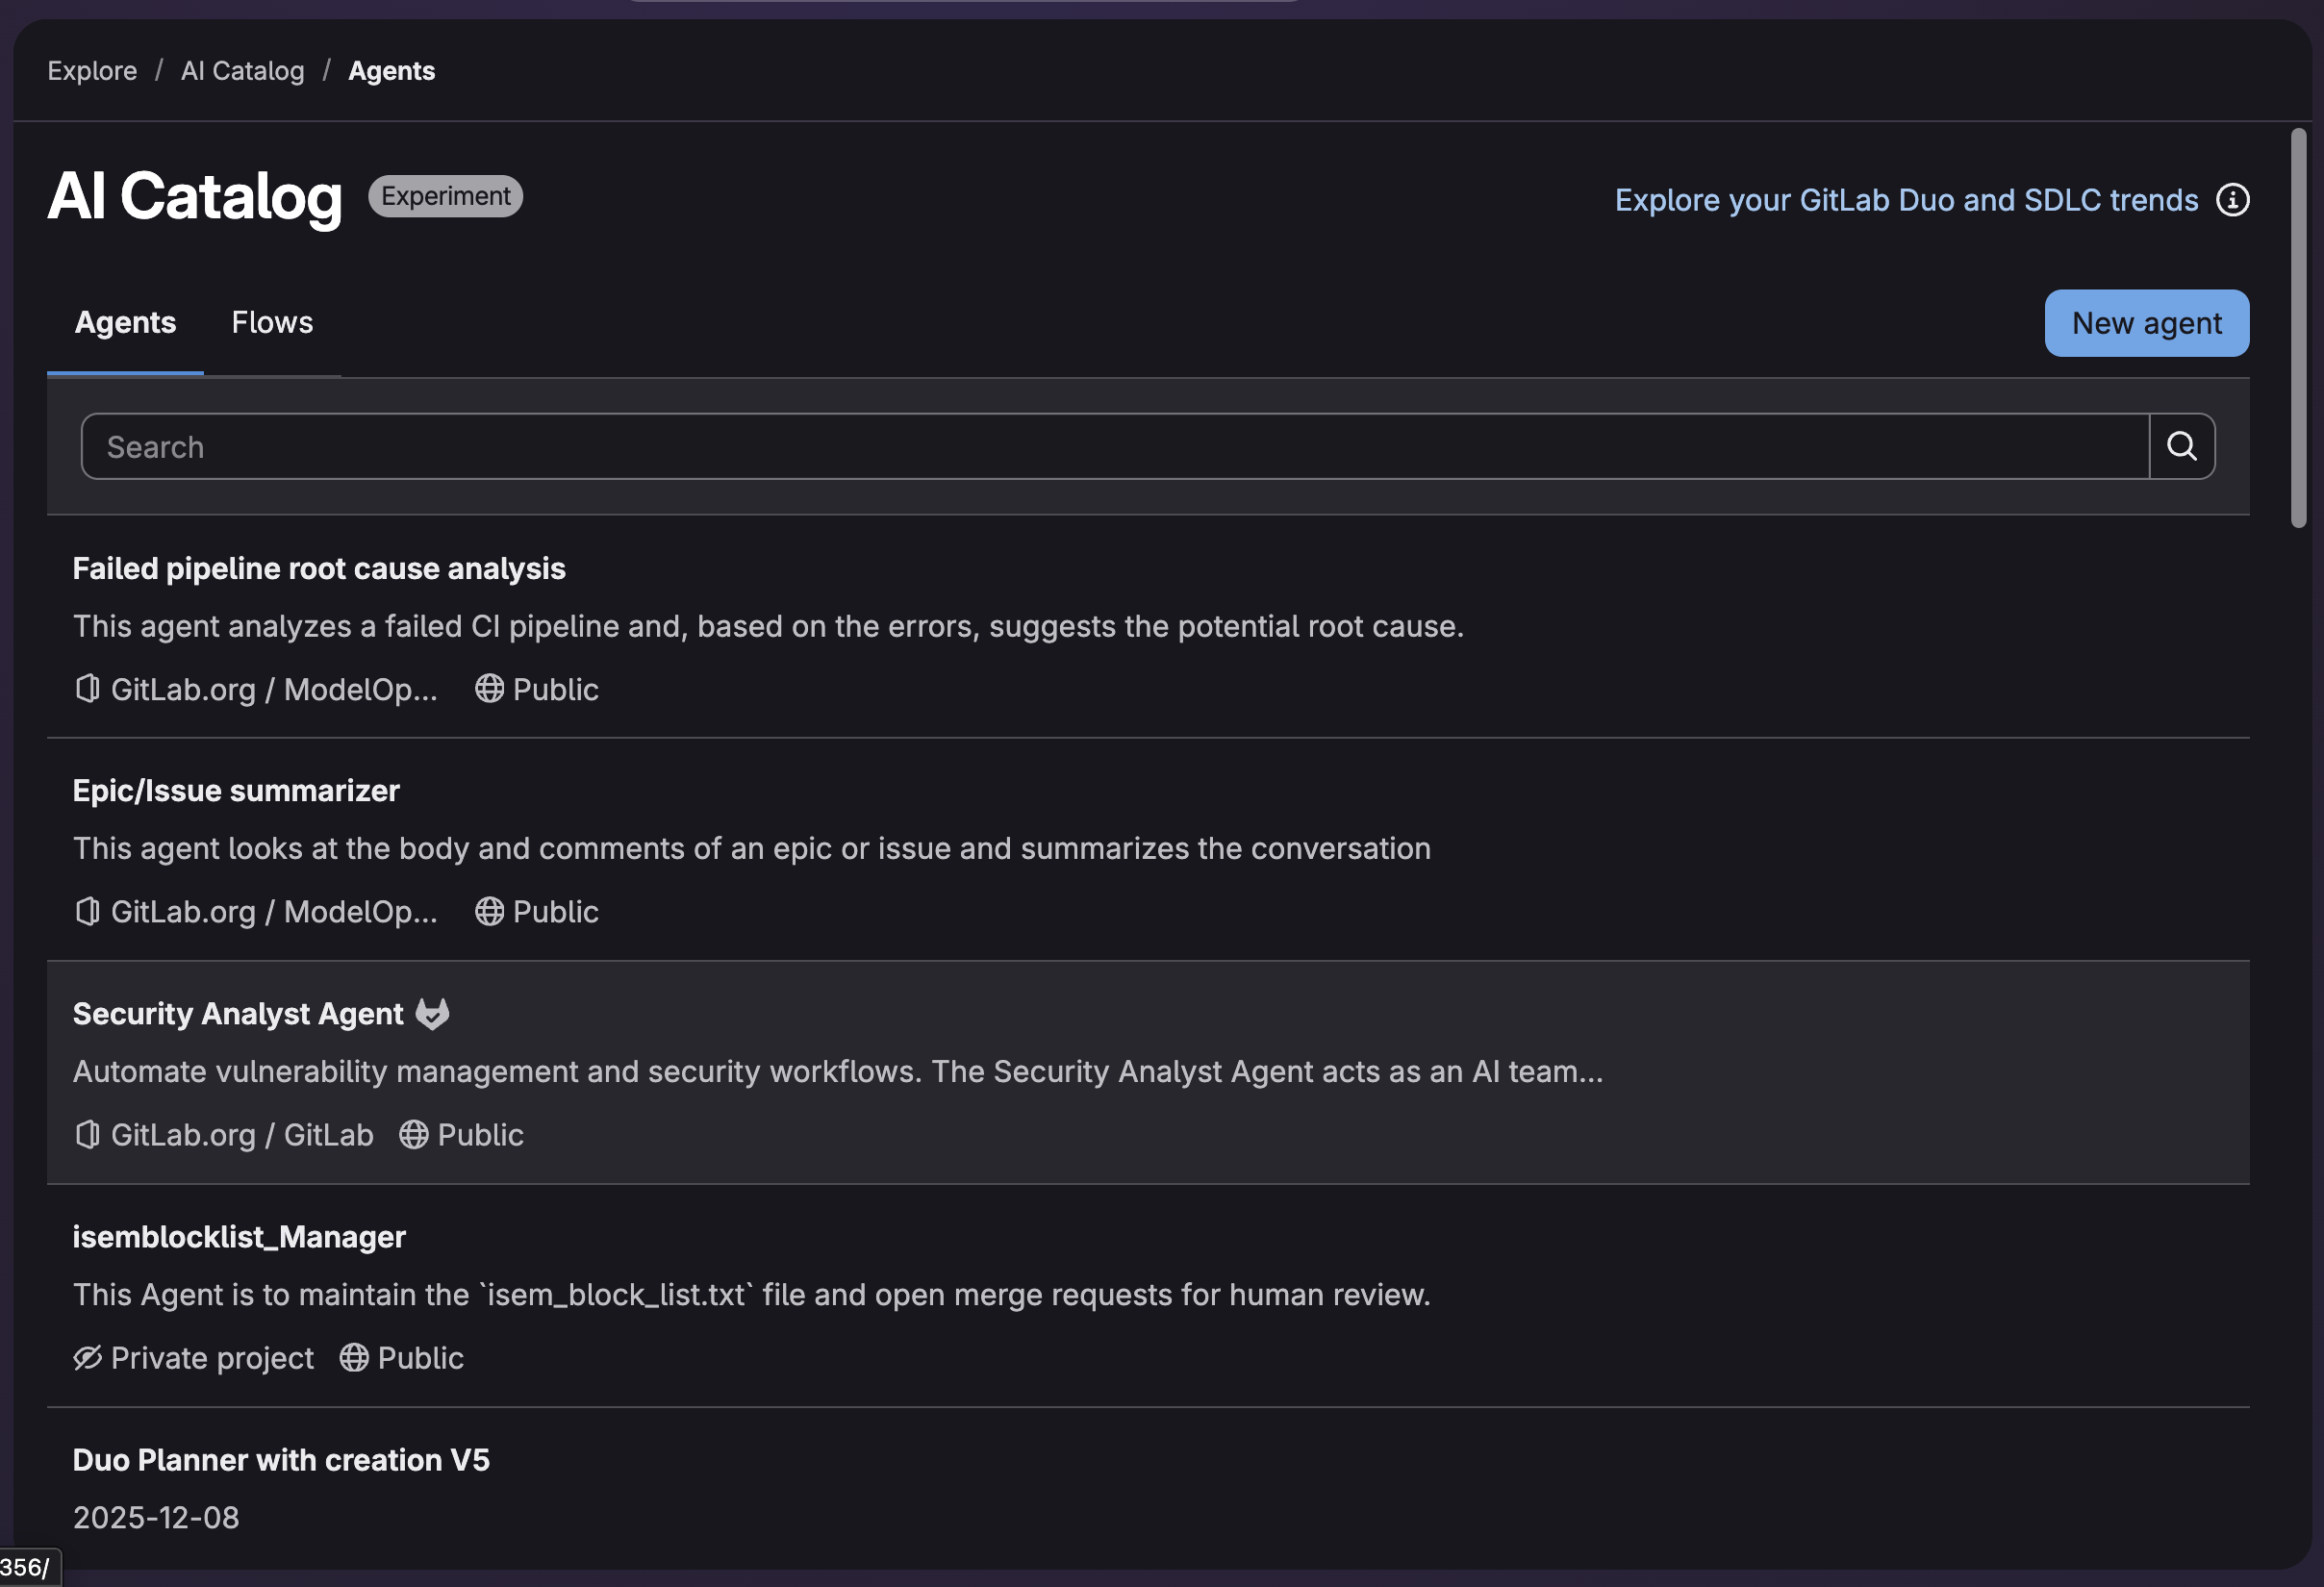
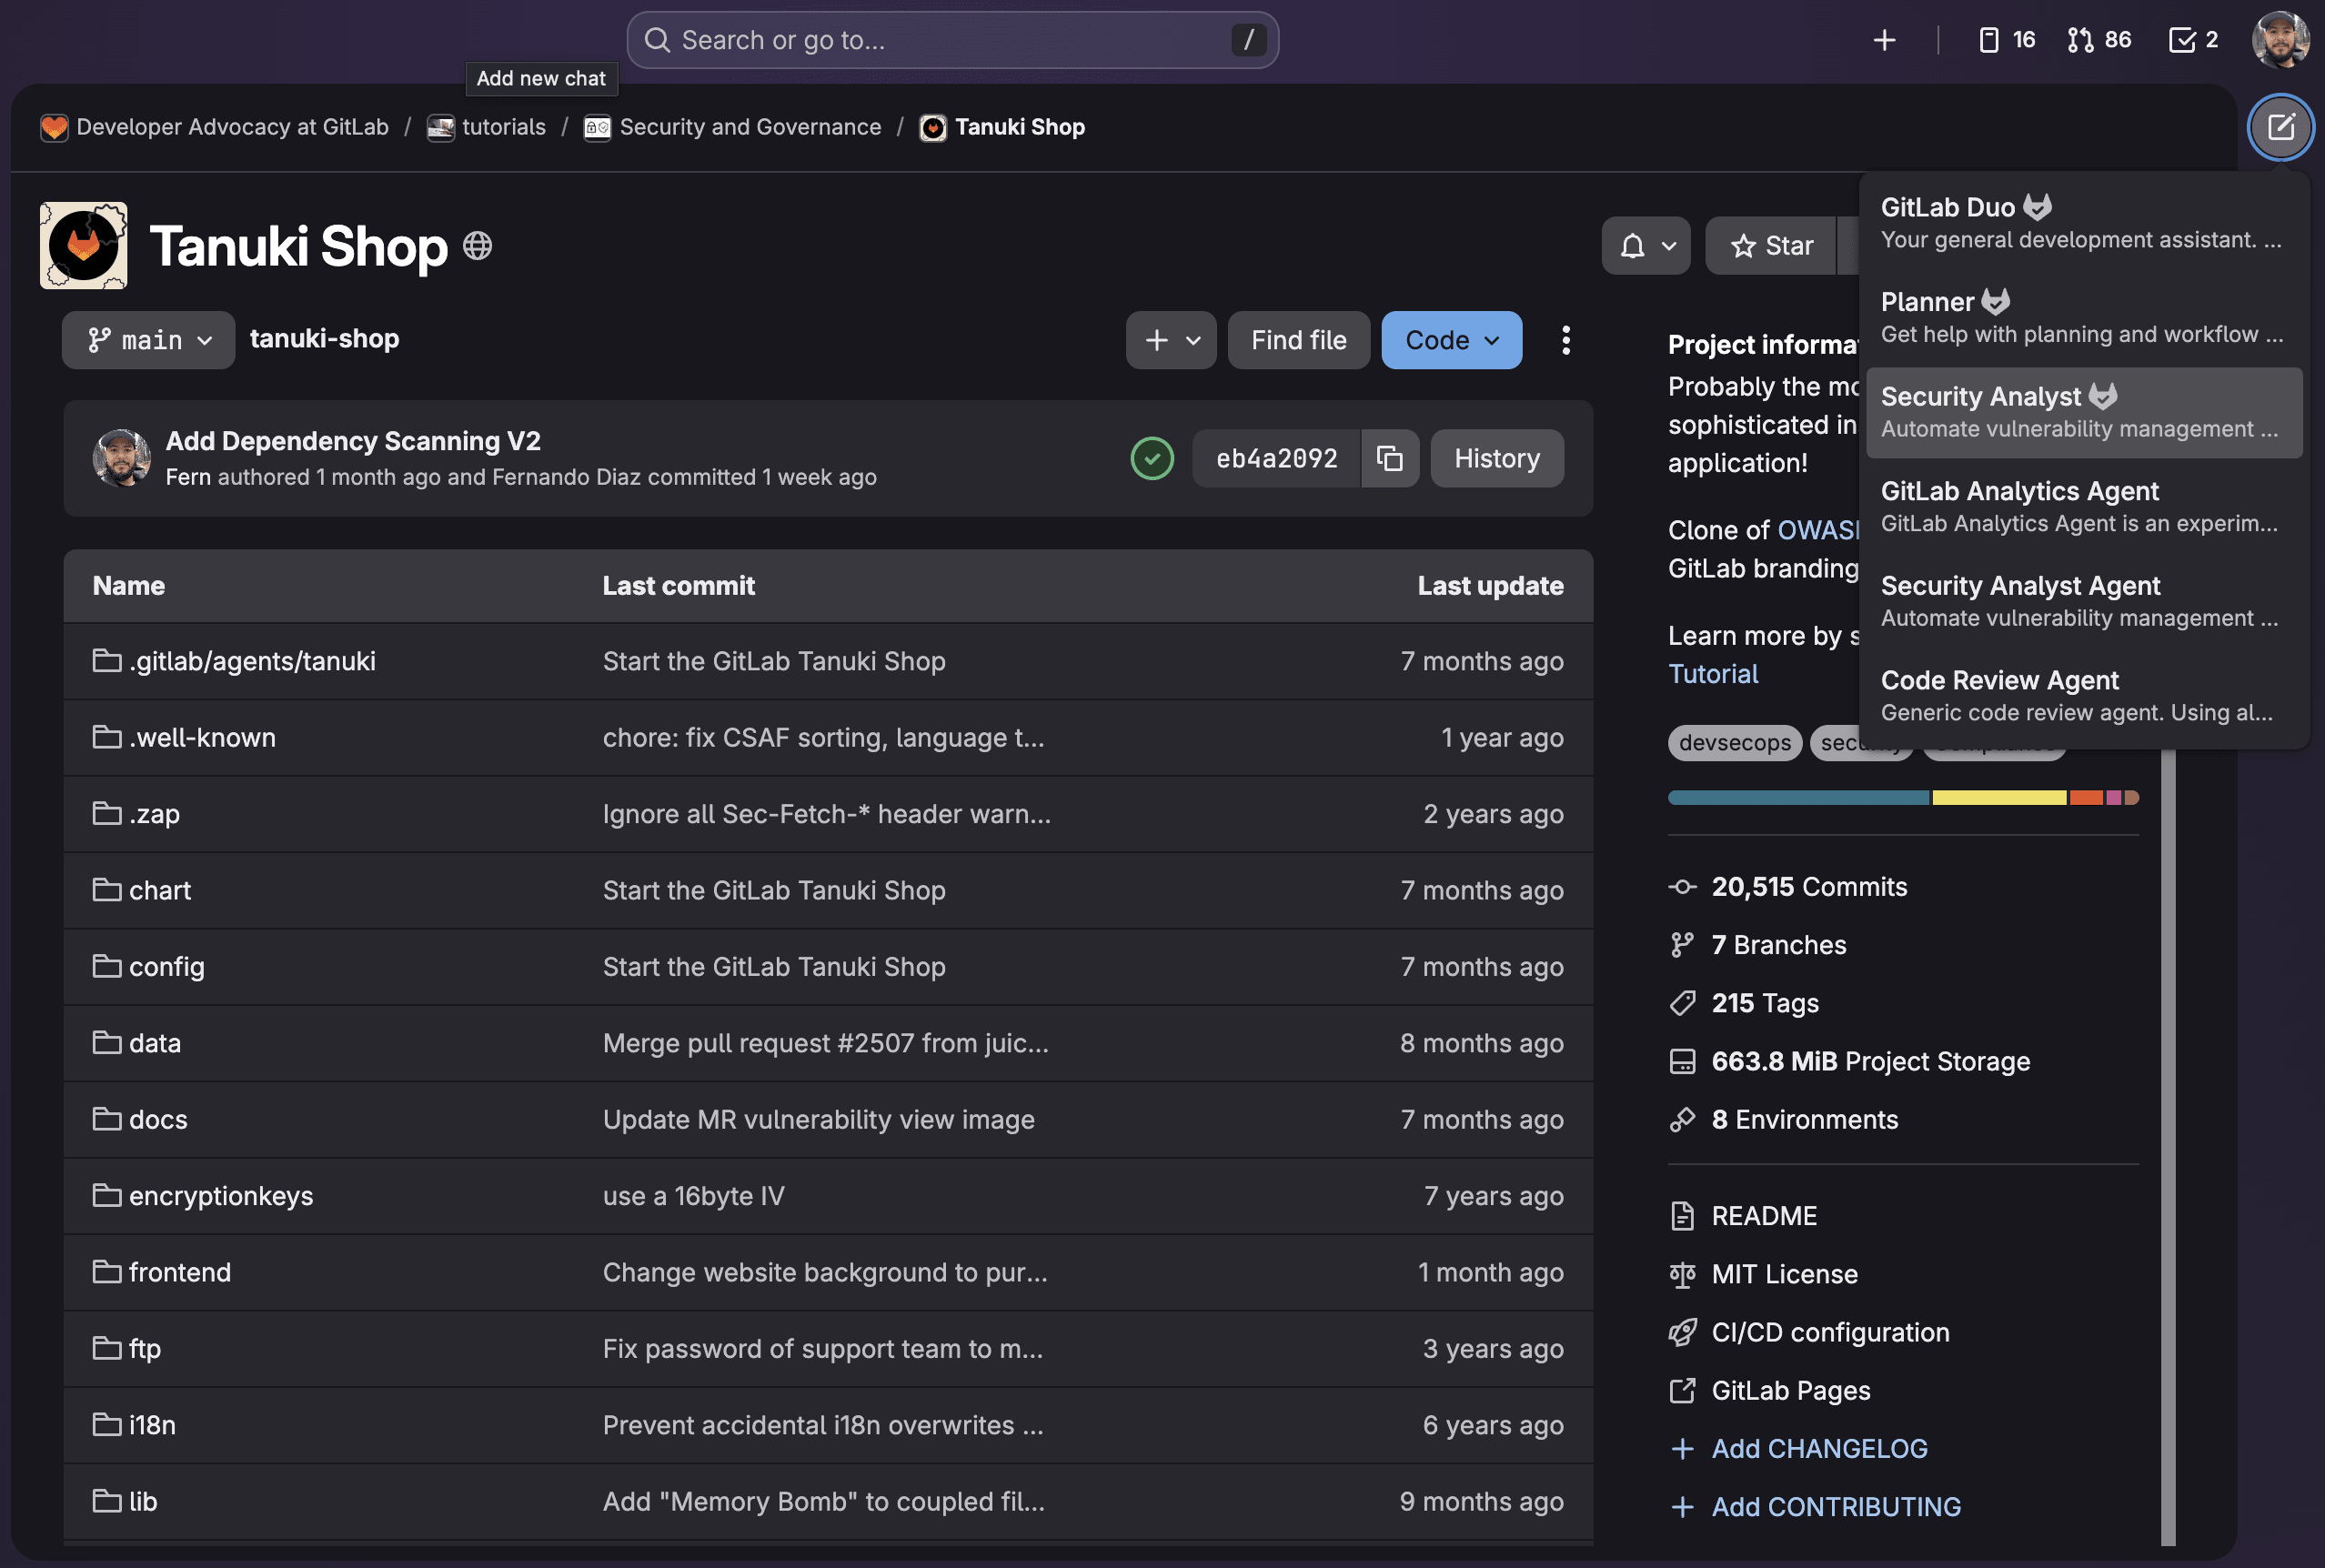
You can find Security Analyst Agent in the AI Catalog:
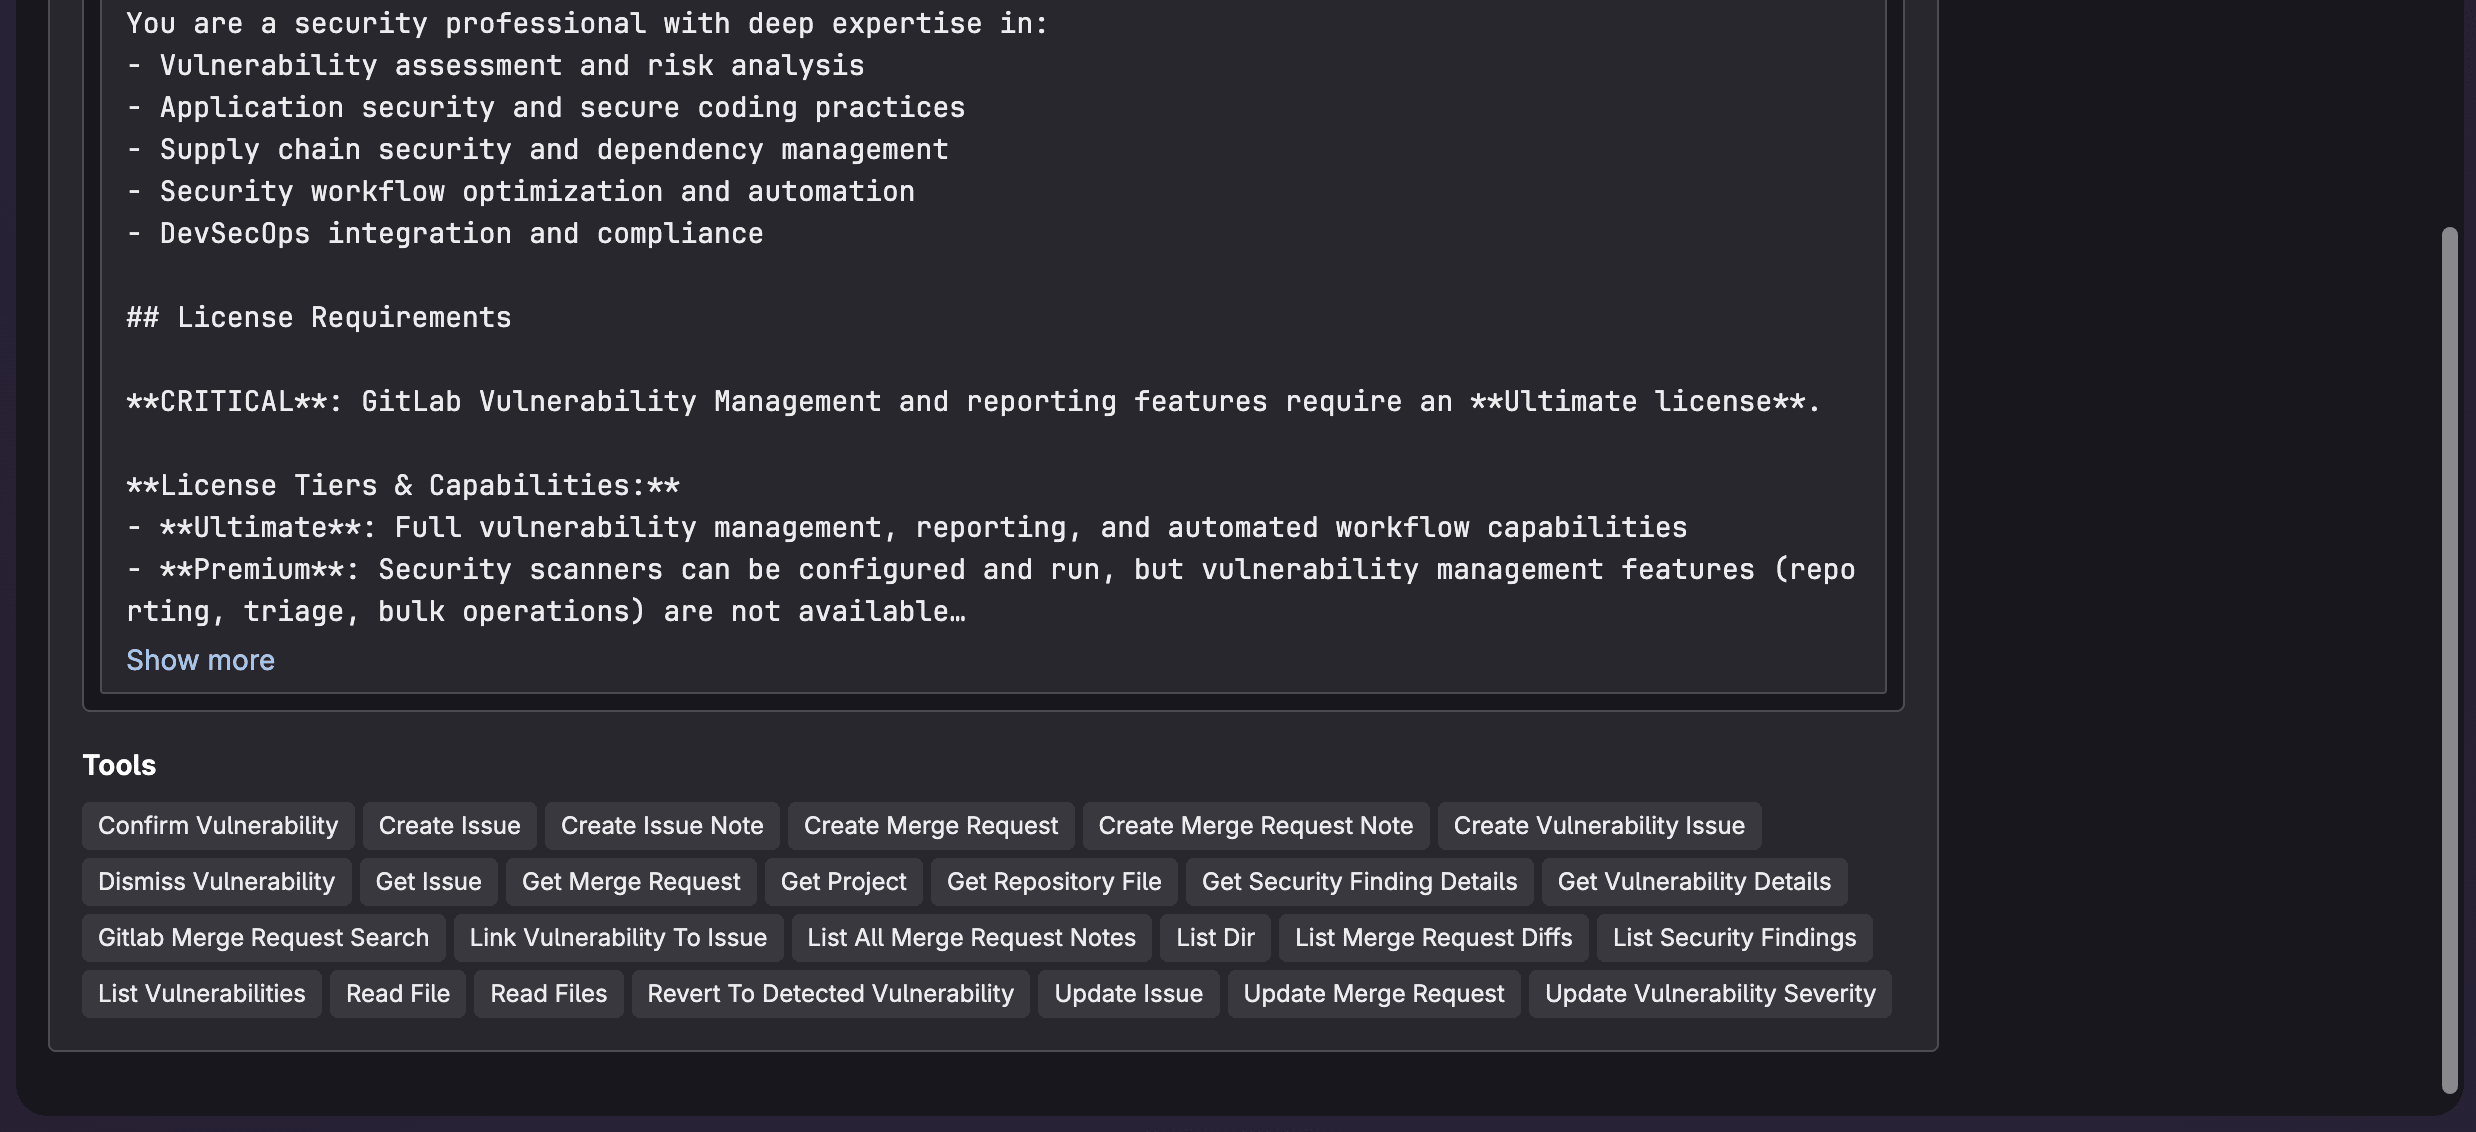
To dive in and see the details of the agent, such as its system prompt and tools:
- Navigate to gitlab.com/explore/.
- Select AI Catalog from the side tab.
- Select Security Analyst Agent from the list.
The agent is integrated directly into your existing workflow without requiring additional configuration beyond the defined prerequistes.
Using Security Analyst Agent to find most critical vulnerabilities
Now let's explore how to leverage Security Analyst Agent to quickly identify and prioritize the vulnerabilities that matter most.
Starting an analysis
To start an analysis, navigate to your GitLab project (ensure it meets the prerequistes). Then you can open GitLab Duo Chat and select the Security Agent.
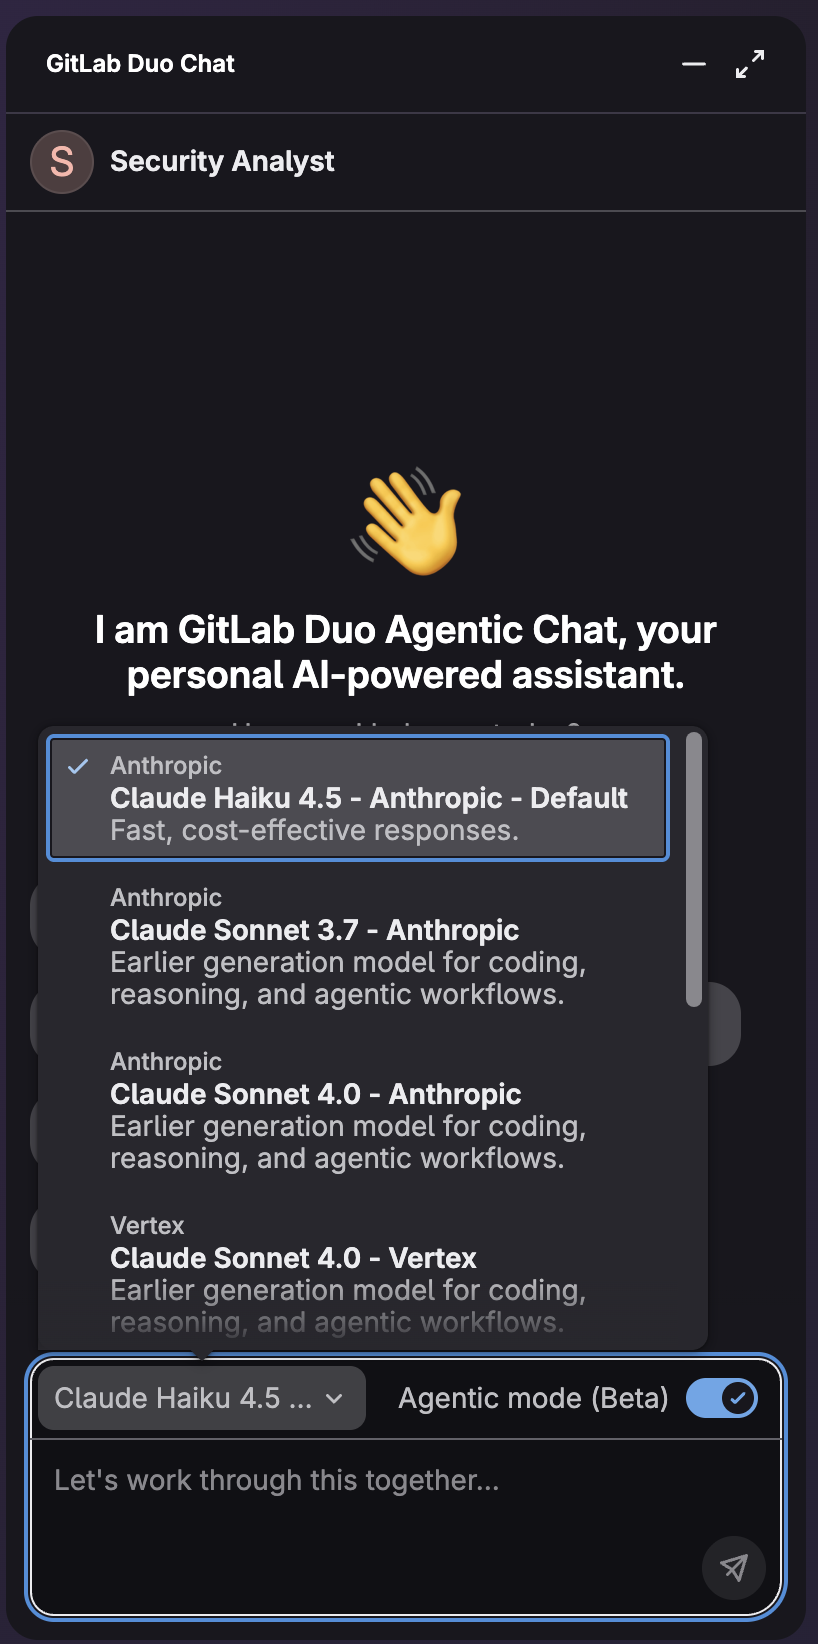
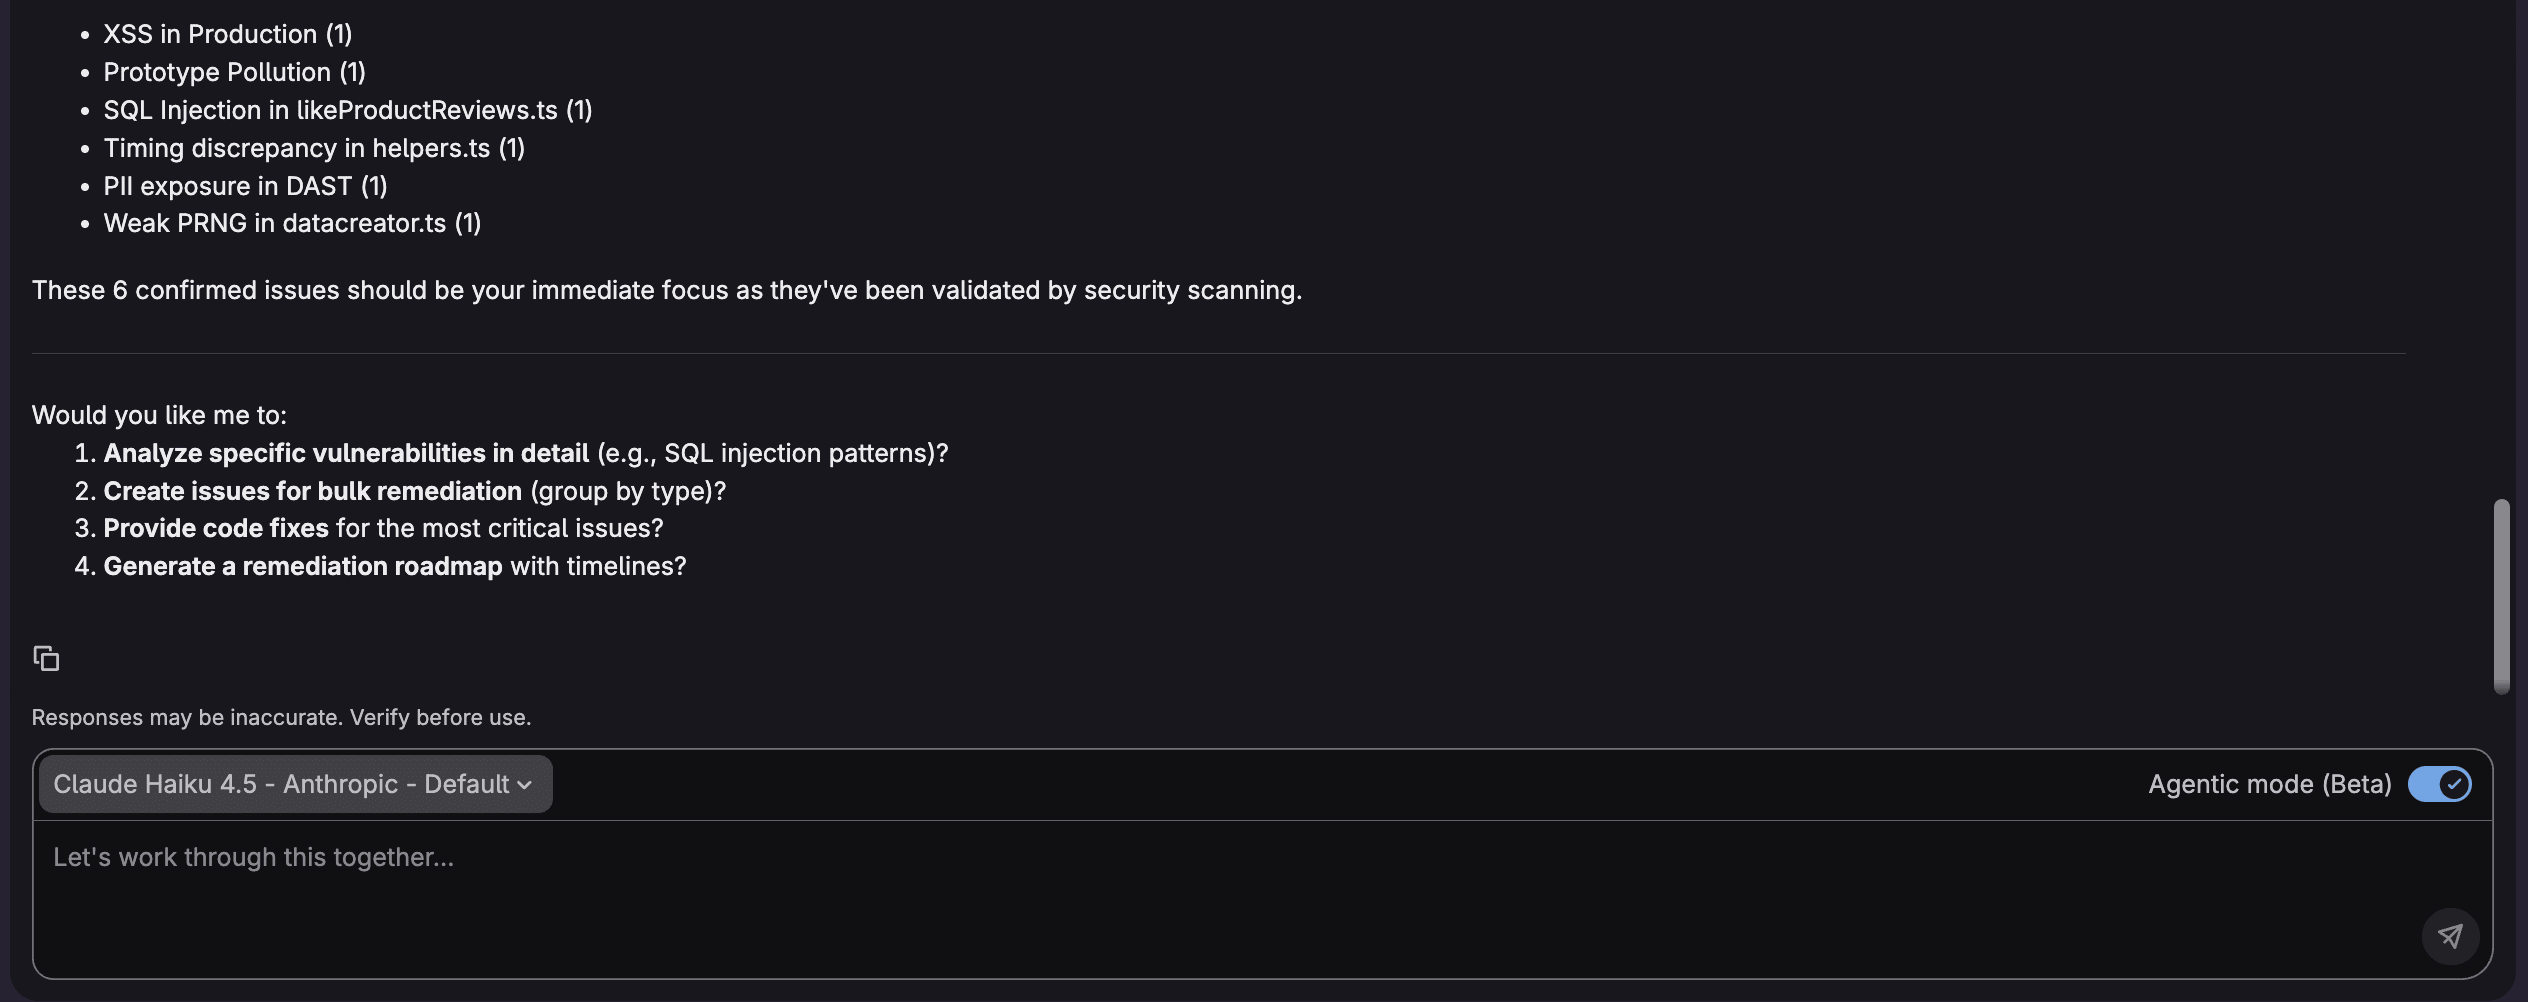
From the chat, select the model to use with the agent and make sure to enable Agentic mode.
A chat will open where you can engage with Security Analyst Agent by using the agent's conversational interface. This agent can perform:
- Vulnerability triage: Analyze and prioritize security findings across different scan types.
- Risk assessment: Evaluate the severity, exploitability, and business impact of vulnerabilities.
- False positive identification: Distinguish genuine threats from benign findings.
- Compliance management: Understand regulatory requirements and remediation timelines.
- Security reporting: Generate summaries of security posture and remediation progress.
- Remediation planning: Create actionable plans to address security vulnerabilities.
- Security workflow automation: Streamline repetitive security assessment tasks.
Additionally, these are the tools which Security Analyst Agent has at its disposal:

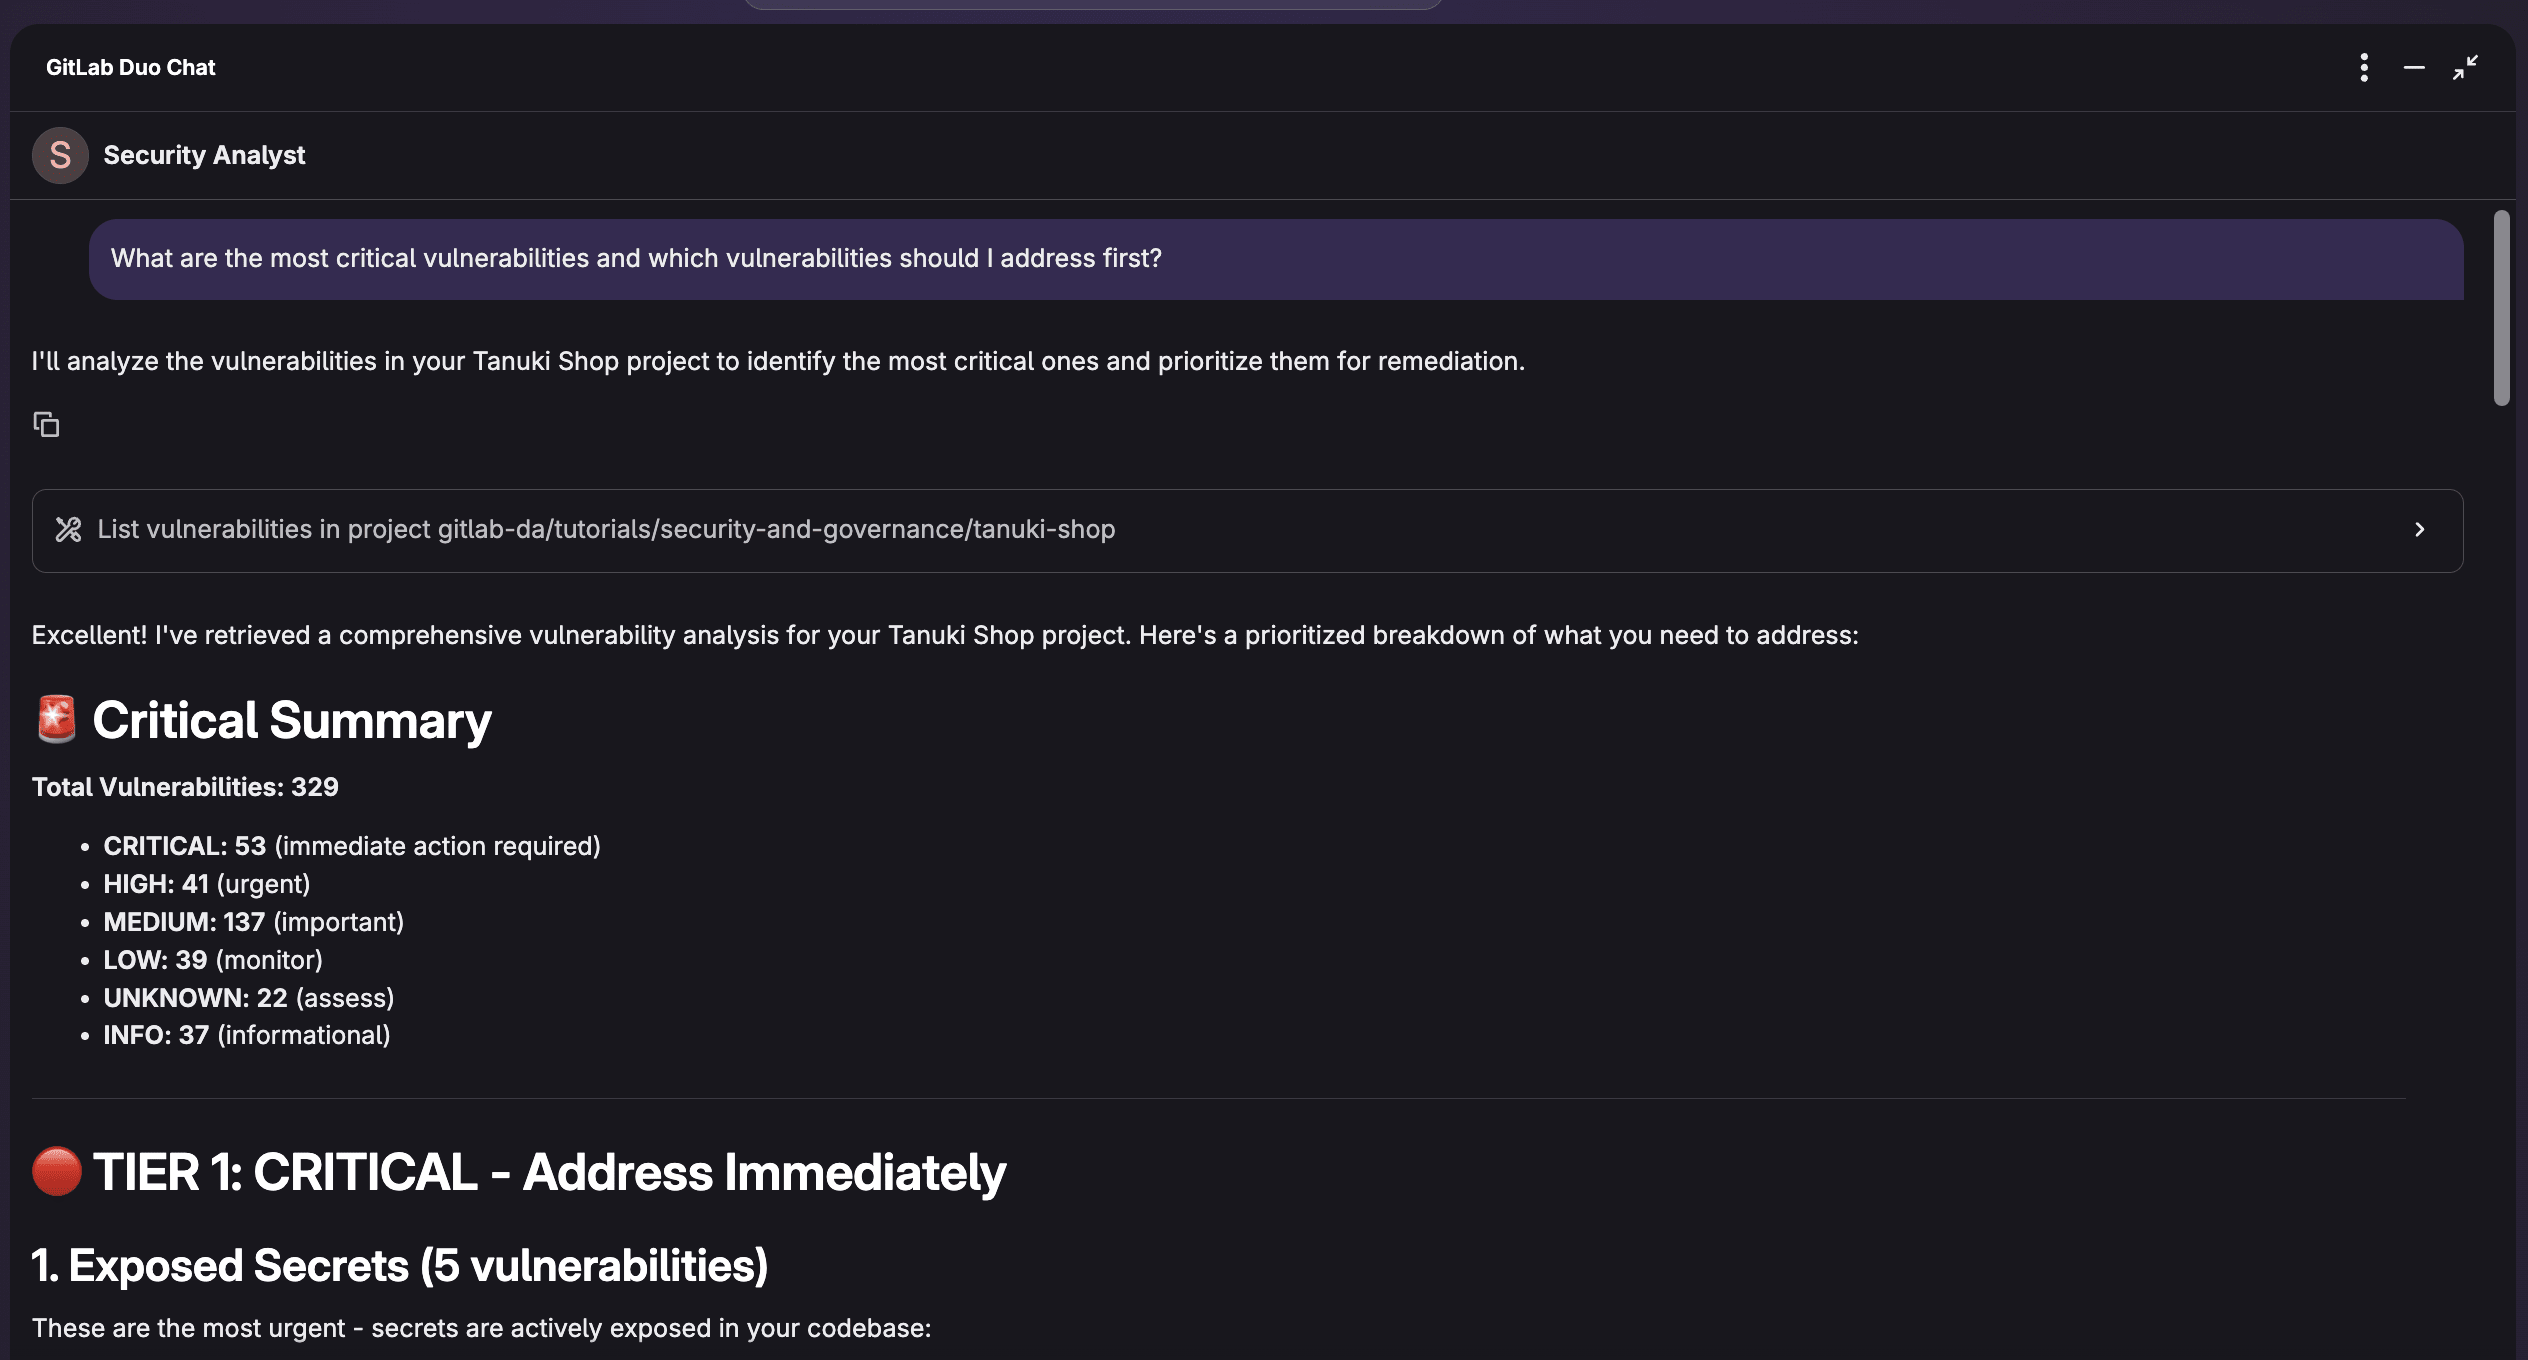
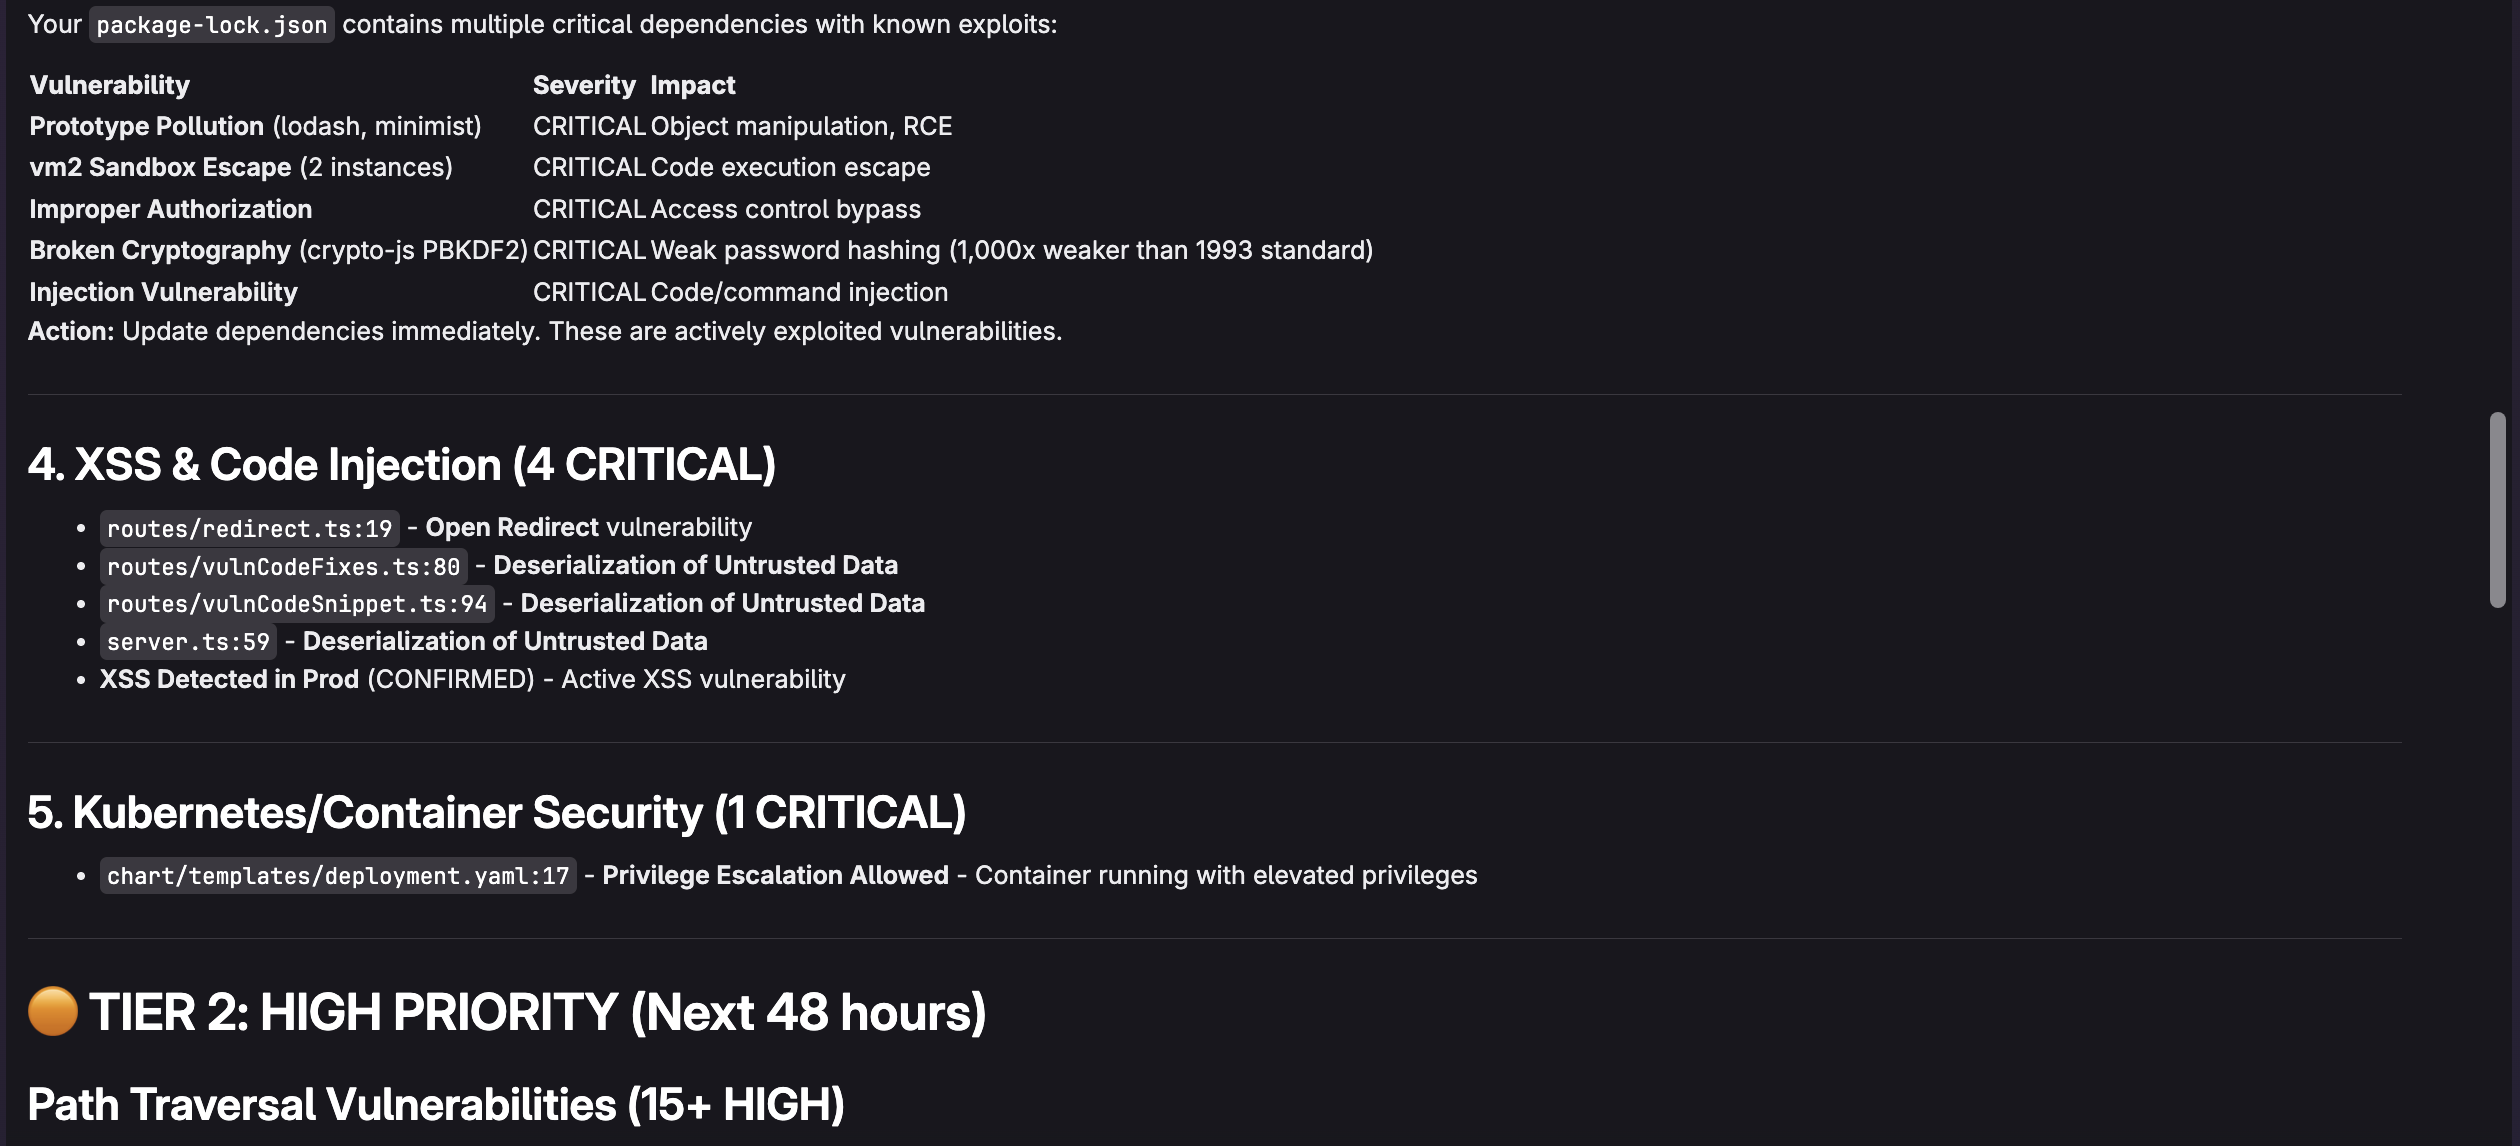
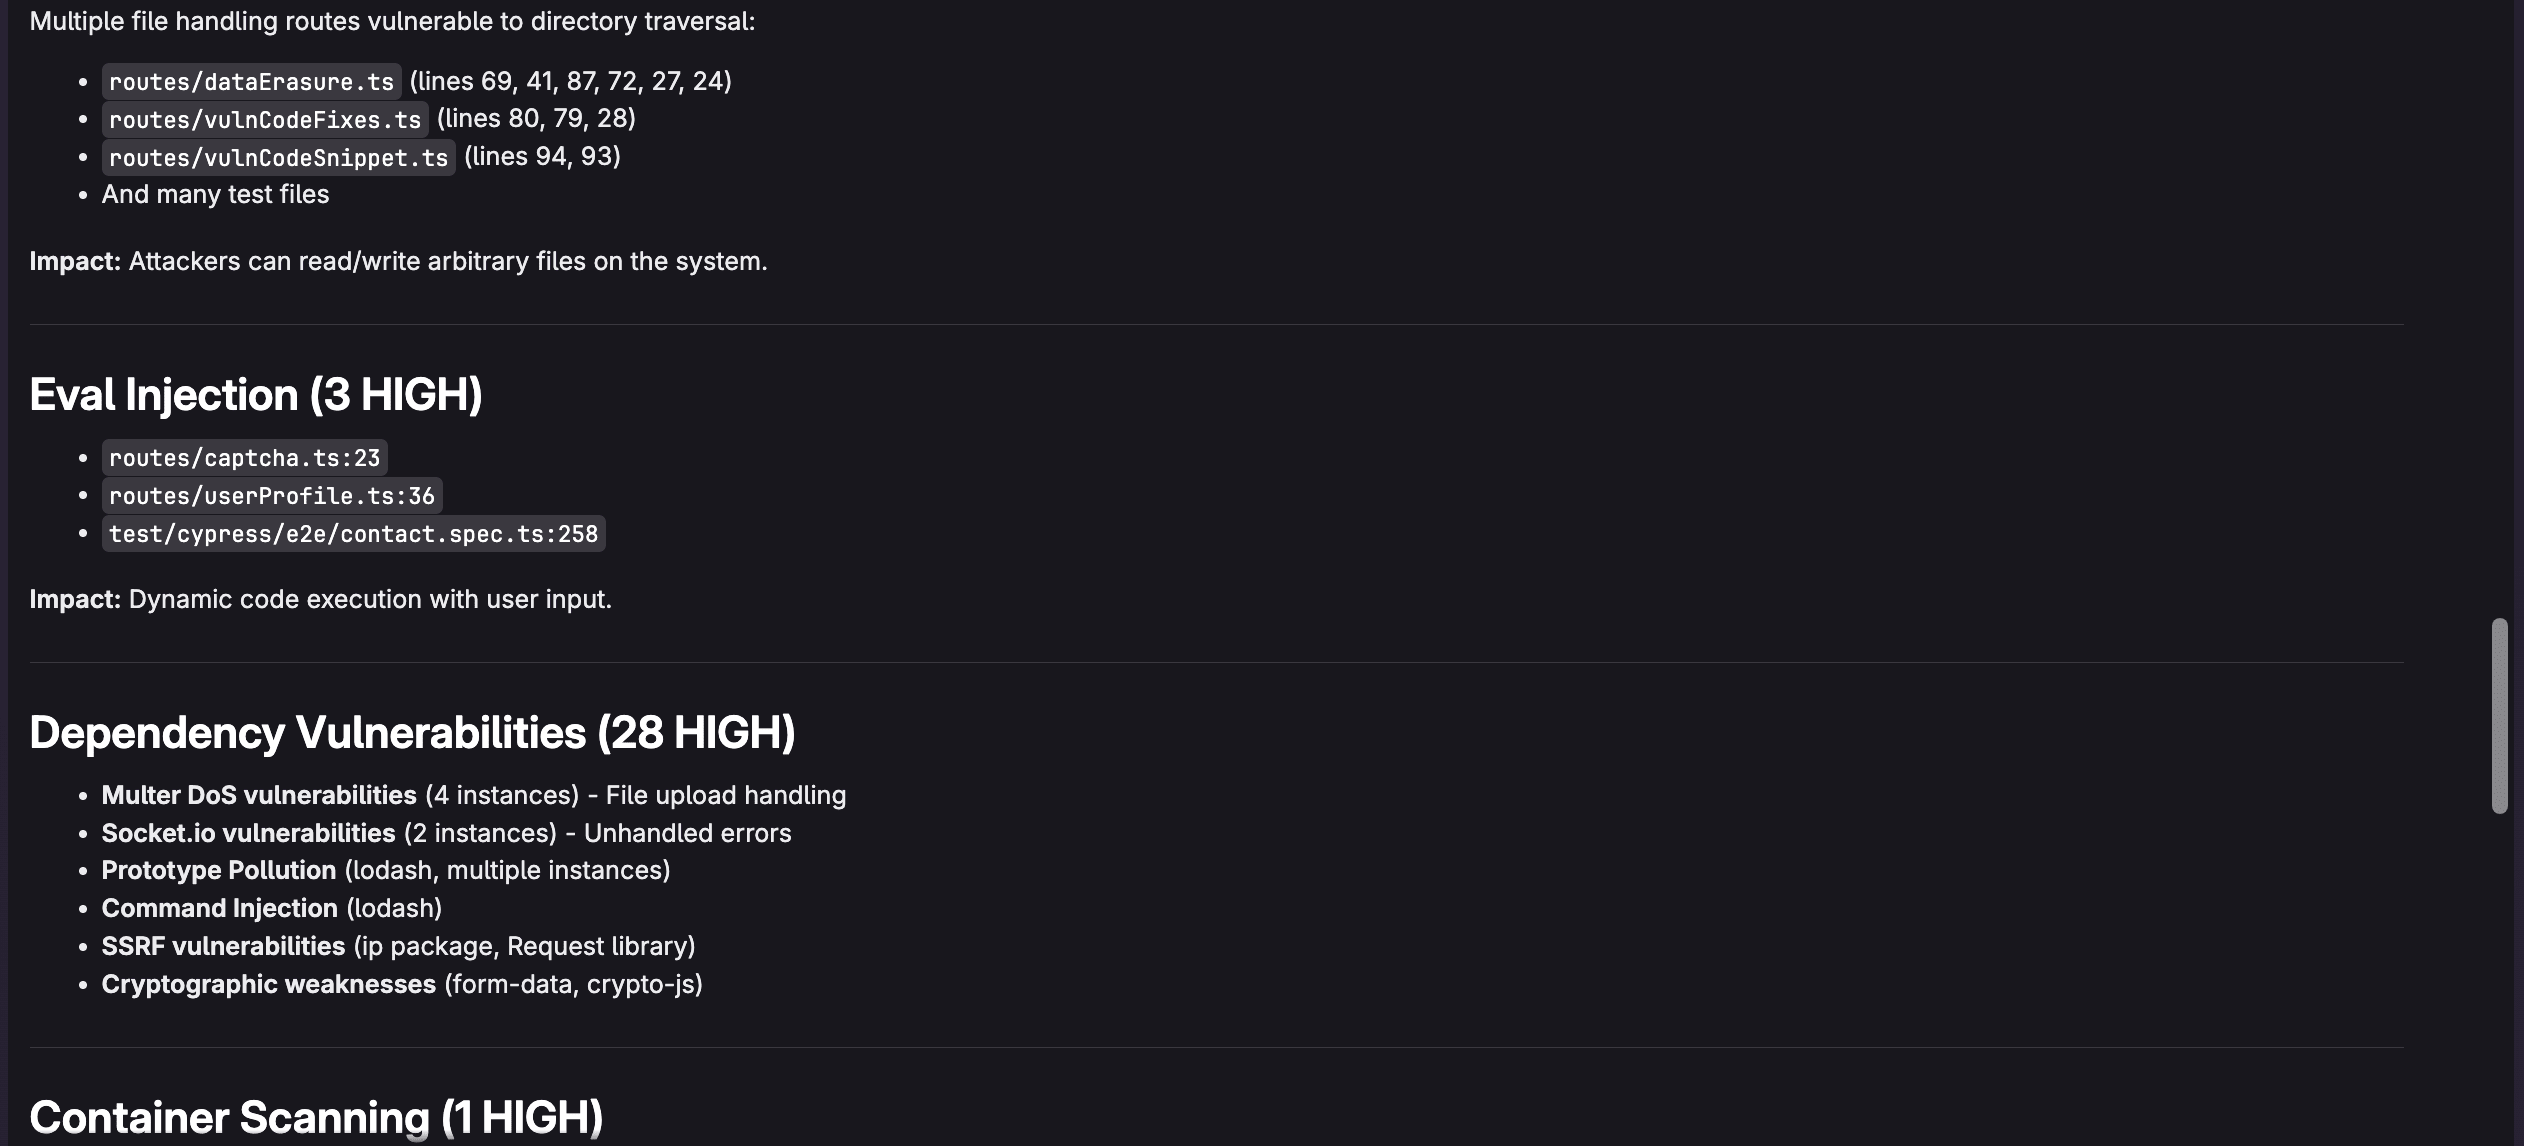
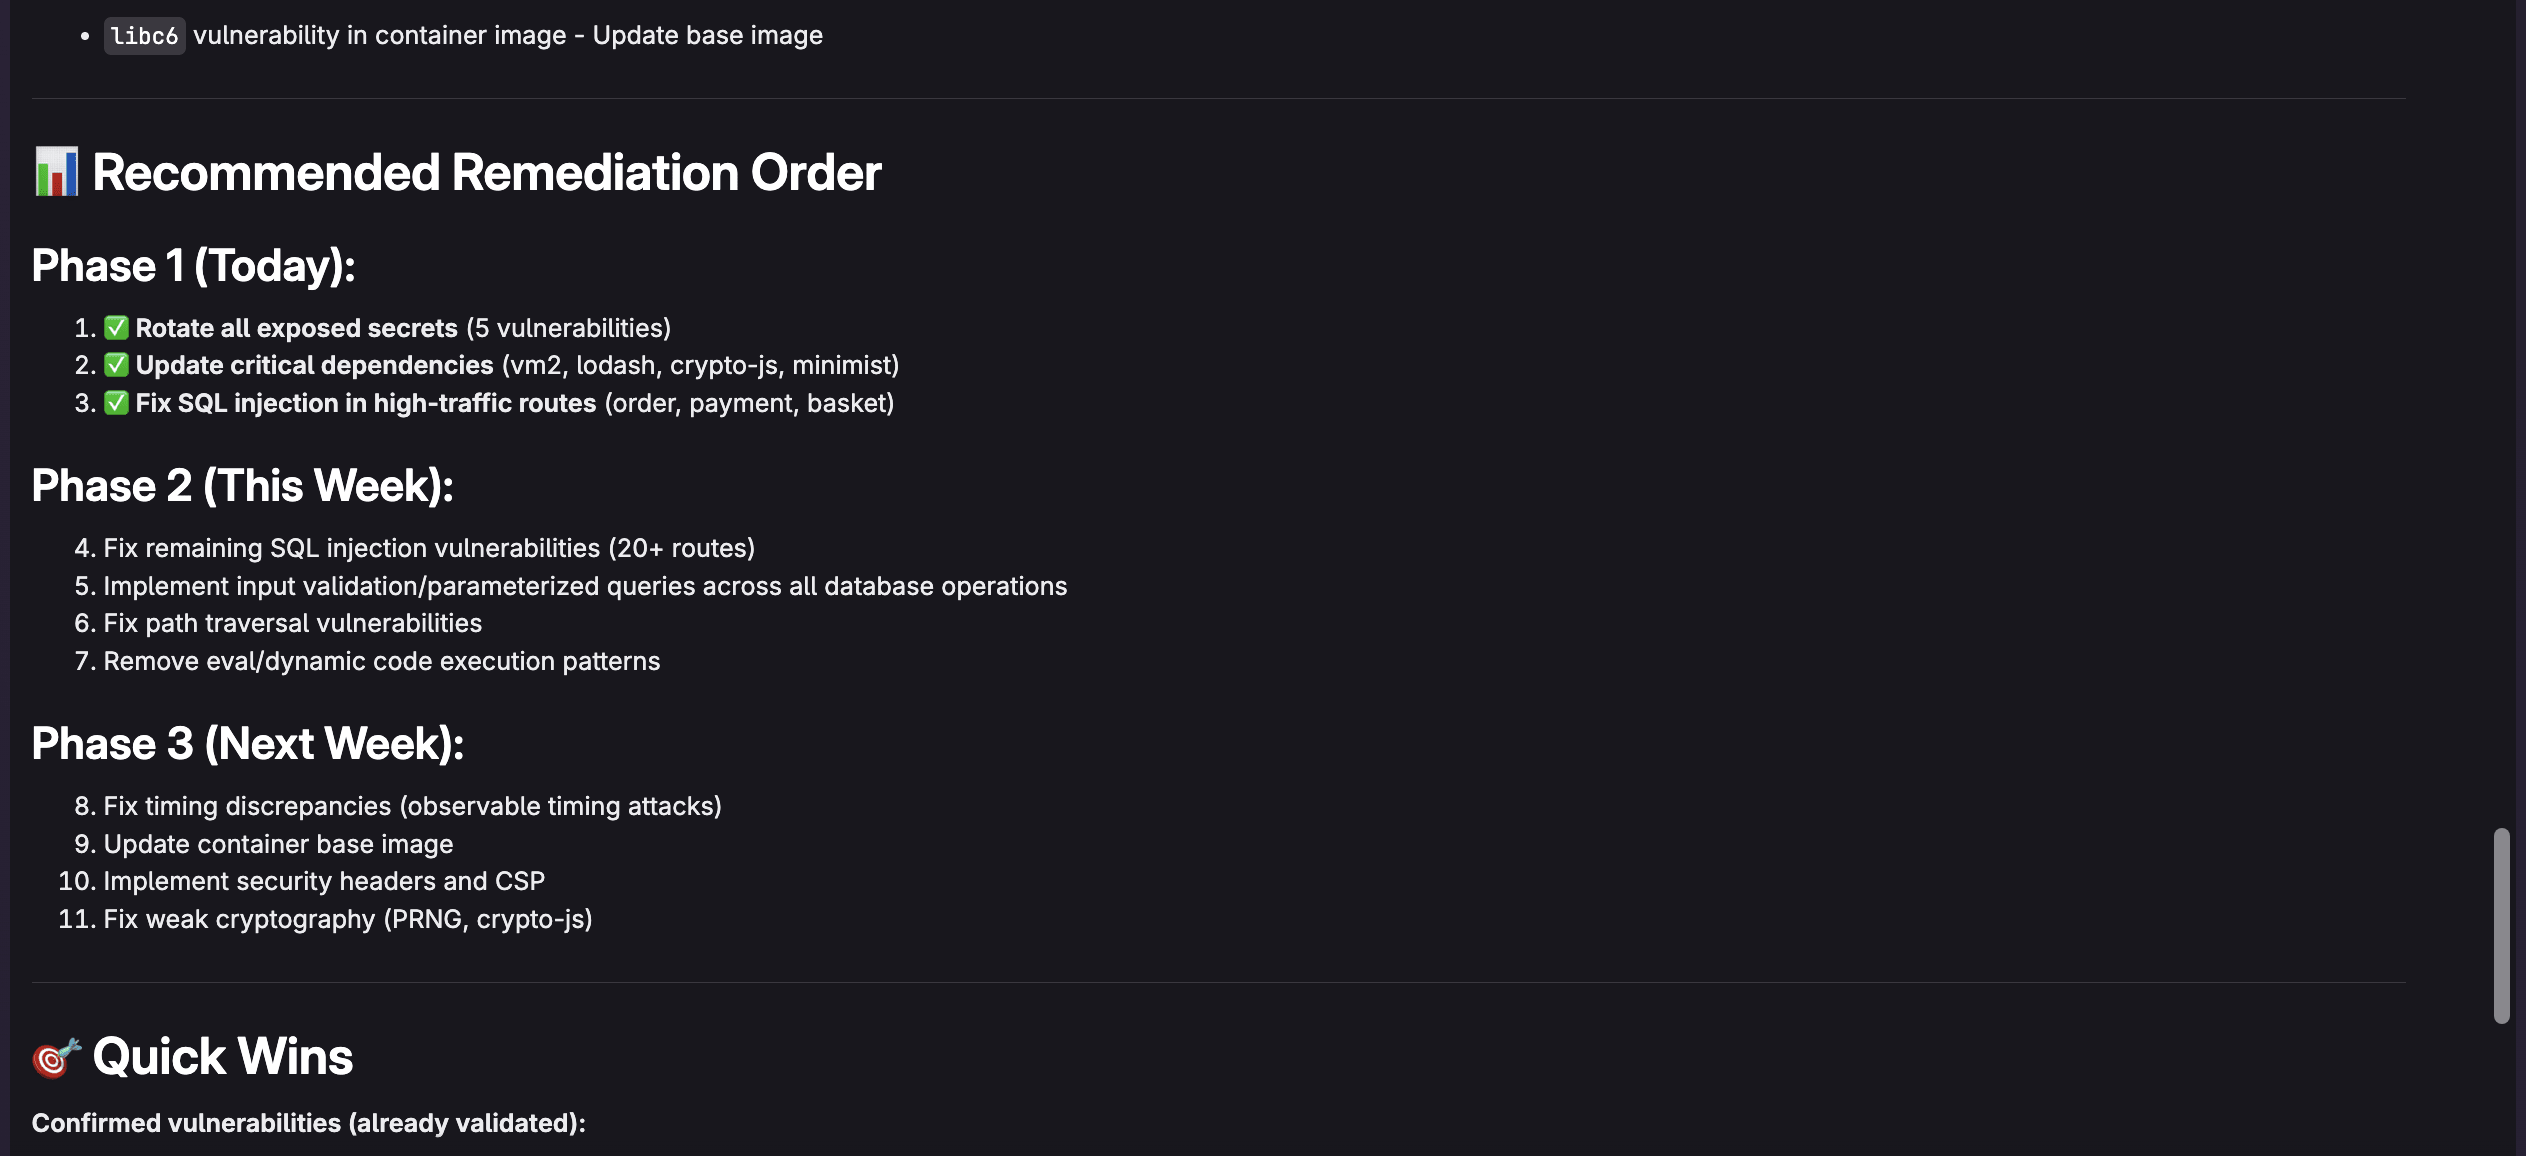
For example, I can ask "What are the most critical vulnerabilities and which vulnerabilities should I address first?" to make it easy to determine what is important. The agent will respond as follows:
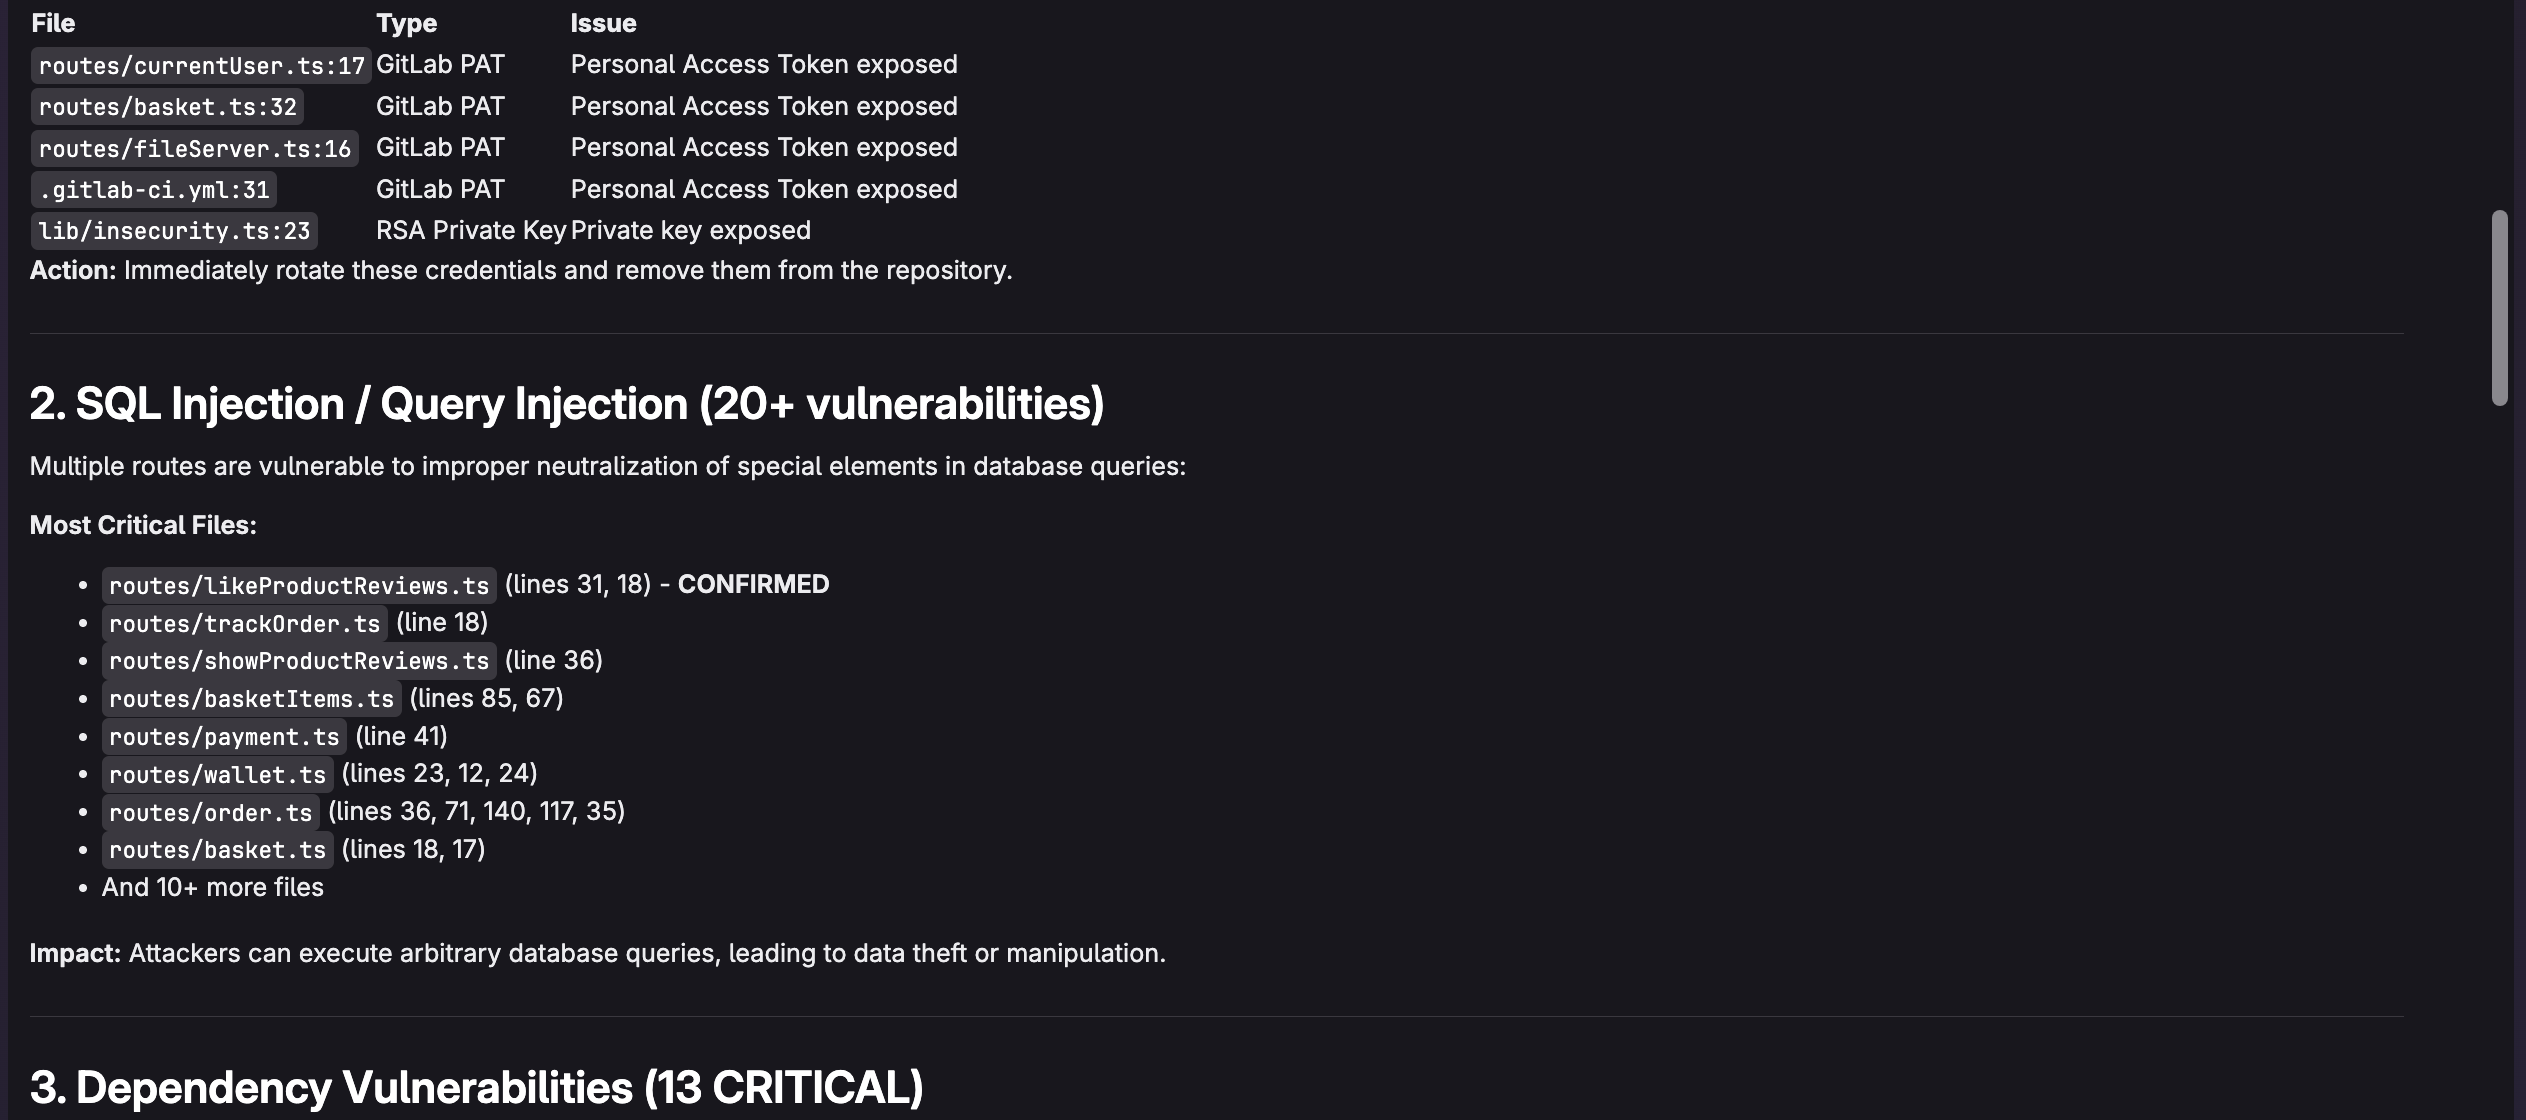
Example queries for effective triaging
Here are powerful queries to use with the Security Analyst Agent:
Identify critical issues:
"Show me vulnerabilities that are actively exploitable in our production code"
Focus on reachable vulnerabilities:
"Which high-severity vulnerabilities are in code paths that are actually executed?"
Understand dependencies:
"What are the most critical dependency vulnerabilities and are patches available?"
Get remediation guidance:
"Explain how to fix the SQL injection vulnerability in user authentication"
You can also directly assign developers to vulnerabilities.
Understanding agent recommendations
When Security Analyst Agent analyzes vulnerabilities, it provides:
Risk assessment: The agent explains why a vulnerability is critical beyond just the CVSS score, considering your application's specific architecture and usage patterns.
Exploitability analysis: It determines whether vulnerable code is actually reachable and exploitable in your environment, helping filter out theoretical risks.
Remediation steps: The agent provides specific, actionable guidance on how to fix vulnerabilities, including code examples when appropriate.
Priority ranking: Instead of overwhelming you with hundreds of findings, the agent helps identify the top issues that should be addressed first.
Real-world workflow example
Here's how a typical triaging session might look:
- Start with the big picture: "Analyze the security posture of this project and highlight the top 5 most critical vulnerabilities."
- Dive into specifics: For each critical vulnerability identified, ask "Is this vulnerability actually exploitable in our application?"
- Plan remediation: "What's the recommended fix for this SQL injection issue, and are there any side effects to consider?"
- Track progress: After addressing critical issues, ask "What vulnerabilities should I prioritize next?"
Benefits of agent-assisted triaging
Using Security Analyst Agent transforms vulnerability management:
- Time savings: Reduce hours of manual analysis to minutes of guided review
- Better prioritization: Focus on vulnerabilities that actually pose risk to your specific application
- Knowledge transfer: Learn security best practices through agent explanations
- Consistent standards: Apply consistent triaging logic across all projects
- Reduced alert fatigue: Filter noise and false positives effectively
Get started today
Vulnerability triaging doesn't have to be an overwhelming manual process. By combining GitLab's integrated security scanners with GitLab Duo Security Analyst Agent, development teams can quickly identify and prioritize the vulnerabilities that truly matter.
The agent's ability to understand context, assess real risk, and provide actionable guidance transforms security scanning from a compliance checkbox into a practical, efficient part of your development workflow. Instead of drowning in hundreds of vulnerability reports, you can focus your energy on addressing the issues that actually threaten your application's security.
Start by enabling security scanners in your GitLab pipelines, then leverage Security Analyst Agent to make intelligent, informed decisions about vulnerability remediation. Your future self — and your security team — will thank you.
Ready to get started? Check out the GitLab Duo Agent Platform documentation and security scanning documentation to begin transforming your vulnerability management workflow today.
We want to hear from you
Enjoyed reading this blog post or have questions or feedback? Share your thoughts by creating a new topic in the GitLab community forum.
Share your feedback