
is now in public beta!
Published on: September 26, 2024
27 min read
Using child pipelines to continuously deploy to five environments
Learn how to manage continuous deployment to multiple environments, including temporary, on-the-fly sandboxes, with a minimalist GitLab workflow.


DevSecOps teams sometimes require the ability to manage continuous deployment across multiple environments — and they need to do so without changing their workflows. The GitLab DevSecOps platform supports this need, including temporary, on-the-fly sandboxes, with a minimalist approach. In this article, you'll learn how to run continuous deployment of infrastructure using Terraform, over multiple environments.
This strategy can easily be applied to any project, whether it is infrastructure as code (IaC) relying on another technology, such as Pulumi or Ansible, source code in any language, or a monorepo that mixes many languages.
The final pipeline that you will have at the end of this tutorial will deploy:
- A temporary review environment for each feature branch.
- An integration environment, easy to wipe out and deployed from the main branch.
- A QA environment, also deployed from the main branch, to run quality assurance steps.
- A staging environment, deployed for every tag. This is the last round before production.
- A production environment, just after the staging environment. This one is triggered manually for demonstration, but can also be continuously deployed.
Here is the legend for the flow charts in this article:
- Round boxes are the GitLab branches.
- Square boxes are the environments.
- Text on the arrows are the actions to flow from one box to the next.
- Angled squares are decision steps.
flowchart LR
    A(main) -->|new feature| B(feature_X)

    B -->|auto deploy| C[review/feature_X]
    B -->|merge| D(main)
    C -->|destroy| D

    D -->|auto deploy| E[integration]
    E -->|manual| F[qa]

    D -->|tag| G(X.Y.Z)
    F -->|validate| G

    G -->|auto deploy| H[staging]
    H -->|manual| I{plan}
    I -->|manual| J[production]
On each step, you'll learn the why and the what before moving to the how. This will help you fully understand and replicate this tutorial.
Why
-
Continuous integration is almost a de facto standard. Most companies have implemented CI pipelines or are willing to standardize their practice.
-
Continuous delivery, which pushes artifacts to a repository or registry at the end of the CI pipeline, is also popular.
-
Continuous deployment, which goes further and deploys these artifacts automatically, is less widespread. When it has been implemented, we see it essentially in the application field. When discussing continuously deploying infrastructure, the picture seems less obvious, and is more about managing several environments. In contrast, testing, securing, and verifying the infrastructure's code seems more challenging. And this is one of the fields where DevOps has not yet reached its maturity. One of the other fields is to shift security left, integrating security teams and, more importantly, security concerns, earlier in the delivery lifecycle, to upgrade from DevOps to DevSecOps.
Given this high-level picture, in this tutorial, you will work toward a simple, yet efficient way to implement DevSecOps for your infrastructure through the example of deploying resources to five environments, gradually progressing from development to production.
Note: Even if I advocate embracing a FinOps approach and reducing the number of environments, sometimes there are excellent reasons to maintain more than just dev, staging, and production. So, please, adapt the examples below to match your needs.
What
The rise of cloud technology has driven the usage of IaC. Ansible and Terraform were among the first to pave the road here. OpenTofu, Pulumi, AWS CDK, Google Deploy Manager, and many others joined the party.
Defining IaC is a perfect solution to feel safe when deploying infrastructure. You can test it, deploy it, and replay it again and again until you reach your goal.
Unfortunately, we often see companies maintain several branches, or even repositories, for each of their target environments. And this is where the problems start. They are no longer enforcing a process. They are no longer ensuring that any change in the production code base has been accurately tested in previous environments. And they start seeing drifts from one environment to the other.
I realized this tutorial was necessary when, at a conference I attended, every participant said they do not have a workflow that enforces the infrastructure to be tested thoroughly before being deployed to production. And they all agreed that sometimes they patch the code directly in production. Sure, this is fast, but is it safe? How do you report back to previous environments? How do you ensure there are no side effects? How do you control whether you are putting your company at risk with new vulnerabilities being pushed too quickly in production?
The question of why DevOps teams deploy directly to production is critical here. Is it because the pipeline could be more efficient or faster? Is there no automation? Or, even worse, because there is no way to test accurately outside of production?
In the next section, you will learn how to implement automation for your infrastructure and ensure that your DevOps team can effectively test what you are doing before pushing to any environment impacting others. You will see how your code is secured and its deployment is controlled, end-to-end.
How
As mentioned earlier, there are many IaC languages out there nowadays and we objectively cannot cover all of them in a single article. So, I will rely on a basic Terraform code running on Version 1.4. Please do not focus on the IaC language itself but instead on the process that you could apply to your own ecosystem.
The Terraform code
Let's start with a fundamental Terraform code.
We are going to deploy to AWS, a virtual private cloud (VPC), which is a virtual network. In that VPC, we will deploy a public and a private subnet. As their name implies, they are subnets of the main VPC. Finally, we will add an Elastic Cloud Compute (EC2) instance (a virtual machine) in the public subnet.
This demonstrates the deployment of four resources without adding too much complexity. The idea is to focus on the pipeline, not the code.
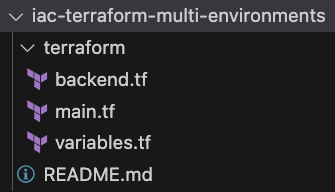
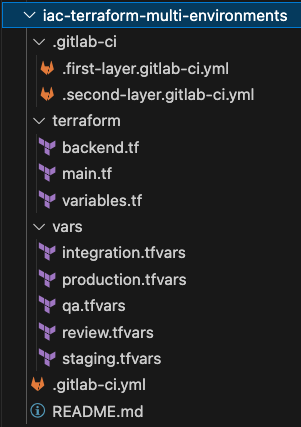
Here is the target we want to reach for your repository.
Let’s do it step by step.
First, we declare all resources in a terraform/main.tf file:
provider "aws" {
  region = var.aws_default_region
}

resource "aws_vpc" "main" {
  cidr_block = var.aws_vpc_cidr

  tags = {
    Name     = var.aws_resources_name
  }
}

resource "aws_subnet" "public_subnet" {
  vpc_id     = aws_vpc.main.id
  cidr_block = var.aws_public_subnet_cidr

  tags = {
    Name = "Public Subnet"
  }
}
resource "aws_subnet" "private_subnet" {
  vpc_id     = aws_vpc.main.id
  cidr_block = var.aws_private_subnet_cidr

  tags = {
    Name = "Private Subnet"
  }
}

resource "aws_instance" "sandbox" {
  ami           = var.aws_ami_id
  instance_type = var.aws_instance_type

  subnet_id = aws_subnet.public_subnet.id

  tags = {
    Name     = var.aws_resources_name
  }
}
As you can see, there are a couple of variables that are needed for this code, so let's declare them in a terraform/variables.tf file:
variable "aws_ami_id" {
  description = "The AMI ID of the image being deployed."
  type        = string
}

variable "aws_instance_type" {
  description = "The instance type of the VM being deployed."
  type        = string
  default     = "t2.micro"
}

variable "aws_vpc_cidr" {
  description = "The CIDR of the VPC."
  type        = string
  default     = "10.0.0.0/16"
}

variable "aws_public_subnet_cidr" {
  description = "The CIDR of the public subnet."
  type        = string
  default     = "10.0.1.0/24"
}

variable "aws_private_subnet_cidr" {
  description = "The CIDR of the private subnet."
  type        = string
  default     = "10.0.2.0/24"
}

variable "aws_default_region" {
  description = "Default region where resources are deployed."
  type        = string
  default     = "eu-west-3"
}

variable "aws_resources_name" {
  description = "Default name for the resources."
  type        = string
  default     = "demo"
}
Already, we are almost good to go on the IaC side. What's missing is a way to share the Terraform states. For those who don't know, Terraform works schematically doing the following:
planchecks the differences between the current state of the infrastructure and what is defined in the code. Then, it outputs the differences.applyapplies the differences in theplanand updates the state.
First round, the state is empty, then it is filled with the details (ID, etc.) of the resources applied by Terraform.
The problem is: Where is that state stored? How do we share it so several developers can collaborate on code?
The solution is fairly simple: Leverage GitLab to store and share the state for you through a Terraform HTTP backend.
The first step in using this backend is to create the most simple terraform/backend.tf file. The second step will be handled in the pipeline.
terraform {
  backend "http" {
  }
}
Et voilà! We have a bare minimum Terraform code to deploy these four resources. We will provide the variable values at the runtime, so let's do that later.
The workflow
The workflow that we are going to implement now is the following:
flowchart LR
    A(main) -->|new feature| B(feature_X)

    B -->|auto deploy| C[review/feature_X]
    B -->|merge| D(main)
    C -->|destroy| D

    D -->|auto deploy| E[integration]
    E -->|manual| F[qa]

    D -->|tag| G(X.Y.Z)
    F -->|validate| G

    G -->|auto deploy| H[staging]
    H -->|manual| I{plan}
    I -->|manual| J[production]
- Create a feature branch. This will continuously run all scanners on the code to ensure that it is still compliant and secured. This code will be continuously deployed to a temporary environment
review/feature_branchwith the name of the current branch. This is a safe environment where the developers and operations teams can test their code without impacting anybody. This is also where we will enforce the process, like enforcing code reviews and running scanners, to ensure that the quality and security of the code are acceptable and do not put your assets at risk. The infrastructure deployed by this branch is automatically destroyed when the branch is closed. This helps you keep your budget under control.
flowchart LR
    A(main) -->|new feature| B(feature_X)

    B -->|auto deploy| C[review/feature_X]
    B -->|merge| D(main)
    C -->|destroy| D
- Once approved, the feature branch will be merged into the main branch. This is a protected branch where no one can push. This is mandatory to ensure that every change request to production is thoroughly tested. That branch is also continuously deployed. The target here is the
integrationenvironment. To keep this environment slightly more stable, its deletion is not automated but can be triggered manually.
flowchart LR
    D(main) -->|auto deploy| E[integration]
- From there, manual approval is required to trigger the next deployment. This will deploy the main branch to the
qaenvironment. Here, I have set a rule to prevent deletion from the pipeline. The idea is that this environment should be quite stable (after all, it's already the third environment), and I would like to prevent deletion by mistake. Feel free to adapt the rules to match your processes.
flowchart LR
    D(main)-->|auto deploy| E[integration]
    E -->|manual| F[qa]
- To proceed, we will need to tag the code. We are relying on protected tags here to ensure that only a specific set of users are allowed to deploy to these last two environments. This will immediately trigger a deployment to the
stagingenvironment.
flowchart LR
    D(main) -->|tag| G(X.Y.Z)
    F[qa] -->|validate| G

    G -->|auto deploy| H[staging]
- Finally, we are landing to
production. When discussing infrastructure, it is often challenging to deploy progressively (10%, 25%, etc.), so we will deploy the whole infrastructure. Still, we control that deployment with a manual trigger of this last step. And to enforce maximum control on this highly critical environment, we will control it as a protected environment.
flowchart LR
    H[staging] -->|manual| I{plan}
    I -->|manual| J[production]
The pipeline
To implement the above workflow, we are now going to implement a pipeline with two downstream pipelines.
The main pipeline
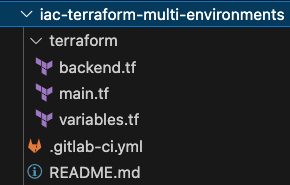
Let's start with the main pipeline. This is the one that will be triggered automatically on any push to a feature branch, any merge to the default branch, or any tag. The one that will do true continuous deployment to the following environments: dev, integration, and staging. And it is declared in the .gitlab-ci.yml file at the root of your project.
Stages:
  - test
  - environments

.environment:
  stage: environments
  variables:
    TF_ROOT: terraform
    TF_CLI_ARGS_plan: "-var-file=../vars/$variables_file.tfvars"
  trigger:
    include: .gitlab-ci/.first-layer.gitlab-ci.yml
    strategy: depend            # Wait for the triggered pipeline to successfully complete
    forward:
      yaml_variables: true      # Forward variables defined in the trigger job
      pipeline_variables: true  # Forward manual pipeline variables and scheduled pipeline variables

review:
  extends: .environment
  variables:
    environment: review/$CI_COMMIT_REF_SLUG
    TF_STATE_NAME: $CI_COMMIT_REF_SLUG
    variables_file: review
    TF_VAR_aws_resources_name: $CI_COMMIT_REF_SLUG  # Used in the tag Name of the resources deployed, to easily differenciate them
  rules:
    - if: $CI_COMMIT_BRANCH && $CI_COMMIT_BRANCH != $CI_DEFAULT_BRANCH

integration:
  extends: .environment
  variables:
    environment: integration
    TF_STATE_NAME: $environment
    variables_file: $environment
  rules:
    - if: $CI_COMMIT_BRANCH == $CI_DEFAULT_BRANCH

staging:
  extends: .environment
  variables:
    environment: staging
    TF_STATE_NAME: $environment
    variables_file: $environment
  rules:
    - if: $CI_COMMIT_TAG

#### TWEAK
# This tweak is needed to display vulnerability results in the merge widgets.
# As soon as this issue https://gitlab.com/gitlab-org/gitlab/-/issues/439700 is resolved, the `include` instruction below can be removed.
# Until then, the SAST IaC scanners will run in the downstream pipelines, but their results will not be available directly in the merge request widget, making it harder to track them.
# Note: This workaround is perfectly safe and will not slow down your pipeline.
include:
  - template: Security/SAST-IaC.gitlab-ci.yml
#### END TWEAK
This pipeline runs only two stages: test and environments. The former is needed for the TWEAK to run scanners. The later triggers a child pipeline with a different set of variables for each case defined above (push to the branch, merge to the default branch, or tag).
We are adding here a dependency with the keyword strategy:depend on our child pipeline so the pipeline view in GitLab will be updated only once the deployment is finished.
As you can see here, we are defining a base job, hidden, and we are extending it with specific variables and rules to trigger only one deployment for each target environment.
Besides the predefined variables, we are using two new entries that we need to define:
- The variables specific to each environment:
../vars/$variables_file.tfvars - The child pipeline, defined in
.gitlab-ci/.first-layer.gitlab-ci.yml
Let's start with the smallest part, the variable definitions.
The variable definitions
We are going here to mix two solutions to provide variables to Terraform:
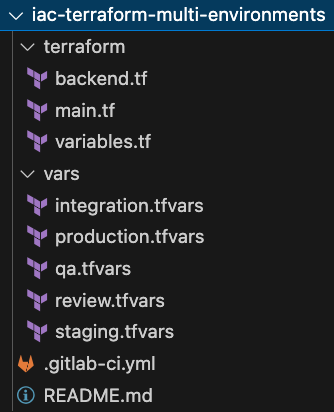
- The first one using .tfvars files for all non-sensitive input, which should be stored within GitLab.
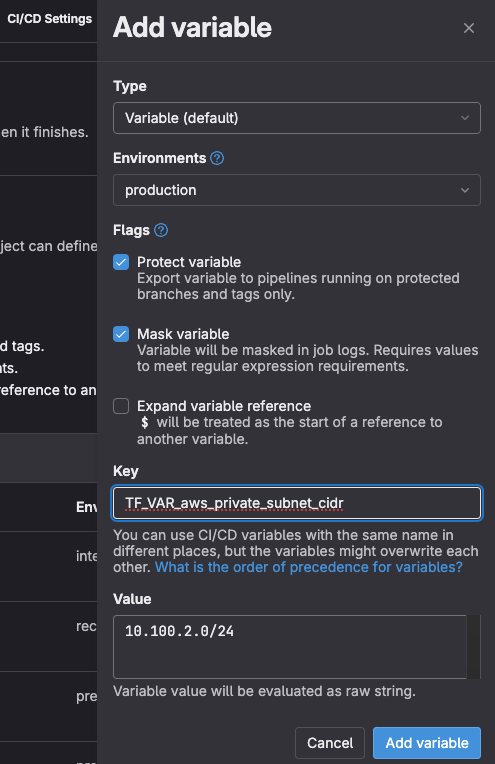
- The second using environment variables with the prefix
TF_VAR. That second way to inject variables, associated with the GitLab capacity to mask variables, protect them, and scope them to environments is a powerful solution to prevent sensitive information leakages. (If you consider your production’s private CIDR very sensitive, you could protect it like this, ensuring it is only available for theproductionenvironment, for pipelines running against protected branches and tags, and that its value is masked in the job’s logs.)
Additionally, each variable file should be controlled through a CODEOWNERS file to set who can modify each of them.
[Production owners]
vars/production.tfvars @operations-group

[Staging owners]
vars/staging.tfvars @odupre @operations-group

[CodeOwners owners]
CODEOWNERS @odupre
This article is not a Terraform training, so we will go very fast and simply show here the vars/review.tfvars file. Subsequent environment files are, of course, very similar. Just set the non-sensitive variables and their values here.
aws_vpc_cidr = "10.1.0.0/16"
aws_public_subnet_cidr = "10.1.1.0/24"
aws_private_subnet_cidr = "10.1.2.0/24"
The child pipeline
This one is where the actual work is done. So, it is slightly more complex than the first one. But there is no difficulty here that we cannot overcome together!
As we have seen in the definition of the main pipeline, that downstream pipeline is declared in the file .gitlab-ci/.first-layer.gitlab-ci.yml.
Let's break it down into small chunks. We'll see the big picture at the end.
Run Terraform commands and secure the code
First, we want to run a pipeline for Terraform. We, at GitLab, are open source. So, our Terraform template is open source. And you simply need to include it. This can be achieved with the following snippet:
include:
  - template: Terraform.gitlab-ci.yml
This template runs for you the Terraform checks on the formatting and validates your code, before planning and applying it. It also allows you to destroy what you have deployed.
And, because GitLab is the a single, unified DevSecOps platform, we are also automatically including two security scanners within that template to find potential threats in your code and warn you before you deploy it to the next environments.
Now that we have checked, secured, built, and deployed our code, let's do some tricks.
Share cache between jobs
We will cache the job results to reuse them in subsequent pipeline jobs. This is as simple as adding the following piece of code:
default:
  cache:  # Use a shared cache or tagged runners to ensure terraform can run on apply and destroy
    - key: cache-$CI_COMMIT_REF_SLUG
      fallback_keys:
        - cache-$CI_DEFAULT_BRANCH
      paths:
        - .
Here, we are defining a different cache for each commit, falling back to the main branch name if needed.
If we look carefully at the templates that we are using, we can see that it has some rules to control when jobs are run. We want to run all controls (both QA and security) on all branches. So, we are going to override these settings.
Run controls on all branches
GitLab templates are a powerful feature where one can override only a piece of the template. Here, we are interested only in overwriting the rules of some jobs to always run quality and security checks. Everything else defined for these jobs will stay as defined in the template.
fmt:
  rules:
    - when: always

validate:
  rules:
    - when: always

kics-iac-sast:
  rules:
    - when: always

iac-sast:
  rules:
    - when: always
Now that we have enforced the quality and security controls, we want to differentiate how the main environments (integration and staging) in the workflow and review environments behave. Let's start by defining the main environment’s behavior, and we will tweak this configuration for the review environments.
CD to integration and staging
As defined earlier, we want to deploy the main branch and the tags to these two environments. We are adding rules to control that on both the build and deploy jobs. Then, we want to enable destroy only for the integration as we have defined staging to be too critical to be deleted with a single click. This is error-prone and we don't want to do that.
Finally, we are linking the deploy job to the destroy one, so we can stop the environment directly from GitLab GUI.
The GIT_STRATEGY is here to prevent retrieving the code from the source branch in the runner when destroying. This would fail if the branch has been deleted manually, so we are relying on the cache to get everything we need to run the Terraform instructions.
build:  # terraform plan
  environment:
    name: $TF_STATE_NAME
    action: prepare
  rules:
    - if: $CI_COMMIT_BRANCH == $CI_DEFAULT_BRANCH
    - if: $CI_COMMIT_TAG

deploy: # terraform apply --> automatically deploy on corresponding env (integration or staging) when merging to default branch or tagging. Second layer environments (qa and production) will be controlled manually
  environment:
    name: $TF_STATE_NAME
    action: start
    on_stop: destroy
  rules:
    - if: $CI_COMMIT_BRANCH == $CI_DEFAULT_BRANCH
    - if: $CI_COMMIT_TAG

destroy:
  extends: .terraform:destroy
  variables:
    GIT_STRATEGY: none
  dependencies:
    - build
  environment:
    name: $TF_STATE_NAME
    action: stop
  rules:
    - if: $CI_COMMIT_TAG  # Do not destroy production
      when: never
    - if: $CI_COMMIT_BRANCH == $CI_DEFAULT_BRANCH && $TF_DESTROY == "true" # Manually destroy integration env.
      when: manual
As said, this matches the need to deploy to integration and staging. But we are still missing a temporary environment where the developers can experience and validate their code without impacts on others. This is where the deployment to the review environment takes place.
CD to review environments
Deploying to review environment is not too different than deploying to integration and staging. So we will once again leverage GitLab's capacity to overwrite only pieces of job definition here.
First, we set rules to run these jobs only on feature branches.
Then, we link the deploy_review job to destroy_review. This will allow us to stop the environment manually from the GitLab user interface, but more importantly, it will automatically trigger the environment destruction when the feature branch is closed. This is a good FinOps practice to help you control your operational expenditures.
Since Terraform needs a plan file to destroy an infrastructure, exactly like it needs one to build an infrastructure, then we are adding a dependency from destroy_review to build_review, to retrieve its artifacts.
Finally, we see here that the environment's name is set to $environment. It has been set in the main pipeline to review/$CI_COMMIT_REF_SLUG, and forwarded to this child pipeline with the instruction trigger:forward:yaml_variables:true.
build_review:
  extends: build
  rules:
    - if: $CI_COMMIT_TAG
      when: never
    - if: $CI_COMMIT_BRANCH != $CI_DEFAULT_BRANCH
      when: on_success

deploy_review:
  extends: deploy
  dependencies:
    - build_review
  environment:
    name: $environment
    action: start
    on_stop: destroy_review
    # url: https://$CI_ENVIRONMENT_SLUG.example.com
  rules:
    - if: $CI_COMMIT_TAG
      when: never
    - if: $CI_COMMIT_BRANCH != $CI_DEFAULT_BRANCH
      when: on_success

destroy_review:
  extends: destroy
  dependencies:
    - build_review
  environment:
    name: $environment
    action: stop
  rules:
    - if: $CI_COMMIT_TAG  # Do not destroy production
      when: never
    - if: $CI_COMMIT_BRANCH == $CI_DEFAULT_BRANCH   # Do not destroy staging
      when: never
    - when: manual
So, to recap, we now have a pipeline that can:
- Deploy temporary review environments, which are automatically cleaned up when the feature branch is closed
- Continuously deploy the default branch to
integration - Continuously deploy the tags to
staging
Let's now add an extra layer, where we will deploy, based on a manual trigger this time, to qa and production environments.
Continously deploy to QA and production
Because not everybody is willing to deploy continuously to production, we will add a manual validation to the next two deployments. From a purely CD perspective, we would not add this trigger, but take this as an opportunity to learn how to run jobs from other triggers.
So far, we have started a child pipeline from the main pipeline to run all deployments.
Since we want to run other deployments from the default branch and the tags, we will add another layer dedicated to these additional steps. Nothing new here. We will just repeat exactly the same process as the one we only did for the main pipeline. Going this way allows you to manipulate as many layers as you need. I have already seen up to nine environments in some places.
Without arguing once again on the benefits to have fewer environments, the process that we are using here makes it very easy to implement the same pipeline all the way from early stages to final delivery, while keeping your pipeline definition simple and split in small chunks that you can maintain at no cost.
To prevent variable conflicts here, we are just using new var names to identify the Terraform state and input file.
.2nd_layer:
  stage: 2nd_layer
  variables:
    TF_ROOT: terraform
  trigger:
    include: .gitlab-ci/.second-layer.gitlab-ci.yml
    # strategy: depend            # Do NOT wait for the downstream pipeline to finish to mark upstream pipeline as successful. Otherwise, all pipelines will fail when reaching the pipeline timeout before deployment to 2nd layer.
    forward:
      yaml_variables: true      # Forward variables defined in the trigger job
      pipeline_variables: true  # Forward manual pipeline variables and scheduled pipeline variables

qa:
  extends: .2nd_layer
  variables:
    TF_STATE_NAME_2: qa
    environment: $TF_STATE_NAME_2
    TF_CLI_ARGS_plan_2: "-var-file=../vars/$TF_STATE_NAME_2.tfvars"
  rules:
    - if: $CI_COMMIT_BRANCH == $CI_DEFAULT_BRANCH

production:
  extends: .2nd_layer
  variables:
    TF_STATE_NAME_2: production
    environment: $TF_STATE_NAME_2
    TF_CLI_ARGS_plan_2: "-var-file=../vars/$TF_STATE_NAME_2.tfvars"
  rules:
    - if: $CI_COMMIT_TAG
One important trick here is the strategy used for the new downstream pipeline. We leave that trigger:strategy to its default value; otherwise, the main pipeline would wait for your grand-child pipeline to finish. With a manual trigger, this could last for a very long time and make your pipeline dashboard harder to read and understand.
You have probably already wondered what is the content of that .gitlab-ci/.second-layer.gitlab-ci.yml file we are including here. We will cover that in the next section.
The first layer complete pipeline definition
If you are looking for a complete view of this first layer (stored in .gitlab-ci/.first-layer.gitlab-ci.yml), just expand the section below.
variables:
  TF_VAR_aws_ami_id: $AWS_AMI_ID
  TF_VAR_aws_instance_type: $AWS_INSTANCE_TYPE
  TF_VAR_aws_default_region: $AWS_DEFAULT_REGION

include:
  - template: Terraform.gitlab-ci.yml

default:
  cache:  # Use a shared cache or tagged runners to ensure terraform can run on apply and destroy
    - key: cache-$CI_COMMIT_REF_SLUG
      fallback_keys:
        - cache-$CI_DEFAULT_BRANCH
      paths:
        - .

stages:
  - validate
  - test
  - build
  - deploy
  - cleanup
  - 2nd_layer       # Use to deploy a 2nd environment on both the main branch and on the tags

fmt:
  rules:
    - when: always

validate:
  rules:
    - when: always

kics-iac-sast:
  rules:
    - if: $SAST_DISABLED == 'true' || $SAST_DISABLED == '1'
      when: never
    - if: $SAST_EXCLUDED_ANALYZERS =~ /kics/
      when: never
    - when: on_success

iac-sast:
  rules:
    - if: $SAST_DISABLED == 'true' || $SAST_DISABLED == '1'
      when: never
    - if: $SAST_EXCLUDED_ANALYZERS =~ /kics/
      when: never
    - when: on_success

###########################################################################################################
## Integration env. and Staging. env
##  * Auto-deploy to Integration on merge to main.
##  * Auto-deploy to Staging on tag.
##  * Integration can be manually destroyed if TF_DESTROY is set to true.
##  * Destroy of next env. is not automated to prevent errors.
###########################################################################################################
build:  # terraform plan
  environment:
    name: $TF_STATE_NAME
    action: prepare
  rules:
    - if: $CI_COMMIT_BRANCH == $CI_DEFAULT_BRANCH
    - if: $CI_COMMIT_TAG

deploy: # terraform apply --> automatically deploy on corresponding env (integration or staging) when merging to default branch or tagging. Second layer environments (qa and production) will be controlled manually
  environment:
    name: $TF_STATE_NAME
    action: start
    on_stop: destroy
  rules:
    - if: $CI_COMMIT_BRANCH == $CI_DEFAULT_BRANCH
    - if: $CI_COMMIT_TAG

destroy:
  extends: .terraform:destroy
  variables:
    GIT_STRATEGY: none
  dependencies:
    - build
  environment:
    name: $TF_STATE_NAME
    action: stop
  rules:
    - if: $CI_COMMIT_TAG  # Do not destroy production
      when: never
    - if: $CI_COMMIT_BRANCH == $CI_DEFAULT_BRANCH && $TF_DESTROY == "true" # Manually destroy integration env.
      when: manual
###########################################################################################################

###########################################################################################################
## Dev env.
##  * Temporary environment. Lives and dies with the Merge Request.
##  * Auto-deploy on push to feature branch.
##  * Auto-destroy on when Merge Request is closed.
###########################################################################################################
build_review:
  extends: build
  rules:
    - if: $CI_COMMIT_TAG
      when: never
    - if: $CI_COMMIT_BRANCH != $CI_DEFAULT_BRANCH
      when: on_success

deploy_review:
  extends: deploy
  dependencies:
    - build_review
  environment:
    name: $environment
    action: start
    on_stop: destroy_review
    # url: https://$CI_ENVIRONMENT_SLUG.example.com
  rules:
    - if: $CI_COMMIT_TAG
      when: never
    - if: $CI_COMMIT_BRANCH != $CI_DEFAULT_BRANCH
      when: on_success

destroy_review:
  extends: destroy
  dependencies:
    - build_review
  environment:
    name: $environment
    action: stop
  rules:
    - if: $CI_COMMIT_TAG  # Do not destroy production
      when: never
    - if: $CI_COMMIT_BRANCH == $CI_DEFAULT_BRANCH   # Do not destroy staging
      when: never
    - when: manual
###########################################################################################################

###########################################################################################################
## Second layer
##  * Deploys from main branch to qa env.
##  * Deploys from tag to production.
###########################################################################################################
.2nd_layer:
  stage: 2nd_layer
  variables:
    TF_ROOT: terraform
  trigger:
    include: .gitlab-ci/.second-layer.gitlab-ci.yml
    # strategy: depend            # Do NOT wait for the downstream pipeline to finish to mark upstream pipeline as successful. Otherwise, all pipelines will fail when reaching the pipeline timeout before deployment to 2nd layer.
    forward:
      yaml_variables: true      # Forward variables defined in the trigger job
      pipeline_variables: true  # Forward manual pipeline variables and scheduled pipeline variables

qa:
  extends: .2nd_layer
  variables:
    TF_STATE_NAME_2: qa
    environment: $TF_STATE_NAME_2
    TF_CLI_ARGS_plan_2: "-var-file=../vars/$TF_STATE_NAME_2.tfvars"
  rules:
    - if: $CI_COMMIT_BRANCH == $CI_DEFAULT_BRANCH

production:
  extends: .2nd_layer
  variables:
    TF_STATE_NAME_2: production
    environment: $TF_STATE_NAME_2
    TF_CLI_ARGS_plan_2: "-var-file=../vars/$TF_STATE_NAME_2.tfvars"
  rules:
    - if: $CI_COMMIT_TAG
###########################################################################################################
At this stage, we are already deploying safely to three environments. That is my personal ideal recommendation. However, if you need more environments, add them to your CD pipeline.
You have certainly already noted that we include a downstream pipeline with the keyword trigger:include. This includes the file .gitlab-ci/.second-layer.gitlab-ci.yml. We want to run almost the same pipeline so obviously, its content is very similar to the one we have detailed above. The main advantage here to define this grand-child pipeline is that it lives on its own, making both variables and rules way easier to define.
The grand-child pipeline
This second layer pipeline is a brand new pipeline. Hence, it needs to mimic the first layer definition with:
- Inclusion of the Terraform template.
- Enforcement of security checks. Terraform validation would be duplicates of the first layer, but security scanners may find threats that did not yet exist when scanners previously ran (for example, if you deploy to production a couple of days after your deployment to staging).
- Overwrite build and deploy jobs to set specific rules. Note that the
destroystage is no longer automated to prevent too fast deletions.
As explained above, the TF_STATE_NAME and TF_CLI_ARGS_plan have been provided from the main pipeline to the child pipeline. We needed another variable name to pass these values from the child pipeline to here, the grand-child pipeline. This is why they are postfixed with _2 in the child pipeline and the value is copied back to the appropriate variable during the before_script here.
Since we have already broken down each step above, we can zoom out here directly to the broad view of the global second layer definition (stored in .gitlab-ci/.second-layer.gitlab-ci.yml).
# Use to deploy a second environment on both the default branch and the tags.

include:
  template: Terraform.gitlab-ci.yml

stages:
  - validate
  - test
  - build
  - deploy

fmt:
  rules:
    - when: never

validate:
  rules:
    - when: never

kics-iac-sast:
  rules:
    - if: $SAST_DISABLED == 'true' || $SAST_DISABLED == '1'
      when: never
    - if: $SAST_EXCLUDED_ANALYZERS =~ /kics/
      when: never
    - when: always

###########################################################################################################
## QA env. and Prod. env
##  * Manually trigger build and auto-deploy in QA
##  * Manually trigger both build and deploy in Production
##  * Destroy of these env. is not automated to prevent errors.
###########################################################################################################
build:  # terraform plan
  cache:  # Use a shared cache or tagged runners to ensure terraform can run on apply and destroy
    - key: $TF_STATE_NAME_2
      fallback_keys:
        - cache-$CI_DEFAULT_BRANCH
      paths:
        - .
  environment:
    name: $TF_STATE_NAME_2
    action: prepare
  before_script:  # Hack to set new variable values on the second layer, while still using the same variable names. Otherwise, due to variable precedence order, setting new value in the trigger job, does not cascade these new values to the downstream pipeline
    - TF_STATE_NAME=$TF_STATE_NAME_2
    - TF_CLI_ARGS_plan=$TF_CLI_ARGS_plan_2
  rules:
    - when: manual

deploy: # terraform apply
  cache:  # Use a shared cache or tagged runners to ensure terraform can run on apply and destroy
    - key: $TF_STATE_NAME_2
      fallback_keys:
        - cache-$CI_DEFAULT_BRANCH
      paths:
        - .
  environment:
    name: $TF_STATE_NAME_2
    action: start
  before_script:  # Hack to set new variable values on the second layer, while still using the same variable names. Otherwise, due to variable precedence order, setting new value in the trigger job, does not cascade these new values to the downstream pipeline
    - TF_STATE_NAME=$TF_STATE_NAME_2
    - TF_CLI_ARGS_plan=$TF_CLI_ARGS_plan_2
  rules:
    - if: $CI_COMMIT_BRANCH == $CI_DEFAULT_BRANCH
    - if: $CI_COMMIT_TAG && $TF_AUTO_DEPLOY == "true"
    - if: $CI_COMMIT_TAG
      when: manual
###########################################################################################################
Et voilà. We are ready to go. Feel free to change the way you control your job executions, leveraging for example GitLab's capacity to delay a job before deploying to production.
Try it yourself
We finally reached our destination. We are now able to control deployments to five different environments, with only the feature branches, the main branch, and tags.
- We are intensively reusing GitLab open source templates to ensure efficiency and security in our pipelines.
- We are leveraging GitLab template capacities to overwrite only the blocks that need custom control.
- We have split the pipeline in small chunks, controlling the downstream pipelines to match exactly what we need.
From there, the floor is yours. You could, for example, easily update the main pipeline to trigger downstream pipelines for your software source code, with the trigger:rules:changes keyword. And use another template depending on the changes that happened. But that is another story.
We want to hear from you
Enjoyed reading this blog post or have questions or feedback? Share your thoughts by creating a new topic in the GitLab community forum.
Share your feedback